background image

ESI 

GIGAPORT eX


11

3.1 Latency and buffer settings 

Via 

Config > Latency

 in the Control Panel it is possible to change the latency setting (also called 

“buffer size”) for the driver of GIGAPORT eX. A smaller latency is the result of a smaller buffer size 
and value. Depending on the typical application (e.g. for playback of software synthesizers) a smaller 
buffer with a smaller latency is an advantage. At the same time, the best latency setting indirectly 
depends on the performance of your system and when the system load is high (for instance with more 
active channels and plugins), it can be better to increase the latency. The latency buffer size is selected 
in a value called 

samples

 and if you are curious about the actually latency time in milliseconds, many 

recording applications display this value inside the settings dialog there. Please note that the latency 
has to be setup before launching the audio application using GIGAPORT eX. 

Via 

Config

 > 

USB Buffer

, you can select the number of USB data transfer buffers used by the driver. 

In many cases, these values do not need to be changed, however as they have a bit of an influence on 
the audio latency and on stability, we allow you to fine tune this setting. In some applications where 
real time processing and latency values or better performance at high system load are critical, you 
can optimize the values here additionally. Which value is best on your system depends on a number 
of factors such as what other USB devices are used at the same time and what USB controller is 
installed inside your PC. 

3.2 DirectWIRE Output Routing 

Under Windows, GIGAPORT eX has a feature called DirectWIRE Output Channels that allows you 
to change the assignment between the audio channel in your application to the physical audio output, 
even while playback is running in real time. 

Note:

 DirectWIRE is a very powerful feature for special applications and professional usage. For 

most situations no DirectWIRE settings are needed at all and you should not change those settings 
unless you know what you want to achieve. 

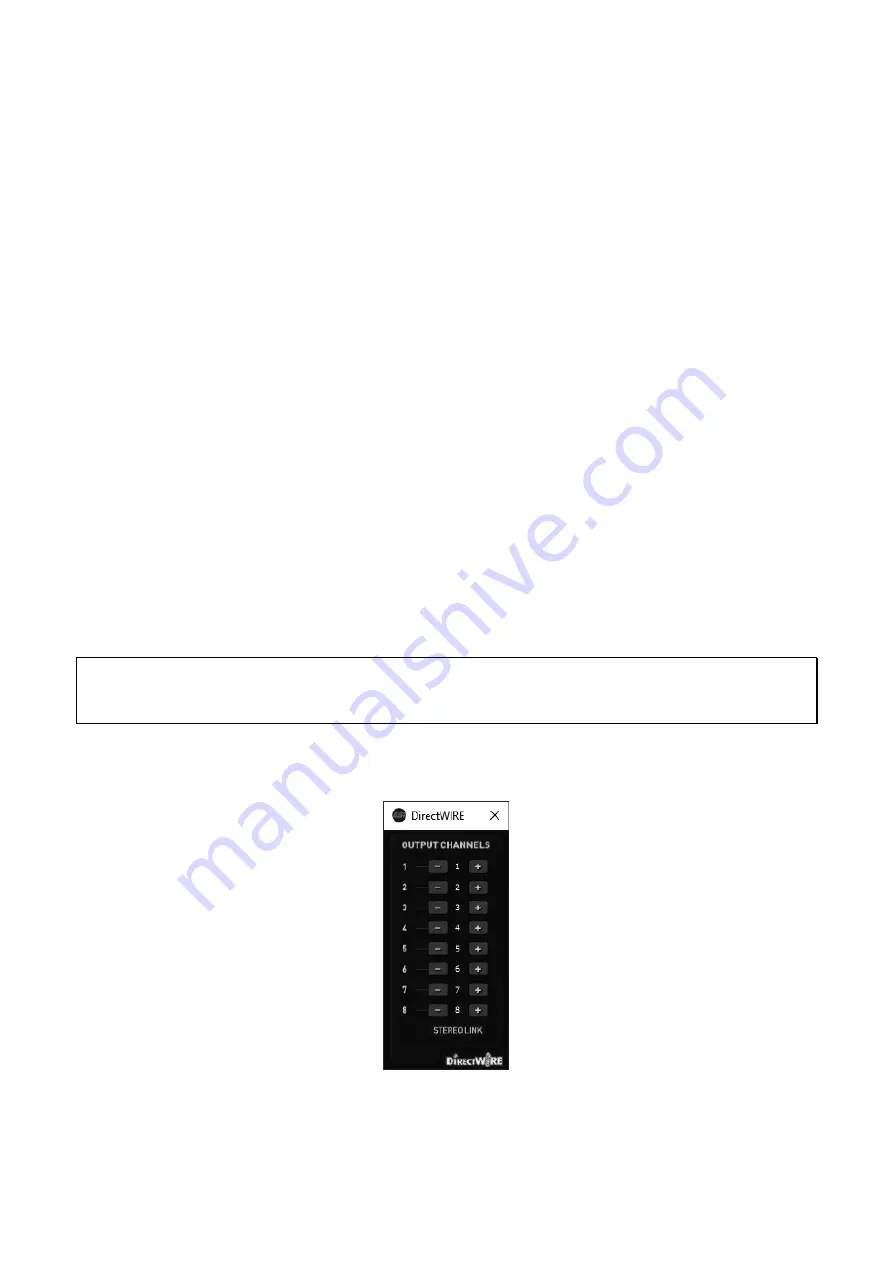
To open the related settings dialog, click on the 

DirectWIRE

 > 

Output Channels

 entry in the top menu 

of the control panel software and the following window appears: 


On this dialog you can see a list with 8 output channels. The left column identifies the physical output 
of GIGAPORT eX. The right column shows the playback channel on the computer (i.e. if you play a 
signal via channel 1 and 2, it is identified here by the numbers 

1

 and 

2

). By default, playback channel 

1 (right) is assigned to physical output 1 (left) , playback channel 2 to physical output 2 and so on. 

Summary of Contents for GIGAPORT eX

Page 1: ...Professional 24 bit 192 kHz USB Audio Interface with 8 separate high quality analog output channels User s Guide...

Page 2: ...ESI Copyright 2020 Revision 1 February 2020 www esi audio com...

Page 3: ...ion under Windows 7 2 3 2 Installation under OS X macOS 9 3 Windows Control Panel 10 3 1 Latency and buffer settings 11 3 2 DirectWIRE Output Routing 11 3 3 Windows Audio Settings 13 3 4 DirectWIRE Lo...

Page 4: ...consumer programs such as DVD playback software GIGAPORT eX is a USB C device optimized for USB 3 1 operation It is also compatible with standard USB 2 0 ports 1 1 Features The front panel of the GIG...

Page 5: ...IGAPORT eX 5 The rear panel has these connectors Line output 1 to 8 with unbalanced RCA connectors Via these outputs the main signals are being sent out Each output channel is labelled numbered accord...

Page 6: ...ur computer The connection to your computer is done either via a so called type A or a type C port For each connection type a separate cable is included in the package Connect one end of that cable wi...

Page 7: ...setup program which is an exe file that is inside a recent driver download from our website by double clicking on it When launching the installer Windows might display a security message Make sure to...

Page 8: ...ly suggest to select Yes restart the computer now and then click Finish You can connect GIGAPORT eX to your computer anytime now Windows will automatically setup the system so you can use the device T...

Page 9: ...dmg file and then you will get the following window in Finder To install the GIGAPORT eX panel click and drag it with your mouse to the left to Applications This will install it into your Applications...

Page 10: ...playback channels arranged in stereo channel pairs Under each slider you can find a mute button M to mute that channel To control both and left channels simultaneously stereo the LINK switch under it...

Page 11: ...In some applications where real time processing and latency values or better performance at high system load are critical you can optimize the values here additionally Which value is best on your sys...

Page 12: ...is sent to the physical outputs 3 and 4 the signal from playback channel 3 4 is sent to physical outputs 5 and 6 and the playback channels 7 8 are being sent as default to physical outputs 7 and 8 Th...

Page 13: ...es would or should be the selected default device This device can be used for playback with any channel count up to 8 channels Some audio applications require you to select via Configure Speaker Setup...

Page 14: ...l digitally inside your system You will find in the Windows Sound control panel and in the audio settings of many applications that there is a 2 channel MME WDM input device called GIGAPORT eX Loopbac...

Page 15: ...rranged in stereo channel pairs Under each slider you can find a mute button M to mute that channel To control both and left channels simultaneously stereo the LINK switch under it must be activated I...

Page 16: ...dio software you are using 4 2 OS X macOS Audio Settings The Audio MIDI Setup utility from Apple you can find it under Applications Utilities or you can call it from our Control Panel via File macOS A...

Page 17: ...There are many possible applications i e you can record what you are streaming online or you can save the output of a software synthesizer application Essentially you can make a 1 1 identical transfer...

Page 18: ...0dBFS THD N 0 0024 A weighted fs 48kHz 32 600ohm impedance 24 bit 192 kHz D A converter for all output channels 114dB dynamic range A weighted THD N 100dB 0dBFS DirectWIRE Output Routing support unde...

Page 19: ...ed to provide reasonable protection against harmful interference when the equipment is operated in a commercial environment This equipment generates uses and can radiate radio frequency energy and if...

Reviews: