background image

Page:

11

User Manual:

 →


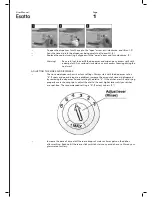
   To open the dispenser, turn the cap to the "open" arrow, anti-clockwise, and lift out. (1)

 →


 Pour the rinse aid into the dispenser, being careful not to overfill. (2)

 →


  Replace the cap by inserting it aligned with the "open" arrow and turn clockwise. (3)


Warning! 

 Be careful not to overfill the dispenser and wipe up any excess spilt with 
a damp cloth. Any residual rinse aid can cause excess foaming during the 
next wash.


ADJUSTING THE RINSE AID DISPENSER

 →


    The rinse aid dispenser has six or four settings. Always start with the dispenser set on 
"4". If spots and poor drying are a problem, increase the amount of rinse aid dispensed 
by removing the dispenser lid and rotating the dial to "5". If the dishes are still not drying 
properly or are showing spots, adjust the dial to the next higher lever until your dishes 
are spot-free. The recommended setting is "4". (Factory value is "4".)


 →


    Increase the dose of rinse aid if there are drops of water or lime spots on the dishes 
after washing. Reduce it if there are sticky whitish stains on your dishes or a film on your 
glassware or cutlery.

Summary of Contents for EDW6CS

Page 1: ...Model Code s EDW6CS Product Freestanding Dishwasher Document User Manual...

Page 2: ...to ensure your crockery is suitable for your dishwasher our Support Team are here to help You can use our online Support Centre at anytime by visiting http support residentiagroup com au or you can c...

Page 3: ...nts Page Safety instructions 04 Your Dishwasher 06 Installation Instructions 07 Operating Your Dishwasher 11 Cleaning Maintenance 18 Troubleshooting 21 Technical Data 21 Warranty Information 24 Purcha...

Page 4: ...itably qualified electrician install the correct outlet Do not abuse sit on or stand on the door or dish rack of the dishwasher Do not touch the heating element during or immediately after use This in...

Page 5: ...o longer than 4 meters otherwise the performance of the dishwasher will be effected DECLARATION OF CONFORMITY The manufacturer declares that the dishwasher is built using certified materials and requi...

Page 6: ...Pipe 5 Lower Basket 6 Dispenser 7 Cup Shelf 8 Spray Arms 9 Filter assembly 10 Inlet pipe connector 11 Drain Pipe MODEL PRODUCT DIMENSIONS W D H PRODUCT FEATURES EDW6CS 598 x 600 x 845mm 14 Place setti...

Page 7: ...to facilitate the installation of inlet and drain hoses refer to figure one If the dishwasher is installed in the corner of your kitchen cabinetry make sure an allowance is made to ensure your dishwas...

Page 8: ...eded to avoid the risk of the water inlet to be blocked and damage the appliance CONNECTION OF THE DRAIN HOSE Insert the drain hose into a drain pipe with a minimum diarmeter of 40mm or connect it ont...

Page 9: ...Page 9 User Manual Operating Your Dishwasher QUICK OPERATION GUIDE...

Page 10: ...ress the button to add the delay time 7 Delay Button Press the button to decrease the delay time 8 Program Button To Press the button to select appropriate Program Attention Child lock function press...

Page 11: ...INSE AID DISPENSER The rinse aid dispenser has six or four settings Always start with the dispenser set on 4 If spots and poor drying are a problem increase the amount of rinse aid dispensed by removi...

Page 12: ...he detergent just before starting each wash cycle Only use branded detergent and rinse aid with your dishwasher Warning Dishwasher detergent is corrosive Take care to keep it out of reach of children...

Page 13: ...during washing Glazed patterns may fade after a large number of washes Scrape off any residual food and soften remnants of burnt food in pans before placing in your dishwasher Whilst it is not necessa...

Page 14: ...basket for the upper position and lifting up the handle to lower the upper basket see the picture below FOLDING BACK THE CUP SHELVES For better stacking of pots and pans the spikes can be folded down...

Page 15: ...ted close the door and the dishwasher will start it s cycle Note A cycle that is underway can only be modified if it has only been running for a short time To enter standby mode during a cycle open th...

Page 16: ...Page 16 User Manual STARTING A WASHING PROGRAM 1 Hour...

Page 17: ...drain are trapped in the coarse filter To remove the items caught by the filter gently squeeze the tap on the top of this filter and lift out Fine Filter 3 This filter holds soil and food resideues in...

Page 18: ...DISHWASHER After every wash leave the door slightly open so that moisture and odours are not trapped inside Before performing maintenance or cleaning always switch off at the power outlet and remove...

Page 19: ...t team on 1300 11 HELP 4357 In the event of an emergency you should Switch off the dishwasher at the controls Switch off the dishwasher at the power outlet and remove the plug Isolate the water supply...

Page 20: ...Page 20 User Manual...

Page 21: ...ping off dishes in the upper basket In short program the washing temperature is lower This also lowers cleaning performance Choose a program with a long washing time Water drainage is more difficult w...

Page 22: ...ng the date of original purchase of the Appliance h you means the purchaser of the Appliance not having purchased the Appliance for re sale and your has a corresponding meaning 2 This warranty only ap...

Page 23: ...failure and for compensation for any other reasonably foreseeable loss or damage You are also entitled to have the Appliance repaired or replaced if the Appliance fails to be of acceptable quality an...

Page 24: ...Page 24 User Manual Model Code s EDW6CS...

Reviews: