background image

Sostituzione della batteria / Substituting the battery / Substitution de la pile / 
Austauschen der Batterie / Sustitución de la batería 


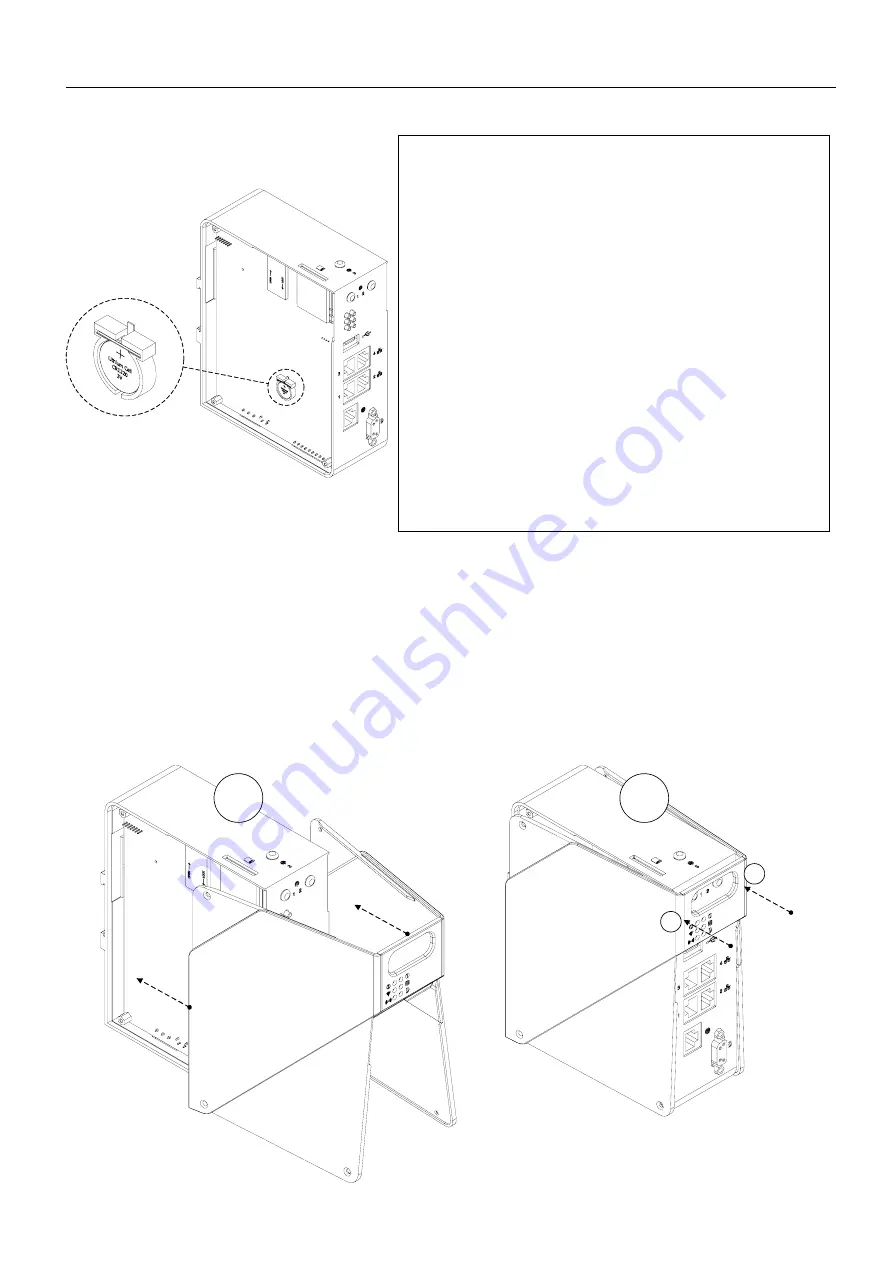
6.  Sostituire la batteria / Replace the battery / Remplacer la batterie / Ersetzen Sie die Batterie / 

Reemplace la batería 


ATTENZIONE:

 Batteria al Litio 3V CR1220 - Inserire la batteria 

nuova rispettando il tipo e le polarità. Rischio di esplosione se 
la batteria è sostituita con altra del tipo errato. Non disperdere 
le batterie nell’ambiente e smaltire secondo quanto prescritto 
dal produttore. / 

ATTENTION:

 Lithium battery 3V CR1220 - 

Insert the new battery checking that the polarities are correct. 
Risk of battery explosion if it is replaced with the wrong type. 
Do not abandon the battery into environment. Dispose of the 
battery as prescribed by the manufacturer. / 

ATTENTION:

 Pile 

au Lithium 3V CR1220 - Introduire la nouvelle pile en 
respectant les polarités. Risque d'explosion si la batterie est 
remplacée avec le type incorrect. Ne jetez pas les batteries 
dans l'environnement et disposez-les de la manière prescrite 
par le fabricant. / 

ACHTUNG:

  Lithium-Batterie CR1220 - Die 

neue Batterie einsetzen, dabei auf korrekte und Polung achten. 
Es besteht ein Explosionsrisiko, bei Verwendung der falschen 
Batterie. Entsorgen Sie die Batterie umweltgerecht an den 
Sammelstellen oder wie vom Hersteller beschrieben. Niemals 
in den Hausmüll entsorgen. / 

ATENCIÓN: 

Pila de litio 3V 

CR1220 - Introduzca la nueva batería observando las 
polaridades. Riesgo de explosión si la batería se sustituye por 
otra de tipo erróneo. No abandone la batería en el medio 
ambiente. Deshágase de la batería según lo prescrito por el 
fabricante.


7.  Rimontare la copertura. Allargare la copertura come descritto ai punti precedenti e rimetterla su 

EW (A), arrivati quasi in fondo (B) premere contemporaneamente come ai punti 1. Rimontare poi 
le viti / Replace the cover. Open the cover as described in the preceding paragraphs and put it 
back on EW (A), arrived almost at the bottom (B) simultaneously press as per points 1. Then 
reattach the screws / Replacer le couvercle. Ouvrez le couvercle comme décrit dans les 
paragraphes précédents et remettre sur EW (A), arrivé presque au fond (B) appuyez 
simultanément selon les points 1. Puis remettez les vis / Setzen Sie die Abdeckung. Öffnen Sie die 
Abdeckung wie in den vorhergehenden Abschnitten beschrieben und legte sie zurück auf EW (A), 
kam fast an der Unterseite (B) gleichzeitig nach Punkten 1. Dann befestigen Sie die Schrauben 
drücken / Vuelva a colocar la cubierta. Abra la tapa como se describe en los párrafos anteriores y 
lo puso de nuevo en EW (A), llegó casi en la parte inferior (B) presione simultáneamente como 
por puntos 1. vuelva a colocar los tornillos 

1

1

A

B


Summary of Contents for EW900

Page 1: ...1 10 2015 405 1300 218 0 EW DATA MANAGER EW DATA MANAGER EW DATA MANAGER EW DATA MANAGER EW DATA MANAGER Dimensioni Forature Dimensions Holes Dimensions Trous Abmessungen Bohrungen Dimensiones y perforaciones EW900 ...

Page 2: ...les paramètres d usine Stellen Sie die Netzwerk mit den Werksparameter Restaurar la red con los parámetros de fábrica Factory Network Configuration Static IP address 192 168 100 10 Subnet mask 255 255 255 0 Default gateway 0 0 0 0 To change Factory Network Configuration Open on a browser the page 192 168 100 10 3000 Insert User name and Password Admin Admin Click on Data manager configuration TCP ...

Page 3: ...t Verde Actividad 3 USB A Porta USB USB port Port USB USB Schnittstelle Puerto USB 5 9 Alarm Rosso Errore Red Error Rouge Erreur Rot Fehler Rojo Error 4 1 2 Optional Connettore per antenna Antenna connector Connecteur d antenne Antennenanschluss Conector de antena 10 Server Verde Attività Green Activity Vert Activité Grün Aktivität Verde Actividad 5 RS485 Optional Porta seriale per la comunicazion...

Page 4: ...osition indiquée dans la figure au point 1 Halten Sie das EW Vergrößern Sie die Abdeckung indem eine Kraft in der in der Abbildung am Punkt 1 gezeigten Position La celebración de la EW agrandar la cubierta mediante la aplicación de una fuerza en la posición mostrada en la figura en el punto 1 1 1 4 Mantenendo fermo il EW e mantenendo la posizione al punto 1 applicare una forza nella posizione most...

Page 5: ... figura del punto 2 asegurarse de soltar el gancho mostrado en el punto 3 1 1 2 2 3 3 5 Mantenendo la copertura aperta come ai punti 1 e 2 rimuoverla tirando nel senso delle frecce Keeping the cover open as in steps 1 and 2 remove it by pulling in the direction of the arrows Garder le couvercle ouvert comme dans les étapes 1 et 2 retirez le en tirant dans le sens des flèches Halten Sie die Abdecku...

Page 6: ...e die Batterie umweltgerecht an den Sammelstellen oder wie vom Hersteller beschrieben Niemals in den Hausmüll entsorgen ATENCIÓN Pila de litio 3V CR1220 Introduzca la nueva batería observando las polaridades Riesgo de explosión si la batería se sustituye por otra de tipo erróneo No abandone la batería en el medio ambiente Deshágase de la batería según lo prescrito por el fabricante 7 Rimontare la ...

Page 7: ...l autorité responsable de la zone d accès restreint ACHTUNG Das EW900 muss in einem nicht frei zugänglichen Bereich installiert werden Zugang ist nur für Service Personal oder befähigte Benutzer gestattet Der Zugang darf in einem durch Werkzeug oder Schlüssel gesicherten Bereich nur für befugte Personen möglich sein ATENCIÓN El EW900 debe ser instalado en un área de acceso restringido El acceso de...

Page 8: ...a sequenza numerica Removing from DIN 35 rail Push in the direction of the arrows in the sequence of numbers Retrait du rail DIN 35 Appuyez sur le sens des flèches dans la séquence de nombres Entfernen von DIN 35 Drücken Sie die Pfeilrichtung in der Folge von Zahlen Extracción de carril DIN 35 Introducir la dirección de las flechas en la secuencia de números 3 2 1 ...

Page 9: ...ties Ein und Ausgangs Beschaltung Enlaces entradas y salidas I O DIG3IN DIG3OUT Opto isolated 1 COM I0 I2 2 I0 3 I1 4 I2 5 COM O0 O2 6 O0 7 O1 8 O2 9 COM INPUT PNP Configuration NPN Configuration I2 I0 I1 COM I0 I2 VDC 0V I2 I0 I1 COM I0 I2 0V VDC OUTPUT O0 COM O0 O2 VDC COM 0V O1 O2 ...

Page 10: ...connect the device from the power supply The device should be installed with the connector easily accessible IMPORTANT La masse des dispositifs connectés aux ports de communication parallèls ou sériels doit formellement être au même potentiel qu il 0V d alimentation du EW La circuòation d un courant entre il 0V d alimentation et la masse des ports de communication pouvait causer des dommages aux c...

Page 11: ...e comunicación RS485 USB A WAN LAN Db 9 female connector 4 pin male connector RJ45 8 pin female connector 1 Tx Rx485 IN OUT 1 USBVCC OUT 1 TX 2 N C 2 USBD 2 TX 3 N C 3 USBD 3 RX 4 N C 4 Signal GND 4 N C 5 Signal GND 5 N C 6 Tx Rx485 IN OUT 6 RX 7 N C 7 N C 8 N C 8 N C 9 5 VDC reserved N C Not connected ...

Page 12: ...emisiones EN 301489 1 V1 9 2 and EN 301489 3 V1 6 1 e perciò rispondono a and thus are in line with et ils répondent pour cela aux und entsprechen daher den y por lo tanto se atienen a las Council Directive EMC 2004 108 EC Tutti i prodotti EW900B1A0xx e EW900C1A0xx possono essere utilizzati solo in ambiente industriale perchè conformi ai seguenti standard All the EW900B1A0xx and EW900C1A0xx models...

Reviews: