background image

Elite 2 User's Manual

Appendix A

Page A-1

Appendix A -   Connectors and Pin

Assignments

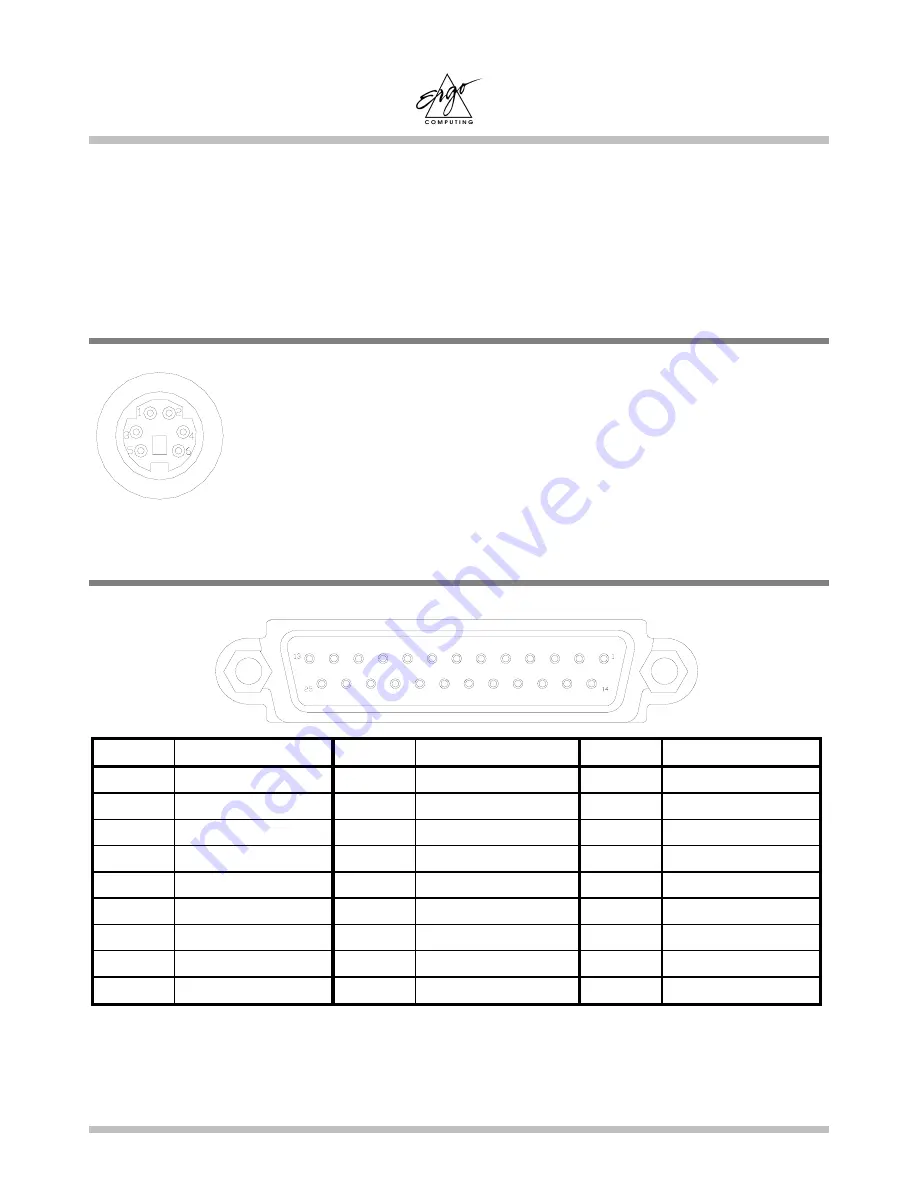
A.1    Keyboard or PS/2 Mouse Connector

A.2    Printer Port Connector

PIN

Assignment

PIN

Assignment

PIN

Assignment

1

STROBE #

10

Acknowledge

19

GROUND

2

DATA 0

11

BUSY

20

GROUND

3

DATA 1

12

Paper Empty

21

GROUND

4

DATA 2

13

Selected

22

GROUND

5

DATA 3

14

Auto Feed #

23

GROUND

6

DATA 4

15

ERROR #

24

GROUND

7

DATA 5

16

INITIALIZE

25

GROUND

8

DATA 6

17

SLIN #

9

DATA 7

18

GROUND

1: Keyboard data     4: +5V
2: No connection     5: Keyboard clock
3: Ground                6: No connection

Summary of Contents for Elite 2

Page 1: ...Ergo Elite 2 User s Manual www ergo co uk ...

Page 2: ...Page II Ergo Elite 2 User Manual Third Edition ã1998 2000 Ergo Computing UK Ltd ...

Page 3: ...apter the basic operations in Chapter 2 and Configuring Your System as explained in Chapter 11 Then you can go ahead and get started with your new Elite 2 If you have any difficulties with your Elite 2 and you cannot find the solution within this manual please take advantage of your free lifetime telephone support Our qualified engineers are here to help you use them We also have a comprehensive w...

Page 4: ...re editions Ergo Computing assumes no responsibility for errors or omissions in this document MS DOS Windows 95 Windows 98 Windows NT and Windows 2000 are trademarks of Microsoft Corporation Pentium is a trademark of Intel Corporation Sound Blaster Pro is a trademark of Creative Technology Ltd Other trademarks are properties of their respective owners NOTICE TRADEMARKS ...

Page 5: ...nings on the enclosure are for air ventilation and are designed to protect the equipment from overheating DO NOT COVER THE VENTILATION OPENINGS 8 Verify the voltage of the power source before connecting the unit to any power outlet 9 DO NOT step on or place anything over the power cord 10 All cautions and warnings on the equipment should be noted 11 WARNING If the equipment is not used for a long ...

Page 6: ...USE DAMAGE TO THE EQUIPMENT 16 To reduce the risk of electrical shock always ensure that the modem line is disconnected from the telephone network while installing your system or when opening the equipment s enclosure 17 Never install modem telephone wiring during a lightning storm 18 Never install modem telephone jacks in wet locations unless the jack is specially designed for wet locations 19 Ne...

Page 7: ...e maintenance contact your local dealer c Use of controls adjustments or the performance of procedures other than those specified may result in hazardous radiation exposure d To prevent direct exposure to Laser Beam do no try to open the enclosure The internal CD ROM DVD ROM drive is classified as a CLASS 1 LASER PRODUCT These labels are located on the outside of the CD ROM DVD ROM drive CAUTION C...

Page 8: ...es which appear on the Notebook screen will be boxed when they are referenced Where extra caution is called for the information will be boxed in a dark frame preceded by Note or Warning Usually after performing a step by step instruction you will be asked to Press the Esc key Which means you should press the key located at the upper left hand corner of the keyboard Standards ...

Page 9: ...be determined by turning the equipment off and on the user is encouraged to try to correct the interference by one or more of the following measures Reorient or relocate the receiving antenna Increase the separation between the equipment and receiver Connect the equipment into an outlet on a circuit different from that to which the receiver is connected Consult Technical Support or a Radio TV tech...

Page 10: ...Elite 2 User s Manual Page X This page is left blank intentionally ...

Page 11: ...3 1 GENERAL VIEW 3 2 3 2 THE EMBEDDED NUMERIC KEYPAD 3 3 3 3 OTHER KEYS 3 3 CHAPTER 4 FDD HDD DRIVES 4 1 4 1 THE FLOPPY DISKETTE DRIVE FDD 4 1 4 2 REMOVAL HARD DISK DRIVE HDD 4 2 4 3 REMOVING THE HARD DISK DRIVE 4 3 CHAPTER 5 THE LCD SCREEN 5 1 5 1 ADJUSTING SCREEN BRIGHTNESS 5 1 5 2 LCD TO CRT TO SIMULTANEOUS DISPLAY 5 1 5 3 RESOLUTIONS AND COLORS 5 2 CHAPTER 6 BATTERIES 6 1 6 1 BATTERY PACKS 6 1...

Page 12: ...RIVE 8 1 8 1 THE CD DVD ROM DRIVE PANEL 8 1 8 2 DISC LOADING EJECTION 8 2 8 3 ROM DISC MAINTENANCE 8 3 CHAPTER 9 PERIPHERALS 9 1 9 1 PS 2 KEYBOARD CONNECTOR 9 1 9 2 PARALLEL PORT 9 1 9 3 COM PORT 9 1 9 4 USB CONNECTOR 9 2 9 5 VGA CONNECTOR 9 2 9 6 TV OUT CONNECTOR 9 2 9 7 AUDIO JACKS AND VOLUME BUTTON 9 2 9 8 PCMCIA PORT 9 3 9 9 FIR PORT 9 3 CHAPTER 10 THE CD ROM DISC 10 1 10 1 DOS UTILITIES 10 1 ...

Page 13: ...GEMENT SETUP 11 7 11 6 PERIPHERAL SETUP 11 10 11 7 CHANGE USER PASSWORD 11 11 11 8 AUTO CONFIGURATION WITH OPTIMAL SETTINGS 11 11 11 9 SAVE SETTINGS AND EXIT 11 11 11 10 EXIT WITHOUT SAVING 11 11 APPENDIX A CONNECTORS AND PIN ASSIGNMENTS A 1 APPENDIX B HOT KEYS B 1 APPENDIX C GLOSSARY C 1 APPENDIX D TROUBLESHOOTING GUIDE D 1 APPENDIX E PORT REPLICATOR E 1 APPENDIX F MODEM INFORMATION F 1 APPENDIX ...

Page 14: ...Contents Elite 2 User s Manual Page XIV This page is left blank intentionally ...

Page 15: ...rocessors running at speeds from 300Mhz to 700Mhz System memory is easily upgradeable from 32MB to 256MB The hard disk system can handle most of the 12 7mm IDE industry standard drives giving you virtually unlimited storage capability Battery life or more appropriately the duration of which the machine may function without an AC outlet is an important issue Knowing this we have not simply incorpor...

Page 16: ... Flash ROM containing user upgradeable system BIOS ROM BIOS and Video BIOS shadowing for superior performance Removable Hard Disk drive DISPLAY AGP Local Bus and embedded 8MB SGRAM for superior performance LCD only CRT only TV only TV CRT simultaneous and LCD CRT simultaneous The LCD can display 12 1 800x600 SVGA resolution or 14 1 1024x768 XGA resolution Video CRT output can display 640x480 800x6...

Page 17: ...ocated on the rear CONNECTIVITY and EXPANSION Built in TouchPad IBM PS 2 mouse compatible One serial D type 9 pin COM1 connector One 6 pin mini DIN external keyboard or PS 2 mouse connector One 15 pin D type connector for external VGA monitor support One parallel port 25 pin D type for printer or pocket LAN High speed bi directional port under either hardware or software control EPP ECP compliance...

Page 18: ...o hours Full range 100 to 240V auto switching International AC adapter PHYSICAL Weight TFT colour 3 1 kg including one Li Ion battery pack Length 320 0 mm Width 255 0 mm Height DSTN TFT colour 38 44 mm Note Weight and height might change due to different configurations and model variations ENVIRONMENT Operating Temperature 10 C to 35 C 50 to 95 F Non Operating Temperature 20 C to 60 C 4 F to 140 F...

Page 19: ... exterior of the case This can damage the Elite 2 and void the warranty OPTIONS Standard SDRAM S O DIMM self refresh 32 64 128MB Memory Modules for expansion from 32MB up to 256MB Additional Battery Pack Lithium Ion Port Replicator Internal Fax Modem K56Flex V90 compatible Note Please contact your supplier for upgrade option pricing and availability ...

Page 20: ...In Suspend To DRAM mode all major devices and components including VGA controller and LCD panel are shutdown to save energy In Suspend To Disk mode system is completely shutdown for energy saving Low Battery Activity allow system to save memory contents and system activities into a Suspend To Disk file refer to Chapter 10 When you power on the system again the system will return to exactly where y...

Page 21: ... to clean your TouchPad with a dry cloth in a regular basis Grease dirt and moisture on the TouchPad can lead to abnormal mouse operations PCMCIA The PCMCIA card system provides many expansion possibilities for your Elite 2 Many cards are available today such as Fax Modems Network Adapter and SCSI Adapters The PCMCIA unit in your Elite 2 provides connections to two Type II 5mm height SOUND SYSTEM ...

Page 22: ...Introduction Elite 2 User s Manual Page 1 8 This page is left blank intentionally ...

Page 23: ... Elite 2 packaging should contain the following items USER S MANUAL b c d e f g Note You should keep the original factory carton and packing materials in case you need to ship the unit back for servicing a a The notebook b AC Adapter c AC Power Cord d CD ROM Disc for Drivers Utilities e Battery Pack f Battery Holder for Slot B provided with second battery g User s Manual ...

Page 24: ...o get acquainted with your Elite 2 s main features and interfaces A Panoramic View of the Elite 2 Power Switch TouchPad Volume Button Primary Battery Pack A Cover Locks Right Speaker Microphone The Three Power LEDs The Five System LEDs FIR CD ROM or DVD ROM Drive Two PCMCIA Ports PCMCIA lock releases LCD Screen Cover Switch ...

Page 25: ...ter COM1 Hard Disk Drive Port VGA TV Out Keyboard or Port Port Replicator Port RCA Jack PS 2 Mouse Rear View Kensington USB USB Kensington Lock Port Port Lock Heat DC in Venting Line In Earphone Cover Latch Grill Phone Modem Floppy MIC In Line Out Speaker Jack Diskette Drive Mono only ...

Page 26: ...Before You Begin Elite 2 User s Manual Page 2 4 View of the Right Panel Emergency Speaker CD ROM or Eject PCMCIA DVD Drive Ejector Cover Latch PCMCIA Ports FIR ...

Page 27: ...on batteries please refer to Chapter 6 The Power On LED This LED should be lit when the Elite 2 is powered on The Primary Battery Pack A LED This LED will be lit red when this battery pack is being recharged This LED will be lit green when the Elite 2 is powered by this battery pack discharged The Secondary Battery Pack B LED This LED will be lit red when this battery pack is being recharged This ...

Page 28: ...e 2 is accessing the FDD The HDD LED This LED should be lit when the Elite 2 is accessing the HDD drive The CD ROM DVD ROM LED This LED should be lit when the Elite 2 is accessing the CD ROM or DVD ROM drive The CAPS LOCK LED This LED should be lit when the keyboard is in Caps Lock mode In this mode all characters you type are in upper case The NUM LOCK LED This LED should be lit when the keyboard...

Page 29: ...nced keyboard that incorporates the functions of a full featured desktop keyboard An embedded numeric keypad accessed via the NumLock key is included The screen control keys are conveniently located near the right side and lower right corner of the keyboard Ergo Elite 2 UK Keyboard Layout ...

Page 30: ... CapsLock indicator light is on the letters are typed in upper case When the CapsLock indicator light is off all letters are typed in lower case Print Screen Key By pressing the PrintScreen key the characters or text shown on the screen will be printed on your printer Warning Don t press the PrintScreen key unless a printer is connected to the Elite 2 To access the 0 press the key only To access t...

Page 31: ...f the keyboard is printed in blue and the keys on the embedded numeric keypad are also in blue 3 3 Other Keys The Fn Key The Function Fn key is located at the bottom left corner of the keyboard This key is used to access the Elite 2 system Hot Keys or function keys For example to change the system into a simultaneous video mode you hold down the Fn key while pressing the F2 LCD CRT key For more in...

Page 32: ...START icon in Win95 The Win95 Key This Win95 key has the same function as clicking the right mouse button when in Win95 This key can activate certain functions of an application program The QuickLock Key The QuickLock key allows you to lock up the system from other people s accessing by pressing Alt Ctrl Scroll Lk keys simultaneously When the system is in QuickLock mode the display screen would re...

Page 33: ...Diskette Drive FDD The FDD is used to transfer data to and from your hard disk via 3 5 inch diskettes It can read and write files from both 720KB and 1 44MB 2HD floppies formatted for IBM compatible computers In order to use a diskette for the first time it needs to be formatted otherwise the computer cannot read or write to it The Left View of the Elite 2 Note By formatting a diskette all informa...

Page 34: ...go Computing Tel 00 44 0 115 9144144 for more information When the Elite 2 is accessing the HDD the HDD LED Chapter 2 4 would be lit The hard disk will spin down if there is no disk access for a user selected time duration e g two minutes Disk accessing will wake the drive up but reading or writing is only enabled after the motor spins back to normal speed Spin up needs about 6 9 seconds to reach ...

Page 35: ...arate hard disks for different purposes Follow these steps to remove the hard disk drive Make sure the system is powered off Un screw the screw on the door of the HDD as shown Slide the HDD door down as indicated by arrow 2 Pull the HDD out as indicated by arrow 3 Note Reverse the above steps to install a hard disk drive If you have just changed a HDD don t forget to change the HDD type in the Set...

Page 36: ...FDD LS120 HDD Drives Elite 2 User s Manual Page 4 4 This page is left blank intentionally ...

Page 37: ...Simultaneous Display By pressing and holding down the Function key couple Fn F2 together you can switch your display between LCD only CRT only TV only TV CRT simultaneous and LCD CRT simultaneous Note When you switch your display from CRT Only to LCD CRT simul the following symptoms may occur Depending on the size of your CRT the size of the screen may be different from smaller larger than the siz...

Page 38: ...ent drivers under Windows DOS or other operating systems you can have different resolutions with different fonts and colours CRT The resolutions on the CRT depends upon both the CRT and its driver program The VGA driver supplied can display up to 1024x768 non interlaced under the MS Windows environment ...

Page 39: ...ration However different configurations CPU HDD Memory etc and system utilization especially I O activities can impact moibile operation time 6 2 Battery Slots Your Elite 2 supports dual battery operation There are two battery slots Slot A is located underneath the palm rest between the left and right speakers Slot B is located underneath the system unit Note For detail on battery insertion and re...

Page 40: ...hould be lit red For detail on the LEDs please refer to Chapter 2 3 and Chapter 2 4 While the Elite 2 is OFF a depleted Li Ion battery will take around two hours to recharge Note When you have two battery packs in the system the battery pack in Slot A will be recharged first Upon completion of the Slot A battery pack the system will begin recharging the battery pack in Slot B 6 4 Questions and Ans...

Page 41: ... few days Even though it was fully recharged there wasn t as much power left as a newly charged one Why A The batteries will self discharge 1 per day for Li Ion when they are not being recharged To make sure a battery pack is fully charged recharge before use Always keep the battery inside the Elite 2 and have the AC adapter connected whenever possible Q I didn t use my spare battery for months I ...

Page 42: ...Elite 2 are equipped with built in gas gauge There is a Battery Button and four Battery LED Indicators on the Battery panel with each LED signifying approximately 25 percent energy level For detail refer to table below Battery Pack in Slot A LED Indicators LEDs Lit Energy Level n n n n 4 75 100 n n n o 3 50 75 n n o o 2 25 50 n o o o 1 0 25 The LEDs will be illuminated up only when the battery but...

Page 43: ...isk file has been created and Suspend Mode refer to Chapter 11 5 set to DISK Suspend To Disk will be performed automatically by the system For detail on Suspend To Disk file refer to Chapter 10 Without the Suspend To Disk file you are running the risk of running out of power soon If you haven t saved your work now is definitely a good time Otherwise all modifications you have made since last save ...

Page 44: ... and be powered off thus consuming less power When there is any disk activity the HDD will automatically wake itself up before performing any disk access The wake up or spin up time varies slightly from HDD manufacturer to manufacturer Suspend To DRAM There are three ways to enter Suspend To DRAM mode Press the Hot Keys Fn F3 Allow the system to invoke this action by setting the Suspend Time Out a...

Page 45: ...l be saved to the Suspend To Disk file refer to Chapter 10 The system will shut the power down automatically When you power on the computer again you will return exactly where you left off Note For more information on Suspend To DRAM and Suspend To Disk refer to Chapter 11 5 and Chapter 10 For more information on Hot Keys see Appendix B Note If Suspend To Disk file has not been created system woul...

Page 46: ...r power source is compatible please contact Ergo Computing for assistance Warning This computer contains an internal lithium battery powered real time circuit There is a risk of explosion and injury if the battery is incorrectly replaced or handled Do not attempt to recharge disassemble immerse in water or dispose of it in fire Replacement should be done by your Ergo dealer Warning Your Elite 2 co...

Page 47: ... the battery while power is on make sure the AC Adapter is inserted or that you have saved your work via the Suspend To Disk feature Follow these steps to remove the battery pack Flip the Elite 2 upside down as shown Press the battery lock latch to the left as indicated by arrow 1 Pull the battery pack out as indicated by arrow 2 To insert battery reverse the steps above pin holes for optional Por...

Page 48: ...y and have it pressed down into the Elite 2 as indicated by arrow 2 There are two screws one on each side of the battery holder Use these screws to lock the battery holder onto the system unit as indicated by arrow 3 Position the battery pack properly and have it pressed into the battery holder as indicated by arrow 4 There is a spring lock latch on the battery holder This lock latch would move la...

Page 49: ... up to 256MB There are two memory banks both on the top side of system board underneath keyboard The table below illustrates some of the most popular way that system memory can be configured If you want to upgrade your system memory please contact Ergo Computing Total Memory Bank A Bank B 32MB 32MB None 64MB 32MB 32MB 64MB None 96MB 32MB 64MB 64MB 32MB 128MB 64MB 64MB 256MB 128MB 128MB SDRAM S O D...

Page 50: ...Memory Elite 2 User s Manual Page 7 2 This page is left blank intentionally ...

Page 51: ...a 2x DVD ROM drive 8 1 The CD DVD ROM Drive Panel CD DVD ROM Drive Panel Externally the drive is labeled with either Compact Disc or DVD DVD drives fully support playback of traditional CDROM discs Eject Button Press this button to open or close the disk tray When the Eject Button is pressed you will hear a clicking sound and the disk tray will eject Eject Emergency Eject Button Button ...

Page 52: ...ls have a different front panel 8 2 DISC Loading Ejection Disc Loading Press the Eject button on the front panel to release the disc tray Gently pull the disc tray to its fullest extend Place the disc on the tray with its labelled side facing up Gently push the disc tray back into the drive Disc Ejection Press the Eject button on the front panel to release the disc tray Gently pull the disc tray t...

Page 53: ...in figure below NEVER touch the disc s data surface non labeled side To protect the disc against scratches and dirt keep it in its protective case when not in use Disc Cleaning When cleaning the disc be sure to wipe it from center to edge Don t wipe the disc in a clockwise counter clockwise direction Otherwise this can damage the disc Keep the discs away from high temperature and high pressure ...

Page 54: ...The CDROM DVD Drive Elite 2 User s Manual Page 8 4 This page is left blank intentionally ...

Page 55: ...either a pocket LAN adapter a printer or any EPP ECP device to this bi directional port This port can be controlled either through BIOS setup or application programs For detail refer to Parallel Port in Chapter 11 6 9 3 COM Port This COM Port allows external Fax Modem serial Mouse or any other standard RS 232C devices to be connected to your Elite 2 Since this port is equipped with a high speed bu...

Page 56: ...external display must be at the same screen resolution and refresh rate 9 6 TV Out Connector You can use this RCA standard connector to contact to a RCA standard television 9 7 Audio Jacks and Volume Button The Elite 2 has three built in Sound Jacks and one Volume Dial Line In Connect any sound audio source such as CD DAT tape player or tuner etc Mic In A microphone can be connected to record spee...

Page 57: ... connection HDD and etc 9 9 FIR Port FIR stands for Fast InfraRed FIR Port is therefore a normal serial port but it communicates via infrared transmission rather than via an attached cable With this feature you can transfer data without cable attachment Just place the FIR Port of the two devices e g an Elite 2 and a printer both equipped with FIR Ports within line of sight distance typical 1 0 met...

Page 58: ...Peripherals Elite 2 User s Manual Page 9 4 This page is left blank intentionally ...

Page 59: ...2000 The CD ROM Disc inside your Elite 2 package contains DOS utilities and Windows drivers for the above operating systems 10 1 DOS Utilities and Drivers The following DOS Utilities are located in the directory DOS of the CD ROM Disc System BIOS Flashing Utility Keyboard Controller KBC Flashing Utility Suspend To Disk Partition Creation Utility Touchpad Driver CD ROM Driver DVD ROM Driver ...

Page 60: ...DVD Movie Software PCMCIA Driver Windows 95 only These drivers are located in either the WIN95 or WIN98 directory of the CD ROM disc 10 3 Windows NT 4 0 Drivers The Windows NT 4 0 drivers are located in the directory NT4 of the CD ROM disc and include the following Audio Driver Video Driver Fax Modem Driver 10 4 Windows 2000 Drivers NT5 The Windows 2000 drivers are located in the directory WIN2000...

Page 61: ... The Setup can only be activated by pressing Del during system boot up You are requested to perform the following one time procedure immediately after you have upgraded reprogrammed your BIOS Press Del during system boot up to get into the SETUP Choose Auto Configuration with Optimal Settings Press Enter and then answer Y followed by Enter Choose Save Settings and Exit then Enter Answer Y followed...

Page 62: ...try Screen Detail on the above major sub menus options will be described on the following pages Movement within the SETUP utility To move between the different item fields or to move between the sub menus use the arrow keys and To change the value of a field press the PgUp and PgDn keys When you select one item that item will be highlighted in gray background and a brief explanation will be displa...

Page 63: ...ri Master Auto 2061 4188 16 0 63 On On 4 Sec Master Auto CD DVD ROM On On 4 Sec Slave Not Installed Boot Sector Virus Protection Disabled Month Jan Dec ESC Exit Sel Day 01 31 PgUp PgDn Modify Year 1901 2099 F2 F3 Color Date and Time Use the arrow keys and to move among these fields to modify the setting Use PgUp and PgDn keys to modify setting Floppy Drive A You should always choose 1 44 MB 3 Pri ...

Page 64: ...to let the system automatically detect the CD ROM or the DVD ROM drive you have in the system For better performance you should choose On for 32 Bit Mode option Sec Slave and 32 Bit Mode You should always choose Not Installed Boot Sector Virus Protect You should choose Enabled so as to protect the system s boot sector from virus infection ...

Page 65: ...PgUp PgDn Modify F2 F3 Color BootUp Sequence Depending on model your Elite 2 is either equipped with either a CD ROM or DVD ROM laser optical storage drive Your DVD ROM drive is backward compatible with industry standard CD ROM Initial Display Mode There are two options to this field Silent and BIOS If you choose Silent during POST the Ergo Elite 2 Logo will be displayed The BIOS option will resul...

Page 66: ...to Always system would request user to enter password during boot up and when user tries to get into Setup by pressing Del during boot up If this field is set to Setup system will request user to enter password only when user tries to get into Setup TV Out Selection Your Elite 2 supports two TV industry standards NTSC and PAL Make the selection according to the standard of the television set that ...

Page 67: ...is field is for programming the Power Switch If this field is set to On Off the Power Switch would behave in a normal On Off function If this field is set to Suspend there are three scenarios If the Power Switch is pressed continuously for 4 seconds or more the system would power off If the Power Switch is pressed for less than 4 seconds and the Suspend Mode is set to DRAM system would perform Sus...

Page 68: ...Mode when the CPU is idle Otherwise CPU would consistently consume the maximum amount of energy even when it is idle Suspend Mode Suspend Time Out These two fields work hand in hand with one another The Suspend Time Out applies to whatever Suspend Mode is set to With Suspend Mode set to DISK and when Suspend Time Out setting expires the system would enter Suspend To Disk Otherwise when the time ou...

Page 69: ...p from Suspend Mode Suspend To DRAM or Suspend To Disk to normal operation when it receives incoming calls through the Fax Modem Note Please note the two resume functions Resume Alarm and Resume on Modem Ring work on both Suspend Modes Suspend To DRAM and Suspend To Disk The amount of time required to wake up from Suspend To Disk is somewhat longer than Suspend To DRAM Note Some of the settings in...

Page 70: ...vailable Options Enable Disabled ESC Exit Sel PgUp PgDn Modify F2 F3 Color Ultra DMA 33 Support There are two options to this field Enable and Disabled You should choose Enable for better performance Serial Port There are two options to this field Auto and Disabled You should choose Auto to let the system to automatically detect the available resources OnBoard Parallel Port There are four options ...

Page 71: ...the system keyboard and touchpad would be locked and the Num Lock LED refer to Chapter 2 4 would flash To unlock just enter the User Password and then press Enter 11 8 Auto Configuration with Optimal Settings This option in the Setup Entry Screen allows you to reload the Setup to its preset values Warning After loading the COMS to its preset values the previous changes you had made and saved in Se...

Page 72: ...Configuring Your System Elite 2 User s Manual Page 11 12 This page is left blank intentionally ...

Page 73: ... PIN Assignment PIN Assignment 1 STROBE 10 Acknowledge 19 GROUND 2 DATA 0 11 BUSY 20 GROUND 3 DATA 1 12 Paper Empty 21 GROUND 4 DATA 2 13 Selected 22 GROUND 5 DATA 3 14 Auto Feed 23 GROUND 6 DATA 4 15 ERROR 24 GROUND 7 DATA 5 16 INITIALIZE 25 GROUND 8 DATA 6 17 SLIN 9 DATA 7 18 GROUND 1 Keyboard data 4 5V 2 No connection 5 Keyboard clock 3 Ground 6 No connection ...

Page 74: ...Connector PIN Assignment PIN Assignment PIN Assignment 1 Carry detect 4 Data Terminal 7 Req to send 2 Received data 5 GROUND 8 Clear to send 3 Transmit data 6 Data Send 9 Ring indicator A 4 USB Port Connector PIN Assignment PIN Assignment 1 5VS 2 USBP0 3 USBP0 4 GND ...

Page 75: ...6 GND 07 DACGND 37 D USBP1 67 D PD1 08 D DDCK 38 D USBP1 68 D PD3 09 GND 39 DOCKIN 69 D PD5 10 5VS 40 OC1 70 D PD7 11 5VS 41 D RED 71 GND 12 D TXD 42 DACGND 72 D SOUTA 13 D GPO 43 DACGND 73 D RTSA 14 D GP2 44 D HSYNC 74 D SINA 15 D GP4 45 DACGND 75 D DSRA 16 D GP6 46 DACGND 76 GND 17 GND 47 CRTSENSE 77 D USBP0 18 D KBD 48 D DDDA 78 D USBP0 19 D KBC 49 GND 79 OC0 20 GND 50 5VS 80 GND 21 D STB WRIT ...

Page 76: ...7 27 D PD0 57 GND 28 D PD2 58 D MSD 29 D PD4 59 D MSC 30 D PD6 60 GND A 6 VGA Monitor Connector PIN Assignment PIN Assignment PIN Assignment 1 RED 6 GROUND 11 N C 2 GREEN 7 GROUND 12 N C 3 BLUE 8 GROUND 13 HSYNC 4 N C 9 N C 14 VSYNC 5 GROUND 10 GROUND 15 N C ...

Page 77: ...LCD and all system devices are either powered off or in the lowest energy consumption state Suspend To Disk In this mode data in memory will be saved to the Suspend To Disk file The system will then shutdown automatically When you switch on the power again you will then return to exactly the point where you left off Warning Buzzer Switch Press this key combination to switch off the Battery Low war...

Page 78: ...st of the DSTN LCD display Contrast Increasing Press this key combination to increase the contrast of the DSTN LCD display Brightness Decreasing Press this key combination to decrease the brightness of the LCD display Brightness Increasing Press this key combination to increase the brightness of the LCD display ...

Page 79: ... 1KB A million Bytes is called a megabyte or MB CACHE A place in the CPU where the computer can temporarily store data to avoid accessing the HDD and FDD drives There is also an external on board 512KB fast write back cache in your Elite 2 to improve performance CD ROM Compact Disc Read Only Memory It stores up to 640MB of information per disc CMOS Complementary Metal Oxide Semi conductor This low...

Page 80: ...uspend To Disk was invoked IDE Integrated or Intelligent Drive Electronics Standard HDD type used in notebooks I O Input Output used for different kind of communications between devices IRQ Interrupt Request every device has an IRQ number If two devices share the same number there will be a conflict and then none of the devices will work IrDA Infrared Data Association a standard for infrared ray d...

Page 81: ...known as PC card POST Power On Self Test Every time you power on the notebook POST runs many different tests to insure the system will operating properly RAM Random Access Memory See DRAM ROM Read Only Memory This memory contains the BIOS where all the information about your notebook is stored SPP Standard Parallel Port This bi directional communication mode is slower than the EPP and ECP modes Al...

Page 82: ...Appendix C Elite 2 User s Manual Page C 4 This page is left blank intentionally ...

Page 83: ...in BIOS been setup properly LS120 Is it a LS120 Does the LS120 require a driver for the particular Windows OS you are running on PCMCIA Does the PCMCIA controller require a driver for the particular Windows OS you are running on No Sound Adjust the volume button or disconnect external speakers Does the audio device require a driver for the particular Windows OS you are running on Slow Speed Is Pow...

Page 84: ... as Word sometimes text seems to be mis placed Explanation and Resolution This happens on most built in touchpads and is caused by user un intentionally tap on the TouchPad with the base of their palms wrists during data entry To prevent this from happening again you can position your wrist away from the TouchPad while typing or take away the TAP feature of the TouchPad With the TAP feature taken ...

Page 85: ...tor provides one more connection that is not available to your standard Elite 2 the joystick connector There are two pins on the Port Replicator The purpose of these pins is to station the Elite 2 onto the Port Replicator by pegging the two pin holes on the back of the notebook For exact location of the two pin holes please refer to diagram in page 6 9 For details on how to dock the Elite 2 onto t...

Page 86: ...2 reverse the procedure above Press the button on the Port Replicator as shown by arrow 1 And at the same time pull the sliding handle out as shown by arrow 2 Put the Elite 2 down as shown by arrow 3 Push the sliding handle back to it lock positioned as shown by arrow 4 ...

Page 87: ...notice that the connection is to be made by another person and that period of notification has expired This modem is suitable for use only on telephone lines proved with Loop Disconnect or Multi Frequency Dialing Facilities Users of this modem are advised that the approval is for connection to the PSTN via the telephone line interface supplied with it Connection of a modem to the PSTN by any other...

Page 88: ...ot approved for connection to U K private speech band services This modem does not support an automatic re dial function Any other usage will invalidate the approval of your modem if as a result it then ceases to confirm to the standards against which approval was granted The approval of this modem is invalidated if the apparatus us subject to modification in any material way not authorized by the...

Page 89: ...free loan computer with our compliments Ergo s Free Lifetime Technical Support Desk Less than a tenth of our technical support calls result in returned equipment as the majority of faults tend to be configuration problems that our Technical Help Desk can resolve Contrary to the modern trend our Help Desk is free and extends for the full life of the Notebook Ergo s 5 Years Spares Availability Guara...

Page 90: ...ys we have not solved the problem we will offer you a full refund and still continue to work on the problem Note that this applies to all applications running under DOS Windows 9X NT 4 and Windows 2000 Ergo s Corporate Account 3 Year Free 24 hour Service Plan If you are a corporate account that has 5 or more Ergo notebooks on one site we guarantee in the first 3 years to either repair your Noteboo...

Page 91: ...elephone before 3 00pm Monday to Friday we can get you a replacement loan computer by 10 00am the next morning Because every Notebook has a removable hard disk all you do is unplug it from your old computer and you are up and running We also offer a world wide loaner package where we air courier computers around the globe price on application Ergo s On Site Warranty The industries record of first ...

Page 92: ...th Ergo what we don t do for free is also up front We are not able to offer extended warranty on batteries as these are a consumable item nor does our warranty extend to accidental damage theft or any consequential damages Given that a large proportion of system failures result from software configuration or corruption errors Ergo offers a chargeable software reconfiguration and data recovery serv...

Page 93: ......

Page 94: ...Ergo Computing UK Ltd Unit 7 Wheatcroft Business Park Edwalton Nottingham NG12 4DG Sales Tel 0115 9144144 Fax 0115 9144155 www ergo co uk Support Tel 0115 9144160 support ergo co uk ...

Reviews: