


650W PENDULUM JIGSAW
chart 2
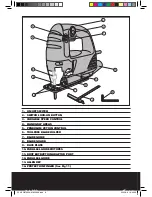
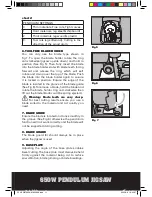
6. TOOLFREE BLADE HOLDER
You can only use the blade type shown in
fig 1. To open the blade holder rotate the ring
anti-clockwise (jigsaw upside down) and hold in
position (See Fig 5). Then fully insert the blade
into the blade holder slot with blade teeth facing
forward and release the ring, which will self
rotate and clamp over the top of the blade. Push
the blade into the blade holder again to ensure
it is locked in position. Ensure the edge of the
blade is located in the groove of the blade guide
(See Fig 6). To remove a blade, hold the blade and
rotate the blade holder ring anti-clockwise then
lift out the blade (blade could be spring ejected).
Warning: blade teeth are very sharp.
For best cutting results ensure you use a
blade suited to the material and cut quality you
need.
7. BLADE GUIDE
Ensure the blade is located and runs smoothly in
the groove (See Fig 6) otherwise the pendulum
function will not work correctly and the blade will
not be supported during cutting.
8. BLADE GUARD
The blade guard (8) should always be in place
when the jigsaw is used.
9. BASE PLATE
Adjusting the angle of the base plate enables
bevel cutting. The base plate must always be held
firmly against the material being cut to reduce
saw vibration, blade jumping or blade breakage.
Fig 5
Fig 6
Fig 7
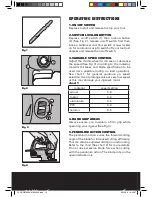
PENDULUM SETTINGS
0
Thin materials, Fine cuts, Tight curves.
1
Hard materials, (eg steel &chipboard)
2
Thick materials (eg wood & plastic)
3
Fast cuts (eg softwood). Cutting in the
direction of the wood grain.
SFX-ERB706SA-M-050908.indd 11
2005-9-8 18:42:37


