background image

OPERATING INSTRUCTIONS

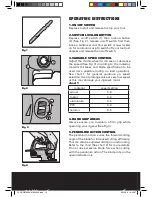
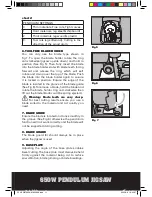
1. ON/OFF SWITCH

Depress to start and release to stop your tool.

2. SWITCH LOCK-ON BUTTON

Depress  on/off  switch  (1)  then  lock-on  button 
(2)  (See  Fig  2),  release  on/off  switch  first  then
lock-on button second. Your switch is now locked 
on for continuous use. To switch off your tool just
depress and release the on/off switch.

3. VARIABLE SPEED CONTROL

Adjust the thumb-wheel to increase or decrease 
the speed (See Fig 3) according to the material,
material  thickness  and  blade  specification  to  be 
used  (also  possible  during  no  load  operation).
See  chart  1  for  general  guidance  on  speed
selection. Avoid prolonged use at very low speed 
as this may damage your Jigsaw’s motor.

chart 1

4. HAND GRIP AREAS

Always  ensure  you  maintain  a  firm  grip  while
operating your Jigsaw (See Fig 4).

5. PENDULUM ACTION CONTROL

The pendulum action varies the forward cutting 
angle of the blade for increased cutting efficiency. 
This can also be adjusted during no load running. 
Refer to the chart (See chart 2) for more details. 
Do  not  use  excessive  blade  force  when  cutting 
with the pendulum action. The blade cuts on the 
upward stroke only.

Fig 1

Fig 2

Fig 3

material

speed setting

wood

5-6

metal

3-4

aluminium

3-5

PVC

3-4

ceramic

3-5

Fig 4

SFX-ERB706SA-M-050908.indd   10

2005-9-8   18:42:37

Summary of Contents for ERB706SA

Page 1: ...650W PENDULUM JIGSAW ERB706SA 2 WARRANTY YEARS SFX ERB706SA M 050908 indd 1 2005 9 8 18 42 34...

Page 2: ...SFX ERB706SA M 050908 indd 2 2005 9 8 18 42 35...

Page 3: ...ailure of consumable items such as batteries Accidental damage Cosmetic damage Failure to follow manufacturer s guidelines Loss of use of the goods Repairs attempted by anyone unless authorized by Scr...

Page 4: ...When operating a power tool outdoors use an extension cord suitable for outdoor use Use of a cord suitable for outdoor use reduces the risk of electric shock f Use a residual circuit breaker on all 2...

Page 5: ...Check for misalignment or binding of moving parts breakage of parts and any other condition that may affect the power tools operation If damaged have the power tool repaired before use Many accidents...

Page 6: ...must always be held rmly against the material being cut to reduce saw vibration blade jumping and blade breakage 9 If possible ensure the workpiece is rmly clamped to prevent movement 10 Your Jigsaw...

Page 7: ...650W PENDULUM JIGSAW SYMBOLS Read the manual Warning Wear gloves Wear dust mask eye ear protection Conforms to relevant safety standards SFX ERB706SA M 050908 indd 7 2005 9 8 18 42 36...

Page 8: ...GRIP AREAS 5 PENDULUM ACTION CONTROL 6 TOOLFREE BLADE HOLDER 7 BLADE GUIDE 8 BLADE GUARD 9 BASE PLATE 10 PARALLEL GUIDE FIXTURES 11 DUST EXTRACTION ADAPTOR PORT 12 PARALLEL GUIDE 13 ALLEN KEY 14 PROT...

Page 9: ...0mm steel 10mm Weight 3 0kg NOISE AND VIBRATION DATA A weighted sound pressure 90dB A A weighted sound power 101dB A Wear ear protection when sound pressure is over 85dB A Typical weighted vibration 4...

Page 10: ...o load operation See chart 1 for general guidance on speed selection Avoid prolonged use at very low speed as this may damage your Jigsaw s motor chart 1 4 HAND GRIP AREAS Always ensure you maintain a...

Page 11: ...Warning blade teeth are very sharp For best cutting results ensure you use a blade suited to the material and cut quality you need 7 BLADE GUIDE Ensure the blade is located and runs smoothly in the g...

Page 12: ...set the angle with a protractor and make a test cut on other material 11 PARALLEL GUIDE FIXTURES Slide the parallel guide arm through both xtures to achieve the required cutting distance and tighten...

Page 13: ...uality of the cut The blade cuts on the upward stroke and may chip the uppermost surface or edges of your work piece When cutting ensure your uppermost surface is a non visible surface when your work...

Page 14: ...eck the voltage given on your power tool matches the supply voltage The power tool is supplied with a tted plug however if you should need to t a new plug follows the instruction below IMPORTANT The w...

Page 15: ...lowing directive 89 336 EEC 93 68 EEC EMC Directive 73 23 EEC 93 68 EEC Low Voltage Directive 98 37 EC Machinery Directive Standards and technical speci cations referred to EN 60745 1 2003 A1 EN 60745...

Page 16: ...SFX ERB706SA M 050908 indd 16 2005 9 8 18 42 38...

Reviews: