background image

b) Do not use the power tool if the switch does not turn it on 
and off.

 Any power tool that cannot be controlled with the switch 

is dangerous and must be repaired.

c) Disconnect the plug from the power source and/or 
the battery pack from the power tool before making any 
adjustments, changing accessories, or storing power tools.


Such preventive safety measures reduce the risk of starting the 

power tool accidentally. 

d) Store idle power tools out of the reach of children and 
do not allow persons unfamiliar with the power tool or 
these instructions to operate the power tool.

 Power tools are 

dangerous in the hands of untrained users. 

e) Maintain power tools. Check for misalignment or binding 
of moving parts, breakage of parts and any other condition 
that may affect the power tool’s operation. If damaged, 
have the power tool repaired before use. 

Many accidents are 

caused by poorly maintained power tools. 

f) Keep cutting tools sharp and clean. 

Properly maintained 

cutting tools with sharp cutting edges are less likely to bind and 
are easier to control. 

g) Use the power tool, accessories and tool bits etc. in 
accordance with these instructions, taking into account the 
working conditions and the work to be performed. 

Use of 

the power tool for operations different from those intended could 

result in a hazardous situation.

5. Service

a) Have your power tool serviced by a qualiied repair 

person using only identical replacement parts. 

This will 

ensure that the safety of the power tool is maintained.

b) If the replacement of the supply cord is necessary, this 
has to be done by the manufacturer or his agent in order to 
avoid a safety hazard.

Summary of Contents for ERB383WCH

Page 1: ...1500W WALL CHASER ERB383WCH ...

Page 2: ...Original Instructions Version 2 0 ...

Page 3: ... goods This guarantee does not affect your statutory rights This guarantee is only valid in the UK For further technical advice spare parts or repair service outside of guarantee please con tact the customer helpline number on 0345 607 6380 Congratulations on your purchase of a quality power tool from Erbauer UK Ltd This product should give you reliable service but for your peace of mind this powe...

Page 4: ...al safety a Power tool plugs must match the outlet Never modify the plug in any way Do not use any adapter plugs with earthed grounded power tools Unmodiied plugs and matching outlets will reduce risk of electric shock b Avoid body contact with earthed or grounded surfaces such as pipes radiators ranges and refrigerators There is an increased risk of electric shock if your body is earthed or groun...

Page 5: ...rrying power tools with your inger on the switch or energising power tools that have the switch on invites accidents d Remove any adjusting key or wrench before turning the power tool on A wrench or a key left attached to a rotating part of the power tool may result in personal injury e Do not overreach Keep proper footing and balance at all times This enables better control of the power tool in u...

Page 6: ...of parts and any other condition that may affect the power tool s operation If damaged have the power tool repaired before use Many accidents are caused by poorly maintained power tools f Keep cutting tools sharp and clean Properly maintained cutting tools with sharp cutting edges are less likely to bind and are easier to control g Use the power tool accessories and tool bits etc in accordance wit...

Page 7: ...lways use undamaged wheel langes that are of correct diameter for your selected wheel Proper wheel langes support the wheel thus reducing the possibility of wheel breakage f Do not use worn down reinforced wheels from larger power tools Wheels intended for a larger power tool are not suitable for the higher speed of a smaller tool and may burst g The outside diameter and the thickness of your acce...

Page 8: ...exposed metal parts of the power tool live and could give the operator an electric shock m Position the cord clear of the spinning accessory If you lose control the cord may be cut or snagged and your hand or arm may be pulled into the spinning wheel n Never lay the power tool down until the accessory has come to a complete stop The spinning wheel may grab the surface and pull the power tool out o...

Page 9: ...ck or torque reaction during start up The operator can control torque reactions or kickback forces if proper precautions are taken b Never place your hand near the rotating accessory Accessory may kickback over your hand c Do not position your body in line with the rotating wheel Kickback will propel the tool in direction opposite to the wheel s movement at the point of snagging d Use special care...

Page 10: ...cut into existing walls or other blind areas The protruding wheel may cut gas or water pipes electrical wiring or objects that can cause kickback ADDITIONAL SAFETY RULES 1 Always wear a dust mask 2 Always wear safety glasses or eye shields when using the WALL CHASER Everyday eyeglasses have only impact resistant lenses they are NOT safety glasses Following this rule will reduce the risk of serious...

Page 11: ...blade jumping and blade breakage 15 Before cutting check the cutting line is free of nails screws etc 16 If possible ensure the work piece is irmly clamped to prevent movement 17 Never stop the cutting blade by applying side pressure to the blade Warning Some dust particles created by power sawing contain chemicals known to cause cancer birth defects or other reproductive harm Some examples of the...

Page 12: ... depending on the ways in which the tool is used dependant on the following examples and other variations on how the tool is used How the tool is used and the materials being cut The tool being in good condition and well maintained The use the correct accessory for the tool and ensuring it is sharp and in good condition The tightness of the grip on the handles and if any anti vibration accessories...

Page 13: ...le insulated This means that all the external metal parts are electrically insulated from the mains power supply This is done by placing insulation barriers between the electrical and mechanical components making it unnecessary for the tool to be earthed Important note Be sure the supply is the same as the voltage given on the rating plate The tool is itted with a two core cable and plug Remove th...

Page 14: ...protection Wear eye protection Wear dust mask Waste electrical products should not be disposed of with household waste Please recycle where facilities exist Check with your Local Authority or retailer for recycling advice yyWxx Manufacturing date code Year of manufacturing 20yy and week of manufacturing Wxx ...

Page 15: ...1500W WALL CHASER 1 2 4 3 5 7 9 16 17 18 19 15 14 13 12 6 10 11 8 ...

Page 16: ...D GUARD 5 CONNECTION TO DUST EXTRACTION 6 GUIDE WHEEL 7 FLANGE CAP LOCK KNOB 8 FLANGE CAP 9 BASE PLATE 10 OUTER FLANGE 11 DISTANCE WASHERS 12 CAP OF CARBON BRUSH ON BOTH SIDES 13 SPINDLE LOCKING BUTTON 14 DIAMOND CUTTING DISC 15 CUTTING DIRECTION 16 AUXILIARY HANDLE 17 CHISEL 18 SPANNER 19 HEX KEY ...

Page 17: ... 30mm Protection class II Weight 4 1kg NOISE INFORMATION A weighted sound pressure LpA 97dB A A weighted sound power LwA 108dB A KpA KwA 3 0dB A Wear ear protection when sound pressure is over 80dB A ACCESSORIES 125mm Diamond disc 2pcs Spanner for screw loosen tighten 1pc Hex key for blade change 1pc Chisel for material removal 1pc Auxiliary handle 1pc ...

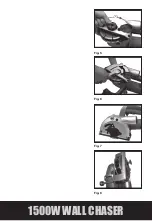
Page 18: ...e Loose the outer lange anticlockwise by the spanner at same time press in the spindle lock button See Fig 2 then take out the distance washers See Fig 3 Make sure the inner lange on the spindle Put the cutting disc and distance washers onto the spindle Place the other cutting disc on the washer See Fig 4 5 Then cover the outer lange and tighten the outer lange fully clockwise by the spanner at sa...

Page 19: ...1500W WALL CHASER Fig 5 Fig 8 Fig 7 Fig 6 ...

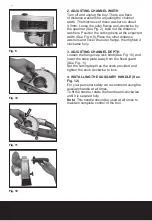
Page 20: ...distance washers and cover the outer lange then tighten it clockwise fully 3 ADJUSTING CHANNEL DEPTH Loosen the lange cap lock knob See Fig 10 and lower the base plate away from the ixed guard See Fig 11 Set the cutting depth as the scale provided and tighten the knob clockwise to lock 4 INSTALLING THE AUXILIARY HANDLE See Fig 12 For your personal safety we recommend using the auxiliary handle at ...

Page 21: ...art the wall chaser irst push the safety button forward then press the On Off switch To turn off the grinder simply release the On Off switch Important note Cutting of channels in materials such as concrete masonry and paving without the use of WATER with a guide wheel 7 REPLACING CARBON BRUSHES See Fig 15 Completely unscrew the cap of carbon brush and pull out the carbon brush Check the length of...

Page 22: ...activated 2 The overheating protection has been activated 1 Re start the machine 2 Wait several minutes until the machine has cooled down and then re start the machine Cutting is dificult and the channel made is irregular The cutting discs are bent or blunt Replace the cutting discs When cutting the workpiece begins to vibrate heavily The cutting discs are overheated or deformed Replace the cuttin...

Page 23: ...the motor ventilation slots clean Keep all working controls free of dust Occasionally you may see sparks through the ventilation slots This is normal and will not damage your power tool If the supply cord is damaged it must be replaced by the manufacturer its service agent or similarly qualiied persons in order to avoid a hazard ENVIRONMENTAL PROTECTION Waste electrical products should not be disp...

Page 24: ...re which is colored blue must be connected to the terminal which is marked with N The wire which is colored brown must be connected to the terminal which is marked with L Warning Never connect live or neutral wires to the earth terminal of the plug Only it an approved 13AMP BS1363 A plug and the correct rated fuse Note If a moulded plug is itted and has to be removed take great care in disposing o...

Page 25: ...2004 108 EC EC Low Voltage Directive 2006 95 EC Restrictions of the Use of Certain Hazardous Substances in Electrical and Electronic Equipment 2011 65 EU Waste Electrical and Electronic Equipment WEEE 2012 19 EU Standards conform to EN 55014 1 EN 55014 2 EN 60745 1 EN 61000 3 2 EN 61000 3 3 Authorised Signatory and technical ile holder Date 04 06 15 Signature Name title Peter Harries Quality Manag...

Page 26: ......

Page 27: ......

Page 28: ......

Reviews: