background image

Epson TM-S9000

 - 9

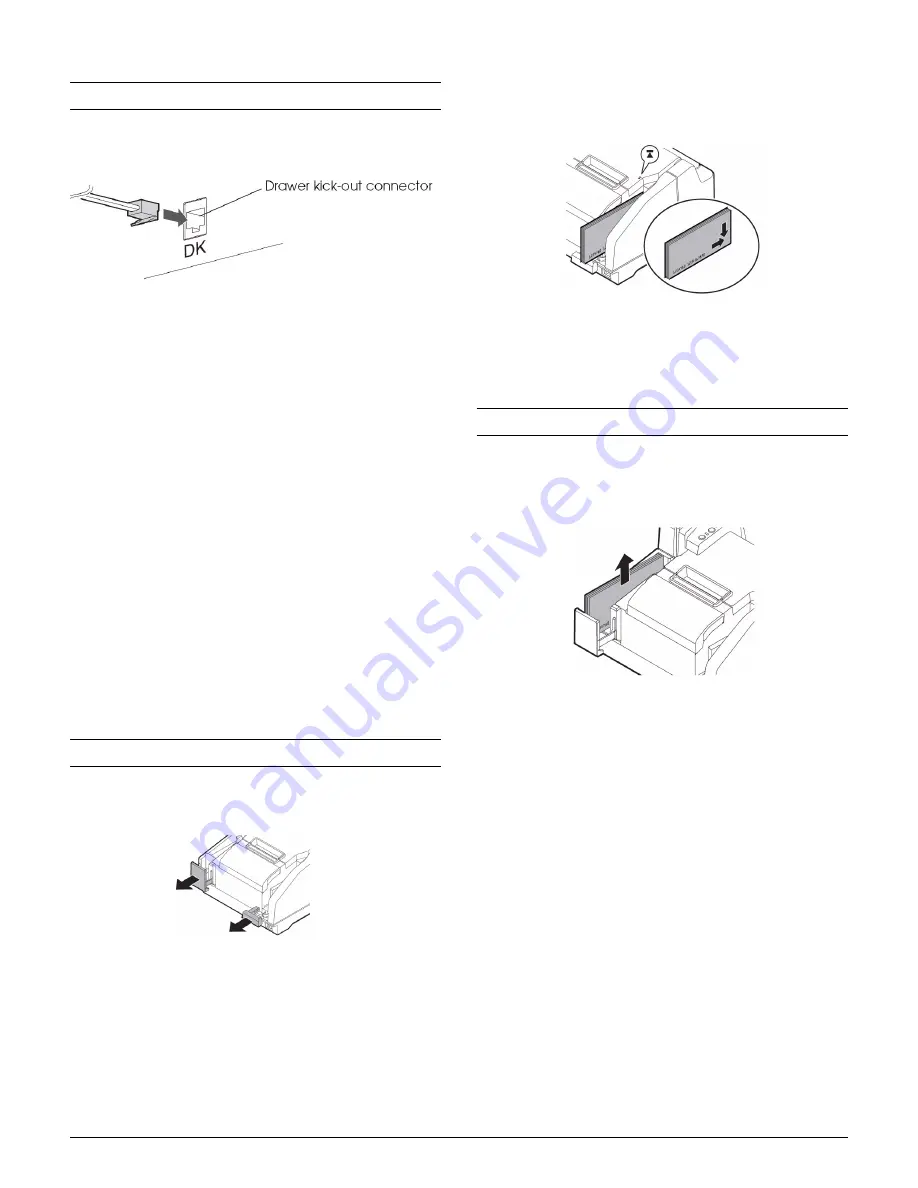
Connecting the Drawer Kick-out Cable

Connect the connector of the drawer kick-out cable to the 
printer.

Specifications of drawers differ depending on makers or 
models. When you use a drawer other than a specified model, 
make sure its specification meets the following conditions, 
otherwise, devices may be damaged.

The load, such as a drawer kick-out solenoid, must be connected 
between pins 4 and 2 or pins 4 and 5 of the drawer kick-out 
connector.

When the drawer open/close signal is used, a switch must be 
provided between drawer kick-out connector pins 3 and 6.

The resistance of the load, such as a drawer kick-out solenoid, 
must be 24 ohm or more or the input current must be 1A or less.

Be sure to use the 24V power output on drawer-kick out 
connector pin 4 for driving the equipment.

Use a shield cable for the drawer connector cable.

Two driver transistors cannot be energized simultaneously.

Leave intervals longer than 4 times the drawer driving pulse 
when sending it continuously.

Be sure to use the printer power supply (connector pin 4) for the 
drawer power source.

Do not insert a telephone line into the drawer kick-out connector. 
This may damage the telephone line or printer.

Loading Sheets (Checks)

1. Fully extend the ASF and pocket guide(s). See the 

illustration below.

2. Make sure the Document LED is flashing.

3. You can insert single-ply paper only. You can put up to 100 

checks in the ASF to be fed automatically.

4. For check scanning and MICR reading, insert checks with 

the MICR characters at the bottom and facing outward.

For printing, insert the sheets with the side to be printed on 
the inside. 

5. Align sheet edges to the bottom right corner and to the 

paper loading mark on the right side of the cartridge cover, 
as shown in the callout bubble below.

6. After loading the sheets, let go of them immediately. 

Feeding starts automatically.

Caution: 

Do not open covers while processing is in progress.

Ejecting Sheets (Checks)

When the checks are ejected, remove them. (For two-pocket 
models, paper may be ejected into the main and sub pockets 
separately, depending on the application.)

Caution: 

Do not overfill pockets with checks (main pocket: 100; sub 

pocket: 50). Otherwise, a paper jam may occur.

Summary of Contents for TM-S9000

Page 1: ...Installing an Ink Cartridge 8 Connecting the Drawer Kick out Cable 9 Loading Sheets Checks 9 Ejecting Sheets Checks 9 Scanning ID Cards 10 Reading Magnetic Stripe Cards Factory Option 10 Check Flow Process 10 Cleaning the Case 10 Cleaning the Print Head 10 Cleaning the MICR Unit 10 Cleaning the Scanner Glass 11 Transporting the TM S9000 11 Troubleshooting 11 Clearing a Jam 11 Roll paper 11 Cut she...

Page 2: ...80 Model M159B also called Adapter J 24 V 7 supplied with TM S9000 Drawer kick out RJ12 modular connector Connects the cash drawer USB 2 0 Type B Plug and play USB HUB Optional Type A Two port USB HUB connector Driver Functions EPSON TM S9000 driver Use this API Application Program Interface to fully use functions of the TM S9000MJ such as the scanner function endorsement printing function cut she...

Page 3: ...ming to ANSI standards 99 at 77 F 25 C for bar codes MICR specifications Supported fonts E13B CMC7 Alphabetic characters not supported Recognition rate 99 at 77 F 25 C using check paper conforming to ANSI ISO standards Checks must be flat without curls folds wrinkles tears staples or clips TM S9000 must not be shaken or jarred during reading Checks must be fed in straight The product should not be...

Page 4: ... friction feed Print speeds text printing with embedded fonts 11 81 sec 300 mm sec 70 9 lps maximum at 1 6 feed page mode printing 11 81 sec 300 mm sec graphics printing monochrome 11 81 sec 300 mm sec ladder bar code two dimensional symbol printing 4 8 sec 124 mm sec graphics printing multi tone 5 91 sec 155 mm sec NV download graphics 2 76 sec 70 mm sec raster graphics Paper feed speed approx 7 ...

Page 5: ...cluding uneven sheets that were folded and straightened out etc Insert the sheets along the bottom of the ASF One pocket model Pocket capacity 100 sheets paper thickness 0 005 0 13 mm Total thickness of all sheets must be 0 51 13 mm including uneven sheets that were folded and straightened out etc Two pocket model Main pocket capacity 100 sheets paper thickness 0 005 0 13 mm Total thickness of all...

Page 6: ...some operations such as powering on off or charging cleaning ink Note Do not turn off the product or open the covers while the Power LED is flashing Error LED Comes on when the product is offline except during a self test or cleaning or when feeding paper using the Feed button Flashes when an error occurs Document LED Comes on when the product is ready to process cut sheet paper in the ASF Auto Sh...

Page 7: ...bble in the illustration below 8 Connect the USB cable to the host Note Do not turn on the unit until you have loaded the necessary drivers 9 Connect the AC cable to the AC adapter then connect the adapter s DC cable to the unit s power supply connector 10 Insert the AC cable plug into a socket Caution Use only the specified AC adapter and never connect to an improper power source 11 Turn on the p...

Page 8: ...artridge Touching the convex part of a used cartridge may stain you Do not open the ink cartridge cover during printing Use only Epson ink cartridges otherwise printer performance is not guaranteed Dispose of used cartridges as industrial waste Follow all applicable laws and regulations 1 Turn on the product 2 Put your finger under the left side of the ink cartridge cover and pull it up to open it...

Page 9: ... Be sure to use the printer power supply connector pin 4 for the drawer power source Do not insert a telephone line into the drawer kick out connector This may damage the telephone line or printer Loading Sheets Checks 1 Fully extend the ASF and pocket guide s See the illustration below 2 Make sure the Document LED is flashing 3 You can insert single ply paper only You can put up to 100 checks in ...

Page 10: ...s in the following order Cleaning the Case 1 Turn off the product by holding the Power button down for 3 seconds After the Power light goes out unplug the AC cord 2 Wipe dirt off the case with a dry cloth or a slightly moistened cloth Caution Never use alcohol benzine thinner or any other solvents Doing so may damage or break parts made of plastic or rubber Cleaning the Print Head When print becom...

Page 11: ... tape over the holes in the cartridge to prevent any leakage 2 Turn off the unit 3 Confirm that the Power LED is off 4 Remove the power supply connector 5 Store pocket guide and the ASF guide inside the product 6 Pack the unit upright Troubleshooting If control panel lights are on or flashing read the information in the tables under Error and Information Codes below If paper or an ID card is jamme...

Page 12: ...ou begin make sure all the covers are closed The nozzle check pattern is only printed on cut sheet paper Paper for the self test must be cut sheets of 2 76 5 98 70 152 mm The self test checks the following functions Control circuit functions Product mechanisms Print quality Control software version Memory switch settings Printing on roll paper 1 Hold down the Feed button while turning on the produ...

Page 13: ...Close roll paper cover or ink cartridge cover Check for a paper jam Fix error and send a recovery command to the printer If problem continues contact your servicer Drive circuit error a The drive circuit thermistor pump driver or image scanner sensor may have a problem Contact your servicer Read write error Problem with read write memory Contact your servicer High voltage error Use an Epson power ...

Page 14: ...s inserted or removed Based on the sensor status the ID Card indicator comes on turns off or flashes Sensor Function Cover sensors Ink cartridge cover sensor Monitors whether the cover is open or closed If the sensor detects a cover open processing stops immediately and the unit goes offline When the cover is closed the unit goes back online Opening a cover during processing MICR reading scanning ...

Reviews: