


Chapter 2 Setup
87
2
Setting for Connected Devices
Follow
t
he s
t
eps below
t
o se
t
for dev
i
ces co
nt
rolled by
t
he TM-L90-
i
pr
int
er by
u
s
ing
EPSON
TMNe
t
WebCo
n
f
ig
.
1
Start up a PC for setting.
2
Connect all the printers to be controlled to the network, and turn them
on.
3
Print a status sheet for each printer.
For how
t
o pr
int
a s
t
a
tu
s shee
t
, see
4
Start up the web browser on the PC for setting, and enter the TM-L90-i
printer’s IP address in the address bar as shown below.
h
tt
p://xxx.xxx.xxx.xxx/Pr
int
erCo
n
f
igu
ra
ti
o
n
Pa
g
e/
EPSON TMNe
t
WebCo
n
f
ig
s
t
ar
t
s.
5
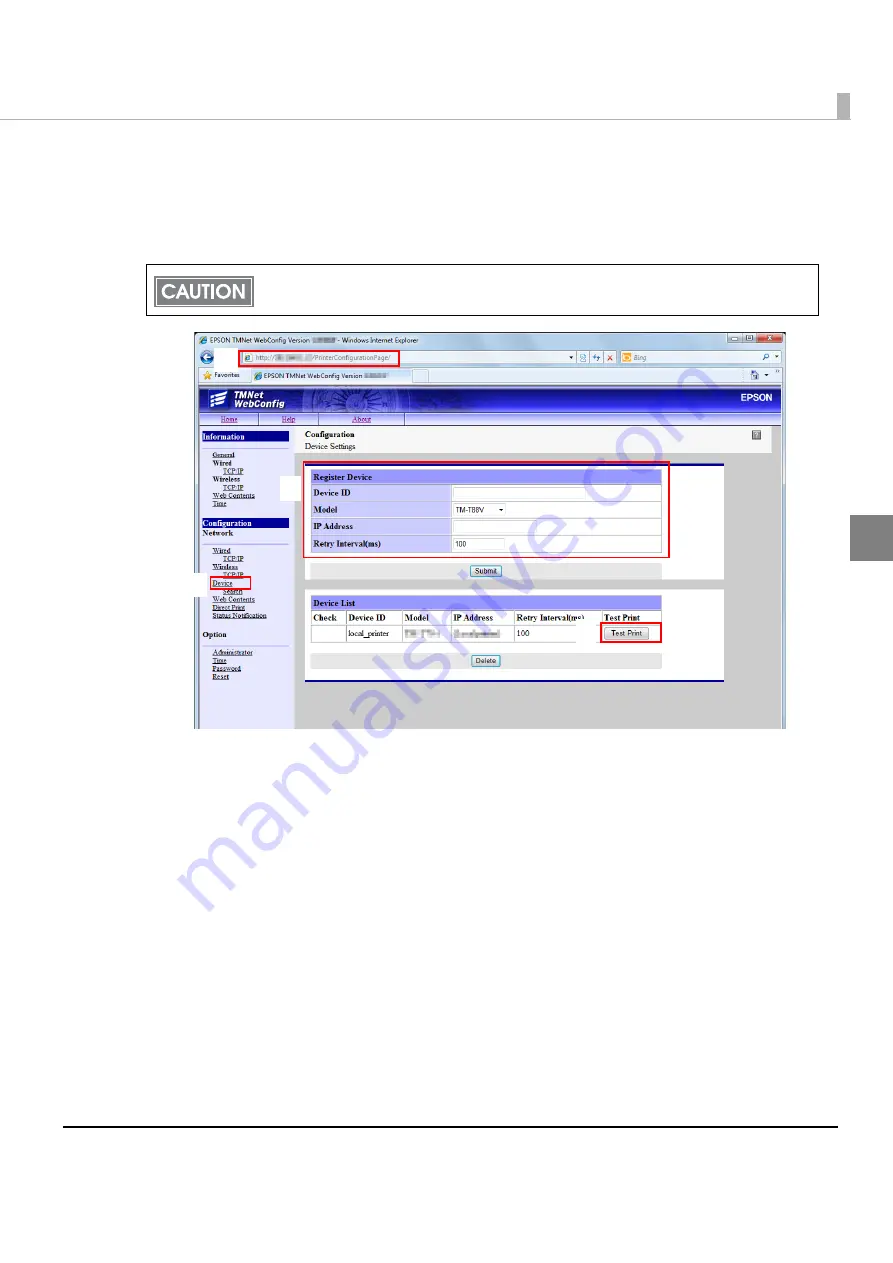
Select [Configuration], and then [Device].
The [Dev
i
ce Se
tting
s] scree
n
appears.
This printer cannot be deleted from a device.
The "device ID" for this printer can be changed.
4
5
6
7
Summary of Contents for TM-L90-i
Page 14: ...14 ...
Page 52: ...52 ...
Page 66: ...66 3 Connect the AC adapter and AC cable AC cable TM T90 i dedicated AC adapter DC 24V DC 5V ...
Page 102: ...102 ...
Page 130: ...130 ...
Page 141: ...Appendix 141 Page 1 Katakana ...
Page 142: ...142 Page 2 PC850 Multilingual ...
Page 143: ...Appendix 143 Page 3 PC860 Portuguese ...
Page 144: ...144 Page 4 PC863 Canadian French ...
Page 145: ...Appendix 145 Page 5 PC865 Nordic ...
Page 146: ...146 Page 16 WPC1252 ...
Page 147: ...Appendix 147 Page 17 PC866 Cyrillic 2 ...
Page 148: ...148 Page 18 PC852 Latin2 ...
Page 149: ...Appendix 149 Page 19 PC858 Euro ...
Page 150: ...150 Page 255 User Defined Page ...


