background image

EPSON Stylus COLOR 800N

10/97

EPSON Stylus COLOR 800N - 11

Printer Care

Cleaning the Print Heads 

If your printed image is unexpectedly light or faint, or dots are 
missing from the image, you may need to clean the print 
heads. This unclogs the nozzles so they can deliver ink 
properly.

Cleaning the print heads uses ink, so clean them only if print 
quality declines. You can clean the print heads in either of the 
following two ways:

With the Head Cleaning utility in your printer software 
(when the printer is on a local port rather than a network)

Using the printer’s control panel buttons

Using the Head Cleaning Utility

Follow these steps to run the utility from a Windows 
computer or a Macintosh:

1. Make sure the printer is turned on but not printing, and the 

B

 black and 

A

 color ink out lights are off.

2. Access the main printer settings dialog box.

3. Click the 

Utility

 tab (Windows) or the 

Utility

 button 

(Macintosh). You see the Utility menu.

4. Click the 

Head Cleaning

 icon.

Caution:
Don’t turn off the printer while the 

power light is 

flashing, unless the printer has not moved or made 
noise for more than 5 minutes.

5. Follow the instructions on the screen to clean one or 

both print heads. Cleaning each head takes about two 
minutes, during which the printer makes some noise and the 

P

power light flashes. 

When the power light stops flashing, you need to run a 
nozzle check.

6. Make sure paper is loaded in the printer and click 

Print 

nozzle check pattern

 (Windows) or 

Confirmation


(Macintosh).

If your print quality has not improved, repeat the steps above.

Using the Control Panel To Clean the Print Heads

Follow these steps to clean the print heads using the control 
panel buttons:

1. Make sure the printer is turned on and not printing, and that 

the 

B

 black and 

A

 color ink out lights are off. 

2. Open the printer cover.

3. Press the 

Y

 black or 

X

 color cleaning button and hold it for 

three seconds. Cleaning takes about two minutes, during 
which the printer makes some noise and the 

P

power light 

flashes. 

4. When the 

P

power light stops flashing, repeat step 2 for the 

other print head if necessary. 

After you’re finished cleaning and the 

P

power light stops 

flashing, you need to run a nozzle check. 

5. Access the main printer settings dialog box.

6. Click the 

Utility

 tab (Windows) or the 

Utility

 button 

(Macintosh). You see the Utility menu.

7. Click the 

Nozzle Check 

icon

See the next section for 

instructions on examining the nozzle check pattern.

If your print quality has not improved, repeat the steps above.

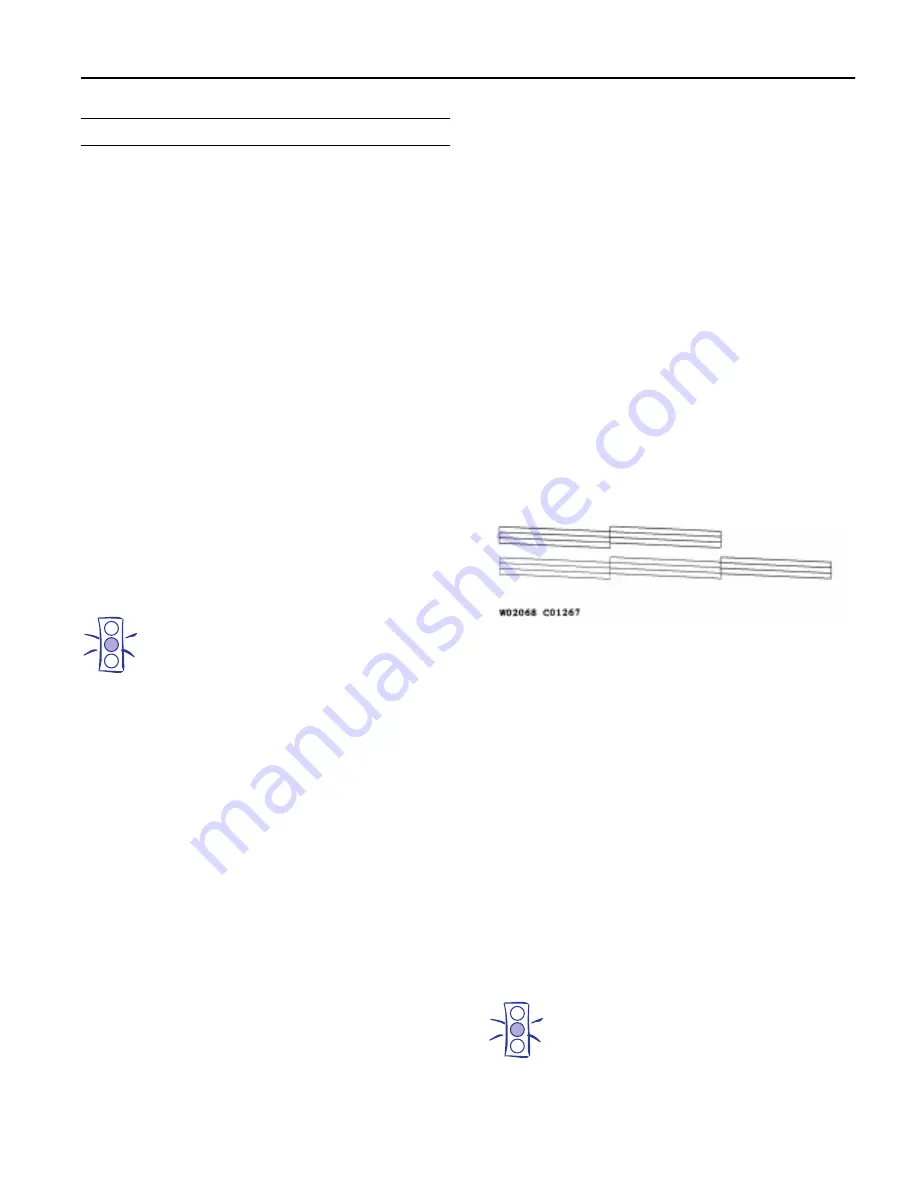
Examining the Nozzle Check Pattern

Examine the nozzle check pattern you print after cleaning the 
print heads. It should look something like this, with the lower 
pattern colored cyan, magenta, and yellow:

Each staggered horizontal and straight vertical line should be 
complete, with no gaps in the dot pattern. If your printout 
looks okay, you’re done. If any dots are missing, clean the 
print heads again, as explained in the previous sections.

Aligning the Print Heads 

If your printouts contain misaligned vertical lines, you may 
need to align the print heads. You can align the print heads in 
either of the following two ways:

With the Print Head Alignment utility in your printer 
software (when the printer is on a local port rather than a 
network)

Using the printer’s control panel buttons

Using the Print Head Alignment Utility

Follow these steps to run the utility from a Windows 
computer or a Macintosh:

1. Make sure the printer is turned on and paper is loaded.

Caution:
Load paper that’s at least 8.27 inches (210 mm) wide. 
This prevents ink from spraying inside the printer and 
smudging your printouts.

Summary of Contents for Stylus Color 800N

Page 1: ...ilable in 10 12 and 15 cpi You can select other font pitch combinations using ESC P commands Scalable fonts EPSON Roman EPSON Sans Serif EPSON Roman T EPSON Sans Serif H All scalable fonts are available in sizes from 8 to 32 points in 2 point increments and four styles normal bold italic and bold italic The printer always uses the fonts you select with your software application You need to use the...

Page 2: ...ht Single Sheets Letter 8 5 11 inches A4 210 297 mm A5 148 210 mm B5 182 257 mm Legal 8 5 14 inches Half letter 5 5 8 5 inches Executive 7 5 10 inches Plain paper and special ink jet papers distributed by EPSON 0 003 to 0 004 inch 0 08 to 0 11 mm 17 to 24 lb 64 to 90 g m2 use 24 lb 90 g m2 paper under normal temperature and humidity conditions Transparencies and glossy media Letter 8 5 11 inches A...

Page 3: ...ink faster The ink thaws and is usable after approximately 3 hours at 77 F 25 C Caution To ensure good results use genuine EPSON cartridges and do not refill them Other products may cause damage to your printer not covered by EPSON s warranty Do not use an ink cartridge after the expiration date on the package A B L B R C A B R C B L Envelope Single sheet Specification Black ink cartridge S020108 ...

Page 4: ... 2 950 with D3 EMC FCC part 15 subpart B class B CSA C108 8 class B DOS Support If driver support for the EPSON Stylus COLOR 800 is not available from your software manufacturer you can use one of the other EPSON ESC P 2 printer drivers Choose the first printer available from the following two lists Black printing only LQ 870 1170 LQ 570 1070 SQ 870 1070 LQ 850 LQ 500 Color and black printing EPSO...

Page 5: ...d off 2 Disconnect the interface cable from the printer 3 Make sure paper is loaded in the feeder 4 Press the E load eject button and hold it down while you press the Ppower button Continue to hold the buttons until the Ppower light starts to flash The printer prints a nozzle check pattern and samples of fonts and colors 5 To end the test turn off the printer power button load eject button color c...

Page 6: ...rk information You need the status sheet information to configure your card Follow these steps 1 Make sure the printer is turned on and has paper in the feeder 2 Press the status sheet button to print out the status sheet Replacing an Ink Cartridge When a B black or A color ink out light flashes the indicated cartridge is low on ink This is a good time to make sure you have a new cartridge When th...

Page 7: ...return to their home position if you don t proceed to step 4 within 60 seconds 4 Pull up the ink cartridge clamp Although the illustration shows the black ink cartridge the procedure is the same for replacing the color ink cartridge Caution Don t open the clamp or remove a cartridge except to replace it with a new one Once you remove a cartridge you can t reuse it even if it contains ink The cartr...

Page 8: ...that your printouts don t look as good as they used to If print quality doesn t improve after cleaning and aligning the print heads you can replace one or both cartridges Follow these steps to replace an ink cartridge before the B black or A color ink out light is flashing or on 1 Make sure the printer is turned on and not printing 2 Lower the output tray and raise the printer cover Then locate th...

Page 9: ... paper don t load it more than half way to the arrow mark EPSON Photo Quality Glossy Paper Film and Transparencies Before you load glossy media or transparencies put a support sheet packed with the media or a plain paper sheet beneath the stack You can load up to 20 sheets of glossy paper and up to 30 sheets of glossy film or transparencies Note Use ink jet papers within one year of purchase Use g...

Page 10: ...per thickness lever to the position as shown above You can load up to 30 cards at a time Always place the included support sheet under the cards When you re ready to print use your software to set the Paper Size option for the size card you re using EPSON Photo Quality Self Adhesive Sheets Use these sheets to print labels or stickers You can load one sheet at a time EPSON Iron On Transfer Paper No...

Page 11: ...inter is turned on and not printing and that the B black and A color ink out lights are off 2 Open the printer cover 3 Press the Y black or X color cleaning button and hold it for three seconds Cleaning takes about two minutes during which the printer makes some noise and the Ppower light flashes 4 When the Ppower light stops flashing repeat step 2 for the other print head if necessary After you r...

Page 12: ...imes a year following these steps Caution Don t touch the gears inside the printer Never use alcohol or thinner for cleaning they can damage the printer components and case Don t use a hard or abrasive brush Don t get water on the printer components Don t spray lubricants or oils inside the printer 1 Turn off the printer unplug the power cord and disconnect the printer cable 2 Remove all the paper...

Reviews: