background image

1

/

Introduction

Your 

EPSON 600Q for Compaq Presario

 printer is the ideal 

output device for business graphics, single-page layout 
proofs, digital photography—or any project you create on 
your computer. With resolutions up to 1440 by 720 dots per 
inch (dpi), you get amazingly realistic photographic images 
and vivid graphics in color, superb grayscale images, and 
razor-sharp black printing for crisp text and detailed line art.

The 

EPSON

®

 printer software for Microsoft

®

 Windows

®


provides advanced color management, with adjustable levels 
of brightness, contrast, saturation, and ink colors. Support for 
Windows Image Color Matching (ICM) ensures printouts 
that match the colors on your monitor.

You can also perform many printer maintenance procedures 
right from your computer, such as cleaning and aligning the 
print heads. And 

EPSON

’s extensive online help can guide 

you through printer operations in real time.

With a standard parallel port, setting up your printer is fast 
and easy. 

EPSON

’s specially formulated ink cartridges and 

wide variety of ink jet papers give you the best quality output 
and offer the most flexibility for getting the results you want.

Summary of Contents for Stylus Color 600Q

Page 1: ...User s Guide Printed on recycled paper with at least 10 post consumer content ...

Page 2: ...rinter cover edge guides paper support extension paper support control panel output tray extensions cleaning button paper light power button load eject button black ink out light color ink out light output tray adjust lever ...

Page 3: ...zed modifications repairs or alterations to this product or excluding the U S failure to strictly comply with SEIKO EPSON CORPORATION s operating and maintenance instructions SEIKO EPSON CORPORATION shall not be liable for any damages or problems arising from the use of any options or any consumable products other than those designated as Original EPSON Products or EPSON Approved Products by SEIKO...

Page 4: ...antenna Increase the separation between the equipment and receiver Connect the equipment into an outlet on a circuit different from that to which the receiver is connected Consult the dealer or an experienced radio TV technician for help WARNING The connection of a non shielded equipment interface cable to this equipment will invalidate the FCC Certification of this device and may cause interferen...

Page 5: ...iv ...

Page 6: ...rinting Printing from Windows 1 1 Setting Printer Options from Windows Applications 1 2 Setting Default Printer Options 1 4 Checking Printer Status 1 6 Printing from DOS 1 7 Choosing Paper and Other Media 1 8 What To Do When the Printer Lights Flash 1 9 Using the Control Panel Buttons 1 10 Using Online Help 1 10 Accessing Online Help from Windows Applications 1 10 Accessing Online Help from Window...

Page 7: ...ty and Photo Quality Ink Jet Paper 3 3 EPSON Photo Quality Glossy Paper Film and Transparencies 3 4 Envelopes 3 5 EPSON Photo Quality Ink Jet Cards 3 6 EPSON Iron On Transfer Paper 3 6 EPSON Photo Quality Self Adhesive Sheets 3 6 Printing Banners and Other Custom Size Projects 3 7 Printing a Banner 3 8 4 Managing Print Jobs and Network Printing Managing Print Jobs 4 1 Using the Spool Manager 4 2 U...

Page 8: ...ng Diagnosing Problems 6 1 Running a Printer Check 6 2 Improving Print Quality 6 3 Printed image has horizontal banding 6 3 Vertical lines are misaligned or vertical banding appears 6 4 The printed image has incorrect or missing colors 6 4 The printed image is faint or has gaps 6 5 The printed image is blurry or smeared 6 5 Photographic images look grainy or rough 6 6 Color documents print in blac...

Page 9: ...95 New Hardware Found window 6 9 You see a spooling error message Windows 6 9 In Windows 95 the Status Monitor box does not appear with the Despooler 6 9 Printing is too slow 6 9 Fixing Paper Problems 6 10 Paper doesn t feed 6 10 Multiple pages feed at the same time 6 11 Paper jams inside the printer 6 11 Paper doesn t eject fully or is wrinkled 6 11 Solving Miscellaneous Printout Problems 6 12 Ch...

Page 10: ...ations Printing A 1 Paper A 3 Ink Cartridge A 5 Mechanical A 5 Electrical A 6 Environmental A 6 Safety Approvals A 6 Interface A 6 Default Settings A 8 Built in Fonts and Character Tables A 8 Command List A 9 Glossary Index ...

Page 11: ...rovides advanced color management with adjustable levels of brightness contrast saturation and ink colors Support for Windows Image Color Matching ICM ensures printouts that match the colors on your monitor You can also perform many printer maintenance procedures right from your computer such as cleaning and aligning the print heads And EPSON s extensive online help can guide you through printer o...

Page 12: ... have a D SUB 25 pin male connector for your computer and a 36 pin Centronics compatible connector for the printer To use the EPSON Answers online guide you need at least a 486 33 processor and a 2x CD ROM drive 4x or faster recommended You also should have at least 20MB of free disk space for full program installation or at least 8MB of free disk space to run EPSON Answers from the CD For more de...

Page 13: ... Maintenance and Transportation gives instructions for replacing ink cartridges cleaning and aligning the print heads and cleaning and transporting the printer Chapter 6 Troubleshooting provides solutions for any printing problems you may have The Appendix Specifications provides the technical details on your printer ink cartridges and EPSON media A Glossary and an Index are included at the end of...

Page 14: ...peration of EPSON products Customer relations For answers to commonly asked questions about EPSON products 24 hours a day seven days a week call EPSON Sound Advice at 800 442 2110 You can purchase manuals accessories or parts from EPSON Accessories at 800 873 7766 U S sales only If you need help using software with an EPSON product see the documentation for that program for technical support infor...

Page 15: ... technical information library by calling 800 442 2110 and selecting the appropriate phone option You must provide a return fax number to use FaxAdvice EPSON Forum on CompuServe Members of CompuServe can type GO EPSON at the menu prompt to reach CompuServe s Epson America Forum As an owner of an EPSON product you are eligible for a free introductory CompuServe membership which entitles you to an i...

Page 16: ...rgy wise If your monitor isn t ENERGY STAR compliant turn it off when you re not using it Turn off your computer printer and monitor each day when you are done using them Use the print preview option in your software so you can catch errors before you print something Send e mail rather than distributing memos Not only is this faster but you ll save paper and storage space too Important Safety Inst...

Page 17: ...t let the power cord become damaged or frayed If you use an extension cord with the printer make sure the total ampere rating of the devices plugged into the extension cord does not exceed the cord s ampere rating Also make sure the total of all devices plugged into the wall outlet does not exceed 15 amperes Except as specifically explained in this User s Guide do not attempt to service the printe...

Page 18: ... the clamp or remove the cartridge except to replace it with a new one The cartridge may become unusable otherwise Install the ink cartridge immediately after you remove it from its package Leaving the cartridge unpacked for a long time before use may result in reduced print quality Do not use an ink cartridge beyond the date printed on the cartridge carton For best results use up the ink cartridg...

Page 19: ...ing the control panel buttons Using online help Printing from Windows When you want to print from your Windows application you click the print icon or choose Print from the File menu You can then choose which pages to print the number of copies and other options The settings that describe your print job whether you want to use color or black ink for example are part of your printer driver software...

Page 20: ... settings you change most often including the number of copies and the pages you want printed 2 Be sure your EPSON 600Q printer is selected and then click the Printer Setup Properties or Options button You may have to click a combination of these buttons You see a dialog box like the following Note The settings you select through your Windows application apply only until you exit that application ...

Page 21: ...rencies The type of media you choose determines the print quality or resolution you can use 6 Choose Color or Black ink If you are printing black text a draft or if you want colors to print as varying shades of gray select Black for faster printing 7 Set the slider to Quality or Speed This lets you choose between the highest resolution or the fastest printing for the media you re using The slider ...

Page 22: ...ter Status on page 1 6 for more information Setting Default Printer Options When you change printer settings through your software application the settings apply only to the application you re using If you want to adjust the default settings for all your Windows applications you can access the dialog box through the Windows 95 Settings option or the Windows 3 1 Control Panel Make sure all your sof...

Page 23: ...click OK Any changes you make will become the default settings for all your applications and documents Setting Default Options in Windows 3 1 Follow these steps 1 Double click the Control Panel icon in the Main group 2 Double click the Printers icon 3 Select EPSON 600Q from the list of printers and click Setup You see the Main printer settings dialog box as shown on page 1 2 4 Change the settings ...

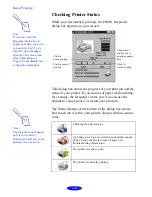
Page 24: ...cons Note If you don t want the Despooler dialog box to appear each time you print you can turn it off To do this start Spool Manager open the View menu and select Show Despool Popup the checkmark next to the option disappears The name of the file you re printing appears here Click to pause printing Click to cancel printing Click to restart printing Note The Status Monitor appears only if you re u...

Page 25: ...Basic Printing 1 7 The ink level is low or empty check the Bor Aink out light on the printer control panel and replace the cartridge if necessary ...

Page 26: ...software If EPSON 600Q is not included in the list contact your software manufacturer to obtain updated software If updated software is not available pick the first printer available in the lists below When printing black and color select EPSON Stylus Pro EPSON Stylus COLOR 500 EPSON Stylus COLOR II LQ 860 LQ 2550 When printing black only select LQ 870 1170 LQ 500 LQ 570 1070 SQ 870 1070 LQ 850 No...

Page 27: ...ct your dealer or call EPSON Accessories at 800 873 7766 U S sales only In Canada please call 800 873 7766 for dealer referral Media name Size Part number EPSON 360 dpi Ink Jet Paper A4 Letter S041059 S041060 EPSON High Quality Ink Jet Paper Letter S041111 EPSON Photo Quality Ink Jet Paper A4 Letter Legal S041061 S041062 S041067 EPSON Photo Quality Glossy Paper A4 Letter S041126 S041124 EPSON Phot...

Page 28: ...e and Transportation for instructions B A When an ink light flashes your ink supply is low Make sure you have a replacement cartridge S B A When the paper light flashes and the ink out lights are on you have a paper jam Turn off the printer and gently pull out all jammed paper Reload the paper then press the Eload eject button P The power light is on when the printer is on The power light flashes ...

Page 29: ...leshooting for more information P Turns the printer on and off Resets the printer clears its memory if pressed twice within 10 seconds while the power is on E Loads or ejects paper if pressed and released within two seconds Resumes printing if pressed after a paper out error is corrected R Moves the print head to the replacement position if pressed for about three seconds while the Bor Aink out li...

Page 30: ...en the File menu and choose Print or Print Setup Then click Printer Setup Options or Properties you may need to click a combination of these buttons depending on the software you are using Click the Help button at the bottom of the dialog box for help related to the items on that dialog box Then select a help topic ...

Page 31: ...how to use help read the online Quick Guide to Using Help While you re using the printer driver you can get specific help related to any item in the menus by right clicking the item and then clicking the What s This prompt Accessing Online Help from Windows 3 1 To access online help from Program Manager open the EPSON program group and click the EPSON 600Q Help icon If you need instructions for ho...

Page 32: ...ows 95 This chapter includes the following information Using predefined advanced settings Customizing print quality and special effects Customizing color settings Saving custom settings Deleting custom settings Using Predefined Advanced Settings Predefined settings provide an easy way to fine tune your printer s operation for special projects Follow these steps to print with predefined settings 1 ...

Page 33: ...n the image Text Graph For printing graphics intensive documents like presentation pages with charts and graphs Intensifies colors and lightens the midtones and highlights Note When you use advanced settings the Quality Speed slider disappears Always choose your Ink setting before you select a project setting from the Customs Settings list Selecting Video Digital Camera or ICM automatically sets t...

Page 34: ... Click OK then click any other buttons that your application uses for printing Customizing Print Quality and Special Effects If you need the maximum control over your project or you want to experiment with special effects you can adjust individual settings in your printer software Follow these steps 1 Create your document image or project in your application software 2 Access the Main printer sett...

Page 35: ...1440 dpi For the highest resolution output on photo quality media only 5 Choose the Media Type and Ink settings you want to use following the guidelines in Chapter 1 Basic Printing and Chapter 3 Printing on Special Media Note The Print Quality is selected automatically depending on the current Media Type If you choose a Print Quality setting that is not appropriate for your media the driver change...

Page 36: ...ght horizontal lines Always use for color printing High Speed For fast bidirectional printing at lower quality Flip Horizontal Prints a mirror image of your document Use for printing with iron on transfer paper When you iron the printout onto a T shirt or other item it will read correctly Finest Detail For printing text graphics and line art with very sharp edges Slows print speed and increases yo...

Page 37: ...s the More Settings dialog box as described on page 2 3 The color settings appear on the right side of the dialog box as shown 2 Choose one of the following Color Adjustment Modes Automatic Analyzes the color information in your project and optimizes color correction accordingly Photo realistic For printing color photographs For more information about working with color see the EPSON Answers Color...

Page 38: ...age Saturation Makes colors more vivid or less vivid Cyan Magenta Yellow Increases or decreases the amount of the three ink colors that combine to make a full color picture Use to fine tune the color balance in your printout 4 For even more fine tuning choose Video Digital Camera or ICM Windows 95 only Video Digital Camera Use for printing images captured from a digital camera or video Increases c...

Page 39: ...gs the next time you print a similar project Follow these steps 1 Customize your printer settings as described in this chapter 2 Click the Save Settings button on the Main printer settings dialog box You see the following dialog box 3 Type a unique name for your settings up to 16 characters and click the Save button The name you choose will now be available on the Main printer settings dialog box ...

Page 40: ...mized settings follow these steps to delete them 1 Select Advanced mode and the document type in the Custom Settings drop down list 2 Click Save Settings 3 Select the document type in the Custom Settings box and click Delete You cannot delete any of the predefined document types ...

Page 41: ...a designed for ink jet printers ranging from transparencies to iron on transfer paper You can even set up your printer to use custom paper sizes to print large posters and banners This chapter covers the following Using special media Printing banners and other custom size projects Using Special Media When you print on special media you need to be careful about choosing the correct Media Type and P...

Page 42: ...ing EPSON Photo Quality Ink Jet Cards EPSON 720 dpi Index Cards EPSON Photo Quality Self Adhesive Sheets EPSON Photo Quality Glossy Paper Photo Quality Glossy Paper EPSON Photo Quality Glossy Film Photo Quality Glossy Film EPSON High Quality Glossy Paper EPSON Iron On Transfer Paper EPSON Ink Jet Transparencies Ink Jet Transparencies Note If the corresponding Media Type option for your paper is no...

Page 43: ...tensions Don t load it more than half way to the arrow mark on the left edge guide EPSON 360 dpi High Quality and Photo Quality Ink Jet Paper You can load paper up to the arrow mark on the left edge guide If you use legal size ink jet paper don t load it more than half way to the arrow mark Caution Don t use the cleaning sheets that may be included with your special media they may damage the print...

Page 44: ...lossy paper 30 sheets of glossy film or 10 transparencies However you may get better results by loading one sheet at a time With multiple sheets loaded the minimum top margin you can use is 1 2 inches If you want to use a smaller top margin load and print one sheet at a time Remove each sheet from the output tray immediately after it s printed Make sure each sheet is dry before stacking it Note Us...

Page 45: ... set the adjust lever to the position Open the printer cover and position the lever as shown below Then close the cover and print Make sure you return the lever to the 0 position before you print on thin media Note Be sure to load the envelope flap edge first and printable side up In the printer driver set the Paper Size to the correct envelope size ...

Page 46: ...mpany logos or anything else you want on this paper and then transfer your images to T shirts or other cloth items Load one sheet of transfer paper at a time After you print follow the instructions that came with the paper to iron the image onto the shirt or other item EPSON Photo Quality Self Adhesive Sheets Use these sheets to print labels or stickers You should load these media one sheet at a t...

Page 47: ...e size feature of your printer software 1 To make a 44 inch banner with continuous form computer paper first tear off four sheets and remove the perforations at the edges If you are using banner paper cut the paper to the length you want for easier handling 2 Insert the paper in the printer as shown The right edge of the paper should be against the right edge guide 3 Slide the left edge guide next...

Page 48: ...tup from the File menu You see a printing dialog box 3 Make sure your printer is selected and then click the Printer Setup Properties or Options button You may have to click a combination of these buttons You see the Main printer settings dialog box as shown on page 1 2 4 Click the Paper tab You see a dialog box like the following 5 Choose the paper you want to use from the Paper Size list If you ...

Page 49: ...hoose Portrait or Landscape if you haven t already specified the orientation in your application software Set the printable area if necessary 8 Click the Main tab to return to the Main printer settings dialog box Make sure you choose Plain paper and the other settings you want to use and then click OK 9 Click Close OK or Print to print your banner You may need to click a combination of these butto...

Page 50: ... the Spool Manager and Status Monitor The Spool Manager starts automatically when you send a job to the printer It allows you to print in the background while you continue to work on your computer and to hold jobs to print at a later time If you re using your printer on a network it also handles multiple print jobs that come in at the same time The Status Monitor which is available only if you re ...

Page 51: ...icon in the EPSON program group or folder You see the Spool Manager window The Spool Manager window displays the status of your print queues and journal files and lets you control them Here are some of the things you can do Hold or release a queue Send journal files to your printer over a network Hold re queue or delete a journal file Select the information you want to see in the Spool Manager win...

Page 52: ...try changing your default spool directory Follow these steps 1 Make a directory on your hard disk where you want Spool Manager to store journal files for example C SPLTEMP 2 Open the Spool Manager as described on page 4 2 3 Choose Default Spool Directory from the Options menu 4 In the dialog box change the spool directory to the one you created in step 1 Then click OK 5 Make sure EPSON 600Q is sel...

Page 53: ...displays automatically when you send a job to the printer However you can use it at any time to see how much ink you have left Follow these steps 1 Access the Main printer settings dialog box as described on page 1 2 2 Click the Utility tab You see the Utility menu For information about these three utilities see Chapter 5 Maintenance and Transportation ...

Page 54: ...r sends journal files from your computer to a shared directory on a network server These files can then be printed from another computer attached to the printer First you need to install the EPSON 600Q printer software on each computer that is going to print on the network Then run Spool Manager and identify the shared directory to use for journal files After you set this up on the system connecte...

Page 55: ...onnected to the printer Follow these steps 1 Double click My Computer 2 Double click the Printers folder 3 Right click the EPSON 600Q icon and choose Properties 4 Click the Details tab The following dialog box appears 5 Click the Add Port button then specify the network path to the printer and click OK 6 Open the Spool Manager window by double clicking the Spool Manager4 icon in the EPSON program ...

Page 56: ... click the queue you want to use for network printing The Queue Setup dialog box appears 3 Click the Spool to remote printer button 4 Click the Browse button 5 Select the remote server directory that will receive journal files and click OK 6 On remote systems open the Spool Manager window as described on page 4 2 7 In the Spool Manager window double click the queue you want to use for network prin...

Page 57: ...the print heads Cleaning the printer Transporting the printer Cleaning the Print Heads If your printed image is unexpectedly light or faint or dots are missing from the image you may need to clean the print heads This unclogs the nozzles so they can deliver ink properly Cleaning the print heads uses ink so clean them only if print quality declines You can use either of the following to clean the p...

Page 58: ...oise and the Ppower light flashes When the Ppower light stops flashing you need to run a nozzle check to check the print quality and reset the cleaning cycle 6 Make sure paper is loaded in the printer and click Print nozzle check pattern See page 5 4 for instructions on examining the nozzle check pattern If your print quality has not improved repeat the steps above If you don t notice any improvem...

Page 59: ...e is complete and the Ppower light stops flashing you need to run a nozzle check to check the print quality and reset the cleaning cycle 3 Access the Main printer settings dialog box as described in Chapter 1 4 Click the Utility tab You see the Utility menu 5 Click the Nozzle Check icon See the next section for instructions on examining the nozzle check pattern If your print quality has not improv...

Page 60: ...ure you have a new cartridge When the light stays on the cartridge is empty and you need to replace it Use these EPSON ink cartridges within six months of installing them and before the expiration date on the package Black ink cartridge S020093 Color ink cartridge S020089 When you need new ink cartridges contact your dealer or call EPSON Accessories at 800 873 7766 U S only In Canada please call 8...

Page 61: ...artridge clamp The cartridge rises up from its holder Although the illustration shows the color ink cartridge the procedure is the same for replacing the black ink cartridge 6 Lift the cartridge out of the printer and dispose of it carefully Caution If you press the R cleaning button when no ink out light is flashing or on the printer cleans the print heads as described on page 5 9 If you need to ...

Page 62: ...rtridge into its holder with the label facing up and the arrow pointing to the back of the printer The larger cartridge color goes on the right the black ink cartridge on the left Warning If ink gets on your hands wash them thoroughly with soap and water If ink gets into your eyes flush them immediately with water Caution You must remove the tape seal from the top of the cartridge leaving the tape...

Page 63: ...nds Charging takes about two minutes When it s finished you can print again Replacing an Outdated Ink Cartridge If an ink cartridge is more than six months old you may need to replace it How can you tell You may notice that your printouts don t look as good as they used to If print quality doesn t improve after cleaning and aligning the print heads you can replace one or both cartridges Caution Do...

Page 64: ...printer cover 3 Press the Eload eject button and hold it down for a few seconds until the print heads move to the left 4 Pull up the ink cartridge clamp The cartridge rises up from its holder 5 Lift the cartridge out of the printer and dispose of it carefully 6 Follow the steps in the previous section Installing the New Cartridge to install the new ink cartridge Caution To avoid damaging the print...

Page 65: ... several times a year following these steps 1 Turn off the printer unplug the power cord and disconnect the printer cable 2 Remove all the paper from the sheet feeder 3 Carefully clean away dust and dirt with a soft damp cloth 4 Clean the exterior of the printer with a soft damp cloth Keep the printer cover closed so water doesn t get inside 5 Clean ink out of the printer s interior with a soft da...

Page 66: ...ter 3 Remove any paper from the sheet feeder and remove the paper support 4 Push in the output tray extensions and close the tray 5 Repack the printer and attachments in the original box using the protective materials that came with it See the Notice Sheet that was packed with the printer Be sure to keep the printer flat as you transport it If you notice a decline in print quality after transporti...

Page 67: ...following Diagnosing problems Improving print quality Solving printing problems Fixing paper jams and other paper problems Solving miscellaneous printout problems Diagnosing Problems Your printer includes a number of ways to help you diagnose problems To identify the most common problems check the lights on the printer s control panel See What To Do When the Printer Lights Flash on page 1 9 You ca...

Page 68: ...lem with your printer See the suggestions in this chapter for possible solutions Follow these steps to check the printer 1 Make sure both the printer and computer are turned off 2 Disconnect the interface cable from the printer 3 Make sure paper is loaded in the printer 4 Hold down the Eload eject button and press the Ppower button to turn on the printer Then release both buttons The printer print...

Page 69: ...ctions Here are some detailed solutions to specific print quality problems Printed image has horizontal banding Possible cause Solution The Media Type setting doesn t match the loaded paper Make sure the Media Type setting matches the loaded paper or other media Then the printer software can automatically select other settings for the best quality See Chapters 1 and 3 The printable side of the pap...

Page 70: ...tructions The Halftoning and Color Adjustment Mode options are set incorrectly for your document type Use the correct settings for the project you are printing following the instructions in Chapter 2 The print head nozzles are clogged Clean the print heads See Chapter 5 for instructions The ICM Windows 95 settings are incorrect for your document Use the Automatic mode setting or choose a different...

Page 71: ...special media loading instructions in Chapter 3 and on the paper packaging for media that require support sheets Also try loading your media one sheet at a time You tried to print on cardboard or other nonrecommended media Make sure your paper or media meets the specifications listed in the Appendix If your printouts are still blurry after you change paper clean the print heads as described in Cha...

Page 72: ...e cause Solution The print heads are misaligned Run the Print Head Alignment utility See Chapter 5 for instructions The resolution of your image may be too low Increase the image resolution using your image editing software or decrease the size of the image Possible cause Solution Your printer is not selected in your application Select your printer and port in your software application Color print...

Page 73: ... a lower resolution for your monitor Add more memory to your computer Printing is stalled in Spool Manager Delete the stalled print jobs in Spool Manager and resume printing see Chapter 4 for instructions The print heads are clogged or the ink cartridges are too old 6 If the printer sounds like it s trying to print but doesn t feed paper clean the print heads see Chapter 5 for instructions If clea...

Page 74: ...tructions on the Notice Sheet in the box An internal error may have occurred Turn off your printer wait a few seconds and turn it on again If the lights still flash or stay on contact EPSON as described in the Introduction Possible cause Solution The ink cartridge clamp isn t locked down Press down on the clamp to lock it into place Packing material remains in the printer Remove the packing materi...

Page 75: ...ion The Windows Print Manager is interfering with the Status Monitor Make sure Use Print Manager for this port is not checked in the Spool Manager Queue setup Then check your bidirectional spool settings See Chapter 4 for instructions Possible cause Solution Your printer software options are set incorrectly For faster printing try the following Set Print Quality to Economy Turn MicroWeave off Turn...

Page 76: ...n t curled or creased Isn t too old see Chapter 3 or your paper packaging for more information Isn t loaded above the arrow on the left edge guide Isn t jammed inside the printer If the S paper out light is flashing paper is jammed Then reload the paper as described in Chapter 3 making sure the left edge guide is adjusted to fit the paper s width Try this Then do this Remove the stack of paper Mak...

Page 77: ... you may have set the wrong paper size Press the E load eject button to eject the paper Then make sure you select the correct paper size in your application or printer software See the paper specifications in the Appendix for the paper sizes you can print with If it s wrinkled when it comes out the paper may be damp or too thin See the paper specifications in the Appendix for paper thicknesses you...

Page 78: ...e See Chapter 1 for more information Possible cause Solution You used a Flip Horizontal option in your application software or the printer software Turn off the Flip Horizontal or mirror setting in your application software or the printer software See Chapter 2 for information Possible cause Solution Your printer is not the Windows default printer Select your printer as the default Windows printer...

Page 79: ...l code ESC P 2 and expanded raster graphics code Line spacing 1 6 inch 1 8 inch or programmable in 1 360 inch increments Paper feed speed 66 6 milliseconds per 1 6 inch line Input buffer 32KB Specifications Character mode Character pitch characters per inch Printing column Draft speed LQ printing speed 10 80 400 cps 200 cps 12 96 480 cps 240 cps 15 120 600 cps 300 cps 17 10 condensed 137 684 cps 3...

Page 80: ...the default setting mode see page A 8 for instructions or by using software commands PC437 U S Standard Europe PC850 Multilingual PC860 Portuguese PC861 Icelandic PC863 Canadian French PC865 Nordic Abicomp BRASCII Roman 8 ISO Latin 1 Italic Character sets 14 international character sets and 1 legal character set Bitmap fonts Font 10 cpi 12 cpi 15 cpi Proportional EPSON Roman x x x x EPSON Sans Ser...

Page 81: ...able area Paper type Size Paper types Thickness Weight Single sheets Letter 8 5 11 inches A4 210 297 mm A5 148 210 mm B5 182 257 mm Legal 8 5 14 inches Statement 5 5 8 5 inches Executive 7 5 10 inches Plain bond paper and special ink jet papers distributed by EPSON 0 003 to 0 004 inch 0 08 to 0 11 mm 17 to 24 lb 64 to 90 g m2 Transparencies Glossy film Glossy paper Letter 8 5 11 inches A4 210 297 ...

Page 82: ... mm except for letter and legal size paper The minimum right margin for letter and legal size paper is 0 35 inch 9 0 mm The minimum right margin for envelopes is as follows 0 28 inch 7 0 mm for DL envelopes 1 10 inches 28 0 mm for No 10 envelopes 0 12 inch 3 0 mm for C6 envelopes C The minimum bottom margin is 0 54 inch 14 0 mm Note Always load paper into the sheet feeder short edge first However ...

Page 83: ... mm Printing Width 16 9 inches 429 mm Depth 24 1 inches 613 mm 27 4 inches 695 mm when printing transparencies Height 12 2 inches 309 mm 7 7 inches 196 mm when printing transparencies Weight 11 5 lb 5 2 kg without the ink cartridges Specification Black ink cartridge S020093 Color ink cartridge S020089 Color s Black Cyan Magenta and Yellow Print capacity 540 pages A4 ISO IEC 10561 Letter Pattern at...

Page 84: ...llel interface and a serial interface Parallel interface The built in parallel interface has the following characteristics Forward channel Data format 8 bit parallel IEEE 1284 compatibility mode Synchronization STROBE pulse Handshake timing BUSY and ACKNLG signals Signal level TTL compatible Connector 57 30360 Amphenol connector or equivalent Reverse channel Transmission mode IEEE 1284 Nibble mode...

Page 85: ...e printer can be initialized returned to a fixed set of conditions in these ways Hardware initialization When the printer is turned on the printer mechanism is initialized the input and print buffers are cleared and all settings return to their default values However the printer mechanism is not initialized if the printer is turned on within 10 seconds after being turned off In this case the print...

Page 86: ... the printer is turned off and paper is loaded in the sheet feeder Use paper at least 8 3 inches wide Otherwise the print heads will spray ink directly onto the platen 2 Hold down the R cleaning button and turn on the printer The printer loads a sheet of paper and prints a brief summary and instructions 3 Follow the instructions on the sheet and press the R cleaning button until the control panel ...

Page 87: ... section lists the available printer commands by topic Your printer works with the following commands ESC P 2 control codes Selecting EPSON ESC P 2 printer in your software allows you to use the most advanced font and graphics handling available See the ESC P Reference Manual for details General operation ESC ESC U ESC EM Paper feeding CR FF LF ESC 0 ESC 2 ESC 3 ESC Page format ESC C ESC C ESC C0 ...

Page 88: ...t A value or setting that takes effect when the equipment is turned on reset or initialized dithering A halftoning method in which dots are arranged in an orderly pattern Dithering works best for printing images with solid colors such as charts and graphs See also halftoning dpi Dots per inch The dpi measures the resolution See also resolution driver A software program that sends instructions to a...

Page 89: ... A scale of shades of gray from black to white Grayscale is used to represent colors when printing with black ink only halftoning A method of using dot patterns to represent an image Halftoning makes it possible to produce varying shades of gray using only black dots or a nearly infinite array of colors using only a few colors of dots initialization Returns the printer to its defaults fixed set of...

Page 90: ...See also print queue printable area The area of a page on which the printer can print It is smaller than the physical size of the page due to margins printer driver See driver proportional printing Printing in which the width of the character varies from character to character For example a capital W receives much more space than a lowercase i The result looks more like a typeset book than a typew...

Page 91: ...understands This data is then sent to the printer directly or to the print server Spool Manager An EPSON software program that converts print data into codes that your printer understands See also spool Status Monitor An EPSON software program that displays the printer s status such as paper out or the amount of ink remaining before printing subtractive colors Colors produced by pigments that abso...

Page 92: ...ntrol codes A 1 A 9 Control panel buttons 1 10 lights 1 9 using 1 9 to 1 10 6 1 to 6 2 6 6 to 6 8 Custom paper size 3 7 3 8 Custom settings color 2 6 to 2 8 deleting 2 9 print quality 2 3 to 2 5 project types 2 2 saving 2 8 special effects 2 3 to 2 5 Customer Care Centers 4 Cyan setting 2 7 D Default printer options setting 1 4 to 1 5 Deleting print job 4 3 Despooler 1 6 4 5 Dithering 2 5 DOS prin...

Page 93: ...r choosing 1 8 3 8 printing 3 3 specifications A 3 Ink setting 2 4 Ink monitoring level 1 6 4 5 Interface specifications parallel A 6 serial A 7 Internet 5 Iron On Transfer Paper choosing 1 8 printing 2 5 3 6 J Jammed paper 1 9 6 10 6 11 Journal files 4 2 4 7 L Legal size paper 3 3 Letterhead 3 3 Lever adjust 3 5 6 5 Lights using 1 9 6 1 6 6 to 6 7 M Magenta setting 2 7 Maintaining printer 5 1 to ...

Page 94: ...2 Printable area A 4 Printer driver accessing Control Panel 1 4 to 1 5 Windows applications 1 2 Printer operation check 6 2 Printer software using 1 10 to 1 11 Printer status Windows 1 6 Problems diagnosing 6 1 to 6 2 paper handling 6 10 to 6 11 print quality 6 3 to 6 5 printing 6 6 to 6 10 solving 6 1 to 6 13 unexpected printout results 6 12 to 6 13 Q Quality Speed slider 1 3 R Replacing ink cart...

Page 95: ...encies choosing 1 8 printing 3 4 specifications A 3 Transporting printer 5 9 Troubleshooting 6 1 to 6 12 U User Defined paper size 3 8 3 9 Utilities Head Cleaning 5 2 Nozzle Check 5 2 to 5 4 Print Head Alignment 5 8 V Video Digital Camera setting 2 2 2 7 W Windows managing print jobs from 4 1 to 4 5 printing from 1 1 to 1 4 Spool Manager 4 2 to 4 3 Windows 95 ICM 2 6 to 2 8 World Wide Web 5 Y Yell...

Reviews: