background image

Solving Problems

37

For Windows 2000, if you see 
an error message or your 
software doesn’t install 
correctly, you may not have 
software installation privileges. 
Contact your System 
Administrator.

In Windows 2000 or XP, 
don’t select 

Block

 under 

Control 

Panel > System > Hardware > 

Driver Signing

; select 

Ignore

 or 

Warn

 instead.

Make sure your Windows 
system was not upgraded from 
Windows 95. The USB Printer 
Device Driver may not install 
correctly if you upgraded from 
Windows 95.

Make sure the USB Controller 
is working properly in Device 
Manager. See your Windows 
help system for details. If it’s not 
working, contact your computer 
manufacturer.

Printer Problems

Only the


green 


P

 power light is 

on, but nothing prints.

Make sure the USB cable is 
connected securely and that the 
cable meets the requirements 
beginning on page 47.

Run a printer check as described 
on page 35. If the check page 
prints, make sure your software 
is installed correctly. 

The printer sounds as though it is 
printing, but nothing prints.

Make sure the print head 
nozzles are not clogged. To 
clean the print head, see 
page 23.

The printer won’t operate 
properly if it’s tilted or at an 
angle. Place it on a flat, stable 
surface that extends beyond the 
printer base in all directions.

Summary of Contents for Stylus C42 Series

Page 1: ...EPSON Stylus C42 Series Printer Basics ...

Page 2: ...any consumable products other than those designated as Original EPSON Products or EPSON Approved Products by SEIKO EPSON CORPORATION A Note Concerning Responsible Use of Copyrighted Materials Digital cameras and scanners like photocopiers conventional cameras and ink jet printers can be misused by improper copying and reprinting of copyrighted material While some countries laws permit limited copy...

Page 3: ...h 13 Macintosh OS X 13 Macintosh OS 8 5 1 to 9 x 17 Printing on Envelopes 20 Selecting the Correct Paper Type 22 MAINTAINING YOUR PRINTER 23 Cleaning the Print Head 23 Running the Head Cleaning Utility 24 Examining the Nozzle Check Pattern 25 Replacing an Ink Cartridge 25 Ink Cartridge Precautions 26 Removing and Installing Ink Cartridges 27 Aligning the Print Head 29 Cleaning the Printer 30 Trans...

Page 4: ...uality Problems 38 Paper Feeding Problems 41 Miscellaneous Printout Problems 42 Reinstalling Printer Software 43 Windows 43 Macintosh OS 8 5 1 to 9 x 44 Macintosh OS X 44 Where To Get Help 46 REQUIREMENTS AND SPECIFICATIONS 47 Windows System Requirements 47 Macintosh System Requirements 48 Specifications 49 EPSON INK JET PAPERS AND INK CARTRIDGES 54 HOW TO ORDER EPSON INK AND PAPER 55 INDEX 56 ...

Page 5: ...ON s support web site periodically for free updates to your printer software Visit http support epson com Download instructions are posted for your convenience About Your Documentation To set up your printer and install your Windows XP or Macintosh software see the Start Here sheet To install your Windows 98 Me or 2000 printer software see the Installing Software for Windows 98 Windows Me and Wind...

Page 6: ...e follow these guidelines Warnings must be followed carefully to avoid bodily injury Cautions must be observed to avoid damage to your equipment Notes contain important information about your printer Tips contain additional hints for better printing ...

Page 7: ...PSON ink jet papers Choose the right Paper Type setting Media Type setting on the Macintosh Your printer automatically adjusts itself for each type of paper That s why this setting is important It tells your printer what kind of paper you re using So remember to check your Paper Type setting every time you print If you re not sure which setting to use with your paper see page 22 Follow the instruc...

Page 8: ...t even when you re printing landscape oriented documents Load the printable side face up It s usually whiter or brighter than the other side Load letterhead or preprinted paper into the printer top edge first Don t load paper above the arrow on the left edge guide Load the following media types one sheet at a time Photo Quality Self Adhesive Sheets Photo Stickers and Panoramic Photo Paper If you r...

Page 9: ...our document in a software program follow these steps to print 1 From the File menu click Print You see a Print window your window may look different 2 Make sure EPSON Stylus C42 Series is selected 3 Click the Properties or Preferences button If you see a Setup Printer or Options button click it Then click Properties or Preferences on the next screen Click here to open your printer software Select...

Page 10: ...printing Text Image For documents that have both text and images like newsletters Photo For photos and graphics when you want good quality with faster printing Photo RPM For photos or graphics when you need highest quality printing Because this setting increases resolution it also increases print time 5 Load the right paper for your document See page 8 for loading instgructions 1 Choose your docum...

Page 11: ...pearance of low resolution and improperly exposed photos Does not work when Black Ink Only is selected ICM Image Color Matching Matches colors on your printout as closely as possible to the colors you see using ICM compatible monitors or scanners Black Ink Only Prints using only black ink Reverse Order Prints your document so that the pages are in the right order when you retrieve them from the pa...

Page 12: ...m you re currently using If you usually print one type of document in different programs for example color photos on letter size paper you can change the default printer settings for all your programs 1 Right click the printer icon on your taskbar in the lower right corner of your screen 2 Select Printer Settings You see your printer Preferences Properties window as shown on page 10 3 Select the d...

Page 13: ...ke sure you have paper in the printer as described on page 8 After you create your document follow these steps to print If you re using an application that s compatible only with Macintosh Classic mode follow the steps on page 17 to print your document 1 From the File menu select Page Setup You see a screen like this 2 Select your printer from the Format for menu 3 Select the Paper Size Orientatio...

Page 14: ...s 5 Select Print Settings from the pull down menu You see a group of settings like this Click here and select Print Settings Select the type of paper you loaded Select the ink color Select Automatic mode Select higher quality or faster printing or an in between setting if available Click Print ...

Page 15: ... Advanced Settings and choose a setting from the Print Quality menu Economy or Economy Plus for printing drafts Saves ink Economy Plus is only available if you select Black as the ink color Normal for everyday printing needs Fine when you want a higher resolution for printing text or text and graphics Photo when you re printing photographs Photo RPM when you want the highest resolution for your ph...

Page 16: ...following Click the print job then click Delete to delete it Click the print job then click Hold to pause printing Click a print job marked Hold and click Resume to resume printing If multiple print jobs are listed click a print job then click the Priority arrow to reorder the jobs When you re finished using your printer make sure you press the P power button to turn it off Never use a power strip...

Page 17: ...age Setup You see the following 2 Make sure C42 Series is selected If not you need to select your printer in the Chooser 3 Select the correct Paper Size Orientation and other settings Then click OK For more information about printer settings click the button 4 From the File menu select Print You see a window like the following Make sure you see C42 Series Select your paper size Select the orientat...

Page 18: ... click it to preview your printout Click to check your ink levels If the red b error light is on or flashing check to see if one of your ink cartridges is low or empty Click PhotoEnhance to improve the appearance of low resolution and improperly exposed photos Only works when Color ink is selected Click Custom and then select ColorSync to match the colors in your printout as closely as possible to...

Page 19: ...ng hold down the J key and press the period key When you re finished using your printer make sure you press the P power button to turn it off Never use a power strip or external switch to turn off the printer Click to cancel printing Click to check ink levels Click to pause printing Click to restart your print job Click on the current print job or a waiting print job Then click here to view detail...

Page 20: ...he locking tab on the left edge guide and slide it against the envelopes 3 In your application software set a left margin of approximately 3 inches Set a top margin of approximately 2 inches Then type the address 4 Open your printer software and make the following settings For Paper Type Windows or Media Type Macintosh select Plain Paper For Orientation select Landscape For Paper Size select Envel...

Page 21: ... 1 to 9 x Click the button on the printer settings menu Then click the Preview button that appears 6 If you need to change the margins cancel or close the preview window and adjust the margins in your application software Then repeat step 5 7 When your preview looks okay print the envelope Windows and Macintosh OS 8 5 1 to 9 x Click the Print button on the Print Preview window Macintosh OS X Selec...

Page 22: ...per Select this Paper setting Plain paper sheets or envelopes EPSON Premium Bright White Paper Plain paper EPSON High Quality Ink Jet Paper EPSON Photo Quality Ink Jet Paper EPSON Photo Quality Ink Jet Cards EPSON Photo Quality Self Adhesive Sheets Photo Quality Ink Jet Paper EPSON Glossy Photo Paper EPSON Photo Paper EPSON Photo Quality Glossy Paper EPSON Glossy Photo Greeting Cards Glossy Photo ...

Page 23: ...g from the image you may need to clean the print head This unclogs the nozzles so they can deliver ink properly Print head cleaning uses ink so clean it only if quality declines This section explains how to clean the print head using the Head Cleaning utility This is the recommended method when the printer is connected directly to your computer not over a network You can also clean the print head ...

Page 24: ...ow the instructions on the screen to clean the print head Cleaning takes about 30 seconds during which the printer makes some noise and the green P power light flashes Never turn off the printer while the P power light is flashing unless the printer hasn t moved or made noise for more than 5 minutes 4 When the P power light stops flashing run a nozzle check to confirm the print head nozzles are cl...

Page 25: ...dge When the red b error light stays on you may need to replace one of the cartridges The red b error light also comes on if your paper runs out or is jammed so make sure you check your paper before replacing a cartridge To check your ink supply do one of the following Windows Double click the printer icon on your taskbar in the lower right corner of your screen You ll see a window like the one on...

Page 26: ...ckage Black ink cartridge T036120 Color ink cartridge T037020 Look for ink cartridge packages labelled T036 black or T037 color To ensure good results use genuine EPSON ink cartridges and do not refill them Other products may cause damage to your printer not covered by EPSON s warranty When you need new ink cartridges contact your dealer or call EPSON at 800 873 7766 or visit the EPSON Store at ww...

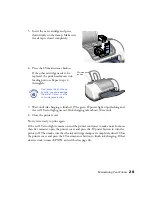
Page 27: ...int head moves to the cartridge replacement position 3 Pull up the ink cartridge clamp and remove the cartridge Dispose of it carefully 4 Unpack the new cartridge and remove the yellow tab If both cartridges need replacing the print head moves to the black cartridge position first The black cartridge is on the left and the color cartridge is on the right Black cartridge Color cartridge Don t touch...

Page 28: ...charging takes about 30 seconds 8 Close the printer cover Now you re ready to print again If the red error light remains on and the printer continues to make noise for more than five minutes open the printer cover and press the P power button to turn the printer off Then make sure that the ink cartridge clamps are completely closed Close the printer cover and press the maintenance button to finish...

Page 29: ...creen and select Print Head Alignment Macintosh OS 8 5 1 to 9 x Open the File menu and choose Page Setup or Print Then click the Utility button In the Utility menu click the Print Head Alignment button Macintosh OS X Double click the Applications folder on your hard drive Double click EPSON Printer Utility select the C42 Series printer in the Printer List window and click OK Then click the Print H...

Page 30: ...n off the printer and disconnect the USB cable and power cord 2 Remove all paper then use a soft brush to clean any dust or dirt from the sheet feeder 3 Clean the exterior of the printer with a soft damp cloth Never use a hard or abrasive brush or alcohol or thinner for cleaning they can damage the printer components and case Don t get water on the printer components and don t spray lubricants or ...

Page 31: ...the electrical outlet Then disconnect both the printer cable and the power cord from the printer 3 Remove any paper from the printer and remove the paper support 4 Open the printer cover Secure the print head to the printer with tape as shown then close the printer cover 5 Push in the output tray 6 Repack the printer and its attachments in the original box using the protective materials that came ...

Page 32: ... printer It s a good idea to check EPSON s support web site periodically for free updates to your printer driver Visit http support epson com Download instructions are posted for your convenience Then see these sections for solutions Setup and Software Installation Problems on page 36 Printer Problems on page 37 Print Quality Problems on page 38 Paper Feeding Problems on page 41 Miscellaneous Prin...

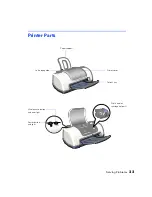
Page 33: ...Solving Problems 33 Printer Parts Power button and light Maintenance button and error light Paper support Printer cover Output tray Left edge guide Print head ink cartridge holders ...

Page 34: ... your ink cartridges Replace the cartridge as described on page 25 Red b error light flashes One of the ink cartridges is low Make sure you have a replacement cartridge To determine which cartridge is low check the ink level as described on pages 25 and 26 Green P power light is off and red b error light is on Paper may be blocking movement of the print head Turn off the printer open the cover and...

Page 35: ...flash then release it The printer prints one page showing its ROM version number the ink counter code and a nozzle check pattern If the pattern has lines you need to clean the print head see page 23 4 Turn off the printer after it prints the check page Then reconnect the cable and turn on your printer and computer If the check page prints the problem probably lies in your software settings the USB...

Page 36: ...r then make sure the ink cartridge clamps are locked down completely and no packing material remains in the printer Wait a moment then turn the printer back on to clear the error You re having problems installing the printer software Make sure your printer is turned on and the USB cable is securely connected at both ends Then carefully follow the installation instructions on the Start Here sheet o...

Page 37: ...y in Device Manager See your Windows help system for details If it s not working contact your computer manufacturer Printer Problems Only the green P power light is on but nothing prints Make sure the USB cable is connected securely and that the cable meets the requirements beginning on page 47 Run a printer check as described on page 35 If the check page prints make sure your software is installe...

Page 38: ...our printer software if your document doesn t include color For Windows choose Draft for Quality Type For Macintosh set the Quality Speed slider to Speed If your printer is connected to a hub disconnect unused USB devices Print Quality Problems You see banding light lines The print head nozzles may need cleaning see page 23 for instructions Make sure the Paper Type setting Media Type setting for M...

Page 39: ...uine EPSON inks Run the Print Head Alignment utility See page 29 for instructions Your printout is faint or has gaps The print head nozzles may need cleaning see page 23 for instructions The ink cartridges may be old or low on ink To replace an ink cartridge see page 25 Make sure the Paper Type setting Media Type setting for Macintosh matches the paper you loaded See page 22 for guidelines Make su...

Page 40: ...window Macintosh OS 8 5 1 to 9 x or page 15 to access the Color Management window Macintosh OS X Your printed colors can never exactly match your on screen colors However you can use a color management system to get as close as possible Try using the ICM Windows or ColorSync Macintosh setting Your printout is grainy Try using a higher quality paper Select Photo RPM for Quality Type Windows or Prin...

Page 41: ...ainst the paper If multiple pages feed at once remove the paper from the sheet feeder fan the edges to separate the sheets then reload it If paper jams press the b maintenance button for several seconds to clear the jam If that doesn t work open the cover and pull the paper out from the front including small pieces that may have torn off Reload the paper and press the b maintenance button If your ...

Page 42: ...d nozzles may need cleaning See page 23 The margins are incorrect Make sure the paper settings are correct for your paper size For instructions see page 11 Windows page 13 Macintosh OS X or page 17 Macintosh 8 5 1 to 9 x Use the Print Preview option in your printer software to check your margins before you print Make sure your paper is positioned next to the right side of the feeder You see incorr...

Page 43: ...ps 1 Turn the printer on Then insert the EPSON CD ROM in your drive If you see the Options Menu go to step 4 If you don t see the Options Menu continue with step 3 2 Windows XP Click Start then click My Computer Double click EPSON You see the Options Menu Other Windows systems Double click My Computer on your desktop and then double click EPSON You see the Options Menu 3 Click Reinstall Printer Dr...

Page 44: ...een click the arrow in the Easy Install list at the top and select Uninstall Then click the Uninstall button at the bottom and follow the instructions 4 Restart your Macintosh then follow the instructions on the Start Here sheet to reinstall your software Macintosh OS X You can reinstall your printer software over your currently installed printer software Follow these steps 1 Insert the EPSON CD R...

Page 45: ...rd and click OK At the next screen click Continue 4 Read the license agreement and click Continue Then click Agree 5 Select the OS X drive where you want to reinstall your printer software then click Continue 6 Click Upgrade on the Easy Install screen and follow the on screen instructions to install the printer softtware and restart your Macintosh Lock icon ...

Page 46: ...eferral Service Access World Wide Web From the Internet you can reach EPSON Support at http support epson com At this site you can download drivers and other files look at product documentation access troubleshooting information and receive technical advice through e mail Automated Telephone Services A variety of automated help services are available 24 hours a day seven days a week To use these s...

Page 47: ...A Microsoft Windows compatible PC with a Pentium equivalent processor 233 MHz or faster recommended Microsoft Windows XP Windows Me Windows 2000 or Windows 98 At least 64MB RAM 128MB recommended 100MB free hard disk space 200MB or more recommended VGA or better display adapter and monitor 2x CD ROM or DVD drive for installing the printer software 4x or faster recommended A shielded USB AB cable up...

Page 48: ...in USB port Macintosh OS 8 5 1 through OS X Macintosh OS 9 0 or later recommended At least 32MB RAM for OS 8 5 1 through OS 9 x 64MB recommended 128MB RAM recommended for OS X At least 100MB free hard disk space 200MB recommended VGA display or better 2x CD ROM or DVD drive for installing the printer software 4x or faster recommended A shielded USB AB cable up to 6 5 feet 2 meters long ...

Page 49: ... of 17 lb 65 8 g m2 paper Dimensions Storage Width 16 7 inches 424 mm Depth 9 0 inches 229 mm Height 6 8 inches 172 mm Printing Width 16 7 inches 424 mm Depth 18 1 inches 460 mm Height 10 9 inches 277 mm Weight 5 47 lb 2 48 kg without the ink cartridges Electrical Rated voltage Universal Power Supply AC 100 240 V Input voltage range 90 to 264 V Rated frequency range 50 to 60 Hz Input frequency ran...

Page 50: ...ation Operation 20 to 80 RH Storage 5 to 85 RH Safety Approvals Safety standards UL 1950 CSA C22 2 No 950 EMC FCC part 15 subpart B class B CSA C108 8 Class B Ink cartridge specifications Specification Black cartridge T036120 Color cartridge T037020 Color s Black Cyan Magenta Yellow Print capacity 330 pages using ISO Letter Pattern 10561 220 pages at 5 in calculation except for the initial ink car...

Page 51: ...to 24 lb 64 to 90 g m2 Envelopes Size No 10 4 13 9 5 inches DL 4 33 8 7 inches C6 4 49 6 38 inches 132 220 mm 5 2 8 7 inches Paper types Plain bond paper airmail Thickness 0 006 to 0 02 inch Weight 12 to 20 lb 45 to 75 g m2 Ink Jet Cards Size A6 4 1 5 8 inches Paper types Special paper distributed by EPSON Transparencies Glossy Film Photo Quality Glossy Paper Glossy Photo Greeting Cards Size Lette...

Page 52: ...ure ranges from 55 to 77 F and optimum humidity ranges from 40 to 60 RH Store EPSON Self Adhesive Sheets under the following conditions 59 to 86 F and 20 to 60 RH Matte Paper Heavyweight Double Sided Matte Paper Size Letter 8 5 11 inches A4 8 3 11 7 inches Paper types Special paper distributed by EPSON Glossy Photo Paper Photo Paper Size Letter 8 5 11 inches 4 6 inches Panorama 8 3 23 4 inches A4 ...

Page 53: ...e bottom margin some colors may not print properly If this occurs try increasing the bottom margin Printable Area Single Sheets Ink Jet Cards Envelopes Minimum top margin A 0 12 inch 3 0 mm Minimum left margin B L 0 12 inch 3 0 mm Minimum right margin B R 0 12 inch 3 0 mm Minimum bottom margin C 0 54 inch 14 0 mm A B L B R C Single sheets or ink jet cards Envelopes ...

Page 54: ...ooth surface and 108 brightness This paper delivers crisp black text and vivid colorful images It s perfect for everyday printing Premium Glossy Photo Paper 4 6 Here s a water resistant photographic weight paper with a glossy finish for your photo keepsakes It s available in a variety of sizes but you ll find the 4 6 inch size is just right for your digital snapshots Glossy Photo Greeting Cards Pe...

Page 55: ...1 7 inches S041117 EPSON Photo Quality Ink Jet Cards A6 4 1 x 5 8 inches S041054 EPSON Glossy Photo Paper EPSON Photo Paper 4 x 6 inches S041134 S041671 Letter 8 5 x 11 inches S041141 S041649 S041271 S041272 A4 8 3 x 11 7 inches S041140 Panoramic 8 3 x 23 inches S041145 EPSON Photo Stickers Kit CD ROM paper EPSON Photo Stickers refill A6 4 1 x 5 8 inches S041144 KIT A6 4 1 x 5 8 inches S041144 EPS...

Page 56: ...Macintosh 15 18 Color problems 40 53 ColorSync 15 18 40 Controlling printing Macintosh 16 19 Windows 12 Copies setting 15 17 D Default settings Windows 12 Documentation 5 to 6 Double Sided Matte Paper 22 52 55 Draft setting 10 E Economy setting 15 18 Electrical specifications 49 Envelopes minimum margins 53 printing on 20 to 21 specifications 51 EPSON accessories 46 help 46 papers 22 54 55 Print L...

Page 57: ...4 M Macintosh printing with OS 8 5 1 to 9 x 17 to 19 printing with OS X 13 to 16 reinstalling software 44 to 45 system requirements 48 Maintaining printer 23 to 30 Margins incorrect 42 minimum 53 Matte Paper Heavyweight 22 52 55 Media Type setting Macintosh 15 18 22 Mirror images 42 Monitoring ink level Macintosh 18 26 Windows 12 25 Moving printer 31 N Noise printer 38 Normal setting 15 18 Nozzle ...

Page 58: ...inter 37 to 38 Progress meter 12 16 19 Properties window 10 Q Quality Type setting 10 Quality Speed setting 15 18 R Reinstalling software 43 to 45 Replacing ink cartridge 25 to 26 Requirements system 47 48 Reverse Order setting 11 S Safety approvals 50 Self adhesive sheets 8 22 51 52 Slow printing 38 Software problems solving 36 to 37 reinstalling 43 to 45 SoundAdvice 46 Specifications electrical ...

Page 59: ...Index 59 W Weight paper 51 Windows default settings 12 printing with 9 to 12 Quality Type 10 reinstalling software 43 system requirements 47 World Wide Web 46 ...

Reviews: