Epson STYLUS 850Ne Specifications Download Page 6

EPSON Stylus COLOR 850Ne

6 -


EPSON Stylus COLOR 850Ne

10/98

Changing control panel settings

Follow these steps to change the settings listed above:

1. Make sure the printer is turned off and has paper loaded.

2. Hold down the 


X

 color cleaning button and press the 


P

power button. The printer prints a summary of 

instructions for changing settings and choosing a language 
for the instructions.

3. Press the 


X

 color cleaning button to print a list of current 

settings (indicated with arrows) and additional instructions.

4. After you make the changes you want, turn the printer off 

to save the settings. The settings remain in effect until you 
change them again.

Character Tables

All character tables except Italic are the same as the PC437 
table for hex codes 00 through 7F. Additional characters are 
available for hex codes 80 through FF. You can select the 
following character tables through the control panel or 
software commands:

• PC 437 (U.S./Standard Europe)
• PC850 (Multilingual)
• PC860 (Portuguese)
• PC861 (Icelandic)
• PC863 (Canadian-French)
• PC865 (Nordic)
• Abicomp
• BRASCII
• Roman 8
• ISO Latin 1
• Italic (no characters available for hex code 15)

International character sets

You can select a number of international character sets with 
the control panel or the ESC R command. Other sets can only 
be selected with the ESC R command. You can select 
additional characters with the ESC ( ^ command.
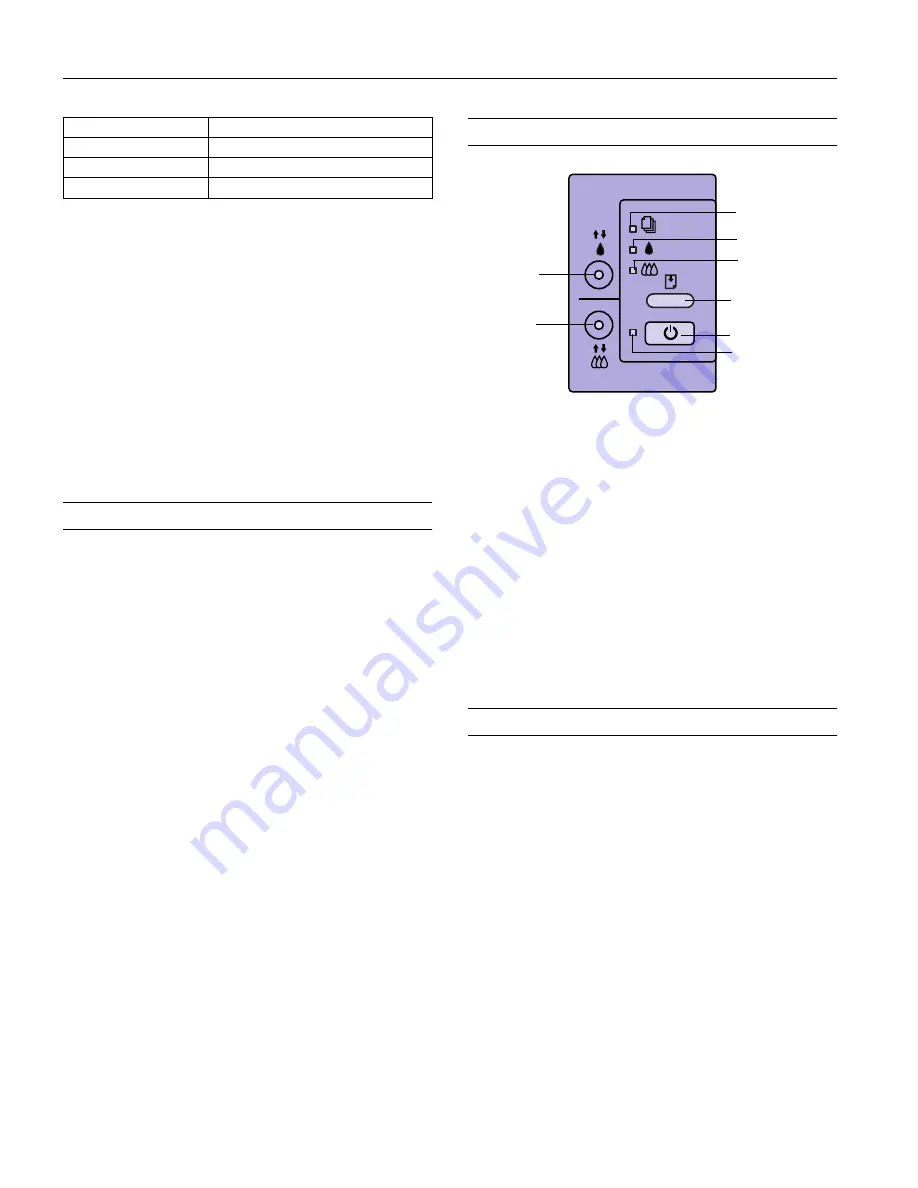
Control Panel 

Follow these guidelines when the control panel lights come on 
or flash:

Testing the Printer

You can run a self test to determine whether the problem 
comes from the printer itself or some other source. 

If the results are satisfactory, the problem lies in your 
software settings, the network and configuration, or your 
computer.

If the self test does not print correctly, you have a problem 
with your printer. 

Follow these steps to run the test:

1. Make sure both the printer and computer are turned off.

2. Disconnect the network cable from the printer.

3. Make sure paper is loaded in the printer.

Caution:
Load paper that’s at least 8.27 inches (210 mm) wide. This 
prevents ink from spraying inside the printer and smudging your 
printouts.

Loading position

8.5 mm, 3 mm, Others

Economy

Off, On

Parallel I/F transfer rate

Fast, Normal

Setting

Options


When the paper out light 

flashes, paper is jammed in 

the printer. Turn off the printer and gently pull out all 
paper. Then press the  


E

 load/eject button. 


S

When the paper out light 

comes on, your paper ran 

out or is incorrectly loaded. Load paper in the feeder 
and then press the  


E

 load/eject button. 


B A

When an ink out light 

flashes, your ink supply is low. 

Make sure you have a replacement cartridge.


B A

When an ink out light 

comes on, you need to replace 

the ink cartridge.


P

When the power light flashes, the printer is receiving 
a print job or performing a maintenance operation.


P S B A

When all the lights 

flash, your printer may have an 

internal error.

power button

load/eject button

color cleaning 
button

black cleaning 
button

paper out light

color ink out light

black ink out light

power light

Summary of Contents for STYLUS 850Ne

Page 1: ...umber EPSON 360 dpi Ink Jet Paper Letter A4 S041060 S041059 EPSON High Quality Ink Jet Paper Letter A4 S041111 S041117 EPSON Photo Quality Ink Jet Paper Letter A4 Legal S041062 S041061 S041067 EPSON Photo Quality Glossy Paper Letter A4 S041124 S041126 EPSON Photo Quality Glossy Film Letter A4 4 1 5 8 A6 S041072 S041071 S041107 EPSON Photo Paper 4 6 Letter A4 Panoramic S041134 S041141 S041140 S0411...

Page 2: ...pplication doesn t allow you to select fonts Ink Cartridges The print capacity may vary depending on how often you use the print head cleaning function Also if you print large graphics and dense text with little white space you use ink faster The ink thaws and is usable after approximately 3 hours at 77 F 25 C Caution To ensure good results use genuine EPSON cartridges and do not refill them Other...

Page 3: ...7 mm A5 148 210 mm B5 182 257 mm Plain paper and special ink jet papers distributed by EPSON 0 003 to 0 004 inch 0 08 to 0 11 mm 17 to 24 lb 64 to 90 g m2 Transparencies and glossy media Letter 8 5 11 inches A4 210 297 mm A6 105 148 mm glossy film only Transparencies glossy paper and glossy film distributed by EPSON Glossy film and transparencies 0 0051 to 0 0059 inch 0 13 to 0 15 mm Glossy paper ...

Page 4: ...4 g m2 paper capacity Total print 75 000 pages A4 text only volume Dimensions Storage Width 18 7 inches 475 mm Depth 10 7 inches 274 mm Height 7 4 inches 177 mm Printing Width 18 7 inches 475 mm Depth 24 0 inches 610 mm 27 2 inches 692 mm when loading transparencies Height 12 4 inches 315 mm 7 95 inches 202 mm when loading transparencies Weight 14 3 lb 6 5 kg without the ink cartridges Electrical ...

Page 5: ...hese drivers don t provide all the EPSON Stylus COLOR 850Ne features such as 720 or 1440 dpi printing Choose the first printer available from the following two lists Black printing only LQ 870 1170 LQ 570 1070 SQ 870 1070 LQ 850 LQ 500 Color and black printing EPSON Stylus PRO EPSON Stylus COLOR 500 EPSON Stylus COLOR II LQ 860 LQ 2550 Control Panel Settings You can change the following default se...

Page 6: ...hen the control panel lights come on or flash Testing the Printer You can run a self test to determine whether the problem comes from the printer itself or some other source If the results are satisfactory the problem lies in your software settings the network and configuration or your computer If the self test does not print correctly you have a problem with your printer Follow these steps to run...

Page 7: ...for about three seconds to print out the status sheet Reading the Ethernet Card Status Lights The status lights on the Ethernet card plate provide you with the basic printer and network status The red and green status lights indicate the following Initializing the Ethernet Card You only need to initialize the card under the following conditions The first time you connect the printer to a network I...

Page 8: ...ove the ink cartridges from their foil packages Then remove only the yellow part of the tape seal on the top of each one Don t pull off the white portion or try to remove the clear seal underneath the cartridge Caution To ensure the print heads charge correctly install the ink cartridges that came with the printer You must remove the yellow tape from the top of the cartridge or you will permanentl...

Page 9: ... dealer or call EPSON Accessories at 800 873 7766 U S only In Canada please call 800 873 7766 for dealer referral Or visit our website at www epsonsupplies com When the A color ink out light comes on you can continue to print with black ink Simply turn the printer off and then back on again When you print make sure you choose Black as the Ink setting in your printer software Removing an Empty Ink ...

Page 10: ...the arrow pointing to the back of the printer 4 Press down the ink cartridge clamp until it locks in place 5 If you need to replace the other ink cartridge follow the steps under Removing an Empty Ink Cartridge and then steps 1 through 4 under Installing the New Cartridge 6 Press the E load eject button and close the printer cover The printer moves the print heads and begins charging the ink deliv...

Page 11: ...ops flashing you need to run a nozzle check to test the print quality and reset the cleaning cycle Caution Never turn off the printer when the P power light is flashing unless the printer hasn t moved or made any noise for more than 10 minutes 6 Make sure paper is loaded in the printer and click Print nozzle check pattern Windows or Confirmation Macintosh Then click Next See Examining the Nozzle C...

Page 12: ...steps to align the print heads 1 Make sure the printer is turned off and paper is loaded Then open the printer cover Caution Load paper that s at least 8 27 inches 210 mm wide This prevents ink from spraying inside the printer and smudging your printouts For the best results load EPSON ink jet paper to check your alignment 2 Hold down the E load eject button and the Y black cleaning button and tur...

Page 13: ...s packed with the printer Be sure to keep the printer level as you transport it If you move the printer to a new network you should initialize its Ethernet card so you can configure it for that network If you notice a decline in print quality after transporting the printer clean the print heads if output is misaligned align the print heads Related Documentation TM STYCLR850 EPSON Stylus COLOR 850 ...

Reviews: