


Problems and Solutions
49
■
Make sure the printable side of the paper is face up. It’s usually brighter or
whiter.
■
The ink cartridges may need replacing; see page 33 for instructions.
■
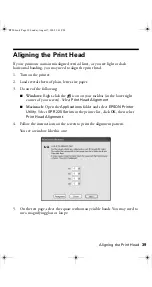
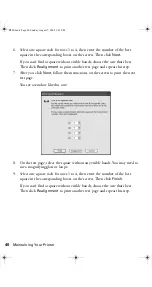
Run the Print Head Alignment utility; see page 39 for instructions.
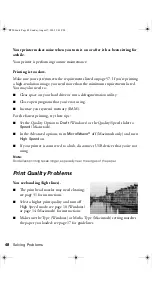
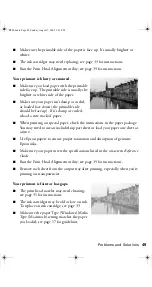
Your printout is blurry or smeared.
■
Make sure you load paper with the printable
side face up. The printable side is usually the
brighter or whiter side of the paper.
■
Make sure your paper isn’t damp or curled,
or loaded face down (the printable side
should be face up). If it’s damp or curled,
reload a new stack of paper.
■
When printing on special paper, check the instructions in the paper package.
You may need to use an included support sheet or load your paper one sheet at
a time.
■
Use Epson papers to ensure proper saturation and absorption of genuine
Epson inks.
■
Make sure your paper meets the specifications listed in the on-screen
Reference
Guide
.
■
Run the Print Head Alignment utility; see page 39 for instructions.
■
Remove each sheet from the output tray after printing, especially when you’re
printing on transparencies.
Your printout is faint or has gaps.
■
The print head nozzles may need cleaning;
see page 31 for instructions.
■
The ink cartridges may be old or low on ink.
To replace an ink cartridge, see page 33.
■
Make sure the paper Type (Windows) Media
Type (Macintosh) setting matches the paper
you loaded; see page 17 for guidelines.
R220.book Page 49 Sunday, August 7, 2005 3:41 PM
Summary of Contents for R220 - Stylus Photo Color Inkjet Printer
Page 1: ...Epson Stylus Photo R220 Printer Basics R220 book Page 1 Sunday August 7 2005 3 41 PM ...
Page 56: ...56 Solving Problems R220 book Page 56 Sunday August 7 2005 3 41 PM ...
Page 64: ...64 Requirements and Notices R220 book Page 64 Sunday August 7 2005 3 41 PM ...
Page 68: ...68 Index R220 book Page 68 Sunday August 7 2005 3 41 PM ...


