background image

50

Displaying and Adjusting the Image

The PowerLite 1220 and PowerLite 1260 projectors include an 

Auto 

Keystone

 function that detects and corrects vertical keystone 

distortion. It takes about one second after the projector starts for the 
image to be corrected.

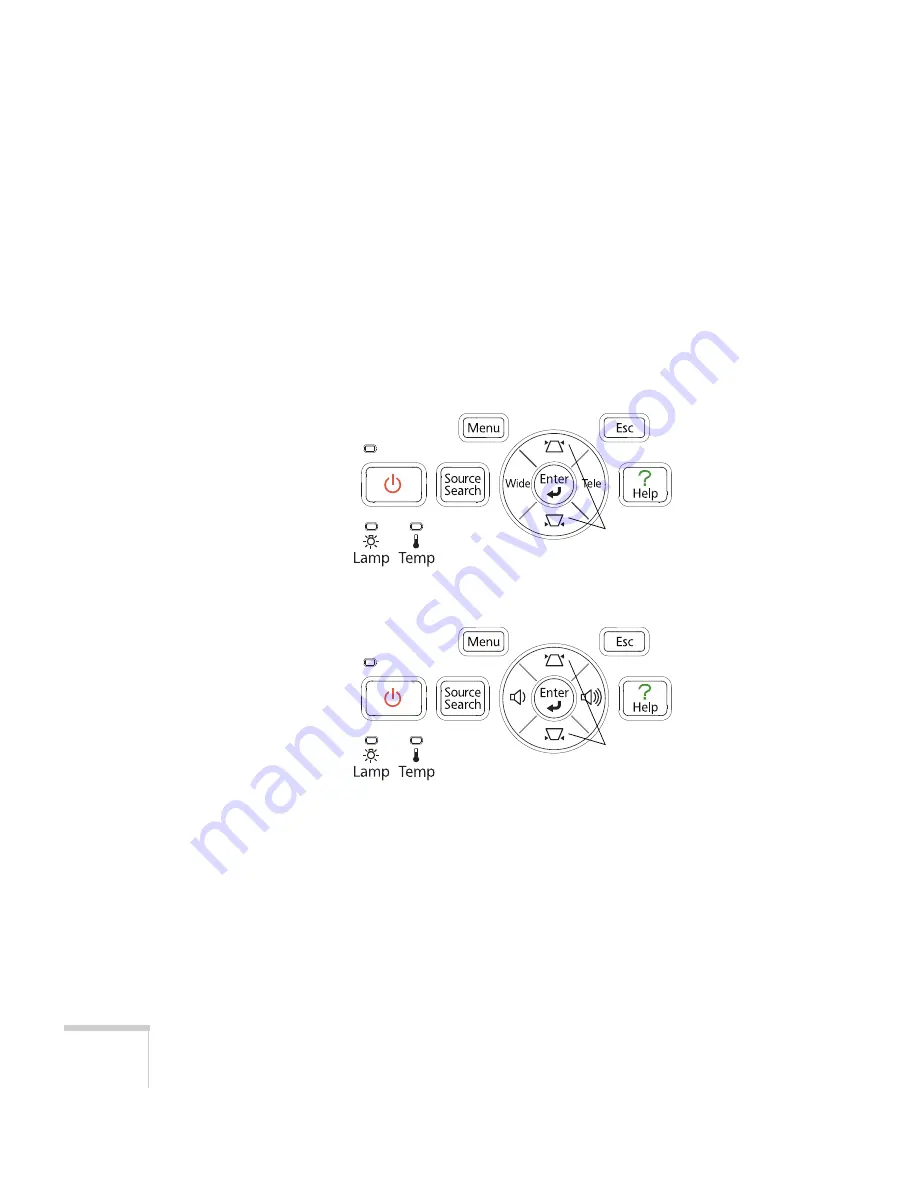
If your image is still distorted, or you are using the PowerLite S9 
projector, do one of the following:

Press the appropriate keystone correction button on the 
projector’s control panel until the shape is evenly rectangular.

Select the 

Keystone

 setting in the projector’s 

Settings

 menu (see 

page 71). Then use the arrow buttons on the remote control to 
adjust the shape of the image.

Keystone correction 
buttons

PowerLite S9

PowerLite 1220/PowerLite 1260

Keystone correction 
buttons

Summary of Contents for PowerLite 1260

Page 1: ...PowerLite S9 1220 1260 Multimedia Projector User sGuide ...

Page 2: ...poration nor its affiliates shall be liable to the purchaser of this product or third parties for damages losses costs or expenses incurred by purchaser or third parties as a result of accident misuse or abuse of this product or unauthorized modifications repairs or alterations to this product or excluding the U S failure to strictly comply with Seiko Epson Corporation s operating and maintenance ...

Page 3: ...son America Inc Pixelworks DNX and the DNX logo are trademarks of Pixelworks Inc HDMI the HDMI logo and High Definition Multimedia Interface are trademarks or registered trademarks of HDMI Licensing LLC General Notice Other product names used herein are for identification purposes only and may be trademarks of their respective owners Epson disclaims any and all rights in those marks This informati...

Page 4: ...4 ...

Page 5: ...mponents 22 Positioning the Projector 22 Projector Placement Options 28 Connecting to a Computer 29 Connecting to the USB Port 30 Installing Software 31 Connecting to the VGA Computer Port 32 Connecting to Video Equipment 33 Connecting an HDMI Video Source PowerLite 1220 PowerLite 1260 Only 34 Connecting a Composite Video Source 35 Connecting an S Video Source 36 Connecting a Component Video Sourc...

Page 6: ...the Image 49 Adjusting the Image Shape 49 Focusing and Zooming the Image 51 Selecting the Color Mode 52 Resizing Video Images 53 3 Presenting With the Remote Control 55 Using the Remote Control 56 Controlling the Picture and Sound 56 Turning Off the Picture and Sound 56 Stopping Action 57 Zooming In on Your Image 57 Controlling the Volume 58 Operating Your Computer With the Remote Control 58 Highl...

Page 7: ...ing 80 5 Maintaining the Projector 81 Cleaning the Lens 82 Cleaning the Projector Case 82 Cleaning the Air Filter 82 Replacing the Air Filter 83 Replacing the Lamp 84 Resetting the Lamp Timer 87 Checking Lamp Usage 88 Replacing the Remote Control Batteries 88 Transporting the Projector 89 6 Solving Problems 91 Using On Screen Help 92 Checking Projector Status 93 What To Do When the Lights Flash 93...

Page 8: ...8 Contents A Technical Specifications 105 B Notices 117 Important Safety Instructions 117 FCC Compliance Statement 120 Index 121 ...

Page 9: ...d security features Plug n Play instant setup instantly project images from a Windows or Macintosh computer via USB connection Ultra HD quality with just one cable all digital HDMI audio video connection PowerLite 1220 PowerLite 1260 only PC free slideshows and presentations USB thumb drive port PowerLite 1220 PowerLite 1260 only Quick convenient control Direct Power On sleep mode Instant Off On E...

Page 10: ... it Warnings must be followed carefully to avoid bodily injury Cautions must be observed to avoid damage to your equipment Notes contain important information about your projector Tips contain additional projection hints Getting More Information Need quick steps for setting up your projector Here s where you can look for help Quick Setup sheet Provides information for connecting the projector to y...

Page 11: ...e support If you still need help after checking this User s Guide and the sources listed in this section you can use the Epson PrivateLine Support service to get help fast Call 800 637 7661 and enter the PIN on the PrivateLine card Or take advantage of Epson s automated support services 24 hours a day See page 102 for more information ...

Page 12: ...red receiver Air filter Air filter cover Focus ring PowerLite S9 Front Lamp cover Foot release lever Control panel Ventilation slots Foot release lever Adjustable foot A V mute slide lens cover Infrared receiver Air filter Air filter cover Focus ring Zoom ring PowerLite 1220 PowerLite 1260 Front Lamp cover Kensington lock port ...

Page 13: ...red receiver Rearadjustable foot Rearadjustable foot Audio out port PowerLite S9 Back Monitor out port HDMI port Computer Component Video port Audio ports S Video port Video port USB TypeB port USB TypeA port AC power inlet Lamp cover screw Infrared receiver Rearadjustable foot Rearadjustable foot PowerLite 1220 PowerLite 1260 Back ...

Page 14: ... button increases image size PowerLite S9 Keystone button corrects screen shape Power button Tele button decreases image size Power light Lamp and Temperature warning lights Source Search button searches for connected video sources Menu button displays projector menus Help button Volumeup button Enter button selects menu items Keystone button corrects screen shape Esc button exits menu items Volum...

Page 15: ... Aspect button changes screen size Color Mode button changes display mode Num button activates number buttons Page Up Down buttons control PowerPoint slides USB cable required E Zoom buttons zoom into image Menu button accesses projector menus Esc button exits menus Menu navigation arrow buttons and Enter button User button lets you assign function ...

Page 16: ...or installing the projector 3 11 in 79 mm 3 03 in 77 mm 11 61 in 295 mm 3 62 in 92 mm 1 57 in 39 8 mm center of lens to mounting bracket holes 3 66 in 93 mm 8 98 in 228 mm 9 59 in 243 5 mm 0 51 in 13 mm 1 5 in 38 3 mm 5 04 in 128 mm 1 48 in 37 5 mm 0 98 in 25 mm Mounting screw holes ...

Page 17: ... can register online at epson com webreg Registering also lets you receive special updates on new accessories products and service Optional Accessories To enhance your use of the projector Epson offers the following optional accessories Product Part number Replacement lamp V13H010L58 Replacement air filter set V13H134A25 Universal projector ceiling mount Adjustable suspended ceiling channel kit Fa...

Page 18: ...0 463 7766 Or you can purchase online at www epsonstore com U S sales or www epson ca Canadian sales Component to VGA video cable S Video cable ELPKC19 ELPSV01 DC 06 document camera ELPDC06 DC 10s document camera DC 11 document camera ELPDC11 V12H321005 ELPDC10S V12H377020 Molded hard shell wheeled carrying case ELPKS58 Product Part number ...

Page 19: ...to a USB storage device or digital camera PowerLite 1220 PowerLite 1260 only Follow the instructions in this chapter on Unpacking the projector Positioning the projector Connecting to a computer Connecting to video equipment Connecting an external monitor PowerLite S9 only Playing sound through the projector Connecting to a digital camera or other USB device PowerLite 1220 PowerLite 1260 only Turn...

Page 20: ...ctor After unpacking the projector make sure you have all these parts Projector Remote control PDF manuals and registration CD ROM Power cord VGA computer cable Password Protected sticker Carrying case 2 AA batteries for remote control PowerLite S9 ...

Page 21: ...to send the projector to another location See page 89 for transportation instructions If you are moving the projector by hand use the carrying case Projector Remote control PDF manuals and registration CD ROM Power cord VGA computer cable Password Protected sticker USB cable Carrying case 2 AA batteries for remote control PowerLite 1220 PowerLite 1260 ...

Page 22: ...rchase one from Epson See Optional Accessories on page 17 To receive an audio signal you ll need an RCA type audio cable with two male plugs PowerLite 1220 PowerLite 1260 or a stereo mini jack to RCA type audio adapter cable with red and white jacks on one end PowerLite S9 Positioning the Projector If the projector isn t already installed in the room you re using you ll probably want to place it o...

Page 23: ...e S9 4 3 images Center of lens Center of lens Screen size Projection distance A Wide to Tele Offset B 30 inches 76 cm 34 to 47 inches 87 to 119 cm 2 inches 5 cm 50 inches 127 cm 58 to 79 inches 147 to 200 cm 3 3 inches 8 cm 60 inches 152 cm 70 to 95 inches 177 to 240 cm 3 9 inches 10 cm 80 inches 203 cm 93 to 126 inches 237 to 321 cm 5 2 inches 13 cm 100 inches 254 cm 117 to 158 inches 297 to 402 ...

Page 24: ...ches 3 cm 150 inches 381 cm 192 to 259 inches 487 to 659 cm 1 6 inches 4 cm 200 inches 508 cm 256 to 346 inches 651 to 880 cm 2 1 inches 5 cm Screen size Projection distance A Wide to Tele Offset B 30 inches 76 cm 36 to 50 inches 93 to 126 cm 0 5 inch 1 cm 50 inches 127 cm 61 to 83 inches 156 to 212 cm 0 8 inch 2 cm 60 inches 152 cm 74 to 100 inches 188 to 255 cm 1 inch 2 cm 80 inches 203 cm 99 to...

Page 25: ...nches 17 cm 150 inches 381 cm 179 to 215 inches 454 to 546 cm 10 inches 25 cm 200 inches 508 cm 239 to 287 inches 607 to 729 cm 13 3 inches 34 cm 250 inches 635 cm 299 to 359 inches 759 to 912 cm 16 7 inches 42 cm 300 inches 762 cm 359 to 431 inches 912 to 1095 cm 20 inches 51 cm Screen size Projection distance A Wide to Tele Offset B 30 inches 76 cm 38 to 46 inches 97 to 117 cm 0 3 inch 1 cm 40 i...

Page 26: ... cm 40 inches 102 cm 50 to 60 inches 126 to 152 cm 0 7 inch 2 cm 50 inches 127 cm 62 to 75 inches 159 to 191 cm 0 9 inch 2 cm 60 inches 152 cm 75 to 90 inches 191 to 230 cm 1 1 inch 3 cm 80 inches 203 cm 101 to 121 inches 256 to 307 cm 1 4 inch 4 cm 100 inches 254 cm 126 to 152 inches 320 to 385 cm 1 8 inch 4 cm 150 inches 381 cm 190 to 228 inches 482 to 579 cm 2 7 inches 7 cm 200 inches 508 cm 25...

Page 27: ...hes 33 cm 200 inches 508 cm 252 to 303 inches 641 to 770 cm 17 1 inches 44 cm 280 inches 711 cm 354 to 425 inches 898 to 1079 cm 24 inches 61 cm Screen size Projection distance A Wide to Tele Offset B 40 inches 102 cm 45 to 54 inches 114 to 137 cm 2 inches 5 cm 50 inches 127 cm 56 to 68 inches 143 to 172 cm 2 5 inches 6 cm 60 inches 152 cm 68 to 82 inches 172 to 208 cm 3 inches 8 cm 80 inches 203 ...

Page 28: ...tically Diagonal screen size Projection distance A Wide to Tele Offset B 40 inches 102 cm 44 to 53 inches 111 to 134 cm 3 inches 8 cm 50 inches 127 cm 55 to 66 inches 139 to 168 cm 3 8 inches 10 cm 60 inches 152 cm 66 to 79 inches 168 to 202 cm 4 5 inches 12 cm 80 inches 203 cm 88 to 106 inches 225 to 270 cm 6 1 inches 15 cm 100 inches 254 cm 111 to 133 inches 281 to 338 cm 7 6 inches 19 cm 150 in...

Page 29: ...ou carry a lightweight cable with you when you transport the projector see page 30 You can connect the projector to any computer that has a standard video output monitor port including desktop models PC and Macintosh computers and hand held devices See page 32 for instructions To play sound through the projector connect an audio cable see page 40 You may be able to use your remote control as a wir...

Page 30: ...n the projector 2 Make sure the USB Type B setting on the Extended menu is set to USB Display see page 73 3 Turn on your computer 4 Connect the square end of a USB cable to the projector s TypeB square USB port 5 Connect the flat end of the cable to any available USB port on your notebook or desktop computer The first time you connect a computer to the projector s USB port you will need to install...

Page 31: ...mote control or the projector Windows XP and Windows 2000 Follow the instructions on the screen to install the Epson USB Display software After the software is installed you see your computer s current desktop displayed by the projector You can switch the projector to other image sources using the Source Search button on the remote control or the projector Macintosh The setup folder for USB displa...

Page 32: ...her end to your computer s monitor port 2 You may need to change the Input Signal setting in the projector s Signal menu to RGB or Auto see page 70 3 You can connect an optional audio cable to play sound through the projector see page 40 caution Don t try to force a connector to fit a port with a different shape or number of pins You may damage the port or connector or the device you are trying to...

Page 33: ...PowerLite 1220 PowerLite 1260 Only on page 34 If your video device has a yellow RCA video output connector see Connecting a Composite Video Source on page 35 If your video device has an S Video connector see Connecting an S Video Source on page 36 If your video device has a component video port three connectors labeled either Y Cb Cr or Y Pb Pr see Connecting a Component Video Source on page 37 If...

Page 34: ...ort if possible Connect an HDMI cable to the HDMI connector on your video equipment and the HDMI connector on the projector When you ve finished making connections see page 43 for instructions on turning on the projector and Chapter 2 for instructions on displaying and adjusting the image note If an HDMI cable was not provided with your video equipment you can purchase one from an electronics deal...

Page 35: ...lay sound through the projector see page 40 for instructions on connecting an audio cable When you ve finished making connections see page 43 for instructions on turning on the projector and Chapter 2 for instructions on displaying and adjusting the image note If the video cable was not provided with your video device you can purchase one from an electronics dealer PowerLite S9 Video port PowerLit...

Page 36: ...ector see page 40 for instructions on connecting an audio cable When you ve finished making connections see page 43 for instructions on turning on the projector and Chapter 2 for instructions on displaying and adjusting the image note If the S Video cable was not provided with your video device you can purchase one from Epson see page 17 PowerLite S9 S Video port PowerLite 1220 PowerLite 1260 S Vi...

Page 37: ...1 Connect the component end of the cable 3 male RCA to the Y Cb Cr or Y Pb Pr connectors on your device 2 Connect the other end of the cable HD15 male to the Computer Component Video port on your projector using an optional component to VGA video cable or adapter 3 You may need to change the Input Signal setting in the projector s Signal menu to Auto see page 70 PowerLite S9 Computer Component Vid...

Page 38: ...laying and adjusting the image Connecting an RGB Video Source You can connect to an RGB video source using the VGA computer cable provided with the projector 1 Connect the cable to the RGB video port on your player and the Computer Component Video port on the projector 2 You may need to change the Input Signal setting in the projector s Signal menu to RGB see page 70 PowerLite S9 Computer Componen...

Page 39: ... A V Mute button or switched to a different picture source Only computer images will appear on the external monitor not video images First make sure your computer s VGA cable is connected to the projector s Computer Component Video port see page 32 Then connect your monitor to the projector s Monitor Out port as shown note Some LCD monitors may not be able to display the image correctly If you hav...

Page 40: ...ough the projector s speaker system 1 Locate the appropriate cable and connect it to the Audio port on the projector 2 Connect the other end of the cable to the audio output connector s on your computer or video equipment PowerLite S9 Audio port PowerLite 1220 PowerLite 1260 Audio ports ...

Page 41: ...eakers you may be able to use a standard audio cable with a stereo mini jack connector on one end and pin jacks on the other end For some speakers you may need a special cable or adapter 2 Connect the stereo mini jack end of the audio cable to the Audio Out port on the projector 3 Connect the other end of the cable to your speakers The projector s internal speaker system is disabled while sound is...

Page 42: ...on the projector 2 Connect the USB drive or the flat end of the USB cable to the USB TypeA port on the projector as shown 3 Connect the other end of the cable to your camera or other device if necessary The indicator light on the projector turns orange and then green when a USB device is connected note Use a cable less than 10 feet 3 meters long and connect the camera or other device directly to t...

Page 43: ...moving the USB device Be sure to turn off your USB device if necessary before you remove the device or cable from the projector Failure to do so may damage the device and or the projector Turning the Projector On and Off Turn on any connected computer or video equipment before starting the projector so it can automatically detect and display the image source If you turn on the projector first or h...

Page 44: ...ector 2 Plug one end of the power cord into the projector and the other end into an electrical outlet The Ppower light turns orange 3 Press the Ppower button on the projector or on the remote control Power light Power button ...

Page 45: ...on t have to press the Ppower button Follow these steps to enable Direct Power On 1 Press the Menu button on the remote control or projector then select the Extended menu and press Enter 2 Choose Operation and press Enter 3 Choose Direct Power On and press Enter 4 Highlight On and press Enter 5 Press Menu to exit The setting will take effect the next time you plug the projector into a power outlet...

Page 46: ...ction lamp turns off and the projector beeps twice You can then unplug the power cord If you want to turn the projector on again make sure the orange Ppower light is not flashing then press the Ppower button note Lamp life will vary depending upon mode selected environmental conditions and usage Turn off this product when not in use to prolong the life of the projector You can set the projector to...

Page 47: ...47 2 Displaying and Adjusting the Image Follow the guidelines in this chapter for Selecting an image source Adjusting the image ...

Page 48: ...e control Computer Video or USB If you still can t see an image or can t project the same image that is on your notebook or computer screen see page 95 for solutions Select USB to project from a USB device PowerLite 1220 PowerLite 1260 only See page 61 for instructions Adjusting the Image Once you see your image you may need to make certain adjustments If the image is too high or too low repositio...

Page 49: ... tilted or you need to fine tune the height of the image you can turn the projector s adjustable rear feet Raising the projector may cause the image shape to distort or keystone but you can correct the shape as described below Adjusting the Image Shape You can maintain a rectangular image by placing the projector directly in front of the screen and keeping it level This also produces the best pict...

Page 50: ... image is still distorted or you are using the PowerLite S9 projector do one of the following Press the appropriate keystone correction button on the projector s control panel until the shape is evenly rectangular Select the Keystone setting in the projector s Settings menu see page 71 Then use the arrow buttons on the remote control to adjust the shape of the image Keystone correction buttons Pow...

Page 51: ...lso use the Zoom setting in the projector s Settings menu see page 71 for instructions If the image still isn t large enough you may need to move the projector farther away from the screen You can also use the E Zoom buttons on the remote control to zoom in on a portion of the image See page 57 for instructions PowerLite 1220 PowerLite 1260 to enlarge or reduce the image turn the zoom ring PowerLi...

Page 52: ...deo games or TV in a bright room Presentation For color presentations in a bright room Theatre For natural toned movies in a darkened room Photo For vivid high contrast still images in a bright room only available when the source is set to Computer or USB Sports For vivid TV images in a bright room only available for component video S Video or composite video sources sRGB Matches the color palette...

Page 53: ...tains the aspect ratio of the image Choose this setting to automatically resize the image and make the best use of the display area Auto HDMI images on PowerLite 1220 only Automatically sets the aspect ratio according to the input signal Choose this setting to project an HDMI image in the best aspect ratio 4 3 Displays images using the full projection area at an aspect ratio of 4 3 16 9 Converts t...

Page 54: ...spect ratio 16 9 Converts the aspect ratio of the image to 16 9 4 3 ratio images are elongated horizontally to fit Full Displays images using the full width of the projection area but does not retain the aspect ratio 4 3 ratio images are elongated horizontally Zoom Displays images using the full width of the projection area and maintains the aspect ratio of the image The image may be cut off on th...

Page 55: ...the remote control which lets you operate the projector from anywhere in the room up to 19 7 feet 6 meters away This chapter covers Using the remote control Controlling the picture and sound Operating your computer with the remote control Highlighting your presentation Presenting a slideshow from a USB device PowerLite 1220 PowerLite 1260 only ...

Page 56: ...and Sound Press the A V Mute button on the remote control or close the A V Mute slide on the projector to turn off the image and sound and darken your screen This is useful if you want to temporarily re direct your audience s attention without the distraction of a bright screen To turn the image and sound back on press the button again or open the A V Mute slide You can create an image such as a c...

Page 57: ... the E Zoom buttons on the remote control 1 Press the E Zoom button on the remote control You see a crosshair indicating the center of the zoom in area 2 Use the arrow menu navigation buttons to position the crosshair 3 Continue pressing the E Zoom button to enlarge the selected area up to 4 times 4 While the image is enlarged you can Use the arrow buttons to move around the screen Press the E Zoo...

Page 58: ...use the remote control buttons to do one of the following Move through presentation slides using the Page Up or Page Down buttons Use the buttons as you would a wireless mouse by pressing the arrow Enter and Esc buttons Before you can use one of these functions you must connect a USB cable to the USB TypeB port on the projector see page 30 and select the function you want to use see page 59 note T...

Page 59: ...less mouse select Wireless Mouse as the USB Type B setting on the Extended menu see page 73 Then you can control your presentation as follows Use the arrow buttons to move the cursor on the screen Press the Enter button once to left click or twice to double click Press the Esc button to right click To drag and drop hold down the Enter button Then use the arrow buttons to drag the object When it s ...

Page 60: ...ructions in the next section 2 Use the arrow buttons on the remote control to position the pointer on the screen 3 When you re done using the pointer press the Pointer or Esc button to clear the screen Customizing the Pointer Tool You can change the appearance of the pointer by choosing from three alternative shapes 1 Press the Menu button on the remote control highlight the Settings menu highligh...

Page 61: ...ctor and begin your presentation You can switch the display from the device displaying the slideshow to another source using the Source Search button or one of the specific Source buttons on the remote control To return to the Slideshow source press Source Search and select USB or simply press the USB button Starting a Slideshow 1 Connect a USB device to the projector s USB TypeA port see page 42 ...

Page 62: ...f the Slideshow screen and press Enter The images display sequentially one time through At the end you see the folder display again Select the following as necessary to control your display or slideshow To move back up a folder level highlight Back to Top at the top of the Slideshow screen and press Enter To select a different device highlight Select drive in the upper right corner of the screen p...

Page 63: ...how Display Options To select slideshow options or add special effects follow these steps 1 Highlight Option at the bottom left corner of the slideshow screen and press Enter You see this screen 2 Highlight the options you want to use and press Enter Option Available settings Display order Name order displays files in name order Date order displays files in date order Sort order In Ascending sorts...

Page 64: ...es Screen switching time No does not switch file display automatically 1Sec to 60Sec displays files for the selected time and switches them automatically Effect Wipe transitions between images with a wipe effect Dissolve transitions between images with a dissolve effect Random transitions between images using a variety of effects in random order Option Available settings ...

Page 65: ...en menus to adjust the image sound and other features This chapter covers the following information Using the menu system Adjusting the image Adjusting signal settings Customizing projector features Customizing power and operation Using the projector security features ...

Page 66: ...ress the Enter button to select it 3 Once you ve selected the menu use the arrow buttons to scroll through the list of options Some of the options may be grayed out or unavailable depending on the selected source 4 After highlighting the option you want to adjust use the arrow buttons to change the setting In some cases you may have to press the Enter button to view a sub screen Press the left or ...

Page 67: ...ss color tint contrast and Auto Iris settings 1 Press the Menu button on the projector or remote control and select the Image menu You see a screen similar to one of these note When you select Reset All in the Reset menu it does not reset the Input Signal User s Logo Language or Lamp Hours settings note If you are using the HDMI port PowerLite 1220 PowerLite 1260 only you see the menu on the left ...

Page 68: ... the image bluer or Low to tint it redder default setting is Medium Not available if sRGB is selected as the Color Mode setting Color Adjustment Adjusts the color values Select Red Green Blue to adjust red green and blue hue and saturation values Not available if sRGB is selected as the Color Mode setting Auto Iris Automatically adjusts the projected luminance according to the brightness of the im...

Page 69: ...n to changing the position of the projected image you can correct tracking and sync for computer images or change the aspect ratio 1 Press the Menu button and select the Signal menu You see a screen similar to one of those below The settings will be different depending on the source you are projecting from Computer RGB video Component video Composite video S Video HDMI PowerLite 1220 PowerLite 126...

Page 70: ...on to convert interlaced signals into progressive signals best for moving images Leave the setting Off for still images HDMI Video Range PowerLite 1220 PowerLite 1260 only When you connect to the HDMI input port set the projector s video range to match the video range setting of your device Input Signal If the colors don t look right on the Auto setting select the setting for the type of equipment...

Page 71: ...ojector adjust audio volume and customize several other features Keystone Adjusts the shape of the image if the projector has been tilted upward or downward If you notice that lines or edges look jagged after adjustment decrease the Sharpness setting see page 67 Auto Keystone PowerLite 1220 PowerLite 1260 only Automatically compensates for keystone distortion when the projector is tilted upward or...

Page 72: ...rmation Power Consumption Lets you select from two levels of brightness The ECO setting reduces power consumption and projector noise and extends the lamp s operating life Volume Raises or lowers the volume of the projector s speaker User Button Lets you create a shortcut to one of the following menu items Closed Caption PowerLite S9 only Power Consumption Info Progressive Resolution When you pres...

Page 73: ...en the A V Mute button is pressed Closed Caption PowerLite S9 only Lets you display closed captioning for content that provides it User s Logo Create a custom startup screen as described on page 77 Projection Select Front to project onto the front of a screen Front Ceiling when the projector is mounted upside down from the ceiling Rear to project from behind onto a transparent screen or Rear Ceili...

Page 74: ...projector above 4 921 feet 1 500 meters to ensure that the temperature is regulated properly Turn this setting off for lower elevations Standby Mode Select Communication On to enable the projector to be monitored and controlled from a computer when it is in standby mode the power light is orange USB Type B Select how you want to use the USB port Select USB Display to use the USB port to project co...

Page 75: ...ld it be stolen See page 77 Disable the projector s buttons this is useful for example in a classroom when you want to ensure that no one touches the projector s buttons while you re using the remote control See page 79 Secure the projector to prevent theft using a cable locking system See page 80 Enabling Password Protection The default setting for the password is 0000 Follow these steps to creat...

Page 76: ...d press Enter 4 When you see a message asking if you want to change the password select Yes and press Enter 5 Hold down the Num button and use the numeric keypad to enter a four digit password 6 When you see a confirmation message reenter the password 7 Press the Menu button then press Enter to exit the screen 8 Turn off and unplug the projector Starting the Projector With a Password When the pass...

Page 77: ...ntering the correct password again If you have forgotten the password contact Epson with the request code number that appears in the Password screen for assistance See Where To Get Help on page 102 If you enter an incorrect password 30 times in succession the projector remains locked and you must contact Epson to arrange for service Creating Your Own Startup Screen You can transfer any image from ...

Page 78: ...he arrow buttons to select the area of the image you want to use Then press Enter 5 When you see the message Select this image highlight Yes and press Enter 6 Use the arrow buttons to select a zoom factor display size and press Enter 7 When the message Save this image as the User s Logo appears select Yes and press Enter Saving the logo may take a few moments Do not use your projector remote contr...

Page 79: ... V Mute to Logo to display your image when you press the A V Mute button 4 When you re finished press Menu to exit Disabling the Projector s Buttons When you enable the Control Panel Lock function you can lock all of the projector s buttons or all of the buttons except the Ppower button The remote control can still be used to operate the projector 1 Press the Menu button highlight the Settings men...

Page 80: ...ector includes two security locking points to prevent its theft when installed or used in public locations Security cable attachment You can attach a commercially available security cable as shown below to secure the projector to a table or ceiling mount Kensington security slot The security slot located on the side of the projector is compatible with the MicroSaver security systems manufactured b...

Page 81: ...icer This chapter covers the following Cleaning the lens Cleaning the projector case Cleaning the air filter Replacing the air filter Replacing the lamp Replacing the remote control batteries Transporting the projector warning Before you clean any part of the projector turn it off and unplug the power cord Never open any cover on the projector except the lamp cover Dangerous electrical voltages in...

Page 82: ...includes an air filter to ensure the best performance If dust collects on the air filter clean it as described here Dust clogs prevent proper ventilation and can cause overheating which can damage the projector 1 Turn off the projector and unplug the power cord 2 Remove dust from the air filter using a small vacuum cleaner designed for computer or office equipment or gently clean the vent with a s...

Page 83: ...ged or torn You repeatedly see a projected message telling you to clean or replace it 1 Turn off the projector and unplug the power cord 2 Open the air filter cover on the side of the projector 3 Lift the air filter out of its slot as shown note To order replacement air filters request part number V13H134A25 See page 17 for ordering information note Air filters contain polycarbonate ABS resin and ...

Page 84: ...enu is Normal default and 5 000 hours if this setting is ECO See page 88 to check the lamp usage It is time to replace the lamp when The projected image gets darker or starts to deteriorate The message Replace the lamp appears on the screen and the Lamp light flashes orange To maintain projector brightness and image quality replace the lamp as soon as possible note Turn off this product when not i...

Page 85: ...n the lamp cover screw you cannot remove it Then slide the lamp cover off Lamp light warning Let the lamp cool fully before replacing it In the unlikely event that the lamp has broken small glass fragments may be present and should be removed carefully to avoid injury If the projector has been installed on the ceiling you should stand to the side of the lamp cover not underneath it If the lamp is ...

Page 86: ...and pull it straight out 6 Gently insert the new lamp If it doesn t fit easily make sure it is facing the right way Then tighten its screws Loosen but don t remove these screws note The lamp s in this product contain mercury Please consult your state and local regulations regarding disposal or recycling Do not put in the trash ...

Page 87: ...ector s menu system 1 Press the Menu button on the remote control or on the projector s control panel You see the main menu 2 Select the Reset menu and press Enter You see this screen 3 Select Reset Lamp Hours and press Enter 4 When you see the prompt select Yes and press Enter 5 When you re finished press Menu to exit note Tighten the lamp cover securely so you do not receive a lamp cover error w...

Page 88: ...h on the battery cover as you lift the cover off note The information displayed depends on the input signal currently selected If you have used the projector for less than 10 hours the hours are listed as 0H caution When replacing batteries take the following precautions Replace the batteries as soon as they run out If the batteries leak wipe away battery fluid with a soft cloth If fluid gets on y...

Page 89: ... A V Mute slide lens cover If a USB device is connected remove it from the projector Return the projector feet to their stored highest positions When shipping the projector for repairs use the original packaging material if possible If you do not have the original packaging use equivalent materials placing plenty of cushioning around the projector When transporting the projector a long distance fi...

Page 90: ...90 Maintaining the Projector ...

Page 91: ...port for problems you can t solve yourself The following information is included Using the projector s on screen help system What to do when the projector s status lights flash Solving projector operation problems Solving problems with the image or sound Solving problems with the remote control Contacting technical support ...

Page 92: ...te control or on the projector You see the Help menu 2 Use the arrow buttons on the remote control or the projector to highlight menu items 3 Press the Enter button on the remote control or the projector to select the menu item and read the solutions 4 To exit the help system press the Help button or Esc button If none of the suggestions solve your problem see additional solutions to problems in t...

Page 93: ... to the following tables for a complete description of the projector s status lights Temperature light Lamp light Power light Power light status P Power light status Description Flashing green The projector is warming up Wait for the image to appear Green The projector is operating normally Orange The projector is in sleep or standby mode You can unplug it or press the P power button to turn it on...

Page 94: ...ord and contact Epson for help as described on page 102 Warning Except as specifically explained in this User s Guide do not attempt to service this product yourself P Flashing red Red Flashing red The projector has an internal problem Stop using the projector disconnect the power cord and contact Epson for help as described on page 102 P Red Off Flashing red There is a problem with the fan or tem...

Page 95: ... the Control Panel Lock function has been enabled you can t use the buttons on the projector Try using the remote control instead or press and hold the projector s Enter button for seven seconds to release the lock see page 79 Solving Problems With the Image or Sound No image appears on the screen Check that the Ppower light is green not flashing and that the A V Mute slide is open Also press the ...

Page 96: ...ssing the button Make sure the power for your connected equipment is turned on If you re using a PC notebook Hold down the Fn key on the keyboard and press the function key that lets you display on an external monitor It may have an icon such as or it may be labelled CRT LCD Allow a few seconds for the projector to sync up after pressing it Check your notebook s manual or online help for details O...

Page 97: ...s settings Only part of the computer image is displayed Press the Auto button on the remote control or the Enter button on the projector Make sure the image Position setting is correct in the Signal menu See page 70 for more information Press the Aspect button on the remote control or select the correct Aspect setting from the Signal menu See page 53 for details on the available options Press the ...

Page 98: ...al may be split between the computer and the projector If you notice a decline in the projected image quality when the image is displayed simultaneously on your notebook computer and the projector turn off the notebook s LCD display Make sure the correct input signal is selected in the Signal menu see page 70 If you re using a composite S Video or component video source with 480i signals turn on t...

Page 99: ...tracking and sync settings as described in the next section You see vertical bands or the image still looks blurry after trying the solutions in the previous section If you re projecting from a computer and displaying an image that contains a lot of fine detail you may notice vertical bands or some of the characters may look heavy or blurred Press the Auto button on the remote control or the Enter...

Page 100: ...sting the Color Saturation Color Temp and Tint settings on the Image menu Try adjusting the Brightness and Contrast settings on the Image menu Try adjusting the Power Consumption setting see page 71 Check your computer display settings to correct the color balance The projector s lamp may need to be replaced See page 84 for instructions Make sure the correct input signal is selected in the Signal ...

Page 101: ...creen or via the volume control function keys If you re using a DVD player or other video source make sure the cables are connected correctly as described on page 40 Nothing appears on an external monitor PowerLite S9 only The only images that can be displayed on an external monitor are computer images connected through the Computer Component Video port see page 39 Solving Problems With the Remote...

Page 102: ... or PowerLite S9 PowerLite 1220 or PowerLite 1260 Canada You can download utilities and documentation get FAQs and troubleshooting advice or e mail Epson with your questions Speak to a Support Representative To use the Epson PrivateLine Support service call 800 637 7661 and enter the PIN on the included Epson PrivateLine Support card This is the fastest way of speaking to a live representative and...

Page 103: ...the projector Proof of purchase such as a store receipt and date of purchase Computer or video configuration Description of the problem Purchase Supplies and Accessories You can purchase screens and other accessories from an Epson authorized reseller To find the nearest reseller call 800 GO EPSON 800 463 7766 Or you can purchase online at www epsonstore com U S sales or www epson ca Canadian sales...

Page 104: ...104 Solving Problems ...

Page 105: ...XGA Color reproduction 16 8 million colors Light output brightness PowerLite S9 Normal mode White light output 2500 lumens ISO 21118 standard Color light output 2500 lumens ECO mode White light output 1960 lumens ISO 21118 standard PowerLite 1220 PowerLite 1260 Normal mode White light output 2600 lumens ISO 21118 standard Color light output 2600 lumens ECO mode White light output 2040 lumens ISO 2...

Page 106: ...ches 87 to 1414 cm PowerLite 1220 4 3 image 35 to 431 inches 89 to 1095 cm PowerLite 1260 16 10 image 36 to 429 inches 91 to 1089 cm Projection methods Front rear upside down ceiling mount Internal sound system monaural 1 W Optical aspect ratio PowerLite S9 PowerLite 1220 4 3 horizontal vertical PowerLite 1260 16 10 horizontal vertical Zoom ratio PowerLite S9 Digital 1 1 35 PowerLite 1220 PowerLit...

Page 107: ...ions Height 3 0 inches 77 mm not including feet Width 11 6 inches 295 mm Depth 9 0 inches 228 mm Weight 5 1 lb 2 3 kg Electrical Rated frequency 50 60 Hz AC Power supply 100 to 240 VAC 10 2 8A to 1 2 A Power consumption 228 W in ECO mode 280 W Normal mode 0 3 W Standby Communication Off 2 6 W Standby Communication On note Lamp life will vary depending upon mode selected environmental conditions an...

Page 108: ...a ICES 003 Class B CSA C22 2 No 60950 1 07 Pixelworks DNX ICs are used in this projector Compatible Video Formats These projectors support the high definition video and computer display formats listed here To project images output from a computer the computer s video card must be set at a refresh rate vertical frequency that s compatible with the projector Some images are automatically resized usi...

Page 109: ...800 600 800 600 800 600 800 600 800 600 XGA 60 XGA 70 XGA 75 XGA 85 60 70 75 85 1024 768 1024 768 1024 768 1024 768 SXGA1 70 SXGA1 75 70 75 1152 864 1152 864 WXGA 60 WXGA 75 60 75 1280 800 1280 800 SXGA2 60 60 1280 960 SXGA3 60 60 1280 1024 WXGA1 60 WXGA2 60 60 60 1280 768 1360 768 WXGA 60 60 1440 900 SXGA 60 60 1400 1050 iMAC VGA iMAC SVGA iMAC XGA MAC13 MAC16 MAC19 MAC19 60 MAC21 117 95 75 67 75...

Page 110: ...0 50 60 60 50 720 480 720 480 720 576 720 576 720 576 720 576 720 576 SDTV 480i SDTV 576i SDTV 480p SDTV 576p HDTV 720p HDTV 1080i 60 50 60 50 60 50 60 50 720 480 720 576 720 480 720 576 1280 720 1920 1080 Computer component video composite video and S Video continued Mode Refresh rate Hz Resolution ...

Page 111: ... 800 600 800 600 800 600 800 600 800 600 XGA 60 XGA 70 XGA 75 XGA 85 60 70 75 85 1024 768 1024 768 1024 768 1024 768 SXGA1 70 SXGA1 75 70 75 1152 864 1152 864 WXGA 60 WXGA 75 60 75 1280 800 1280 800 SXGA2 60 60 1280 960 SXGA3 60 60 1280 1024 WXGA1 60 WXGA2 60 60 60 1280 768 1360 768 WXGA 60 60 1440 900 SXGA 60 60 1400 1050 iMAC VGA iMAC SVGA iMAC XGA MAC13 MAC16 MAC19 MAC19 60 MAC21 117 95 75 67 7...

Page 112: ...720 576 720 480 720 576 1280 720 1920 1080 HDMI signals Mode Refresh rate Hz Resolution VGA 60 640 480 SVGA 60 800 600 XGA 60 1024 768 WXGA 60 1280 800 SXGA SXGA 60 60 1280 960 1280 1024 SXGA 60 1400 1050 UXGA 60 1600 1200 SDTV 480i SDTV 576i SDTV 480p SDTV 576p HDTV 720p HDTV 1080i HDTV 1080p 60 50 60 50 60 50 60 50 60 50 720 480 720 576 720 480 720 576 1280 720 1920 1080 1920 1080 Computer compo...

Page 113: ...5 XGA 85 60 70 75 85 1024 768 1024 768 1024 768 1024 768 SXGA1 70 SXGA1 75 SXGA1 85 SXGA1 100 70 75 85 100 1152 864 1152 864 1152 864 1152 864 WXGA 60 WXGA 75 WXGA 85 60 75 85 1280 800 1280 800 1280 800 SXGA2 60 SXGA2 75 SXGA2 85 60 75 85 1280 960 1280 960 1280 960 SXGA3 60 SXGA3 75 SXGA3 85 60 75 85 1280 1024 1280 1024 1280 1024 WXGA1 60 WXGA2 60 60 60 1280 768 1360 768 WXGA 60 WXGA 75 WXGA 85 60...

Page 114: ... 600 1024 768 640 480 832 624 1024 768 1024 768 1152 870 NTSC NTSC 4 43 PAL N PAL M PAL PAL 60 SECAM 60 60 50 50 60 60 50 720 480 720 480 720 576 720 576 720 576 720 576 720 576 SDTV 480i SDTV 576i SDTV 480p SDTV 576p HDTV 720p HDTV 1080i 60 50 60 50 60 50 60 50 720 480 720 576 720 480 720 576 1280 720 1920 1080 Computer component video composite video and S Video continued Mode Refresh rate Hz Re...

Page 115: ...A 60 640 480 SVGA 60 800 600 XGA 60 1024 768 WXGA 60 1280 800 SXGA SXGA 60 60 1280 960 1280 1024 SXGA 60 1400 1050 UXGA 60 1600 1200 SDTV 480i SDTV 576i SDTV 480p SDTV 576p HDTV 720p HDTV 1080i HDTV 1080p 60 50 60 50 60 50 60 50 60 50 720 480 720 576 720 480 720 576 1280 720 1920 1080 1920 1080 ...

Page 116: ...116 Technical Specifications ...

Page 117: ... use a ceiling mount and apply adhesives to the mount to prevent the screws from loosening or if you use lubricants or oils on the projector the projector case may crack and the projector may fall from its ceiling mount This could cause serious injury to anyone under the mount and could damage the projector When installing or adjusting a ceiling mount do not use adhesives to prevent the screws fro...

Page 118: ...o may cause an unstable display and could lead to projector damage Do not store the projector outside the required temperature range of 14 to 140 F 10 to 60 C or in direct sunlight for long periods of time Doing so may cause damage to the case Do not touch the plug during an electrical storm Otherwise you may receive an electric shock Unplug the projector when it will not be used for extended peri...

Page 119: ...d or damaged by heat near the exhaust vents Do not bring your hands or face close to the vents while projection is in progress Before you move the projector make sure its power is turned off the plug is disconnected from the outlet and all cables are disconnected Never try to remove the lamp immediately after use because it will be extremely hot Before removing the lamp turn off the power and wait...

Page 120: ...ing antenna Increase the separation between the equipment and receiver Connect the equipment into an outlet on a circuit different from that to which the receiver is connected Consult the dealer or an experienced radio TV technician for help WARNING The connection of a non shielded equipment interface cable to this equipment will invalidate the FCC Certification of this device and may cause interf...

Page 121: ...lurry image 99 Brightness 105 Brightness setting 68 C Cables audio 40 component to VGA 18 33 37 composite 33 35 HDMI 34 illustrations 21 ordering 17 to 18 security 80 S Video 18 36 USB 21 30 to 31 42 to 43 VGA 32 38 Capturing image 78 Carrying cases 10 20 21 89 Ceiling mount 17 29 Chalkboard projecting on 52 Cleaning air filter 82 to 83 lens 82 projector case 82 Closed captioning 73 Color correcti...

Page 122: ...l aspect setting 54 H HDMI cable 34 HDMI Video Range setting 70 HDTV images video formats 112 115 Height of image adjusting 49 Help system using 92 Help Epson 10 102 to 103 High Altitude mode 74 94 108 I Image adjusting 48 to 54 67 to 68 blurry 99 capturing and saving in projector 78 correcting shape 50 71 98 fitting on screen 70 97 to 98 height adjusting 49 presentation cameras 18 problems with 9...

Page 123: ...tting 54 Not Supported message 97 Num button 76 Numeric keypad using 76 O Optical aspect ratio 53 to 54 106 Options for projector 17 to 18 P Page Up Page Down buttons 58 to 59 Page Up Down setting 59 74 Password Protect sticker 20 21 protection 75 to 77 request code 77 Photo color mode 52 Picture source selecting 48 Picture see Image Pointer tool using 60 Position setting 70 97 Positioning image 4...

Page 124: ...oting 101 USB button 43 48 using 56 Replacing lamp 84 to 87 Request code password 77 Resetting lamp timer 87 Resetting menu options 67 Resize image 53 to 54 Resolution 53 to 54 97 105 Resolution setting 70 S Safety instructions 117 to 119 specifications 108 Saturation setting 68 Screen distance from projector 23 to 28 106 ordering 17 to 18 startup screen creating 77 to 78 Screen image see Image Se...

Page 125: ...96 to 97 projector problems 91 to 103 remote control problems 101 tapered image 50 Turning off picture using A V Mute 56 Turning off projector 46 U Unpacking projector 20 to 21 USB button 43 48 cable 21 30 to 31 42 to 43 connecting external device 42 to 43 connecting for display 30 to 31 selecting TypeB port usage 58 74 User s Logo creating 78 display settings 79 V VCR connecting 33 to 39 VGA vide...

Page 126: ......

Reviews: