background image

3. Environment and Installation 


24 

Part Feeding 7.0  IF-80 Rev.3


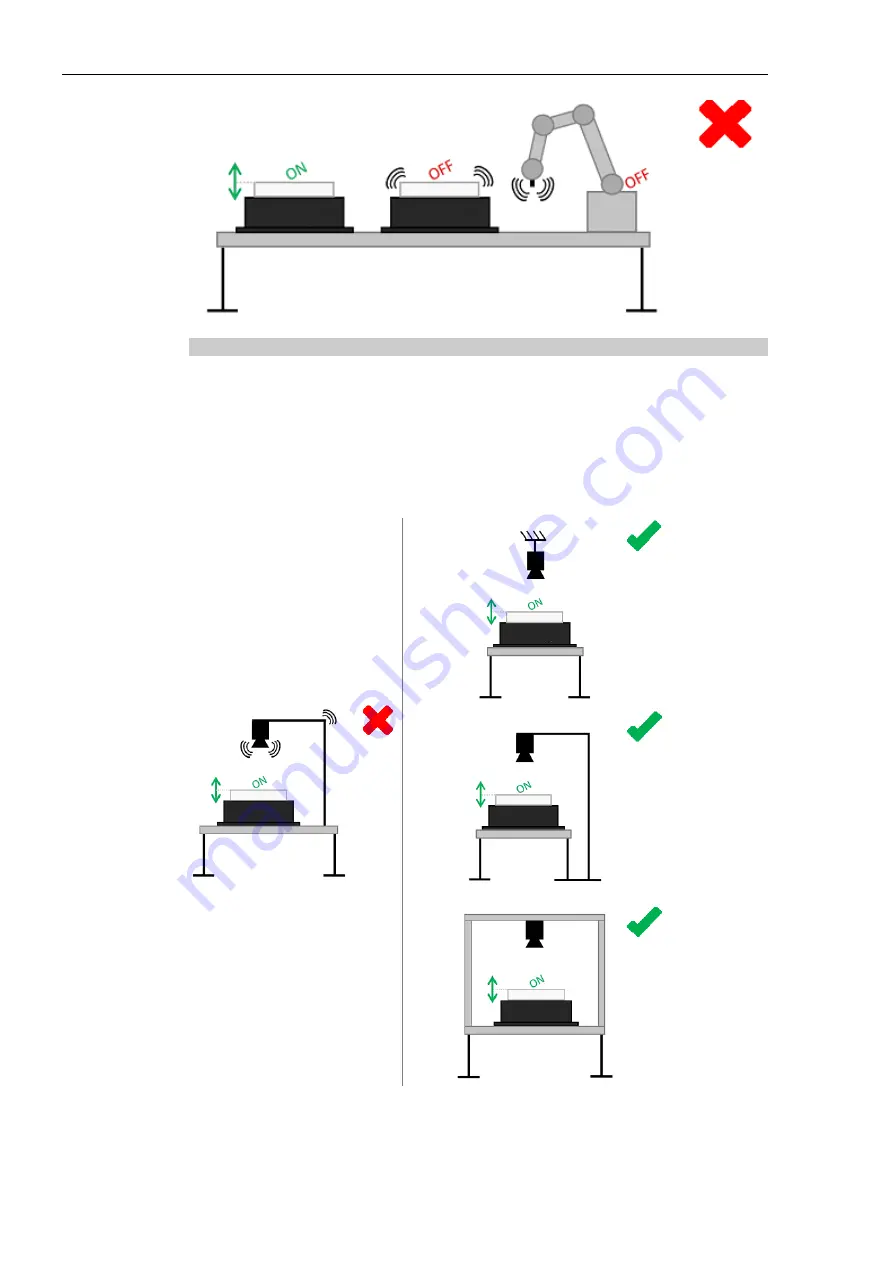
3.5.3.2  Decoupling the Camera 

It is important that the camera is not perturbed by the vibration of the feeder or by any 

other moving device. If the vision system is disturbed by residual vibrations, the 

coordinates sent to the robot will not be reliable, thus compromising the precision of the 

whole system.  

Therefore, it is recommended not to install feeders and cameras on the same support. 

When this solution is not applicable, be sure to mount the camera on a rigid and heavy 

enough base table to prevent back-feeding of vibrations into surrounding devices. 


Summary of Contents for Part Feeding 7.0 IF-80

Page 1: ...Rev 3 EM221S4980F EPSON RC 7 0 Option Part Feeding 7 0 IF 80 ...

Page 2: ...EPSON RC 7 0 Option Part Feeding 7 0 IF 80 Rev 3 ...

Page 3: ...Part Feeding 7 0 IF 80 Rev 3 i EPSON RC 7 0 Option Part Feeding 7 0 IF 80 Rev 3 Copyright 2020 2022 SEIKO EPSON CORPORATION All rights reserved ...

Page 4: ...utions on this manual to use our robot system safety and correctly TRADEMARKS Microsoft Windows Windows logo Visual Basic and Visual C are either registered trademarks or trademarks of Microsoft Corporation in the United States and or other countries Other brand and product names are trademarks or registered trademarks of the respective holders TRADEMARK NOTATION IN THIS MANUAL Microsoft Windows 8...

Page 5: ...acement 12 2 3 8 Plate Z Repeatability 12 2 4 Specification Table 13 2 4 1 Specification of IF 80 13 2 4 2 Picking Surface 14 3 Environment and Installation 15 3 1 Environment 15 3 1 1 Installation Environment 15 3 1 2 Storage Environment 15 3 2 Base Table 16 3 3 Installing IF 80 16 3 4 Unpacking and Transportation 17 3 4 1 Unpacking 17 3 4 2 Packaging of the Product Transportation and Handling 18...

Page 6: ...tenance 40 5 2 1 Periodic Maintenance Schedule 40 5 2 2 Remove the Platform Module 41 5 2 3 Control and Cleaning of the Platform 42 5 3 Component Replacement 43 5 3 1 Exchange of the Backlight 44 5 3 2 Resetting IP Address 45 6 Option Part List 47 6 1 Feeder series IF 80 47 6 2 Plate series IF 80 47 6 2 1 Plate Anti static 47 6 2 2 Plate FDA 48 6 2 3 Plate for Purging Option Anti static 48 6 2 4 P...

Page 7: ...Hardware IF 80 ...

Page 8: ......

Page 9: ...possible harm to people caused by electric shock exists if the associated instructions are not followed properly CAUTION This symbol indicates that a danger of possible harm to people or physical damage to equipment and facilities exists if the associated instructions are not followed properly The NOTE sections describe important information to be followed for operating the Robot system REFER TO F...

Page 10: ...witched off Never modify the product Unauthorized modification may cause the product to malfunction resulting in injury electric shock fire etc Turn off the power to the product in the event of power failure Failure to do so may cause the product to suddenly start moving when the power is restored Do not use the product in a place where it may come in contact with water or oil droplets WARNING Do ...

Page 11: ...equipment 1 2 2 2 Specific danger WARNING Backlight The part feeder has an integrated Backlight that uses LEDs Light Emitting Diodes These LEDs emit visible or non visible radiation depending on the color of the Backlight LEDs illumination can create discomfort cornea retinal and lens damage Never look directly into the light source without any personal protection e g protective eyewear Customers ...

Page 12: ...ion beyond 700nm C Prohibit or limit as possible direct access to the source exposure in the axis of radiation D Establish a security perimeter to prevent operators from approaching the source at distances beyond the nominal ocular hazard recommended by the manufacturer E In all cases ensure that the means used properly mitigate exposure variables characteristics of screens or goggles to choose ba...

Page 13: ...ation of small parts 3 mm 8 mm to a robot equipped with a vision system 2 2 Model Model numbers of IF 80 Product name Specification Model number IF80 no Light IF80 No backlight R12NZ9015B IF80 RED IF80 backlight Red R12NZ9015C IF80 WHITE IF80 backlight White R12NZ9015D IF80 GREEN IF80 backlight Green R12NZ9015E IF80 BLUE IF80 backlight Blue R12NZ9015F IF80 INFRARED IF80 backlight Infrared light R1...

Page 14: ...Os D An integrated mechanism allowing to remove the platform easily without additional tooling E An integrated backlight optional that allows an easy recognition of the parts from a camera placed above C For details refer to 3 6 Conneting Cable D For more information on how to remove or change the platform refer to 5 2 2 Remove the platform module E For more information on the backlight color and ...

Page 15: ...f the IF 80 Additional space is needed around the IF 80 to unclamp and remove the platform with the integrated lever Figure 2 3 overall dimensions with lever Refer to 5 2 2 Remove the platform module for more information on how to remove the platform For details of installing refer to 3 3 Installing IF 80 ...

Page 16: ...peration Indicator LEDs LED State Meaning Power On 24V on Power input S power On 24V on S power input refer to 3 6 2 Power connection for more information Platform On Platform vibrating Hopper On Hopper vibrating State Blinking Time on 100ms System in standby Blinking Time on 900ms System in service Backlight On 24V on backlight Synchronization input 1 On Communication ...

Page 17: ...UTION Note that the shock or impact of the gripper may damage the surface of the platform 2 3 5 Permissible Platform Weight IF 80 Maximum weight of the platform without components 150 g Maximum weight of components in addition to the maximum weight of the platform 50 g 2 3 6 Permissible Hopper Weight IF 80 Maximum weight of the hopper without components 400 g Maximum weight of components in additi...

Page 18: ...12 Part Feeding 7 0 IF 80 Rev 3 2 3 7 Maximum Plate Displacement IF 80 Maximum displacement x 0 5mm Maximum displacement y 0 5mm Maximum displacement z 0 5mm 2 3 8 Plate Z Repeatability IF 80 Plate Z repeatability 20 µm ...

Page 19: ...se refer to 4 3 Backlight for more information Independent vibrations in three orthogonal directions Interchangeable vibration platform Refer to 5 2 2 for more information Easily removable hopper RoHS Maximum weight on the platform components 50 g Maximum weight on the hopper components 400 g Weight Includes platform backlight 3 7kg Protection class IP40 Working temperature 5 C 40 C Humidity 30 80...

Page 20: ...2 Specifications 14 Part Feeding 7 0 IF 80 Rev 3 2 4 2 Picking Surface The maximum picking surface dimensions corresponds to the IF 80 platform size Figure 2 5 Picking surface ...

Page 21: ...idity or temperature variations note that it might affect the global performance of part feeder Avoid extreme electromagnetic waves ultraviolet rays and radiation Avoid using the product in a place where the main unit or controller may be exposed to water or oil droplets Clean room application cleanliness class ISO7 CAUTION Do not use the product in an atmosphere of corrosive gases 3 1 2 Storage E...

Page 22: ...ing of mounting table refer to 3 5 Installing 3 3 Installing IF 80 CAUTION The IF 80 must be mounted on a smooth flat and solid surface Ensure that the IF 80 is not submitted to mounting flexure Failure to do so will degrade feeder performance To guarantee a proper behavior of the IF 80 a tight fastening to a solid underground is necessary The following holes in the base plate of different IF 80 f...

Page 23: ...or return Do not remove the part feeder from its packaging until you are ready to install it Step 1 Carefully open the shipping box by using a cutter A product WARNING Take care not to cut too deep or else you will damage the IF 80 Step 2 Verify that there is no visible damage If the product A received does not match your order or is damaged contact your Sales Representative NOTE NOTE ...

Page 24: ...e with the specific terms indicated on the package top bottom fragile etc In addition pay particular attention to the following points CAUTION Be careful of the weight and take care when transporting the system Always hold the system firmly with two hands The operator should not carry heavy shipping boxes by themselves If the shipping box is to be left standing it should be in a horizontal positio...

Page 25: ...530 Refer each table when the values differ depending on the model 3 5 1 Symbols and Acronyms in this Manual This section describes symbols and acronyms 3 5 1 1 Symbols Wrong implementation Correct implementation ON Active operating feature moving Movements OFF Passive NOT operating feature NOT moving Perturbation undesired vibration ...

Page 26: ...ection Rubber buffersw A max base table length B max base table width c distance between feeders ØD diameter of the round buffer APSOvib G screw diameter H height of the round buffer APSOvib cz spring constant of the round buffer APSOvib compression in Z direction axial direction Fz max allowed compressive force of the round buffer APSOvib L Length of male screws M mass N A not applicable Qty quan...

Page 27: ...to installing on the table and specification of the table The Part Feeding must be installed either on a rigid base table screwed to the ground or on a not secured but heavy base table For the second application the mass M and the dimensions A B of the base table must be large enough to absorb the vibrations generated by the feeder 3 5 2 2 Installing Part Feeding on the table The Part Feeding must...

Page 28: ...it is necessary to avoid that all the involved devices can interfere with each other Hoppers are provided with vibration isolators so that hopper vibration is not transmitted to other peripherals 3 5 3 1 Decoupling of Moving Devices If several moving devices are assembled in parallel and close to each other it is necessary to decouple the vibrations to avoid that behavior of any product is disturb...

Page 29: ...ate vibration e g vibration isolators Vibration isolators solution is only applicable to IF 240 380 and 530 For the mass M and dimensions A B of the base table refer to 3 5 5 1 Specification of Base Table For the vibration isolators refer to 3 5 5 3 Specification of Vibration Isolators Increasing the mass of the base table to avoid the integration of the vibration isolators does not ensure that th...

Page 30: ...he vision system is disturbed by residual vibrations the coordinates sent to the robot will not be reliable thus compromising the precision of the whole system Therefore it is recommended not to install feeders and cameras on the same support When this solution is not applicable be sure to mount the camera on a rigid and heavy enough base table to prevent back feeding of vibrations into surroundin...

Page 31: ...r more feeders are installed close to each other the movement of the active device can excite the passive one It is therefore recommended to install the feeders at enough distance to prevent them from disturbing each other The minimal distance between Part Feeding refer to 3 5 5 4 Minimal Distance Between Part Feeding ...

Page 32: ...F 530 M Kg 10 40 200 250 A mm 600 600 1000 1200 B mm 150 350 500 750 Table 3 2 Specification of Base Table The thickness of the base table must be calculated basing on requirements resumed in Table 3 2 Specification of Base Table Dimension the base table so that the minimum mass M requirement is met 3 5 5 2 Specification of Screw IF 80 IF 240 IF 380 IF 530 Quantity of screws 4 4 4 4 Screw ø M5 M6 ...

Page 33: ...55 412021 DVA 2 50 45 M10 28 55 øD mm 15 50 H mm 20 45 G mm M4 M10 L mm 10 28 S mm 4 10 cz N mm 47 182 Fz N 234 2046 Qty 4 4 Table 3 4 Specification of vibration isolators CAUTION Make sure that total mass of the Part Feeding base table and components are not exceeding the max allowed compressive force of the round buffers Fz If the total mass exceeds the max allowed compressive force select new r...

Page 34: ...Vibration isolator Vibration isolator 1 Angst Pfister www apsoparts com section Antivibration Technology APSOvib 2 Elesa www elesa com section Rubber buffers 3 5 5 4 Minimal Distance Between Part Feeding IF 80 IF 240 IF 380 IF 530 c mm 10 10 30 30 Table 3 5 Minimal Distance Between Part Feeding ...

Page 35: ...able 3 6 1 Overview The IF 80 is a standalone module with its own controller The electrical interfaces of the IF 80 are located on the rear panel of the product Figure 3 5 Electrical interfaces of the IF 80 A Power connection B Ethernet connection RJ45 C Backlight synchronization ...

Page 36: ... is on Always turn the machine off and then cut the power Use PELV protected extra low voltage nominal voltage Unplug the main power plug when plugging unplugging the cord Figure 3 6 Power connection Pin Signal description 1 24VDC PELV S Power 2 0V GND S Power 3 24VDC PELV Power 4 0V GND Power 5 EARTH Connector type on IF 80 side M16 5 Poles male In case of all functions working simultaneously vib...

Page 37: ... 80 depending on if your application requires an external relay to ensure that the backlight is safely switched off or not In any case both Power and S Power have to be supplied for using the backlight Figure 3 7 Figure 3 8 Power connection without safety relay Power connection with safety relay Both Power and S Power can be connected to a single power supply or to two different power supplies The...

Page 38: ...a standard Ethernet communication via RJ45 port A Figure 3 9 Ethernet connection RJ45 Characteristic Value Default IP address 192 168 0 64 Default subnet mask 255 255 255 0 Port 4001 MAC address Can be read by ARP request For more information on the procedure to restore the default IP address please refer to 5 3 2 Resetting IP address ...

Page 39: ...esigned and fabricated by the customer Platform type Example picture Example drawing Advantage Flat Ex Bolts This type of platform can be used for a large variety of components with a flat surface allowing a stable resting position Slots deep Ex Screws Rivets Screw type components can be fed in vertical position when the platform is structured with deep grooves L max 4mm L can be increased by a va...

Page 40: ...splacements on the platform surface stop the components from rolling on the surface Grooves narrow Anti stick Ex Thin washers Narrow grooves are necessary to reduce surface contact especially for flat and light components This reduces adhesion forces and improves the pick performance of the robot Holes Ex Pins Holes are useful when cylindrical components are to be fed and presented upright For mod...

Page 41: ...dered from Epson The flat platform can be used for a large variety of components mainly components with a flat surface allowing a stable resting position The IF 80 platform is available in option Product name Specification Model number PLATE FIXATION KIT 80 Platform kit R12NZ9016M Mechanical interfaces of the platform for IF 80 ...

Page 42: ...rm 4 1 4 Platform with Purge A platform with purge function is available in option with the IF 80 The purge option consists in a platform A with a special geometry which allows the components to be evacuated in a dedicated box B The box can be easily removed by the operator without tooling Figure 4 2 Purge option ...

Page 43: ...a retaining dam and screws which can be assembled by customer if needed Figure 4 3 Hopper Product name Specification Model number 160cm3 HOPPER 80 160cm3 Hopper R12NZ9016F 160cm3 HOPPER MEDICAL 80 160cm3 Hopper FDA R12NZ9016G We use materials which conformed FDA Food and Drug Administration FDA 21CFR177 2470 21CFR178 3297 ...

Page 44: ...tion on the backlight color and the procedure to exchange the backlight please refer to 5 3 1 Exchange of the backlight For model number of backlight refer to 6 5 Backlight series IF 80 4 4 Cables The following cables are available as options Product Power Cable 5m Ethernet RJ45 cable 5m WARNING All these cables are NOT adapted for cable carriers cable tracks Product name Specification Model numbe...

Page 45: ...r liquids onto the product Spraying water over the product washing it with water or using it in water may cause the product to malfunction resulting in injury electric shock fire etc WARNING There are no user serviceable parts inside the product Contact the supplier of your region or your local supplier for maintenance In cases of nonconformity the product guarantee will expire CAUTION Do not oper...

Page 46: ...uct Item Period Reference General Cleaning of the machine Week Visual check of electrical harness Year Visual check and cleaning of the plate Week Section 4 2 3 Specific process It is the customer s responsibility to schedule the maintenance of his specific process Backlight Visual check Month Table 5 1 Periodic maintenance schedule The information given in Table 5 1 Periodic maintenance schedule ...

Page 47: ...Platform Module CAUTION Be sure that the backlight is off before removing the platform module Failure to follow this instruction may cause permanent damage to the backlight A B Figure 5 1 Remove the platform Step 1 Turn the lever A clockwise and pull it forward Step 2 Remove the platform B ...

Page 48: ...of parts its replacement must be preceded For more information about maintenance parts please contact the supplier of your region Material needed Lint free cloth Isopropanol alcohol A Figure 5 2 Platform Step1 Control the surface state of the platform A and be particularly careful of the following points Dirt or spotted surface Oily or greasy surface Step2 Clean the surface of the platform ...

Page 49: ...customer please contact the supplier of your region For any other repair the product must be returned to the manufacturer CAUTION For any kind of replacement always use Epson products Replaceable parts Parts name Code GREEN BACKLIGHT 80 R12NZ9016Q RED BACKLIGHT 80 R12NZ9016R BLUE BACKLIGHT 80 R12NZ9016T WHITE BACKLIGHT 80 R12NZ9016U INFRARED BACKLIGHT 80 R12NZ9016V ...

Page 50: ...are disconnected before changing the backlight A B C Figure 5 3 Exchange of the backlight Step 1 Remove the platform module A For more information on how to remove the platform refer to 5 2 2 Remove the platform module Step 2 Remove the four screws B Step 3 Remove the backlight C Step 4 Place the new backlight Step 5 Screw the four screws 0 2 N m Step 6 Remount the platform module ...

Page 51: ...are unknown and cannot be found Following this procedure you are able to connect to the IF 80 with default parameters and then modify parameters as desired Step 1 Remove the hopper Unscrew the 4 screws A and remove the cover B Use a torx key size 10 Step 2 Place selector 1 in on Position C Step 3 Disconnect and reconnect the power cable or switch off and switch on the power on the IF 80 The IF 80 ...

Page 52: ...eeding page For more details refer to Software 2 1 System Configuration Step 5 When parameters are defined as desired replace selector 1 in position D Step 6 Disconnect and reconnect the power cable or switch off and switch on the power on the IF 80 The IF 80 will take the parameters defined by the new startup Step 7 Replace the cover B and screw the 4 screws A Use a torx key size 10 0 9 N m ...

Page 53: ...i static R12NZ9015H ANTI ROLL PLATE 80dia 0 7 1 5 Anti roll Ocher Supported work piece ø0 7 1 5 Material POM C ED Anti static R12NZ9015J ANTI ROLL PLATE 80dia 1 5 3 5 Anti roll Ocher Supported work piece ø1 5 3 5 Material POM C ED Anti static R12NZ9015K ANTI STICK PLATE 80 Anti stick Ocher Material POM C ED Anti static R12NZ9015L FLAT PLATE BLACK 80 Flat Black Material POM C EC Anti static R12NZ90...

Page 54: ... POM C black FDA R12NZ9016A ANTI STICK PLATE MED BK 80 Anti stick Black FDA Material POM C black FDA R12NZ9016B 6 2 3 Plate for Purging Option Anti static Product name Specification Model number FLAT PLATE PURGE 80 Flat Ocher Material POM C ED Anti static R12NZ9015M ANTI ROLL PLATE PURGE 80dia 0 7 1 5 Anti roll Ocher Supported work piece ø0 7 1 5 Material POM C ED Anti static R12NZ9015N ANTI ROLL ...

Page 55: ...E PURGE MED BK 80dia1 5 Anti roll Black FDA Supported work piece ø1 5 3 5 Material POM C black FDA R12NZ9016D ANTI STICK PLATE PUR MED BK 80 Anti stick Black FDA Material POM C black FDA R12NZ9016E 6 3 Hopper series IF 80 Product name Specification Model number 160cm3 HOPPER 80 160cm3 Hopper R12NZ9016F 160cm3 HOPPER MEDICAL 80 160cm3 Hopper FDA R12NZ9016G We use materials which conformed FDA Food ...

Page 56: ...GHT 80 backlight Red R12NZ9016R BLUE BACKLIGHT 80 backlight Blue R12NZ9016T WHITE BACKLIGHT 80 backlight White R12NZ9016U INFRARED BACKLIGHT 80 backlight Infrared light R12NZ9016V 6 6 License series common Product name Specification Model number Part Feeding License Part Feeding License R12NZ90106 Part Feeding License for USB Key Part Feeding License for USB Key R12NZ90107 ...

Page 57: ...7 Troubleshooting Part Feeding 7 0 IF 80 Rev 3 51 7 Troubleshooting For trouble refer to following manual EPSON RC 7 0 Option Part Feeding 7 0 Introduction Software Trouble Shooting ...

Page 58: ...7 Troubleshooting 52 Part Feeding 7 0 IF 80 Rev 3 ...

Reviews: