background image

Maintenance

43

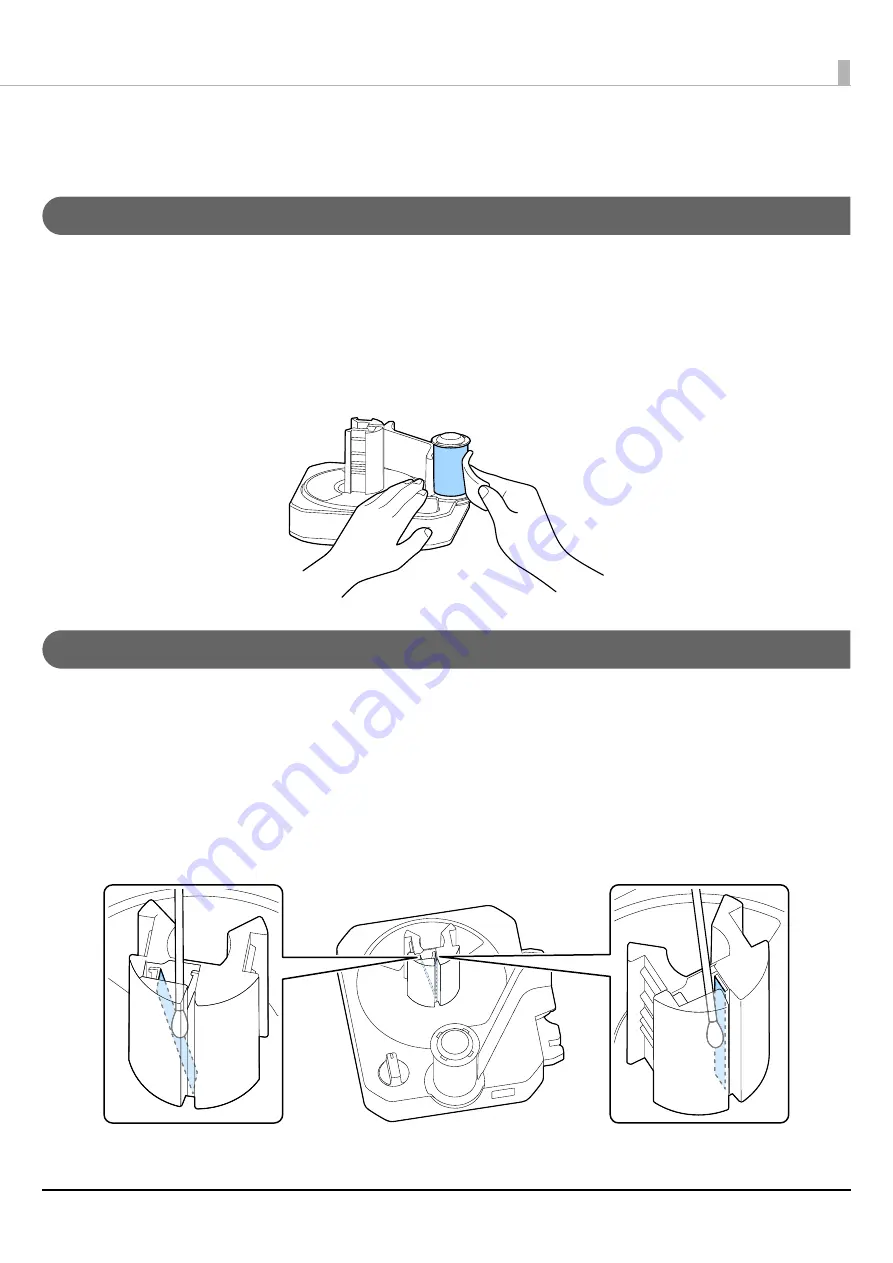
Cleaning the Rewinder (Option)

Rubber Roller

If paper dust or other foreign materials adhere to the rubber roller, it may cause printed characters/symbols 
to expand or contract, or the tape may be cut at a wrong position resulting in producing pieces of tape longer 
than the setting. Clean the rubber roller periodically.

1

Wring out a wet cloth, and then wipe the dirt off with the cloth or a cloth moistened 

with alcohol.

Rotation Shaft

If you smear the leading edge of tape with your dirty or wet hands, it may result in contaminating inside the 
rotation shaft. If inside the rotation shaft is contaminated too much, the tape may not be rewound correctly 
or the tape may come off the shaft.
If the tape comes off the shaft even after you set the tape correctly, clean inside the rotation shaft. 

1

Wipe the portions shown in the figure below with a cotton swab moistened with 

alcohol.

Summary of Contents for LabelWorks LW-Z5010 Series

Page 1: ...Series User s Guide M00127002EN Before Use Ways of Using the Printer Part Names and Functions Setting up the Printer Connecting to Your Device Maintenance Troubleshooting Specifications Appendix LW Z5000 Series LW Z5010 Series ...

Page 2: ...SA 8 Introduction to Software 9 For a Computer 9 For a Smartphone or Tablet 9 Caution Label 10 Ways of Using the Printer 11 Part Names and Functions 15 LW Z5000 Series 15 LW Z5010 Series 17 External 17 LCD touch panel Buttons Keyboard 19 Setting up the Printer 23 Installing the Tape Cartridge 23 Feeding the Tape 25 LW Z5000 Series 25 LW Z5010 Series 25 Connecting the AC Adapter 26 Installing the B...

Page 3: ...nging the Setting on the Printer LW Z5010 Series only 36 Replacing the Cutter Unit 37 Charging the Battery LW Z5010 Series only 39 Cleaning the Printer 41 Exterior Base Plate 41 Print Head 41 Cartridge Sensor 41 Cutter Unit 42 Cleaning the Rewinder Option 43 Rubber Roller 43 Rotation Shaft 43 Attaching the Rewinder Cover 44 Passing Tape of Bulk Label Quick Kit Option Through the Cartridge 45 Initi...

Page 4: ...pe 52 Power supply 52 LW Z5010 Series 53 Printer 53 Interface 53 Usage conditions 53 Supported tape 53 Power supply 53 Appendix 55 Consumables and Options 55 Symbol List LW Z5010 Series only 56 Frame List LW Z5010 Series only 58 Table List LW Z5010 Series only 58 Copyright Notice 59 Trademarks 59 ...

Page 5: ... information Symbols for Safety The symbols shown below are used in this manual in order to ensure safety and proper use of this product and to prevent danger to you and other persons and property damage Be sure that you completely understand their meanings before reading this manual Symbols for General Information WARNING Handling the product improperly by ignoring this symbol can lead to death o...

Page 6: ...t the most out of your printer please use a genuine Epson tape cartridge and Bulk label quick kit Using a non genuine consumable may damage your printer or may cause a drop in print quality Compatible Epson tape cartridges and Bulk label quick kit vary with the printer model When purchasing a tape cartridge or Bulk label quick kit make sure that it is compatible with your printer model You may not...

Page 7: ... a plastic tape when a room temperature is at 15 degrees C or below labels cut by the half cutter may come off the backing paper or may result in faint print During printing do not touch the tape ejection slot and the connectors AC adapter USB and LAN connectors Doing so may cause a static electricity resulting in malfunction of the printer You can save your label files or other data in the printe...

Page 8: ... this battery into your municipal waste stream Please call 1 800 8 BATTERY for information on how to recycle this battery For Users in the USA WARNING Handling the cord on this product or cords associated with accessories sold with this product will expose you to lead a chemical known to the State of California to cause birth defects or other reproductive harm Wash hands after handling This notice...

Page 9: ...er and Network Configuration Tool How to get Download from the website below www epson com For LW Z5000PX LW Z5010PX labelworks epson com Network Configuration Tool for a Windows computer Allows you to check configure and change the network settings of the printer How to get Use Setup exe of Label Editor to install this software For a Smartphone or Tablet The following Epson apps allow you to edit...

Page 10: ...Before Use 10 Caution Label The caution label attached to the printer indicates the caution described below WARNING Be careful not to cut yourself with the cutter unit A C and D D A C ...

Page 11: ...ed in the following ways Using from a computer smartphone tablet connected via Wi Fi Using from a computer connected via a Wired LAN Using as a Standalone Printer LW Z5010 Series only Using from a computer connected with the included USB cable Simple AP mode Infrastructure mode ...

Page 12: ...he unit can rewind the printed label paper neatly Creating Labels using Your Existing Data File Label Editor the software provided for Epson label printers allows you to easily create labels from data of your Excel or other format data file With LW Z5010 Series you can create labels using the printer s keyboard however using the Label Editor function enables you to create labels more efficiently B...

Page 13: ...b and then click Transfer Data Transfer Tool in that order 3 Click Transfer Images 4 Click Load and then select an image file you want to transfer from image files stored in the computer QNOTE Beside this function Label Editor has more useful functions For instructions on how to use the other functions see Label Editor Online Manual QNOTE From the Height Width Ratio pull down menu select the ratio...

Page 14: ...Transferred Image on the Printer 1 When editing a label seeing the label image on the display touch the menus in the order shown below Add Symbol Download Symbol The images transferred from the computer are displayed 2 Touch one of the images to insert it into the label file you are editing ...

Page 15: ...mple AP mode and off 2 button Lets you turn the printer on or off 3 Power LED Stays on while the printer is powered 4 LED Stays on while the printer is in the Infrastructure mode 5 LED Stays on while the printer is in the Simple AP mode 6 LED Blinks when an error occurs 7 Tape ejection slot Printed labels come out through this slot Front Rear ...

Page 16: ... a tape cartridge of Bulk label quick kit in the printer let the tape pass through this slot 13 AC adapter connector Connect the cable of the AC adapter 14 USB connector Connect the included USB cable 15 Wired LAN connector Connect a LAN cable Use a shielded twisted pair Category 5 or higher straight through Ethernet cable wired for 10BASE T or 100BASE TX 16 button Press this when connecting the p...

Page 17: ...nder unit available as an option to the printer 4 LED Stays on while the printer is powered 5 LED Indicates the battery status Comes on when charging is started and stays on during charging Turns off when charging is completed You can check the battery level on the touch panel U LCD touch panel Buttons Keyboard on page 19 Blinks if an error such as stop of charging occurs 6 Top cover lever Push th...

Page 18: ...apter connector Connect the cable of the AC adapter 10 USB connector Connect the included USB cable 11 Wired LAN connector Connect a LAN cable Use a shielded twisted pair Category 5 or higher straight through Ethernet cable wired for 10BASE T or 100BASE TX 12 button Press this when connecting the printer to a wireless LAN using WPS 13 Security cable attachment point For a commercially available se...

Page 19: ...reen 3 button When editing a label seeing the label image on the display press this button to access the following menus File Save Open Delete Print Print Settings Cut Settings Print Density Drop Stop Die Cut Position Adjustment Half Cut Depth Setting Half Cut Error Setting full cut detection Settings Basic Settings Network Settings Restore Default Settings Version ...

Page 20: ...cursor when selecting a menu or setting or when editing a label 12 key Hold down the key and press this to add a new column 13 key Press and hold this key to delete characters and or symbols until you release the key Hold down the key and press this to delete entire text or delete text and the settings 14 key Hold down the key and press this to access the following menus Number of Copies Enlarge P...

Page 21: ...talled tape Label length Tape width 2 Indicates that caps lock is enabled 3 Shows the currently selected font style 4 Shows the current cut setting 5 Indicates Wi Fi connection mode and the connection status Touch the icon to change the wireless LAN settings or to print PIN code or status sheet 6 Indicates the battery level 7 Indicates that the printer is currently powered through the AC adapter 8...

Page 22: ...an change the following settings Font Size Style Border Line Bold Italic Character Spacing Character Width 11 Allows you to change the label settings You can change the following settings Layout Frame Table Label Length Margins Orientation Rotation Line Swap 12 Allows you to change the focus position of a displayed label image whole label only a column and etc 13 Allows you to select the view sett...

Page 23: ...stalling the Tape Cartridge 1 Check that the printer is powered off 2 Remove any slack in the tape inside the cartridge 3 Open the top cover CAUTION Make sure to turn the printer off when installing a tape cartridge Make sure to use a tape designated by Epson When you replace the tape cartridge make sure to adjust the half cut depth with a new tape U Adjusting Half Cut Depth on page 35 ...

Page 24: ...Setting up the Printer 24 4 Install a tape cartridge 5 Close the cover ...

Page 25: ...ress the button 2 Press the button The tape is fed LW Z5010 Series 1 Press the button 2 Press the button 3 Touch one of the options on the LCD touch panel The tape is fed or fed and then cut CAUTION Make sure to feed the tape whenever you install a tape cartridge ...

Page 26: ...Setting up the Printer 26 Connecting the AC Adapter 1 Connect the AC adapter as shown below CAUTION Make sure to use the designated AC adapter ...

Page 27: ...attery LW Z5010 Series only 1 Open the top cover 2 Open the battery cover 3 Install the battery 4 Close the cover CAUTION Make sure to use the included lithium ion battery AST2437Z2 1 Charge the battery when using the printer for the first time ...

Page 28: ...onnecting Directly with a Device Simple AP mode The following explains the procedure for connecting using SSID For information on the other methods see Network Configuration Guide Connecting with a Computer SSID 1 Change the connection mode of the printer U Part Names and Functions on page 15 D 2 Print a status sheet to know the security key of the printer U Printing a Status Sheet on page 33 D 3 ...

Page 29: ...y of the printer U Printing a Status Sheet on page 33 D 3 Enable Wi Fi on the smartphone or tablet D 4 Select the printer on the smartphone or tablet and then enter the security key Connection is complete D 5 Install Epson apps such as iLabel and Data com on the smartphone or tablet U Checking the Printer Settings on page 33 Setting is complete You can operate the printer from the smartphone or ta...

Page 30: ...Checking the Printer Settings on page 33 D 2 Install Label Editor on the computer D 3 Following the on screen instructions turn the printer on U Part Names and Functions on page 15 D 4 Change the connection mode of the printer U Part Names and Functions on page 15 D 5 Following the on screen instructions press the button on the printer U Part Names and Functions on page 15 Connection is complete D...

Page 31: ...ng PIN Code on page 34 D 2 Register the PIN code of the printer to the router or access point Connection is complete D 3 Install Label Editor and the printer driver on the computer U Checking the Printer Settings on page 33 When a message saying that the setting is complete you can operate the printer from the computer ...

Page 32: ... U Checking the Printer Settings on page 33 D 2 Install Label Editor on the computer D 3 Following the on screen instructions turn the printer on U Part Names and Functions on page 15 D 4 Following the on screen instructions connect a LAN cable to the printer U Part Names and Functions on page 15 D 5 Select the printer on the computer When a message saying that the setting is complete you can oper...

Page 33: ...A status sheet is printed LW Z5010 Series 1 Touch the Wi Fi icon on the LCD touch panel 2 Touch Print Connection Information 3 When a confirmation message is displayed touch OK A status sheet is printed QNOTE When printing a status sheet set a tape that has a width of 6 to 50 mm in the printer Do not use a tape of self laminating labels or die cut labels ...

Page 34: ...icon on the LCD touch panel 2 Touch Print WPS PIN Code 3 When a confirmation message is displayed touch OK The PIN code is printed QNOTE When printing PIN code set a tape that has a width of 6 to 50 mm in the printer Do not use a tape of self laminating labels or die cut labels QNOTE You can also print the PIN code by pressing and holding the button for at least three seconds ...

Page 35: ...m Label Editor 2 Select the Advanced Setting tab 3 Click Update to the latest information The current printer settings are displayed 4 Move the slider of Half Cut Depth Setting to change the setting 5 Click Test Printing The tape is cut with the changed half cut depth setting 6 Check the result of the half cut To change the setting repeat the procedure from step 4 QNOTE The larger the setting valu...

Page 36: ... on the Printer LW Z5010 Series only 1 Press the button and then touch Print Settings Half Cut Depth Settings in that order 2 Touch and or to change the setting Click Test Print The tape is cut with the changed half cut depth setting 3 Check the result of the half cut To change the setting repeat the procedure from step 2 4 Touch OK to apply the change ...

Page 37: ... Always turn the printer off and remove the AC adapter and the battery before performing work The cutter unit consists of two parts Make sure to replace both the parts at a time Dispose of used cutter units following your local regulations When you have replaced the half cutter unit make sure to adjust the half cut depth U Adjusting Half Cut Depth on page 35 A B C D A Half cutter blade Half cutter...

Page 38: ...enance 38 2 Hold the upper edge of the unit between your thumb and index finger as shown and remove it 3 Insert a new cutter unit into the printer Insert the unit until it clicks into place 4 Close the cover ...

Page 39: ... LW Z5010 Series only 1 Check that the printer is powered off 2 Open the top cover 3 Open the battery cover CAUTION Charge the battery at a temperature between 5 to 35 degrees C Make sure to turn the printer off when charging the battery ...

Page 40: ...Maintenance 40 4 Install the battery 5 Close the battery cover and the top cover 6 Connect the AC adapter to the printer LED turns on LED turns off when charging is completed ...

Page 41: ...nsor Clean the cartridge sensor using a cotton swab as shown below CAUTION Make sure to turn the printer off In addition disconnect the AC adapter from the printer and disconnect the power cable from the wall outlet For LW Z5010 Series when using the battery make sure to remove the battery from the printer CAUTION Do not use chemical agent or solvent such as benzine thinner and alcohol In addition...

Page 42: ...ve the cutter unit from the printer U Replacing the Cutter Unit on page 37 2 Dampen a cotton swab with alcohol and using the swab remove paper dust and or adhesive from the cutter blade and the blade receiving part Clean the areas shown in the figure below 3 After removing paper dust and or adhesive wipe off alcohol or moisture with a dry cotton swab 4 Install the cutter unit in the printer U Repl...

Page 43: ... a wet cloth and then wipe the dirt off with the cloth or a cloth moistened with alcohol Rotation Shaft If you smear the leading edge of tape with your dirty or wet hands it may result in contaminating inside the rotation shaft If inside the rotation shaft is contaminated too much the tape may not be rewound correctly or the tape may come off the shaft If the tape comes off the shaft even after yo...

Page 44: ...you do not use the rewinder The printer does not print if the rewinder cover is open without having the rewinder connected If the connecting strap gets caught in the rewinder cover when you close the cover the cover cannot be closed properly and the printer does not print If you lose the rewinder cover you cannot print by the printer unless the rewinder is connected because the printer cannot reco...

Page 45: ... You will see a gap as shown below 2 Pass the tape through the cartridge Let the leading edge of tape protrude by about 3 cm from the cartridge 3 Press the cartridge as shown below to close the gap CAUTION Do not touch the print side of the tape with your bare hands If the print side is smeared it will result in a drop in print quality Be careful not to let the tape skew in the cartridge Face the ...

Page 46: ... is initialized LW Z5010 Series 1 Turn the printer off 2 Press the button the key and the key at the same time 3 When a confirmation message is displayed touch Yes The printer is initialized CAUTION Initializing the printer resets all data files stored in the printer and the printer settings such as the cut settings and network settings to the factory default settings QNOTE You can also initialize...

Page 47: ...37 Half cut does not cut tape cleanly The cutter can become dull if paper dust and or adhesive adhere to the cutter Clean the cutter unit U Replacing the Cutter Unit on page 37 If the cutter is still dull even after the cleaning the cause may be wear of the half cutter Adjust the half cut depth U Adjusting Half Cut Depth on page 35 If the cutter is still dull even after the adjustment replace the ...

Page 48: ...or is contaminated with smear or paper dust the printer cannot detect the tape correctly Remove smear and or paper dust from the sensor U Cartridge Sensor on page 41 If you are using a plastic tape the first letter on the first label on the tape may become faint or blur A print quality problem can occur if you are printing on a plastic tape or heat shrink tube tape with the half cut setting enable...

Page 49: ...s and then touch Power Off Timer AC or Power Off Timer Battery 3 Select a time period Unable to complete battery charge LW Z5010 Series only Check the battery to see if it is installed correctly If there is no problem with the installation but the charging status still continues replace the battery with a new one You felt a static shock when you touch the tape ejection slot or connectors during pr...

Page 50: ...inder Option on page 43 If you are printing on a plastic label tape with the half cut enabled and the ambient temperature is 15 degrees C or below the tape may come off the backing paper If you are using a heat shrink tube tape due to its characteristics the tape may get stuck at the tape ejection slot or on the plate that exists between the ejection slot and the rubber roller Clear the stuck stat...

Page 51: ...ape is not fed correctly Make sure that tape is not getting stuck or tangled inside the box When using the Bulk label quick kit make sure to set it on the base plate Poor print quality If the kit is used in a dusty area print quality may drop due to dust adhered to the tape When you finished printing labels put the cartridge back into the box and then close the box When you set the cartridge to th...

Page 52: ...SB 2 0 Full Speed Wired LAN 100BASE TX 10BASE T Wireless LAN IEEE802 11b g n Wi Fi 4 Wi Fi Certified Operating temperature 5 to 35 degrees C Storage temperature 10 to 55 degrees C Tape cartridge 4 to 50 mm width tape can be used Bulk label quick kit Type AST2437Z2 1 Manufacturer SEIKO EPSON CORPORATION Input AC100 240 V 1 2 A 50 60 Hz dedicated adapter power cable only Output DC24 V 3 75 A Total o...

Page 53: ...rtridge USB USB 2 0 Full Speed Wired LAN 100BASE TX 10BASE T Wireless LAN IEEE802 11b g n Wi Fi 4 Wi Fi Certified Operating temperature 5 to 35 degrees C Storage temperature 10 to 55 degrees C Tape cartridge 4 to 50 mm width tape can be used Bulk label quick kit Type AST2437Z2 1 Manufacturer SEIKO EPSON CORPORATION Input AC100 240 V 1 2 A 50 60 Hz dedicated adapter power cable only Output DC24 V 3...

Page 54: ...facturer SEIKO EPSON CORPORATION Mean output voltage DC7 2 V Capacity Typ 1950 mAh Min 1850 mAh During operation 0 to 45 degrees C Charge 0 to 40 degrees C During storage Less than 1 month 20 to 50 degrees C Less than 3 month 20 to 40 degrees C Less than 1 year 20 to 20 degrees C ...

Page 55: ...uto cutter unit CF001 This is a replacement auto cutter unit Half cutter unit CH001 This is a replacement half cutter unit Tape Cartridges The cartridge can be set in the printer Epson offers a wide array of tapes for multiple uses Bulk label quick kit You can set this kit on the base plate that is included in the printer package Epson offers a wide array of tapes for multiple uses Rewinder unit R...

Page 56: ...Symbol List LW Z5010 Series only ASME ANSI ARC Arrows Audio Visual Brackets Currency Data Center Double Number Electrical Environment Fire GHS WHMIS Greek ...

Page 57: ...IMO Laboratory Mark Math Metric Number Office PPE Prohibited Public Signs Punctuation Shipping Warning Extra Symbol ...

Page 58: ...Frame List LW Z5010 Series only Table List LW Z5010 Series only ...

Page 59: ...incurred by purchaser or third parties as a result of accident misuse or abuse of this product or unauthorized modifications repairs or alterations to this product or failure to strictly comply with Seiko Epson Corporation s operating and maintenance instructions Seiko Epson Corporation shall not be liable for any damages or problems arising from the use of any options or any consumable products o...

Reviews: