background image

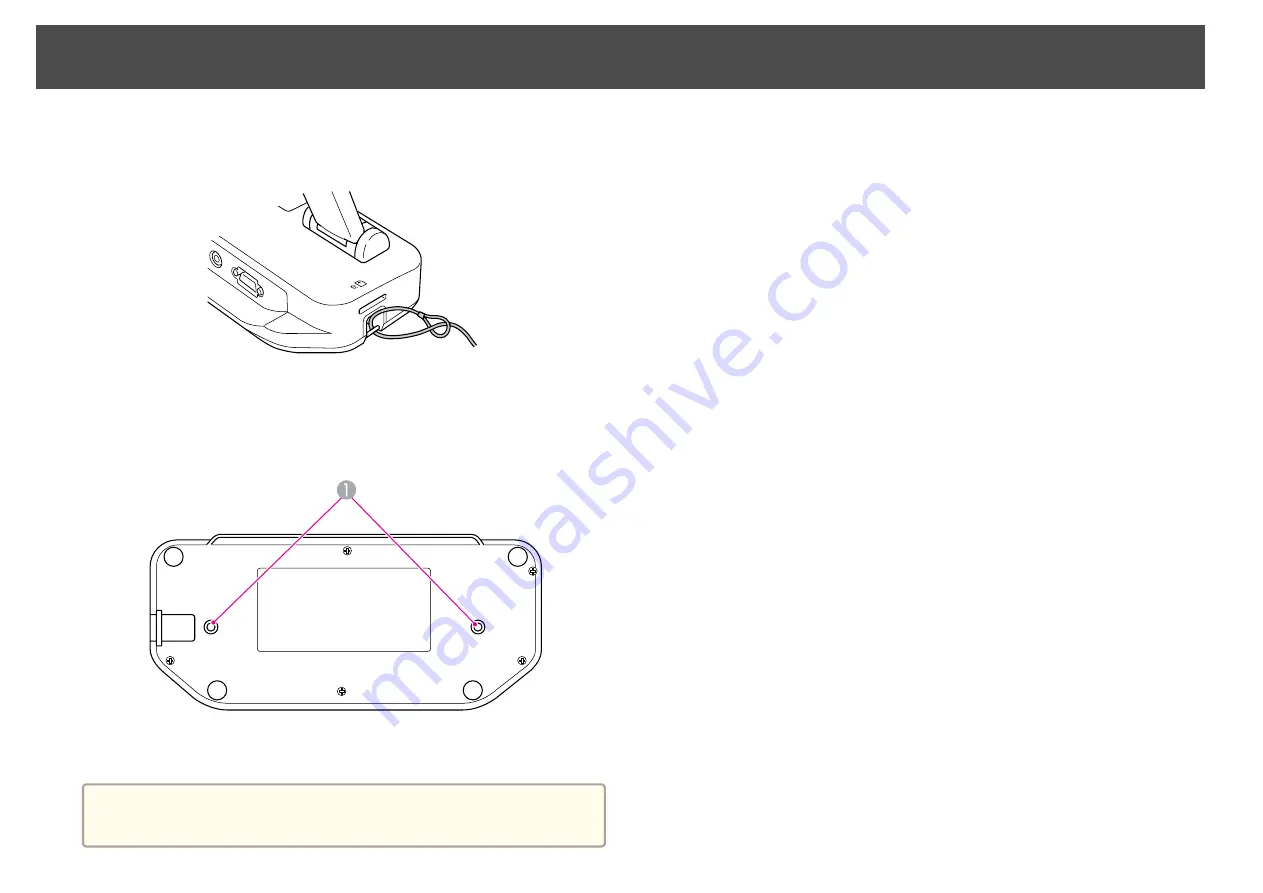
You  can  secure  the  document  camera  by  fastening  a  cable  to  the  security
bar,  shown  below,  or  by  inserting  a  Kensington  anti-theft  cable  into  the
Kensington  security  port.

In  addition,  you  can  attach  the  document  camera  to  a  table,  cart,  or  stand
at  the  mounting  points  indicated  below.  Use  M4-size  bolts;  you  can  thread
them  into  document  camera  case  to  a  maximum  depth  of  9  mm
(0.35  inch).

A

Mounting points

Attention

Fasten  the  bolts  securely  but  do  not  overtighten  them.  Do  not  use  adhesives.

Securing the Document Camera

16

Summary of Contents for ELPDC11 Document Camera

Page 1: ...Document Camera User s Guide ...

Page 2: ...ire or malfunction may occur Do not use or store the document camera outdoors for an extended length of time or where it may be exposed to rain water or excessive humidity Fire or electric shock may result Do not use the document camera in places where smoke from cigarettes may be present where it will be exposed to greasy smoke humidity or steam such as cooking areas or near humidifiers or where ...

Page 3: ...oper voltage indicated in this guide Use of a different power source may result in fire or electric shock If the AC adapter power cord or document camera is damaged turn the power off unplug the AC adapter from the electrical outlet and contact your local distributor Using the damaged device may cause fire or electric shock Do not touch the device the AC adapter or the plug with wet hands This may...

Page 4: ...overtighten them Do not use adhesives Cleaning and Liquids Warning Use a dry cloth or for stubborn stains a moist cloth that has been wrung dry for cleaning Do not use liquid aerosol cleaners or solvents such as alcohol thinner or benzine Do not place any containers of liquid on top of or near the unit Do not spill liquid or spray fine mist into the document camera Liquids entering the document ca...

Page 5: ...mediately with plenty of water and consult a doctor If liquid from the battery comes in contact with your skin or clothes wash with water to prevent possible skin damage Keep batteries out of the reach of children Batteries are a choking hazard and are very dangerous if swallowed Insert batteries so that the polarities and are correct Not doing so may cause leakage overheating or explosion Do not ...

Page 6: ...3 Displaying Small Objects Up Close 23 Displaying Live Action or a Whiteboard 24 Switching Between Your Computer and the Live Camera Image 25 Image Adjustments and Effects Using the On screen Menu 27 Making Image Adjustments 27 Displaying a Split Screen 28 Making Other Settings 30 Saving Images and Displaying a Slideshow Saving Images to the Internal Memory 32 Exporting Images to a Memory Card 33 ...

Page 7: ...re 50 Where to Get Help 51 Europe 51 Africa 56 Middle East 56 North and Central America 56 South America 57 Asia and Oceania 58 Notices Specifications 62 General 62 Remote Control 62 Dimensions 62 Electrical 62 AC Adapter 62 Environmental 62 System Requirements 62 FCC Compliance Statement 63 For United States Users 63 WARNING 63 For Canadian Users 63 Declaration of Conformity 64 Copyrights and Tra...

Page 8: ...ument camera to capture and project pages from books or other documents and even three dimensional objects With the included software you can capture live audio and video create time lapse photos and annotate images produced by the document camera ...

Page 9: ...nd including sound from the built in microphone when you use the document camera with a computer and the included software Use the software to edit your videos and play them back later High image quality and performance 5 megapixel image sensor 10x digital zoom up to 2x lossless and 29 7 x 42 cm 11 7 x 16 5 inch capture area enable you to display up to two pages side by side in rich detail with SX...

Page 10: ...o automatically focus the image The unit cannot focus on objects that are approximately 10 cm 4 inches or less from the camera lens H button If you press and release the button the image is frozen If you press and hold the button the still image is saved to SD card or internal memory I Security slot The security slot is compatible with the Microsaver security system manufactured by Kensington s p ...

Page 11: ...ble to lock the document camera in place s p 16 S SD card slot Lets you save and display images on an SD card s p 33 Camera Head Name Function A Microphone Captures sound when you record a video B Lamp switch Turn the LED lamp on or off C Image rotation dial Turns the displayed image 90 D LED lamp Turn on this lamp when there is not enough light on your document E Camera lens Captures the image Do...

Page 12: ...era head Base Name Function A Mounting points You can attach the document camera to a table cart or stand with commercially available M4 size bolts s p 16 B Security bar Lets you attach a commercially available security cable to lock the document camera in place s p 16 Document Camera Parts 12 ...

Page 13: ...ss the button again to continue E Menu button Displays and closes the menu F buttons When the menu or Help screen is displayed pressing these buttons selects menu items and setting values G Enter button When the menu is displayed pressing this button confirms the current item H Esc button Stops the current function When the menu is displayed pressing this button moves to the previous menu level I ...

Page 14: ...on Turns the video and audio on or off when you are connecting the document camera when used with an Epson projector O Source Search button When used with an Epson projector changes the input source connected to the projector P Remote control light emitting area Outputs remote control signals Remote Control Buttons 14 ...

Page 15: ...down as shown It cannot be folded flat Caution Do not try to press the arm flat or fold it backwards or it may get damaged Attention When you see the black line on the bottom of the camera arm never fold it more Or it may get damaged Storing the Document Camera 15 ...

Page 16: ...curity port In addition you can attach the document camera to a table cart or stand at the mounting points indicated below Use M4 size bolts you can thread them into document camera case to a maximum depth of 9 mm 0 35 inch A Mounting points Attention Fasten the bolts securely but do not overtighten them Do not use adhesives Securing the Document Camera 16 ...

Page 17: ...Basic Setup and Use Follow the instructions in this section to set up the document camera and give a presentation ...

Page 18: ...tput an image c Turn on your projector d Select the appropriate source on the projector such as Computer or Video depending on port to which you connected Your projector may use different names for the sources a When you re done using the document camera press the t power button twice to turn it off disconnect any cables and fold down the camera arm s p 15 Plugging In and Turning On 18 ...

Page 19: ...the type of cable you will use based on the type of port that s available on your projector or other video equipment VGA port computer monitor style Composite video port yellow RCA style VGA cable included Composite video cable b Connect the document camera in one of the ways shown below VGA connection A Display Out port B VGA cable Composite video connection A Composite port B Composite video cab...

Page 20: ... Connect to Use the Document Camera Software This connection method lets you use the included software as well as display PowerPoint slides or images from another application on your computer Make sure you ve already installed the software s p 39 a Connect the document camera to your computer with a USB cable as shown A USB cable B VGA cable b Connect your computer to your projector using a VGA ca...

Page 21: ...ter b Connect a VGA cable from your computer s monitor out port to the document camera s Computer In port A Computer In port B VGA cable C VGA cable D Display Out port c Connect a second VGA cable from the document camera s Display Out port to your projector a You cannot use the Composite port to display your computer image in this configuration If you connected a laptop but the image doesn t appe...

Page 22: ... lamp switch to illuminate the document a If necessary you can adjust the brightness of the image using the or on the document camera or remote control A Lamp switch B Image rotation dial C Focus button d Turn the dial on the camera head to rotate the image on the screen a If desired you can rotate an upside down image by pressing the Menu button and selecting Image Image Rotation 180 degrees Disp...

Page 23: ...erruption Displaying Small Objects Up Close To display a small object lower the camera arm You can place the lens within approximately 10 cm 4 inches of the object To further enlarge an object press the Zoom z button on the document camera or remote control Press the Zoom x button to zoom out a You can zoom up to 10x digitally with lossless magnification up to 2x To display objects as seen through...

Page 24: ...n audio video recording of the live presentation s p 38 Warning Turn off the lamp when the camera is aimed at a person Avoid looking directly into the lamp The bright light could damage your eyes a Rotate the camera head so it faces the front of the room b Turn the dial on the camera head to orient the image on the screen c Press the Focus button The image is automatically focused Displaying Live ...

Page 25: ...lay the live camera image make sure you ve selected Capture mode in the document camera software s p 40 When you connect with USB cable you cannot switch to computer image if you press the button If you ve connected your computer with a VGA cable s p 21 use the document camera s Source buttons to switch between your computer and the live camera image To display your computer image such as a PowerP...

Page 26: ... Adjustments and Effects The document camera provides a full range of image adjustments and effects including freeze image split screen black and white and the ability to display negative film in true color ...

Page 27: ...matically Fluorescent to lessen blue tones or Incandescent to lessen yellow tones Focus Lets you manually adjust the focus if the auto focus doesn t produce a sharp enough image High Contrast Select On to increase the visibility of a faint or low contrast image Color B W Negative Displays the image in color or black and white To show a photographic negative in true color select Negative Image Rota...

Page 28: ...ted image b Use the and arrow buttons to select the source for the highlighted image You can select from these sources Live Display to display the camera image Internal Memory to display an image stored in internal memory SD Card to display an image stored on an SD card if one is inserted a Images on the SD card must be stored in the proper format to be readable s p 50 c Press the Enter button to ...

Page 29: ...lect Return to finish setting up the split screen e Press to highlight the right image f Repeat steps 2 through 4 to select the source for the right side a You cannot display the live camera image on both sides of the screen g Once you re done setting up both sides of the screen press then press Enter The selected images appear side by side on the screen h To exit split screen mode press Menu or E...

Page 30: ...ent electrical systems using 50 or 60 Hz Video Format Select NTSC or PAL depending on the video format used by your projector Language Changes the on screen menu language Sleep Mode Sleep Mode Timer By default sleep mode turns the document camera off after 2 hours of inactivity You can turn off sleep mode or change the length of time after which the camera turns off from 1 to 6 hours In addition t...

Page 31: ...era s internal memory You can store up to about 4000 images depending on their content and then select just the ones you want to view You can also export captured images to an SD memory card or view them from a connected computer a You cannot store videos on the document camera Follow the instructions on p 38 to record videos ...

Page 32: ...d when you use the control panel You see the displayed in the upper right of the screen The image is saved to the internal memory a Using the control panel if you press and release the button without holding it the image is frozen on the screen instead of being saved in memory c Repeat steps 1 and 2 for any additional images you want to save Saving Images to the Internal Memory 32 ...

Page 33: ...ht the arrow and press Enter to view more images c Use the arrow buttons to highlight each image you want to export and press Enter to select it Press Enter again to deselect it A checkmark is added to each selected image a To add checkmarks to all images choose Select All To remove all checkmarks choose Select All again d Select Export and press Enter At the confirmation screen press Enter again ...

Page 34: ...the document camera press Menu or Esc to close the SD Card screen If you want to remove the SD card press in on the card and then pull it straight out of the slot The SD Card screen automatically closes Exporting Images to a Memory Card 34 ...

Page 35: ...experience problems copying or moving the files e Now connect the document camera to your computer with a USB cable A USB cable The document camera s internal memory appears as an external drive on your computer a The document camera does not have a built in clock Therefore when you view files from your computer they won t show the actual time they were created f Use your computer to view the file...

Page 36: ... the setting back to Application a If you don t change the setting back you won t be able to see a live camera image when you use the document camera software If you don t plan to use the software you don t need to change the setting back Viewing and Managing Files from Your Computer 36 ...

Page 37: ... it Press Enter again to deselect it A checkmark is added to the image In the same way select any additional images you want to rotate Select Rotate All checkmarked images are rotated 90 degrees clockwise a Image quality may decrease slightly after rotating an image Also if your photo is time stamped the date will be changed to a default value d Use the arrow buttons to highlight each image to be ...

Page 38: ... files The software also lets you annotate images from the document camera with text and graphics and upload your videos to popular websites Before starting follow the instructions in this section to install the software a For detailed help when using the software do one of the following Windows Press F1 or select Application Help from the Extras menu Macintosh Select Help from the menu bar ...

Page 39: ... software to install Uninstalling the Software Follow these steps if you need to uninstall the software Windows a Windows 7 Windows Vista Select Control Panel Programs and Features In Classic View select Programs Uninstall a program instead Windows XP Select Control Panel Add or Remove Programs b Select ArcSoft Application Software for Epson Document Camera c Windows 7 Windows Vista Click Uninstal...

Page 40: ...click ArcSoft Application Software for Epson Document Camera You see the screen shown below a If you see a message that the document camera is not found make sure it is connected and turned on Then click the Connect button in the upper right corner of the screen A Main modes capture edit and file management B Capture album previously captured images C Capture buttons still image burst time lapse a...

Page 41: ...ode Your live camera image appears in the preview area b Click the Live Annotation button c Select a drawing tool such as Pen Line or Text d Change the properties of the selected tool e Use the selected tool to add text and graphics f To clear an annotation use the Eraser tool or click the Undo button to clear the last change you made To clear all annotations select the Eraser tool and then click ...

Page 42: ...perties Choose the number of photos up to 10 that will be captured with each burst 5 is the default b To capture a still image click the Take Picture button c To capture a quick series of images click the Burst button Your captured image s appear in the Capture album on the left side of the screen To display a captured image through your projector double click the image or right click it and selec...

Page 43: ...m Set the total capture duration up to 72 hours Click OK to close the Settings screen b Click the Start Time Lapse button to begin capturing images When the process is done the time lapse movie or image appears as an icon in the Capture album on the left side of the screen To display the movie through your projector double click the icon or right click it and select Preview Making Time lapse Movie...

Page 44: ...ick the Record Video button to start recording Click Record Video again to stop You can also use the button on the control panel to start and stop recording Your movie appears as an icon in the Capture album on the left side of the screen To display the movie through your projector double click the icon or right click it and select Preview When you connect with the computer you cannot use two docu...

Page 45: ...lip it to create a mirror image You can also annotate still images While viewing a video you can pause it and capture a still image from the current frame a Click the Edit button to enter Edit mode b For detailed help when using the software do one of the following Windows Press F1 or select Application Help from the Extras menu Macintosh Select Help from the menu bar Editing Saved Files 45 ...

Page 46: ...descriptive text you can make it easier to find them later on a Click the File Management button to enter File Management mode b For detailed help when using the software do one of the following Windows Press F1 or select Application Help from the Extras menu Macintosh Select Help from the menu bar Managing Saved Files 46 ...

Page 47: ...Tube a This feature is not available for Apple Macintosh systems a Click the Edit button b Select a video c Select a website d Follow the instructions on the screen to log in provide a title for your video and other descriptive information and upload the file Uploading and Sharing Your Videos 47 ...

Page 48: ...Solving Problems ...

Page 49: ...pplication Now you can use the USB cable to display the image Image Quality Problems The image is fuzzy or out of focus The document camera needs hard edges or sharp lines in the image to be able to focus properly If the image has only soft edges try placing a different document under the camera lens while adjusting the focus Or focus the image manually with the Focus adjustment in the Image menu ...

Page 50: ...ets you display on an external monitor On most systems the or CRT LCD key lets you toggle between the LCD screen and the projector or display on both at the same time Check your monitor settings to make sure both the LCD screen and the external monitor port are enabled From the Control Panel open the Display utility Click the Settings tab then click Advanced The method for adjusting the settings v...

Page 51: ...0 Web Address http www epson at BELGIUM EPSON Europe B V Branch office Belgium Belgicastraat 4 Keiberg B 1930 Zaventem Tel 32 2 7 12 30 10 Fax 32 2 7 12 30 20 Hotline 070 350120 Web Address http www epson be BOSNIA AND HERZEGOVINA KIMTEC d o o Poslovni Centar 96 2 72250 Vitez Tel 00387 33 639 887 Fax 00387 33 755 995 Web Address http content epson it about int_services htm BULGARIA EPSON Service C...

Page 52: ... Address http www epson dk Hotline 70279273 ESTONIA EPSON Service Center Estonia c o Kulbert Ltd Sirge 4 10618 Tallinn Tel 00372 671 8160 Fax 00372 671 8161 Web Address http www epson ee FINLAND Epson Finland Rajatorpantie 41 C FI 01640 Vantaa Web Address http www epson fi Hotline 0201 552090 FRANCE and DOM TOM TERRITORIES EPSON France S A 150 rue Victor Hugo BP 320 92305 LEVALLOIS PERRET CEDEX We...

Page 53: ... Tel 39 06 660321 Fax 39 06 6123622 Web Address http www epson it Hotline 02 26830058 KAZAKHSTAN EPSON Kazakhstan Rep Office Gogolya street 39 Office 707 050002 Almaty Kazakhstan Phone 3272 727 259 01 44 Fax 3272 727 259 01 45 Web Address http www epson ru LATVIA EPSON Service Center Latvia c o ServiceNet LV Jelgavas 36 1004 Riga Tel 00 371 746 0399 Fax 00 371 746 0299 Web Address www epson lv LIT...

Page 54: ...90 Warszawa Poland Hotline 0 801 646453 Web Address http www epson pl PORTUGAL EPSON Portugal R Gregório Lopes n 1514 Restelo 1400 195 Lisboa Tel 213035400 Fax 213035490 Hotline 707 222 000 Web Address http www epson pt ROMANIA EPSON EUROPE B V Branch Office Romania Strada Ion Urdareanu nr 34 Sector 5 050688 Bucuresti Tel 00 40 21 4025024 Fax 00 40 21 4025020 Web Address http www epson ro RUSSIA E...

Page 55: ...pson es SWEDEN Epson Sweden Box 329 192 30 Sollentuna Sweden Tel 0771 400134 Web Address http www epson se SWITZERLAND EPSON DEUTSCHLAND GmbH Branch office Switzerland Riedmuehlestrasse 8 CH 8305 Dietlikon Tel 41 0 43 255 70 20 Fax 41 0 43 255 70 21 Hotline 0848448820 Web Address http www epson ch TURKEY TECPRO Sti Telsizler mah Zincirlidere cad No 10 Kat 1 2 Kagithane 34410 Istanbul Tel 0090 212 ...

Page 56: ...pson co za Web Address http www epson co za Middle East Epson Middle East P O Box 17383 Jebel Ali Free Zone Dubai UAE United Arab Emirates Tel 971 4 88 72 1 72 Fax 971 4 88 18 9 45 Email supportme epson co uk Web Address http www epson co uk welcome welcome_africa htm North and Central America CANADA Epson Canada Ltd 3771 Victoria Park Avenue Scarborough Ontario CANADA M1W 3Z5 Tel 905 709 9475 or ...

Page 57: ...Web Address http www epson com ar BRAZIL EPSON Do Brasil Av Tucunaré 720 Tamboré Barueri Sao Paulo SP Brazil 0646 0020 Tel 55 11 3956 6868 Web Address http www epson com br CHILE EPSON Chile S A La Concepción 322 Piso 3 Providencia Santiago Chile Tel 562 230 9500 Web Address http www epson cl COLOMBIA EPSON Colombia LTD Calle 100 No 21 64 Piso 7 Bogota Colombia Tel 57 1 523 5000 Web Address http w...

Page 58: ...400 810 9977 Web Address http www epson com cn HONG KONG Epson Service Centre Hong Kong Unit 517 Trade Square 681 Cheung Sha Wan Road Cheung Sha Wan Kowloon HONG KONG Support Hotline 852 2827 8911 Fax 852 2827 4383 Web Address http www epson com hk INDIA EPSON INDIA PVT LTD 12th Floor The Millenia Tower A No 1 Murphy Road Ulsoor Bangalore 560 008 India Tel 1800 425 0011 Web Address http www epson ...

Page 59: ...399 Web Address http www epson com my NEW ZEALAND Epson New Zealand Level 4 245 Hobson St Auckland 1010 New Zealand Tel 09 366 6855 Fax 09 366 865 Web Address http www epson co nz PHILIPPINES EPSON PHILIPPINES CORPORATION 8th Floor Anson s Centre 23 ADB Avenue Pasig City Philippines Tel 032 706 2659 Web Address http www epson com ph SINGAPORE EPSON SINGAPORE PTE LTD 1 HarbourFront Place 03 02 Harb...

Page 60: ...THAILAND EPSON Thailand Co Ltd 42th Floor Empire Tower 195 South Sathorn Road Yannawa Sathorn Bangkok 10120 Thailand Tel 02 685 9899 Fax 02 670 0669 Web Address http www epson co th Where to Get Help 60 ...

Page 61: ...Notices ...

Page 62: ...es Weight 2 2 kg 1 lb Electrical Power supply 100 240V AC 10 50 60Hz Power consumption Standby 0 46 W Operating 14 5 W AC Adapter Model DSA 36 W 12 Input 100 240V AC 50 60Hz 1 0A Output 12V DC 2A Environmental Temperature Operating 41 to 95 F 5 to 35 C Storage 14 to 140 F 10 to 60 C Humidity Operating 20 to 80 RH non condensing Storage 10 to 90 RH non condensing Operating altitude Up to 2000 meter...

Page 63: ...terference by one or more of the following measures Reorient or relocate the receiving antenna Increase the separation between the equipment and receiver Connect the equipment into an outlet on a circuit different from that to which the receiver is connected Consult the dealer or an experienced radio TV technician for help WARNING The connection of a non shielded equipment interface cable to this ...

Page 64: ... marketed is identical to the representative unit tested and found to be compliant with the standards Records maintained continue to reflect the equipment being produced can be expected to be within the variation accepted due to quantity production and testing on a statistical basis as required by 47CFR 2 909 Operation is subject to the following two conditions 1 this device may not cause harmful ...

Page 65: ...proved Products by Seiko Epson Corporation The contents of this guide may be changed or updated without further notice Illustrations in this guide and the actual projector may differ Responsible Use of Copyrighted Materials Epson encourages each user to be responsible and respectful of the copyright laws when using any Epson product While some countries laws permit limited copying or reuse of copy...

Reviews: