background image

EPSON Stylus Photo 900

6 -

 EPSON Stylus Photo 900

5/03

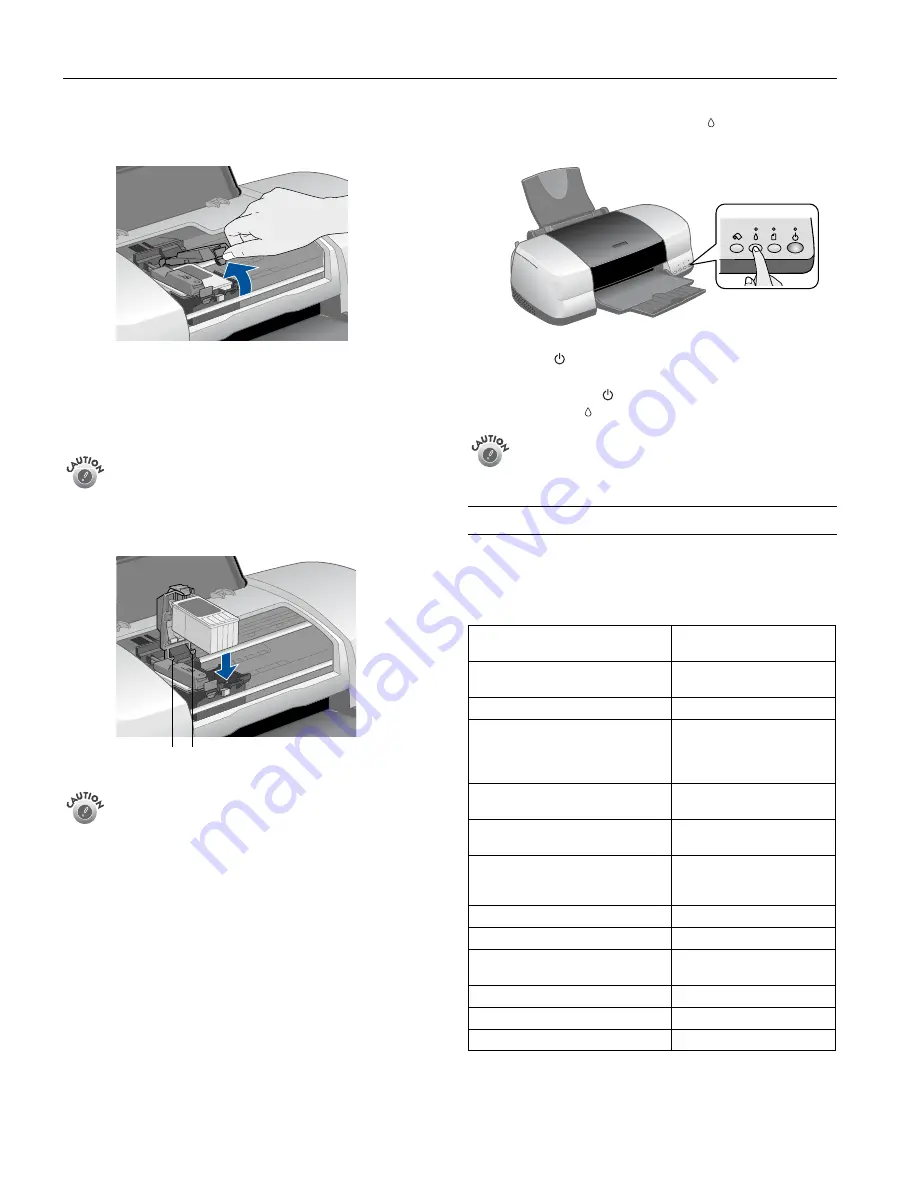
3. Pull up the ink cartridge clamp. The cartridge rises up from 

its holder.

4. Lift the cartridge out of the printer and dispose of it 

carefully.

5. Remove the new cartridge from its package. Then remove 

only

 the yellow tape seal on top.

Don’t touch the green circuit board on the back of the 
cartridge; you may inhibit normal operation and printing. 

6. Lower the new cartridge down into the holder. Make sure 

the tabs rest on the hooks in back.

Don’t place the cartridge tabs under the hooks; you may 
damage the clamp when you close it.

7. Press down firmly on the ink cartridge clamp until it snaps 

in place.

8. If you need to replace the other ink cartridge, repeat steps 3 

through 7 before continuing with step 9.

9. Close the printer cover and press the   ink button. The 

printer begins charging the ink delivery system.

The green   power light flashes and the printer makes 
noise. Charging takes about half a minute. When it’s 
finished, the green   power light stops flashing and stays 
on, and the red   light goes out.

Never turn off the printer while the green


P

power light 

is flashing, unless the printer hasn’t moved or made 
noise for more than 5 minutes.

Selecting the Paper Type Setting

Select the correct 

Type

 or 

Media Type

 setting so your printer 

knows what kind of paper you’re using and adjusts the ink 
coverage accordingly.

Hooks

For this paper

Select this paper Type or 
Media Type setting

Plain paper sheets or envelopes
EPSON Premium Bright White Paper

Plain paper

EPSON Iron-On Transfer Paper

360 dpi Ink Jet Paper

EPSON Photo Quality Ink Jet Paper
EPSON Photo Quality Ink Jet Cards
EPSON Photo Quality Self Adhesive 
Sheets

Photo Quality Ink Jet Paper

EPSON Matte Paper Heavyweight
EPSON Double-Sided Matte Paper

Matte Paper - Heavyweight

EPSON Photo Paper
EPSON Panoramic Photo Paper

Photo Paper

EPSON Glossy Photo Paper
EPSON Photo Quality Glossy Paper
EPSON Glossy Photo Greeting Cards

Glossy Photo Paper

EPSON Premium Glossy Photo Paper

Premium Glossy Photo Paper

EPSON Premium Luster Photo Paper

Premium Luster Photo Paper

EPSON Premium Semigloss Photo 
Paper

Premium Semigloss Photo 
Paper

EPSON Photo Stickers

Photo Quality Glossy Film

EPSON ColorLife Photo Paper

ColorLife Photo Paper

EPSON Ink Jet Transparencies

Ink Jet Transparencies

Summary of Contents for C11C501061 - Stylus Photo 900 Color Inkjet Printer

Page 1: ...2 Control Panel EPSON Stylus Photo 900 3 Installing the First Ink Cartridges EPSON Stylus Photo 900 4 Replacing an Ink Cartridge EPSON Stylus Photo 900 5 Selecting the Paper Type Setting EPSON Stylus Photo 900 6 Paper Loading Guidelines EPSON Stylus Photo 900 7 Loading Roll Paper EPSON Stylus Photo 900 7 Loading and Printing CDs and DVDs EPSON Stylus Photo 900 9 Cleaning the Print Head EPSON Stylu...

Page 2: ...S041061 Legal 8 5 x 14 inches S041067 EPSON Photo Quality Ink Jet Cards A6 4 1 x 5 8 inches S041054 EPSON Glossy Photo Paper or EPSON Photo Paper Letter 8 5 x 11 inches S041141 S041649 S041271 S041272 A4 8 3 x 11 7 inches S041140 Panoramic 8 3 x 23 4 inches S041145 EPSON Matte Paper Heavyweight 8 x 10 inches Borderless S041467 Letter 8 5 x 11 inches S041257 Double Sided Matte Paper Letter 8 5 x 11...

Page 3: ... 8 mm Storage temperature 4 to 104 ºF 20 to 40 ºC 1 month at 104 ºF 40 ºC Transit temperature 22 to 140 ºF 30 to 60 ºC 1 month at 104 ºF 40 ºC 20 hours at 140 ºF 60 ºC Freezingtemperature Black 3 2 ºF 16 ºC Color 0 4 ºF 18 ºC The figure given is based on continuous printing after ink replacement The actual print capacity may vary Ink thaws and is usable after approximately 3 hours at 77 F 25 C To ...

Page 4: ...If the light is still flashing open the cover and remove all paper including any jammed or torn pieces Then reload paper and press the paper button to continue printing You can also set the paper thickness lever to the position pull the jammed paper out then return the lever to the position If you re using roll paper press the roll paper button If the roll paper is jammed you may need to remove th...

Page 5: ...into the holder Make sure the tabs rest on the hooks in the back You must install both cartridges or the printer won t work 5 Press down on the ink cartridge clamps until they click into place 6 Close the printer cover and press the ink button The green power light flashes as the printer charges ink for about 2 minutes Don t turn off the printer or interrupt charging while the power light is flash...

Page 6: ... If ink gets in your eyes flush them thoroughly with water To avoid damaging the printer never move the print head by hand You cannot print if an ink cartridge is empty Leave the empty cartridge installed in the printer until you have obtained a replacement Otherwise the ink remaining in the print head nozzles may dry out Removing and Installing Ink Cartridges Be sure you have a new ink cartridge ...

Page 7: ...s out Never turn off the printer while the green P power light is flashing unless the printer hasn t moved or made noise for more than 5 minutes Selecting the Paper Type Setting Select the correct Type or Media Type setting so your printer knows what kind of paper you re using and adjusts the ink coverage accordingly Hooks For this paper Select this paper Type or Media Type setting Plain paper she...

Page 8: ... touching the printable surface of the roll paper 4 Remove any paper that s in the sheet feeder at the top of the printer Then remove the paper support lower the output tray and turn on the printer 5 Make sure the paper thickness lever is set to the position Paper type Loading capacity Premium Bright White Paper 100 Sheets Photo Quality Ink Jet Paper 65 sheets Photo Quality Ink Jet Cards 30 cards ...

Page 9: ... seconds to back the paper all the way out Then turn the roll paper holder knobs to roll up the paper Press the roll paper button to clear the paper out error Repeat steps 7 through 9 to reload the paper Loading and Printing on Card Stock or Matte Board You can use the manual feed slot in the back of the printer to print on white card stock or matte board up to 1 3 mm 0 051 inch or 51 mil thick in...

Page 10: ...this section to load an ink jet printable CD or DVD on the printer s special tray and print it You can print on both regular 12 cm CDs and 8 cm mini CDs Thermal printable CDs and DVDs should not be used with this printer Ink jet printable CDs and DVDs can be ordered from several websites for example www pcmall com www cdw com www warehouse com www zones com and www pcconnection com Make sure the d...

Page 11: ...D or DVD on the CD tray with the white or printable side face up 4 Slide the edge guide to the right to make room for the tray 5 Insert the tray against the left side of the feeder 6 Open the printer cover and push the tray into the printer aligning the white line on the tray with the edges of the printer rollers 7 Slide the edge guide against the tray 8 Set the paper thickness lever to the positi...

Page 12: ...r printer for a long time print quality can decline so turn it on and print a few pages at least once a month to maintain good print quality Running the Head Cleaning Utility 1 Make sure the printer is turned on but not printing and the red ink light is off If the ink light is flashing or on you need to replace a cartridge see Removing and Installing Ink Cartridges on page 5 for details 2 Windows ...

Page 13: ...Setup or Print Click the Utility button then click the Print Head Alignment button Macintosh OS X Open the Applications folder and select EPSON Printer Utility Select SP 900 in the printer list click OK and select Print Head Alignment 4 Follow the instructions on the screen to print a test page You see this window 5 On the test page select the pattern with the two vertical lines most precisely pri...

Page 14: ...inter To keep your printer working at its best you should clean it several times a year 1 Turn off the printer unplug the power cord and disconnect the cable 2 Remove all the paper then use a soft lint free cloth to clean the sheet feeder 3 If the outer case or inside of the sheet feeder is dirty clean it with a soft cloth dampened with mild detergent Keep the printer cover closed to prevent water...

Page 15: ...r printer or secure it to the case with tape Be sure to remove the insert after installing the printer in its new location 5 Close the printer cover push in the output tray extension then close the output tray 6 Repack the printer and its attachments in the original box using the protective materials that came with them Keep the printer level as you transport it After transporting the printer remo...

Reviews: