background image

EPSON FX-880/FX-1180

11/98

EPSON FX-880/FX-1180

 - 1

13

User Replaceable Parts

FX-880

FX-1180

Options

Paper Handling Options

High-capacity cut-sheet feeder (C806381 for FX-880, 

C806401 for FX-1180)

Feeds up to 150 sheets of paper or 25 plain bond 
envelopes into the printer without reloading. You can 
load single-sheet paper, single-sheet multi-part forms, or 
envelopes.

Single-bin cut-sheet feeder (C806371 for FX-880, C806391 

for FX-1180)

Feeds up to 50 sheets of paper into the printer without 
reloading. You can load only ordinary single sheets in this 
feeder.

Additional tractor unit (C800201 for FX-880, C800211 for 

FX-1180)

Use the additional tractor in the pull position along with 
your standard tractor installed in the front or rear push 
position to improve paper handling and reduce the 
chance of paper jams. This setup is especially useful with 
continuous multi-part forms.

Roll paper holder (#8310)

Allows you to use your printer with 8.5-inch roll paper 
like that used with telex machines.

Front sheet guide (C814001 for FX-880, C814011 for 

FX-1180)

Allows you to load single sheets and carbonless single-
sheet multi-part forms of up to 6 parts.

User Replaceable Part

Parts Price List Name

Part Number

Front cover

Cover, front

1036539

Knob

Knob

1036511

Logo plate

Logo plate

1037486

Optional interface cover

Upper connector cover

1002045

Paper guide

Sheet guide assembly, rear

1036541

Paper guide support 
frame

Support frame, sheet guide

1036506

Paper tension unit

N/A

N/A

Paper thickness lever cap

Cap cover

1025333

Printer cover

Cover assembly, printer

1036540

Ribbon cartridge

Ribbon cartridge

#8750

Tractor

Tractor assembly

1036538

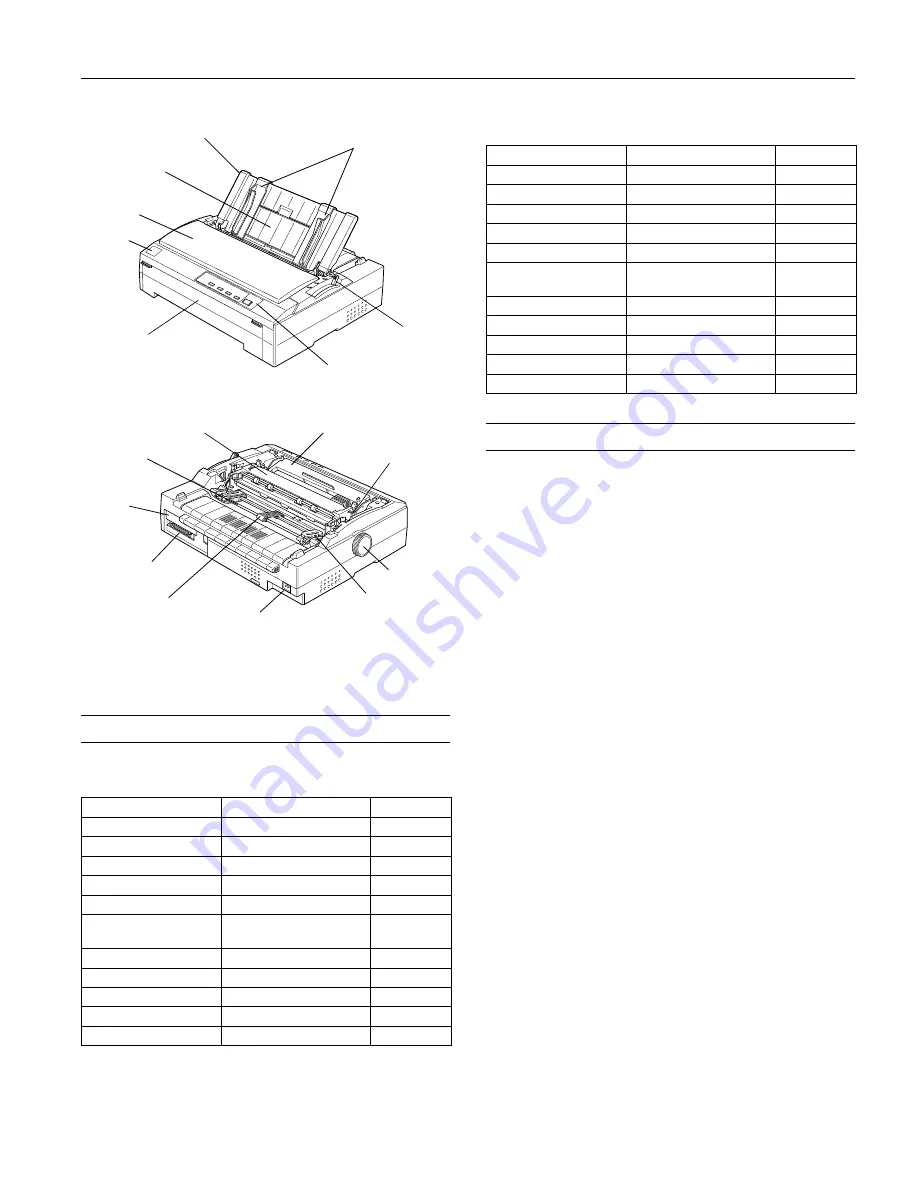
paper guide

edge guides

continuous 
paper support*

printer cover

front cover

control panel

paper release 
lever

logo plate

paper tension unit

ribbon cartridge

paper 
thickness 
lever

knob

sprocket**

AC inlet

center support**

parallel interface

optional 
interface 
cover

tractor

*

The paper guide support frame is beneath the continuous 
paper support.

** The center support and sprockets are parts of the tractor.

User Replaceable Part

Parts Price List Name

Part Number

Front cover

Cover, front

1038524

Knob

Knob

1039337

Logo plate

Logo plate

1039511

Optional interface cover

Upper connector cover

1037223

Paper guide

Sheet guide assembly, rear

1038525

Paper guide support 
frame

Support frame, sheet guide

1039332

Paper tension unit

N/A

N/A

Paper thickness lever cap

Cap cover

1039356

Printer cover

Cover assembly, printer

1038533

Ribbon cartridge

Ribbon cartridge

#8755

Tractor

Tractor assembly

1038519

Summary of Contents for C11C422001 - FX 880+ B/W Dot-matrix Printer

Page 1: ... Part Parts Price List Name Part Number Front cover Cover front 1036539 Knob Knob 1036511 Logo plate Logo plate 1037486 Optional interface cover Upper connector cover 1002045 Paper guide Sheet guide assembly rear 1036541 Paper guide support frame Support frame sheet guide 1036506 Paper tension unit N A N A Paper thickness lever cap Cap cover 1025333 Printer cover Cover assembly printer 1036540 Rib...

Page 2: ...mum 240 144 dpi near letter quality Interfaces One standard bidirectional 8 bit parallel interface with IEEE 1284 nibble mode support and one optional interface slot Paper feed methods Friction front rear Push tractor front rear Pull tractor front bottom rear Push and pull tractor additional tractor is required Cut sheet feeder optional Roll paper holder optional Paper feed speed Continuous 5 inch...

Page 3: ... range 103 5 to 132 V 198 to 264 V Rated frequency range 50 to 60 Hz Input frequency range 49 5 to 60 5 Hz Rated current 0 7 A maximum 1 6 A 0 4 A maximum 0 9 A Power consumption Approx 36 W ISO IEC 10561 letter pattern Temperature Humidity without condensation Operation 41 to 95 F 5 to 35 C 10 to 80 RH Operation recycled paper envelopes labels or roll paper 59 to 77 F 15 to 25 C 30 to 60 RH Stora...

Page 4: ...3 in 364 mm 3 6 in 92 mm 14 3 in 364 mm Thickness 0 0025 in 0 065 mm 0 0055 in 0 14 mm 0 0025 in 0 065 mm 0 0055 in 0 14 mm Weight 14 lb 52 g m2 24 lb 90 g m2 14 lb 52 g m2 24 lb 90 g m2 Quality Plain paper bond paper and recycled paper Minimum Maximum Width inches mm 5 8 148 FX 880 FX 1180 10 1 16 5 257 420 Length inches mm 7 2 182 14 3 364 Copies 1 original 5 copies Total thickness inches mm 0 0...

Page 5: ...X 880 and 13 6 inches 345 4 mm for the FX 1180 Safety Approvals 120 V model Safety standards UL1950 CSA C22 2 No 950 EMI FCC part 15 subpart B class B CSA C108 8 class B 220 to 240 V model Safety standards EN 60950 VDE NEMKO EMI EN 55022 CISPR pub 22 class B AS NZS 3548 class B Acoustic noise Approx 55 dB A ISO 7779 pattern Control Panel Buttons and Lights Font Lights Indicate which font is select...

Page 6: ...roblem and solution Pause Paper Out Beep Pattern n n No paper is loaded in the selected paper source The paper is not loaded correctly Load paper in the selected paper source remove and reload your paper or select a different paper source with the paper release lever The Paper Out light goes off Press the Pause button to turn off the Pause light Pause Beep Pattern n The paper release lever is set ...

Page 7: ...tor in the pull position The pull tractor provides the best paper jam prevention and allows you to load continuous paper from the front rear or bottom of the printer However you cannot use the tear off feature with the pull tractor Note To use a pull tractor you can install the tractor that comes with the printer in the pull position or you can purchase the optional additional tractor C800201 for ...

Page 8: ...ition For loading single sheets from the top from the paper guide or an optional cut sheet feeder or from the optional sheet or paper guide in the front Front push tractor position For loading continuous paper from the tractor installed in the front push position Also set the lever to this position when using the pull and front push tractors in combination Rear push tractor position For loading co...

Page 9: ...h If they are too far apart or there is any slack in the paper you need to move the sprockets 4 If you are using the front push tractor reattach the front cover If you are using the rear push tractor reattach the paper guide 5 Make sure the paper release lever is in the correct position 6 Make sure that the paper guide is lying flat on the printer and the continuous paper support is in the upright...

Page 10: ...s paper remain in the printer press the Tear Off Bin button to advance them to the tear off position and then tear them off Caution Tear off your printed document before you press the Load Eject button in the next step Reverse feeding several pages at a time may cause a paper jam Never use the knob to eject paper while the printer is on this may damage the printer or cause it to lose the tear off ...

Page 11: ... tear off feature to advance your continuous paper to the printer s tear off edge when you finish printing You can then easily tear off the printed document As described below you can use the tear off feature in two ways manually by pressing the printer s Tear Off Bin button or automatically by turning on the auto tear off mode The Tear Off Bin light flashes when the paper is in the tear off posit...

Page 12: ...printed pages When you resume printing the printer automatically feeds the paper back to the top of form position and begins printing Replacing the Ribbon Cartridge Warning You need to move the print head by hand to install or replace the ribbon cartridge If you just used the printer the print head may be hot let it cool before you replace the ribbon cartridge Caution Make sure the printer is off ...

Page 13: ... the printer tear off the fresh supply at the perforation nearest the paper entry slot 4 Turn the knob on the left side of the printer away from you to eject the paper in the printer Caution Always turn off the printer before you use the knob otherwise the printer may be damaged or the top of form or tear off position may be lost 5 Remove any remaining pieces of paper If the paper is stuck where t...

Page 14: ... change them and show you how the control panel lights help you make settings Use these instructions to change the printer s default settings from the control panel Note The arrows in the instructions indicate the printer s current settings 6 To save your settings and turn off the printer press the Operate button This also exits the default setting mode Note You may exit the default setting mode a...

Page 15: ...oaded and the printer is turned off Caution Whenever you turn off the printer wait at least five seconds before turning it back on otherwise you may damage the printer 2 To run the test using the Draft font hold down the LF FF button while you press the Operate button to turn on the printer To run the test using the printer s near letter quality fonts hold down the Load Eject button while you turn...

Page 16: ...e printer components as well as the case Be careful not to get water on the printer mechanism or electronic components Do not use a hard or abrasive brush Do not spray the inside of the printer with lubricants unsuitable lubricants can damage the printer mechanism Contact an EPSON dealer if you think lubrication is needed Transporting the Printer If you need to transport your printer some distance...

Reviews: