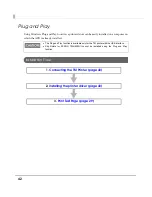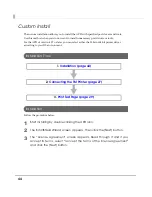
background image

40

Connecting the devices 

Confirm


the


following


before


connecting


devices


(TM


printer,


Customer


Display)

• Set


the


Handshaking


setting


of


the


printer


to

 ʺ

Receive


buffer


full

ʺ

.

• Configure


the


DIPSW


when


you


connect


the


DM

D500


with


the


Y

connection.

Connect


the


TM


printer.


For


information


on


how


to


connect


the


TM


printer


and


configure


the


DIPSW,


see


the


User

ʹ

s


Manual


supplied


with


the


TM


printer


or


the


Technical


Reference


Guide.

Serial (COM) connection

When


using


the


serial


connection,


make


sure


the


printer


settings


match


the


printer


driver


port


settings


(BaudRate/DataBits/Parity/StopBits/FlowControl).

USB connection

Do


not


connect


the


TM


printer


to


the


computer


before


installing


the


APD.


In


case


you


connect


the


TM


printer


first,


delete


the


port


drivers


and


reinstall


the


printer


drivers


without


connecting


the


TM


printer.


The maximum number of printers that can be simultaneously connected to multiple 
computers is 8.

Turn off the power of the TM printer and wait for more than 5 seconds before turning on 
the power.

USB device requirements

Maximum USB cable length is 5m, and 5 cascaded hubs maximum. 

Use the USB cable and the USB hubs compliant with USB2.0 specification (12Mbps). 

For USB power saving, see the C:\Program Files\EPSON\EPSON Advanced Printer Driver 
4\TMUSB\readme_e.txt generated after the APD installation.

Summary of Contents for Advanced Printer Driver Ver.4

Page 1: ...n overview of the APD and the description of operating environment Descriptions from installation of the APD to making prints with the TM printer Descriptions of the silent install M00002112 Rev N Overview Installation and Setup Silent Installation ...

Page 2: ...eiko Epson Corporation s operating and maintenance instructions Seiko Epson Corporation shall not be liable against any damages or problems arising from the use of any options or any consumable products other than those designated as Original EPSON Products or EPSON Approved Products by Seiko Epson Corporation Trademarks EPSON and ESC POS are registered trademarks of Seiko Epson Corporation in the...

Page 3: ...ou should use this product only after giving consideration to including fail safes and redundancies into your design to maintain safety and total system reliability Because this product was not intended for use in applications requiring extremely high reliability safety such as aerospace equipment main communication equipment nuclear power control equipment or medical equipment related to direct m...

Page 4: ... provide the necessary information to install the EPSON TM printer driver and Customer display Advanced Printer Driver Manual Content The manual is made up of the following sections Chapter 1 Overview Chapter 2 Installation and Setup Chapter 3 Silent Installation ...

Page 5: ...er 9 OS 9 NET Framework Version 10 Interface 10 Application 10 Supported Models 11 Connection Pattern 12 Connecting cable 13 Differences Depending on the OS 14 Restrictions 15 Manuals Sample Programs 16 Installation 16 Uninstallation 17 Installation and Setup 19 Notes on upgrading from APD 2 xx 3 xx 19 Installation methods 20 Standard Install 21 Installation Flow 21 Installation 21 Connecting the ...

Page 6: ...44 Shared Printer 49 Installation 49 Uninstallation 52 Maintenance after Installing the APD 55 Adding the printer driver 55 Uninstalling the printer driver 58 Replacing a printer 59 Changing the port settings of the printer driver 60 Upgrade Install of the APD 61 Silent Installation 63 What Is a Silent Installation 63 Flow of the Silent Installation 64 Setting the APD Environment To Be Copied 64 A...

Page 7: ... POS embedded However the Customer Display is not supported The APD environment that is already set up can be restored silent install on another computer The printers locally connected to the computers can be used as shared printers Point Print by using network function of the OS Package organization The APD consists of the following packages APD installer APD_4xxE exe A package to install the APD...

Page 8: ...cifications of each printer driver TM C100 Manual Descriptions of how to use the TM C100 printer driver and its functions Customer Display Manual Descriptions of how to use the Customer Display printer driver and its functions Status API Manual Descriptions of how to get the status of the TM printer from the user application by using the Status API Devmode API PRINTERINFO Manual Descriptions of ho...

Page 9: ...ows Embedded POSReady 2009 Microsoft Windows Embedded for Point of Service 1 1 32bit Microsoft Windows Embedded Standard 32bit English version The following components are required Volume Shadow Copy Service System Restore Core OLE Dialog Interfaces Local Printing Support Task Scheduler Required for USB driver installation Primitive DbgHelp Required for USB driver installation Communications Port ...

Page 10: ...ows applications No programming is required for printing directly from commercial applications such as word processing or spread sheet When you want to receive TM printer statuses such as paper out errors at your application use the Status API In this case you need to develop the applications to incorporate the monitoring function Interface Descriptions Parallel Serial USB USB 2 0 compliant Full S...

Page 11: ...600 7500 TM L60II TM L90 TM L90 Peeler TM P60 TM P60 Peeler TM T20 TM T58 TM T70 TM T88III TM T88IV TM T88IV ReStick TM T88V TM T90 TM U120 TM U120II TM U220 TM U230 TM U295 TM U325 TM U375 TM U590 TM U675 TM U950 BA T500 BA T500II EU T300 EU T400 EU T500 The printer driver for the TM T88IV does not support the TM T88IV ReStick Also the printer driver for the TM T88IV ReStick does not support the ...

Page 12: ... Y connection be sure to install the drivers in the correct order USB Ethernet Parallel Serial Serial Modular Stand alone connection Pass through connection Serial Serial Modular Wireless LAN connection Ethernet Hub Access Point Ethernet connection Ethernet Hub Modular IR 700 Internal serial connection Modular When using this connection method first install the Customer Display driver Then install...

Page 13: ...onnection patterns for each TM printer model interface specification and configure the communication settings of each interface Use DIP switch to configure communication settings of the TM printer and the Customer Display For more details see the manuals bundled with the products Pass through Y connection Serial USB Modular Modular When using this connection method first install the TM printer dri...

Page 14: ...Delete a shared printer Windows 7 Start Control Panel Hardware and Sound Devices and Printers Windows Vista Start Control Panel Hardware and Sound Printers Windows XP Start Control Panel Printers and Faxes Add a shared printer Windows 7 Start Control Panel Hardware and Sound Add a printer Windows Vista Start Control Panel Hardware and Sound Add a printer Windows XP Start Control Panel Add a printe...

Page 15: ...n the printer recovers from the offline status it will be added The maximum number of printers that can be connected simultaneously through a USB connection is 8 When a Parallel interface TM printer is connected to Windows XP a Plug and Play request window pops up and ʺEPSON TM P2 01ʺ is added in Other devices of the Device manager Do not perform Uninstall or Update Driver Software for this device...

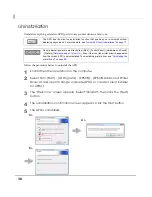
Page 16: ... accept the terms of the license agreement Then click the Next button 4 The Select Features screen appears Select Manual or Sample then click the Next button 5 The Ready to install the Program screen appears Click the Install button The installation of manuals or sample programs starts 6 The Install Shield Wizard Complete screen appears Click the Finish button Installation ends 7 Select from Start...

Page 17: ... Uninstall a program Reference page of other OS 2 The Program and Features screen appears Click the EPSON APD4 Sample Manual button 3 The uninstallation confirmation screen appears Click the Yes button Manuals and sample programs are uninstalled 4 Click the Finish button Installation ends Uninstall manuals sample programs before uninstalling the APD ...

Page 18: ...18 ...

Page 19: ...owing points When you install APD 4 xx to a computer on which APD 2 xx or 3 xx has been installed the previous version is automatically uninstalled before the installation of APD 4 xx Some printers do not support APD 4 xx Make sure that your printer supports APD 4 xx If you are using such printer and install APD 4 xx the printer becomes unusable on your system The APD of version 4 07 or later supp...

Page 20: ... be installed in the specified order Plug and Play page 42 TM printer with USB interface can be added as a printer device on a computer on which the APD is already installed standard or custom install Custom installation page 44 This allows you to select specific functions and port drivers to install the APD For the APD of version 4 07 or later you can select the 32 bit printer driver or 64 bit pr...

Page 21: ... version 4 07 or later the printer drivers for both 32 bit and 64 bit version OS are installed Installation Flow Installation Follow the procedure below 1Double click the APD icon and start the installation 2 The Install ShieldWizard screen appears Click the Next button 1 Installation page 21 3 Print Test Page page 29 2 Connecting the TM Printer page 27 ...

Page 22: ...er as well as the APD click the Add button When you want to install the printer driver later click the Next button and proceed to Step 11 For the USB interface installing the printer driver at Step 5 is not necessary the printer driver will be installed by Plug and Play function of the computer after APD driver is installed Click the Copy button to install more than one of the same printer driver ...

Page 23: ...characters for the name Port Type Select the type of interface to connect the computer and printer Create a Parallel port Proceed to Step 7 Create a Serial port Proceed to Step 8 Create an Ethernet port Proceed to Step 9 Create a USB port Proceed to Step 10 Set as Default Printer Check when configuring the printer as that normally used from the Windows applications Setting Description Printer name...

Page 24: ...not be changed COM Port Specify the number of serial port used for connecting the printer Baud Rate Specify the baud rate Data Bits Specify the data bits Stop Bits Specify the stop bits Flow Control Specify the method of data flow between the computer and the printer Parity Specify the parity Setting Description Printer name The printer name you entered at Step 6 is displayed This cannot be change...

Page 25: ...n you install the second or later printer drivers example Share with EPSON TM H6000III Receipt Using both the Receipt driver and Slip driver for a hybrid printer Using peeler paper on one label printer and using full label paper on another label printer Making multiple different print settings on multiple printer drivers Example using two drivers specify portrait receipt printing on one driver and...

Page 26: ...n to finish installation 14 When printer drivers are added at Step 5 confirm that the printer drivers are installed in Hardware and Sound Printers from Start Control Panel Reference page of other OS When you have not added printer drivers at Step 5 no printer drivers are displayed in the Printers 13 12 ...

Page 27: ...tion When using the serial connection make sure the printer settings match the printer driver port settings BaudRate DataBits Parity StopBits FlowControl Ethernet 10 100 Base T connection When using Ethernet connection check the IP address setting To configure the IP address use the Epson TM Netwingconfig Utility For details see the ʺUB E02 Technical Reference Guide ʺ Wireless LAN IEEE 802 11b con...

Page 28: ...einstall the printer drivers without connecting the TM printer USB device requirements Maximum USB cable length is 5m and 5 cascaded hubs maximum Use the USB cable and the USB hubs compliant with USB2 0 specification 12Mbps For USB power saving see the C Program Files EPSON EPSON Advanced Printer Driver 4 TMUSB readme_e txt generated after the APD installation ...

Page 29: ...s screen of the printer appears Click the Print Test Page button to start test printing 3 The following screen appears If the test print was output correctly click the Close button If the test print was not output correctly click the Troubleshoot button and perform troubleshooting in accordance with the Windows message Print Test Page of the APD does not print all the data unlike normal Print Test...

Page 30: ...lick the Next button 4 The uninstallation confirmation screen appears Click the Yes button 5 The APD is uninstalled The APD has the silent uninstallation function that enables you to uninstall without displaying any screens For more details see uninstall Silent Uninstallation on page 71 Do not uninstall printer drivers directly from Start Control Panel Hardware and Sound Printers Reference page of...

Page 31: ...Chapter 2 Installation and Setup 31 2 6 The Uninstall Complete screen appears Click the Finish button to finish uninstallation ...

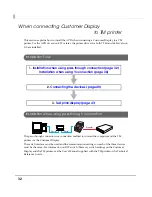
Page 32: ...ection method to connect the computer and the TM printer via the Customer Display The serial interface must be used and the communication settings on each of the three devices must be the same For information on DIP switch Memory switch settings on the Customer Display and the TM printer see the Userʹs Manual supplied with the TM printer or the Technical Reference Guide 1 Installation when using p...

Page 33: ...5 The Printer Configuration screen appears Click the Add button 6 The Add Printer screen appears Select a printer driver and port to be used for the Customer Display and click the Next button Setting Description Select driver Select the printer driver for the Customer Display Printer name The name of the driver for the Customer Display Do not use Unicode 2 byte characters for the name Port Type Se...

Page 34: ...ver for the TM printer Setting Description Printer name The printer name you entered at Step 6 is displayed This cannot be changed COM Port Specify the number of serial port used for connecting the printer Baud Rate Specify the baud rate Data Bits Specify the data bits Stop Bits Specify the stop bits Flow Control Specify the method of data flow between the computer and the printer Parity Specify t...

Page 35: ... screen Click the Next button 11 The Start Copying Files screen appears See Current Settings to confirm the installation settings and then click the Next button Setting Description Select driver Select the printer driver to be installed Printer name The printer driver name This is changeable Do not use Unicode 2 byte characters for the name Port Type Select the type of interface to connect the com...

Page 36: ...r The available interfaces of the computer and the TM printer are USB and serial The TM printer and the Customer Display should be connected using the serial interface and the modular cable of the Customer Display should be connected to the DM D connector on the printer Set 19200 bps for the communication speed for the Customer Display When turning on the Customer Display and the TM printer first ...

Page 37: ...Configuration screen appears Click the Add button 6 The Add Printer screen appears Select a printer driver and port to be used for the TM printer and click the Next button Setting Description Select driver Select the printer driver to be installed Printer name The printer driver name This is changeable Do not use Unicode 2 byte characters for the name Port Type Select the type of interface to conn...

Page 38: ... Printer name The printer name you entered at Step 6 is displayed This cannot be changed COM Port Specify the number of serial port used for connecting the printer Baud Rate Specify the baud rate Data Bits Specify the data bits Stop Bits Specify the stop bits Flow Control Specify the method of data flow between the computer and the printer Parity Specify the parity Setting Description Select drive...

Page 39: ...ttings to confirm the installation settings and then click the Next button 12 The APD is installed 13 The InstallShield Wizard Complete screen appears Click the Finish button to finish installation 14 In Start Control Panel Hardware and Sound Printers Reference page of other OS check that the specified printer driver and Customer Display driver are correctly installed 10 11 ...

Page 40: ...ate DataBits Parity StopBits FlowControl USB connection Do not connect the TM printer to the computer before installing the APD In case you connect the TM printer first delete the port drivers and reinstall the printer drivers without connecting the TM printer The maximum number of printers that can be simultaneously connected to multiple computers is 8 Turn off the power of the TM printer and wai...

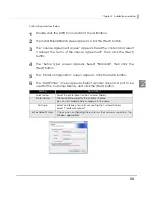
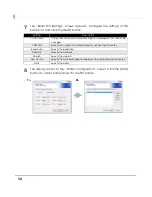
Page 41: ...t print function of the printer driver to send text data to the Customer Displays Follow the procedure below 1 Select from Start Control Panel Hardware and Sound and open Printers and then right click the target printer driver and select Printing Preferences Reference page of other OS 2 The Printing Preference screen appears Select the Font tab 3 Enter text data in the Test Data box to be displaye...

Page 42: ...he APD is already installed Installation Flow The Plug and Play function is available only for the TM printer with the USB interface Slip Rotate for EPSON TM H6000III cannot be installed using the Plug and Play function 1 Connecting the TM Printer page 43 3 Print Test Page page 29 2 Installing the printer driver page 43 ...

Page 43: ...ing the APD delete the corresponding port driver and then without connecting the TM printer reinstall the printer driver For information on how to connect the TM printer and check the DIP switch setting see the User s Manual supplied with the TM printer or the Technical Reference Guide The maximum number of printers that can be simultaneously connected to multiple computers is 8 Turn off the power...

Page 44: ...t printer driver according to your OS environment Installation Flow Installation Follow the procedure below 1 Start installing by double clicking the APD icon 2 The InstallShield Wizard screen appears Then click the Next button 3 The License Agreement screen appears Read through it and if you accept its terms select I accept the terms of the license agreement and click the Next button 1 Installati...

Page 45: ...ersion OS Selectable when installing from 64 bit version OS 64 bit printer driver Supports EPSON printer driver for 64 bit version OS Selectable when installing from 32 bit version OS TMFLogo Installs the TM Flash Logo Setup Utility and TM Flash Logo Setup Utility Ver 3 that allows you to save bitmapped images to the TM printer Status API NET Supports Status API in NET environment Devmode API NET ...

Page 46: ... the USB interface If this is not checked the printer driver cannot be installed by the Plug and Play function Launch StatusViewer on login TM C100 is needed When this is checked the Status Viewer automatically starts to run when you login the computer Setting Description Select driver Select the printer driver to be installed Printer name The printer driver name This is changeable Do not use Unic...

Page 47: ...are finished click the Next button Setting Description Printer name The printer name you entered at Step 8 is displayed This cannot be changed LPT Port Specify the number of parallel port used for connecting the printer Usually the port number is automatically displayed and no setting is required Setting Description Printer name The printer name you entered at Step 8 is displayed This cannot be ch...

Page 48: ... and then click the Next button 14 The APD is installed 15 The InstallShield Wizard Complete screen appears When you click the Finish button the installation ends 16 In Start Control Panel Hardware and Sound Printers check that the specified printer driver is correctly installed Reference page of other OS ...

Page 49: ...he printer to be shared is connected Make sure Client for Microsoft Networks is installed on a server and a client computer on which the APD will be installed When you install both 32 bit and 64 bit printer drivers on a server the shared printer environment can be provided for clients using 32 bit and 64 bit version OS For example if you connect a 32 bit client to a 64 bit server the 32 bit printe...

Page 50: ...Sound select Add a printer Reference page of other OS 2 The Choose a local or network printer screen appears Select Add a network wireless or Bluetooth printer 3 The Select a printer screen appears Select a printer to be shared on the displayed list and click the Next button 4 The selected shared printer is installed 1 2 3 4 ...

Page 51: ...ut correctly click the Close button If the test print was not output correctly click the Troubleshoot button and perform troubleshooting in accordance with the Windows message 7 Click the Finish button to finish the installation 8 In Start Control Panel Hardware and Sound Printers check that the specified printer driver is correctly installed Reference page of other OS 5 6 7 ...

Page 52: ...all the shared printer page 52 Uninstall the APD page 53 Uninstalling the shared printer Follow the procedures below to uninstall the shared printer 1 From Start Control Panel Hardware and Sound select Printers Reference page of other OS 2 Right click on the printer driver to be deleted and select Delete ...

Page 53: ... Hardware and Sound select Printers Reference page of other OS 3 From File Run as administrator select Server Properties Reference page of other OS 4 The Print Server Properties screen appears Select a printer driver to delete in the Drivers tab and click the Remove button Uninstallation of the APD must be executed by an administrator A normal user needs an administrator s password to execute the ...

Page 54: ...6 6 The Print Server Properties screen appears Click the Yes button to delete the printer driver selected in Step 4 7 From Start Control Panel select Uninstall a program Reference page of other OS 8 Select EPSON APD4 Point and Print Support and click the Uninstall button to delete EPSON APD4 Point and Print Support and uninstalla tion of the APD is completed 5 6 ...

Page 55: ...you want to install and then click the Next button The following features are available You cannot add the printer drivers directly from Start Control Panel Hardware and Sound Printers Reference page of other OS Features Description 32 bit printer driver Supports EPSON printer driver for 32 bit version OS Selectable when installing from 64 bit version OS 64 bit printer driver Supports EPSON printe...

Page 56: ...t be installed by the Plug and Play function Launch StatusViewer on login TM C100 is needed When this is checked the Status Viewer automatically starts to run when you login the computer Setting Description Select driver Select the printer driver to be installed Printer name The printer driver name This is changeable Do not use Unicode 2 byte characters for the name Communication Select the type o...

Page 57: ...installed which is displayed in Current Settings and then click the Next button 12 The printer driver added in the list at Step 10 is installed 13 The Maintenance Complete screen appears When you click the Finish button the process of installing the printer driver ends Setting Description Printer name The printer name you entered at Step 6 is displayed This cannot be changed COM Port Specify the n...

Page 58: ...staller for APD4 2 The Welcome screen appears Then select Custom and click the Next button 3 The Select Features screen appears Click the Next button 4 The Local Port Support screen appears Click the Next button 5 The Printer Configuration screen appears Select the printer diver from the list which you want to remove and click the Delete button 6 A screen appears to confirm the remove action Click...

Page 59: ...ped with the same interface beware of the following Set the new TM printer s DIPSW as same as the previous TM printer s settings regardless of interface If the memory switch is changed see the Userʹs Manual or the Technical Reference Guide of each TM printer Configure the following settings for each interface Interface Description Parallel No configuration is required after replacement Serial With...

Page 60: ... Select from Start Control Panel Hardware and Sound and open Printers and then right click the target printer driver and select Properties Reference page of other OS 2 The property screen of the TM printer appears Select the Ports tab and then click the Configure Port button 3 The Configure Port screen appears Set a configure port while referring to the screen and click the OK button 4 The display...

Page 61: ...ccept the terms of the license agreement and click the Next button 4 The screen asking whether you want to upgrade the APD to the new version appears Click the Yes button 5 The Start Upgrading screen appears Confirm the content of installation in the Current Settings field and click the Next button In the case of upgrade install of the APD4 06a or earlier the screen asking whether you want to inst...

Page 62: ...62 6 The upgrade installation of the APD starts 7 The Upgrade Complete screen appears Click the Finish button to complete the upgrade installation 6 7 ...

Page 63: ...h this file you can create the silent installation package or the script file for the silent installation and you can also add another printer With this function you can incorporate the APD installation into a batch file a recovery disc for the OS and an installer of an application Also you can add the command options for the silent installation to enable the following functions Notification when ...

Page 64: ...etting This is the setting when installing the APD System setting This is the system setting for the printer User setting This is the user setting for the printer The same setting as that of the copy source computer 2 Creating a package page 66 1 APD environment setting to copy page 64 APD initial settings System settings User settings 2 Creating a script file page 66 3 Executing the silent instal...

Page 65: ... setting Select Start Control Panel Hardware and Sound Printers right click the printer and select Properties Advanced Printing Defaults to make settings Reference page of other OS Making the user setting Select Start Control Panel Hardware and Sound Printers right click the printer and select Properties General Printing Preferences to make settings Reference page of other OS ...

Page 66: ...PD4 or create a silent installer for APD4 2 The Welcome screen appears Select Silent then click the Next button 3 The Select a file name screen appears Specify a destination folder and file name and specify which type of file to create Click the Next button Setting Description Location to save the file and file name Specify a destination and a file name for the file to be created Create silent ins...

Page 67: ...Select the printer driver you want to copy To change the printer name click the Rename button If you do not want to change the printer name go to step 7 by clicking the Next button Setting Description Include all currently installed printers If checked all the APD printers installed in the copy source computer are selected If unchecked each APD printer installed in the copy source computer can be ...

Page 68: ...file information displayed in Current Settings is correct and click the Next button to create the silent installation package or the script file for the silent installation 8 The Maintenance Complete screen appears Click the Finish button The silent installation package or the script file for the silent installation has been created in the destination folder specified in Step 3 7 6 ...

Page 69: ... Installing using the silent installation package Copy the silent installation package to the copy destination computer and execute the following command Package File Name specified with the full path Ex D APD Apd4Silent exe When checking the result of silent installation using a package file check that the specified printer driver is correctly installed in Start Control Panel Hardware and Sound P...

Page 70: ... file Using this command option enables you to execute the silent installation using the script file for the silent installation For more details see Installing using the script file for the silent installation on page 69 s a Upgrade Using this command option enables you to upgrade the APD Printers not supported by the APD4 are deleted Example D APD4 APD_406E exe s a Result Code Description 0 Comp...

Page 71: ...e Package File D APD4 Apd4Silent exe d Script File D APD4 APD_400E exe s f1 D APD4 Apd4Silent inf d w m Display a window message of the silent installation completion Adding the Windows handle and message ID to the command enables you to display a window message of the silent installation completion Example In the example below Windows handle is 0x6789abc and message ID is 0x0501 Package File D AP...

Page 72: ...d4Silent inf rY Example when you do not want to restart Package File D APD4 Apd4Silent exe rN Script File D APD4 APD_400E exe s f1 D APD4 Apd4Silent inf rN l Specify the install log file Using this command option enables you to specify the output destination of the installation log Apd4Setup log Normally this is output in the Windows folder Example Package File D APD4 Apd4Silent exe l D APD4 log t...

Reviews: