background image

Removing a Hard Disk Drive From the Internal

Drive Bay

To remove a hard disk drive, reverse the installation steps
outlined above. Then disconnect the hard disk drive ribbon
cable and the Rower supply cable from the back of the drive.
When you disconnect the cables, grasp the connectors and pull

them straight out so you do not bend the pins; do not pull on
the cables. Use the screws to again secure the hard disk drive

mounting bracket to the base of the computer.

Installing a Drive in the Upper External Drive Bay

Your system comes with a 3.5-inch diskette drive installed in

the lower externally accessible drive bay. You can also install a

diskette drive, a CD-ROM, a tape drive, or optical drive in the
upper externally accessible drive bay.

If you are installing a diskette drive or a tape drive with a
standard 5.25-inch diskette drive connector, you can 

connect 

it

using the diskette drive cable that came with your system.

Before you install a drive in the upper drive bay, remove the
cover. Once you have the drive installed, replace the cover,
following the instructions in Chapter 4.

5-14

Installing 

and 

Removing Drives

Summary of Contents for ActionDesk 4000

Page 1: ......

Page 2: ... by any means electronic mechanical photocopying recording or otherwise without the prior written permission of Epson America Inc No patent liability is assumed with respect to the use of information contained herein Nor is any liability assumed for damages resulting from the use of the information contained herein Further this publication and features described herein are subject to change withou...

Page 3: ...ter using the type of power source indicated on its label If you plan to operate the computer in Germany observe the following safety precaution To provide adequate short circuit protection and over current protection for this computer the building installation must be protected by a 16 Amp circuit breaker Beim Anschluß des Computers an die Netzversorgung muß sichergestellt werden daß die Gebäudei...

Page 4: ...cing to qualified service personnel 14 Unplug the computer from the wall outlet and refer servicing to qualified service personnel under the following conditions A When the power cord or plug is damaged B If liquid has entered the computer C If the computer does not operate normally when the operating instructions are followed Adjust only those controls that are covered by the operating instructio...

Page 5: ...dinateur près d une source de chaleur directe Le fonctionnement de l ordinateur doit s effectuer conformément au type de source d alimentation indiquée sur l etiquette Lorsqu on desire utiliser l ordinateur en Allemagne on doit observer les normes séuritaires qui suivent Afin d assurer une protection adequate à l ordinateur contre les court circuits et le survoltage l installation de l édifice doi...

Page 6: ...lifie 14 Débrancher l ordinateur de la prise murale et confier le service au personnel de service qualifié selon les conditions qui suivent A Lorsque le cordon d alimentation ou la prise sont endommagés B Lorsqu un liquide s est infiltré dans l ordinateur C Lorsque l ordinateur refuse de fonctionner normalement méme en suivant les instructions N ajuster que les commandes qui sont énuméres dans les...

Page 7: ... circuit different from that to which the receiver is connected Consult an experienced radio TV technician for help WARNING The connection of a non shielded equipment interface cable to this equipment will invalidate the FCC Certification of this device and may cause interference levels that exceed the limits established by the FCC for this equipment It is the responsibility of the user to obtain ...

Page 8: ...is Manual 6 Where to Get Help 7 CompuServe On line Support 8 Chapter 1 Setiing Up Your System Getting Started Choosing a Location 1 1 Unpacking Your Computer 1 2 Connecting Peripheral Devices 1 3 Connecting a Keyboard 1 3 Connecting a Mouse 1 4 Connecting a Monitor 14 Connecting a Printer or Other Device 1 5 Connecting the Power Cord 1 6 Turning On the Computer 1 7 Turning Off the Computer 1 9 vii...

Page 9: ...SETUP 2 15 Post SETUP Procedures 2 16 Installing the IDE Driver 2 16 Installing Video Drivers 2 18 Chapter 3 using Your Computer Working Comfortably 3 1 Using Energy Wisely 3 2 Using Your Green PC Features 3 3 Inserting and Removing Diskettes 3 4 Stopping a Command or Program 35 Resetting the Computer 3 5 Using a Password 3 7 Changing the Processor Speed 3 8 Chapter 4 lnstdling and Removing Optons...

Page 10: ...k Below the Mounting Bracket 5 8 Installing the Hard Disk On the Mounting Bracket 5 11 Removing a Hard Disk Drive From the Internal Drive Bay 5 14 Installing a Drive in the Upper Extemal Drive Bay 5 14 Connecting the Drive and Power Cables 5 17 RemovingaDrivefromtheUpperDriveBay 5 19 Reconnecting the Drive and Power Cables to the Diskette Drive in the Lower Drive Bay 5 19 Post installatim Procedur...

Page 11: ... 5 Physical Characteristics A 5 Power Supply A 6 Option Slot Power Limits A 6 Environmental Requirements A 6 Video Resolutions and Colors A 7 Hard Disk Drive Types A 8 Drive Option Information A 10 DMA Assignments A 11 Hardware Interrupts A 11 System Memory Map A 12 System I O Address Map A 13 Connector Pin Assignments A 14 Tested Operating Environments A 20 Options Available from Epson A 21 Gloss...

Page 12: ...4MB of internal memory expandable to 64MB System and video BIOS shadow RAM 8KB of internal processor cache with support for 64KB 128KB or 256KB of external cache 1 MB of onboard video memory expandable to 2MB Math coprocessor built into the microprocessor on DX DX2 and Pentium OverDrive systems Local bus video with True Color support which lets your monitor display up to 16 8 million colors Built ...

Page 13: ...al bus combined with the standard 1MB of on board video memory provides fast video response in a range of resolutions and colors See Appendix A for a list of supported resolutions In standard configurations this computer complies with the United States Environmental Protection Agencys Energy Star Program which promotes the manufacture of energy efficient printers computers and monitors Your comput...

Page 14: ...and enhanced video resolutions have been installed for you Just connect your keyboard mouse and monitor and you re ready to go Optional Equipment You can easily upgrade your computer by installing additional memory and a wide variety of options as described below Installation instructions are provided in Chapters 4 and 5 System Memory By adding lMB ZMB 4h4B 8h4B 16MB or 32MB SIMMs single inline me...

Page 15: ...x m 486DX 33 486DX 50 486DX2 50 486DX2 66 Pentium OverDrive Math Coprocessor If your system contains a DX DX2 or Pentium OverDrive microprocessor a math coprocessor is built into the chip Drives Your system can support up to four mass storage devices including hard disk drives diskette drives a tape drive a CD ROM or an optical drive As your storage needs expand you can install additional drives S...

Page 16: ...ions on installing the IDE driver Readme files on your driver diskettes tell you how to install drivers for specific applications How to Use This Manual This manual contains the information you need to get the best results from your computer You don t have to read everything in this book see the following chapter summanaries to find the the sections you need Chapter 1 provides simple instructions ...

Page 17: ...g tips Appendix A lists the specifications of your computer and the operating environments that have been tested on your system At the end of this manual you ll find a Glossary an Index and a list of international marketing locations Conventions Used in This Manual This manual uses the following type conventions Example Enter Ctrl C Meaning Keys ycu press on the keyboard Keys you press at the same...

Page 18: ...n Technical assistance with the installation configuration and operation of Epson products On site Servicer referral Assistance in locating your nearest Authorized Epson Reseller or Service Center Sales of Epson ribbons supplies parts documentation and accessories for your Epson product Customer Relations Epson technical information library fax service also available directly by calling the toll n...

Page 19: ... of an Epson product This membership entitles you to An introductory 15 credit on CompuServe Your own user ID and password A complimentary subscription to CompuServe Magazine CompuServe s monthly publication To take advantage of this offer call 800 848 8199 in the United States and Canada and ask for representative 529 In other countries call 614 529 1611 or your local CompuServe access number If ...

Page 20: ...et up your system choose a safe convenient location that provides the following A flat hard surface Surfaces like beds and carpets attract static electricity which can erase data on your disks damage the computer s circuitry and prevent proper ventilation Moderate environmental conditions Select a cool dry area and protect your computer from extremes in temperature humidity dust and smoke Avoid di...

Page 21: ...Your Computer When you unpack your system components make sure you have these items Your system may also include Epson s PS 2 compatible mouse and may come with the operating system and software already installed on a hard disk drive If you purchased any optional equipment that wasn t installed at the factory such as option cards memory modules a hard disk or a diskette drive install these options...

Page 22: ...other devices Your system also includes a removable panel above the mouse and keyboard ports if you want to install a game port connector to the game port interface on the system board Connecting a Keyboard To connect a keyboard hold the cable connector so the arrow on the connector faces up Insert it into the port marked K B Setting Up Your System 1 3 ...

Page 23: ...am installed a mouse driver for Windows applications Connecting a Monitor YOU Can connect your VGA or SVGA monitor to the computer s built in VGA port as described below 1 Place your monitor on top of or near the computer Turn the monitor and computer around so the backs are facing you 2 There should be two cables provided with your monitor the monitor cable to connect it to the computer and the p...

Page 24: ...he back of your computer make sure the monitor s power requirements do not exceed 1 Amp Connecting a Printer or Other Device Your computer has one bidirectional parallel and two serial ports To connect a printer or other peripheral device follow the appropriate instructions below Using the parallel port Follow these steps to connect a parallel printer to your computer 1 Place the printer next to t...

Page 25: ...er Make sure you have a cable compatible with a DB 9P connector To connect a serial device insert the connector into one of the ports marked COMl and COM2 If you are connecting only one serial device use the COMl port Connecting the Power Cord Follow these steps to connect the computer s power cord 1 Plug the power cord into the power inlet on the back of the computer Warning To avoid an electric ...

Page 26: ...ices connected to the computer 4 Turn on the computer by pressing the power button on the right side of the front panel The power indicator lights up then the screen displays the BIOS version number and copyright information The computer performs its power on diagnostics which are a series of checks to make sure everything is working correctly During diagnostics you see a message telling you to pr...

Page 27: ...or now once you install the operating system you will not see this message Now you need to run the SETUP program to make sure your computer is configured properly First turn off the computer as described below then see Chapter 2 for instructions When you finish running SETUP be sure to see Post SETUP Procedures on page 2 16 for guidelines on what you need to do next Turning Off the Computer Whenev...

Page 28: ...4 Press the power button to turn off the computer 5 Turn off the monitor printer and any other peripheral devices 1 10 Setting Up Your System ...

Page 29: ...r If you want information about installing video drivers or utilities see the Readme files included on the diskettes that came with your system Using SETUP You may need to run the SETUP program the first time you use your computer If your system came unconfigured you need to define how it is set up If your system was configured for you you may want to check the settings or adjust the date and time...

Page 30: ...ory is backed up by a battery so it is not erased when you turn off or reset the computer Starting the SETUP Program When you start your computer it performs some power on diagnostics During these diagnostics you may see the following message Press F2 to enter SETUP Press F2 to run SETUP This message is only on the screen for a few seconds If you missed it restart your computer and try again If yo...

Page 31: ...The computer automatically changes the date for leap years Setting the video display type The Video System option allows you to define the type of display you are using If you have connected a VGA or SVGA monitor to the computer s built in VGA port select EGA VGA If you connected a monitor that doesn t support VGA to a video adapter card installed in your system select either the CGA 80 x 25 or th...

Page 32: ...es the types of hard disk drives you have installed in your system When you select this option you see the Fixed Disk Setup screen From this screen select Fixed Disk 0 Control or Fixed Disk 1 Control Your computer comes with a hard disk auto sensing feature Press Enter when the Autotype Fixed Disk option is highlighted The system detects the type of hard disk drive and fills in the remaining field...

Page 33: ...d to move the cursor to the next field 3 When you leave SETUP make sure you save your changes Note If you are going to install NetWare 286 version 22 you must enable the System shadow option See page 2 7 Using the Advanced System Setup Options When you select the Advanced System Setup option from the Main Menu you see the Advanced System Setup screen From this screen you can select options that al...

Page 34: ...ure Configuring memory shadow The system can configure the Memory Shadow options or you can manually enable shadowing for your system and video memory as well as for specific blocks of ROM Your computer can access RAM faster than ROM The options on this screen allow your system to copy the contents of its system and or video ROM into RAM When you use shadowing your system can perform certain opera...

Page 35: ... Options When you select Boot Options from the Main Menu you see the Boot Options screen Options on this screen allow you to define the boot sequence and determine what information you see when you start your system The Disk drive boot sequence optiondetermines the order in which the computer checks the drives for an operating system when you turn it on or reset it The following table describes th...

Page 36: ...ed however you can still start SETUP by pressing F2 during power on diagnostics The Pause on POST errors option allows you to disable the error message followed by the message Press F1 t o resume F2 to Setup that you see when the system identifies a configuration error If you disable this option the system ignores configuration errors it finds during power on diagnostics and starts as it normally ...

Page 37: ...vel Entering or changing a password You can define both User and Supervisor password levels for this system If this system will be used by more than one person you may want to set a Supervisor password for yourself and a User password for others you don t want to have complete access to the system For instance you may want to restrict access to the diskette drives or the virus protection features ...

Page 38: ...cebar The Supervisor Password In option now displays Enabled To set a User password select the Set User Password option and follow the steps above Deleting passwords To delete your passwords follow these steps 1 Set the Password on boot option to Disabled 2 Delete the User password by pressing Enter for both the password field and the confirmation field Don t type any characters in these fields 3 ...

Page 39: ...ver will see an error message when he or she tries to access the diskette drive If you select User for the Diskette Access option you can access the diskette drives whether you enter the Supervisor or User password when you start the system Note To use passwords for diskette drive access you must enable the Par sword on boot option If you select a password level for Diskette Access but leave the P...

Page 40: ...ods to put the system and hard disk drive in a low energy standby mode The Inactivity Timer1 option sets the time out period for video signals to your monitor When the mouse or keyboard has been inactive for the time period you select here your computer stops sending video signals to your monitor If your monitor is also Energy Star compliant it goes into a low power standby mode because it isn t r...

Page 41: ... active mode may cause errors in some applications If you have problems you may want to disable the Fixed Disk Timeout option Viewing the System Summary When you select the System summary option from the Main Menu the SETUP program displays a summary of the configuration settings for your system This summary screen is the same one you see when you start your system You can choose not to have the s...

Page 42: ...actory default settings stored in ROM back into CMOS If you change your system configuration using the SETUP program and then have problems you can load ROM values to boot the system and start over Load Values from CMOS Loads the current values stored in CMOS for all SETUP options This ignores any changes you have made through SETUP Save Values to Saves the changes you have made CMOS to your confi...

Page 43: ...ver If you want to take advantage of the high speed performance available through your system s local bus interface for the hard disk drive you must install the IDE integrated drive electronics driver included on the Drivers diskettes If your system was configured for you this driver and the SVGA drivers have been installed for you Before you install the IDE driver make sure you back up your hard ...

Page 44: ...e for Windows Note You should always install the IDE driver for DOS If you are using Windows make sure you also install the IDE driver for Windows Windows must be installed before you install the driver for Windows After installing the driver the system reboots Note Not all hard disk drives can take advantage of the local bus IDE interface To take advantage of this feature your hard disk drive mus...

Page 45: ...Installing Video Drivers For instructions on installing video drivers see the Readme files included on the Drivers diskettes 2 18 Running SETUP and Installing Drivers ...

Page 46: ...or speed Working Comfortably This section provides some tips for creating a comfortable work environment Use good posture Keep your elbows hips and knees bent at approximately 90 degree angles and keep your wrists as close to horizontal as possible Vary your posture often and take frequent breaks Stand up stretch and move around Use a good chair Make sure your chair supports your lower back A chai...

Page 47: ...or directly in front of you and sit about an arm s length away from it The top of the screen should be slightly below your eye level so you look down at the screen Position the monitor so that no light is reflected from the screen Using Energy Wisely By purchasing this low power Energy Star compliant computer you join a growing number of users concerned about conserving energy Here are a few addit...

Page 48: ...mLock light on your keyboard flashes and your screen is blank Press any key or move the mouse to resume activity If the hard disk drive is in standby mode it doesn t return to active mode until you access it You ll hear it start again It will take a second or two to reach its operating speed and read or write to the disk The hard disk drive access light turns on when the system begins accessing th...

Page 49: ...the label facing up and the read write slot leading into the drive When the disk is completely in the drive turn down the latch to secure the diskette in the drive When you want to remove the diskette make sure the drive light is off then press the release button or turn the latch Remove the diskette and store it properly caution Never remove a diskette reset the computer or turn it off while a di...

Page 50: ...ases any data you did not save Resetting the Computer Occasionally you may want to clear the computer s memory without turning it off You can do this by resetting the computer For example if an error occurs and the computer does not respond to your keyboard entries you can reset it to reload your operating system and try again However resetting erases any data in memory that you have not saved so ...

Page 51: ...You can also press the RESET button located on the front right side of your computer See the following illustration The screen displays nothing for a moment and then the computer reloads the operating system If resetting the computer does not correct the problem you probably need to turn it off and on again Remove any diskette s from the diskette drive s Turn off the computer and wait 20 seconds I...

Page 52: ...ou started your system If you entered a User password when you started the system but the Diskette Access option is set to Supervisor you see an error message when you access the diskette drive When you need to enter your password you ll see the prompt Enter password As you type your password you see a rectangle for each character you type When you press Enter the computer loads the operating syst...

Page 53: ...e computer is operating at slow speed the light is off You should use fast speed for almost everything you do because your programs will work faster However certain application programs have specific timing requirements and can run only at the slower speed See your software manual to determine if this is the case Some copy protected programs require the computer to run at slow speed while accessin...

Page 54: ...ess on the numeric keypad The speed light comes on N o t e You can use the commands listed above while you are running a program However if the program uses one of these commands for another function you cannot use it to change the processor speed The speed setting remains in effect until you do one of the following Reset your computer Turn off your computer Change the speed with another keyboard ...

Page 55: ...finished It then describes the following Locating the internal components Changing the jumper settings Installing and removing SIMMs single inline memory modules Installing and removing option cards Adding video memory Installing external cache Installing microprocessor upgrades Caution Never install options or change jumper settings when the computer is turned on or the power cable is connected t...

Page 56: ...pheral devices including the monitor and printer 2 Disconnect the computer s power cable from the electrical outlet and from the back panel Also disconnect any other cables that are connected to the computer including the keyboard cable 3 If the monitor is on top of the computer lift it off and set it to one side 4 Turn the computer around so the back panel is facing you 5 Remove the three screws ...

Page 57: ...omputer by touching the metal surface of the back panel Warning Be sure to ground yourself by touching the back panel of the computer every time you remove the cover If you are not properly grounded you could generate an electric shock that could damage a component when you touch it Installing and Removing Options 4 3 ...

Page 58: ...l cables are out of the way so they do not catch on the cover Insert the front of the cover between the front bezel and the chassis of the computer and guide it straight down See the illustration on page 4 3 Replace the three cover retaining screws Reconnect the computer to the monitor printer keyboard and any other peripheral devices you have Then reconnect the power cable to the back of the comp...

Page 59: ...ocating the Internal Components As you follow the instructions in this chapter refer to the illustration below to locate the different components inside your computer Installing and Removing Options 4 5 ...

Page 60: ...rol certain functions These jumpers are preset at the factory to default positions See the illustration below to locate the jumpers on the system board Note You may need to change the jumpers shown here Other jumpers on the system board are for service purposes only 4 6 Installing and Removing Options ...

Page 61: ...rive Selects a CPU clock speed of 50 MM DX 50 Selects a CPU clock speed of 25 MM 486SX 25 486DX2 50 O f f Selects fast speed On Selects 8 MM speed 2 3 Selects normal system board battery operation 3 4 Discharges CMOS memory resets SETUP to defautts 1 2 Enables the IDE hard disk drive controller 2 3 Disables the IDE hard disk drive controller Factory setting You can use MS DOS to automatically reas...

Page 62: ...2 or Pentium OverDrive 1 2 3 4 1 2 486SX 2 3 off SVGA jumper settings SVCA jumper function Enable on board SVGA Disable on board SVGA Factory settings J36 J37 On On Off off Setting the Jumper If you need to change any jumper settings follow these steps 1 Refer to the illustration on page 4 6 to locate the jumpers 2 If there are any option cards installed in your computer you need to remove them to...

Page 63: ...nder the jumper A triangle is traced on the board at pin 1 To move a jumper from one position to another use needle nose pliers or tweezers to pull it off its pins and gently move it to the desired position Caution Be careful not to bend the jumper pins or damage any components on the main system board 4 Replace any option cards you removed See page 4 14 for instructions installing and Removing Op...

Page 64: ...MB 4MB 8MB 16MB and 32MB SIMMs The following table shows the possible SIMM configurations When the front of the computer is facing you BANK 0 is on the right An x in the table below indicates that no SIMM is installed SlMM configurations BANK0 4MB 4MB 4 M B 4 M B 8 M B 8 M B 8 M B 4 M B 8 M B 8 M B 16MB 16MB 16MB 1MB 17MB 2MB 18MB 4 M B 20MB 16MB BANK 1 Total memory X 4MB 1MB 5MB 2MB 6MB 4MB 8MB X...

Page 65: ...ss speed of 80ns nanoseconds or faster Be sure all the SIMMs operate at the same speed Inserting SIMMs Make sure the computer is turned off and then follow these steps to install SIMMs 1 Make sure the front of the computer is facing you 2 Refer to the illustration on page 4 5 to locate the SIMM sockets on the right side of the system board 3 Remove any option cards that may be blocking your access...

Page 66: ...e socket until it is seated firmly in the slot Then tilt it upright as shown below guiding the hole at each end of the SIMM over the retaining post at each end of the SIMM socket If it does not go in smoothly do not force it pull it all the way out and try again 4 12 Installing and Removing Options ...

Page 67: ...eps below 1 2 3 4 Make sure the front of the computer is facing you Use the illustration on page 4 5 to locate the SIMM sockets on the right of the system board Remove any option cards that may be blocking your access to the SIMM sockets See page 4 19 for instructions Use your fingers or a small screwdriver to carefully pull away the metal tabs that secure the SIMM at each end as shown below Insta...

Page 68: ...rent SIMMs follow the instructions on page 4 11 to install them 8 Replace any option cards you removed as described below Installing an Option Card This section explains how to install option cards in your computer Your computer has three 16 bit full length slots and two B bit half length slots to accommodate a total of five option cards 4 14 Installing and Removing Options ...

Page 69: ... edged connectors If you need to set it down before you install it place it gently on top of its original packing material with the component side facing up Keep the packing materials in case you remove the card later Before you install the card adjust any switches or jumpers on the card if necessary See the option card instructions Also see if you need to change any jumper settings on the system ...

Page 70: ... bit slot near the power supply you need to move the power supply before you can remove the metal slot cover Remove the three screws securing the power supply to the computer as shown below Be careful not to disconnect any of the cables Slide the power supply away from the slots until you can remove the slot covers easily 4 16 Installing and Removing Options ...

Page 71: ...on slot cover to the computer as shown below Keep the screw to secure the option card to the computer 3 Slide out the slot cover and set it aside Store it in a safe place in case you remove the option card later Installing and Removing Options 4 17 ...

Page 72: ...onnectors reach the slot push the card in firmly but carefully to insert it fully You should feel the card fit into place If it does not go in smoothly do not force it pull the card all the way out and try again 5 Secure the end of the card to the computer with the retaining screw 6 If you had to move the power supply make sure you replace it and secure it again with the three retaining screws 4 1...

Page 73: ... option card replace the option slot cover and retaining screw Adding video Memory Your computer comes with 1MB of video memory You can increase your video memory to 2MB by installing two video DRAM 256KB x 16 bit 40 pin ZIP Zig zag Inline Package chips This is useful for running graphics intensive applications or for supporting high resolutions with many colors The following table lists the video...

Page 74: ...e 4 19 for instructions Caution To avoid generating static electricity and damaging the memory chips ground yourself by touching the metal surface on the inside of the computer s back panel Then remain as stationary as possible while you install them 3 Remove the memory chips from their package and inspect each one All the pins should be straight If any of the pins are bent or crooked straighten t...

Page 75: ...rrectly aligned If the chip does not go in smoothly remove it and try again 6 When the chip is properly positioned push down firmly on both ends of the chip to make sure it is well seated 7 Repeat steps 4 through 6 to install the other chip in socket U3 8 Replace any option cards you removed See page 4 14 for instructions 9 Now run SETUP as described in Chapter 2 so that your system recognizes the...

Page 76: ...56KB of external cache use eight SRAM 28 pin 32 x 8 20ns DIP chips and one 32 x 8 20ns tag chip To install any cache on a 486DX 50 system make sure the tag chip is a 15ns chip For the cache memory to work properly you must install chips in the following configuration each bank contains four cache memory sockets Cache memory configurations BANK0 BANK1 Tag SRAM U20 21 22 23 U29 30 31 32 U36 Total ca...

Page 77: ...e chips ground yourself by touching the metal surface on the inside of the computer s back panel Then remain as stationary as possible while you install them 3 Remove the cache chips from their package and inspect them The pins should point inward at slightly less than a 90 angle If any of the pins are bent or crooked straighten them gently with your fingers or with small tweezers to align them wi...

Page 78: ...nds of the chip to make sure it is well seated Repeat steps 4 through 6 for each of the remaining chips Change jumpers J25 J26 J27 and J28 as described on page 4 8 to match to the amount of cache you installed Replace any option cards you removed See page 4 14 10 Run SETUP to enable the External Cache option and check that the System shadow and Video shadow options are enabled You select these opt...

Page 79: ...Intel Pentium OverDrive processor Intel Heat sink Heat sink fan assembly Tennmax Trading Corp Tennmax Trading Corp For me DX 33 processor For DX 50 DX2 50 DX2 66 and Pentium OverDrive processors To upgrade your microprocessor you will perform these steps See the page in parentheses for instructions Replace the existing processor chip see page 426 Install the new microprocessor and heat sink or hea...

Page 80: ... plastic tab Press the handle down and away from the tab then rotate the handle to the released position This releases the chip from the socket The illustration on the next page shows this handle in the released position If your microprocessor isn t inserted in the ZIF socket with a handle use a chip puller or a small flat head screwdriver to remove the chip Carefully wedge the tip of the screwdri...

Page 81: ...r a new microprocessor 5 Position the processor chip over the socket aligning the notched edge of the chip marked with a dot with pin 1 on the socket as shown below Note If you install the processor chip in the wrong orientation you may damage the chip and void your warranty 6 Make sure the pins in the processor chip are directly over the holes in the socket Then gently push the microprocessor str...

Page 82: ...ect jumper settings 9 If you are upgrading to a DX 33 DX 50 DX2 or Pentium OverDrive processor you must install a heat sink or a heat sink fan assembly Follow the instructions included with the heat sink 10 Run SETUP as described in Chapter 2 to update your computer s configuration with the new microprocessor Installing a Heat Sink If you are installing a DX 33 DX 50 DX2 or Pentium OverDrive proce...

Page 83: ...oprocessor you must run SETUP to update the computer s configuration See Chapter 2 for instructions Additionally you may need to add some commands to your configuration files See your operating system manual and the manual that came with your optional equipment Installing and Removing Options 4 29 ...

Page 84: ...bay you can install a second diskette drive a tape drive or a CD ROM drive To install or remove a drive first remove the computer s cover as described in Chapter 4 Then follow the appropriate instructions in this chapter to install and remove drives Installing a hard disk drive in the internal drive bay Removing a hard disk drive from the internal drive bay Installing a drive in the upper external...

Page 85: ... installing the hard disk drive above the mounting bracket Note Be sure to check the jumper settings on the hard disk drive before you install it Also you may need to know the drive parameters if the hard disk drive autosensing feature in SETUP is unable to correctly identify your drive See the documentation that came with your drive for this information Before you can install a hard disk drive yo...

Page 86: ...rive there may be a plastic guiderail and metal grounding plate attached to one of the mounting frames If so remove the screws securing them to the mounting frame and remove the guiderail and grounding plate 2 Then remove the two screws securing each mounting frame to the drive and remove the frames Installing and Removing Drives 5 3 ...

Page 87: ...should connect both the hard disk drive ribbon cable and the power supply cable to the drive before you secure it with the mounting bracket You will not be able to attach them once the bracket is in place Connecting the drive cuble to the system board If you need to connect the hard disk drive ribbon cable to the system board follow the steps below If the hard disk drive ribbon cable is already at...

Page 88: ...e system board There is a 1 printed on the system board to identify pin 1 4 Make sure the holes in the cable connector fit over the pins in the system board connector then push in the cable connector Caution If you do not correctly align the holes with the pins you could severely damage your system board when you push in the cable connector Installing and Removing Drives 5 5 ...

Page 89: ... on the drive connector If you do not see it on the connector casing turn the drive over so you can see the drive s circuit board as shown below There is a 1 or 2 printed on the board to identify the side of the connector containing pin 1 3 Position the connector on the cable so that the red wire aligns with pin 1 on the drive 4 Make sure the holes in the cable connector fit over all the pins then...

Page 90: ...ly cable connector so that its notched corners line up with the notched corners of the power supply connector on the hard disk drive Make sure the holes fit over all the pins and then push in the connector Caution If you do not align the cable connector correctly you could severely damage your hard disk drive when you push it in Installing and Removing Drives 5 7 ...

Page 91: ...t Refer to the illustrations below and follow these steps 1 Remove the screw securing the mounting bracket to the base of the computer as shown below 2 Slide the mounting bracket toward the diskette drive bays as shown above until the slots clear the tabs 3 Lift the mounting bracket out of the computer and set it aside 5 8 Installing and Removing Drives ...

Page 92: ...ove the four pegs as shown below 5 Gently lower the drive over the pegs When the pegs are inserted in the mounting holes on the base of the hard disk drive the drive will not move from side to side Note If the drive isn t seated correctly on the pegs you may not be able to close the cover all the way Installing and Removing Drives 5 9 ...

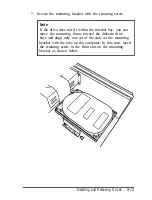
Page 93: ...t the slots in the mounting bracket fit over the tabs on the base of the computer 7 Slide the bracket toward the side of the computer as shown below until the tabs hold the bracket in place 8 Secure the mounting bracket with the screw 5 10 Installing and Removing Drives ...

Page 94: ...rew securing the mounting bracket to the base of the computer and slide the mounting bracket toward the diskette drive bays until the slots clear the tabs See the illustration on page 5 8 2 Lift the mounting bracket out of the computer 3 Turn the hard disk drive over and locate the four mounting holes on the drive 4 Position the bracket on the hard disk drive aligning the holes in the bracket with...

Page 95: ... can purchase flat head screws at any hardware store request this size 6 32UNC x 8 FH M Set the jumpers on both hard disk drives to indicate which is the master and which is the slave drive See the documentation that came with your drive for instructions 6 Turn the drive and the mounting bracket over then slide the slots in the mounting bracket under the tabs at the base of the computer until the ...

Page 96: ...internal bay you can move the mounting frame toward the diskette drive bays and align only one set of the slots on the mounting bracket with the tabs on the computer In this case insert the retaining screw in the front slot on the mounting bracket as shown below Installing and Removing Drives 5 13 ...

Page 97: ...ter Installing a Drive in the Upper External Drive Bay Your system comes with a 3 5 inch diskette drive installed in the lower externally accessible drive bay You can also install a diskette drive a CD ROM a tape drive or optical drive in the upper externally accessible drive bay If you are installing a diskette drive or a tape drive with a standard 5 25 inch diskette drive connector you can conne...

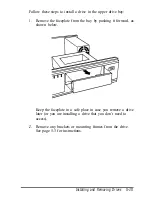
Page 98: ...e bay by pushing it forward as shown below Keep the faceplate in a safe place in case you remove a drive later or you are installing a drive that you don t need to access 2 Remove any brackets or mounting frames from the drive See page 5 3 for instructions Installing and Removing Drives 5 15 ...

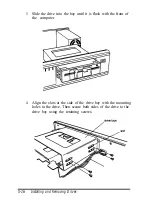
Page 99: ... is flush with the front of the computer 4 Align the slots at the side of the drive bay with the mounting holes in the drive Then secure both sides of the drive to the drive bay using the retaining screws 5 16 Installing and Removing Drives ...

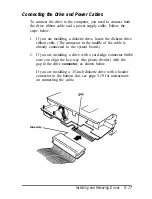
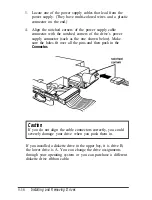
Page 100: ... ribbon cable The connector in the middle of the cable is already connected to the system board 2 If you are installing a drive with a card edge connector make sure you align the key way the plastic divider with the gap in the drive connector as shown below If you are installing a 3 5 inch diskette drive with a header connector in the bottom slot see page 5 19 for instructions on connecting the ca...

Page 101: ...uch as the one shown below Make sure the holes fit over all the pins and then push in the Connector Caution If you do not align the cable connectors correctly you could severely damage your drive when you push them in If you installed a diskette drive in the upper bay it is drive B the lower drive is A You can change the drive assignments through your operating system or you can purchase a differe...

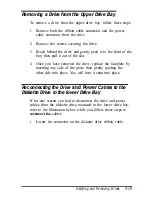
Page 102: ...e removed the drive replace the faceplate by inserting one side of the plate then gently guiding the other side into place You will hear it snap into place Reconnecting the Drive and Power Cables to the Diskette Drive in the lower Drive Bay If for any reason you had to disconnect the drive and power cables from the diskette drive mounted in the lower drive bay refer to the illustration below while...

Page 103: ...he system board rather than the power supply 4 Position the power supply cable connector so that the holes fit over all the pins The red wire on the cable aligns with pin 1 identified at the power connector on the circuit board of the drive Push in the connector Caution If you do not align the cable connector correctly you could severely damage your hard disk drive when you push it in 5 20 Install...

Page 104: ...ter you install or remove your drive s and replace the cover on your computer you need to run SETUP to define the correct configuration for your newly installed drive See Chapter 2 for instructions Installing and Removing Drives 5 21 ...

Page 105: ...er will not start Within each category a more specific problem is described with possible solutions If the suggestions here do not solve the problem contact your Authorized Epson Servicer Identifying Your System When you request technical assistance be ready to provide the serial number of your computer its system BIOS version number its configuration including the type of disk drives monitor and ...

Page 106: ... option to see your system s configuration At the MS DOS prompt type VER and press Enter to see the MS DOS version number In Windows applications select About from the Help menu As your software application starts it usually displays a version number on the banner screen Also you can check your software manual At the MS DOS prompt type TYPE CONFIG SYS and press Enter to see a listing of your CONFI...

Page 107: ...drive A then reinstall the IDE driver Also make sure the hard disk drive type is identified correctly in SETUP The computer does not start and the power light is not it Make sure the power cord is securely connected to both the AC inlet on the back panel and an electrical outlet The power cord is securely connected but the computer still does not start Check the electrical outlet for power Turn of...

Page 108: ... the system won t start See Chapter 4 The Computer Does Not Respond The computer locks up Wait a few moments if your computer does not respond after a reasonable length of time press Ctrl Alt Del If that doesn t work press the RESET button You may have installed memory using SIMMs that work at the wrong speed Install the correct SIMMs see Chapter 4 Your system may have over heated If you are using...

Page 109: ... these ports look alike they cannot be used interchangeably Nothing happens when you type on the keyboard The Lockout Timer may be set in SETUP This option inactivates the keyboard for a specified period of time after the system returns to an active mode from a low power standby mode This delay gives Energy Star compliant monitors the time they need to return to an active mode Wait a few seconds a...

Page 110: ...y connected to the computer If you are running an application program see if you need to set up the program for the type of monitor and display adapter you have Also make sure you are using the appropriate monitor and display adapter for your software The power switch is on but the power tight is not on If the monitor is Energy Star compliant it may be in low power standby mode Press a mouse butto...

Page 111: ...ht type but you still see an error Check that the diskette is not writeprotected preventing the drive from writing to the diskette Make sure the diskette is formatted See your operating system documentation for instructions on formatting diskettes The system may have the Diskette Access option in SETUP enabled If you entered a User level password when you started the system but this option is set ...

Page 112: ... hard disk drive is not working property or its performance is not what you expect Make sure you have installed the drive correctly and check all cable connections Also check the jumper settings on your drive Check that you have installed the IDE driver on your hard disk see Chapter 2 To take advantage of the local bus IDE interface your hard disk drive must support a 32 bit data path that uses do...

Page 113: ...rrectly See the documentation that came with the drive for more information You are unable to store data on the hard disk drive If the hard disk drive has been in low power standby mode make sure the drive has had time to achieve its full operating speed before you try to write data to it If your drive was not configured make sure you have partitioned and formatted it correctly for your operating ...

Page 114: ... read write errors the disk may have a physical problem Contact your Authorized Epson Servicer Password Problems You have forgotten your password You must discharge your CMOS memory To do this you need to change the setting of jumper J34 to position 3 4 See Chapter 4 for details on changing the jumper setting After you have changed J34 restart your system leave it on for a few seconds then turn it...

Page 115: ...y be running an application that requires a slower processor speed You need to change the speed switch jumper J22 See Chapter 4 for information on changing the jumper The application program is having trouble reading from or writing to the hard disk drive If you have enabledthe Fixed Disk Timeout option in SETUP your application may be timing out during the few second delay when the hard disk driv...

Page 116: ...l for the printer s correct DIP switch or control panel settings Also make sure you have the proper drivers installed for your printer and make sure you ve selected the correct printer within your software application Option Card Problems A newly installed option card is not working correctly Make sure the option card is installed correctly and is well seated in its slot Run the SETUP program to u...

Page 117: ...a fan or heat sink is attached to the CPU don t install an option card in the lowest 16 bit option slot An external device connected to the option card is not working correctly Make sure you are using the proper cable to securely connect the device to the card Memory Module Problems The memory count displayed by the power on diagnostics program is incorrect You may have installed the SIMMs incorre...

Page 118: ...The indicated controller on your system board may be faulty If you have an option card with a controller that will work with your device you can install it and change the jumper settings on the system board to disable the built in controller You can then continue to use your system until it is convenient for you to have it serviced External Cache Problems The amount of cache displayed by the power...

Page 119: ...u have set the External cache option to Enabled and set both the System shadow and the Video shadow optionsto Enabled See Chapter 4 for instructions on changing the jumper settings or information on installing external cache see Chapter 2 for instructions on using the SETUP program Troubleshooting 6 15 ...

Page 120: ... the video signals the computer sends to the monitor time periods selectable in SETUP Fast and slow speeds available as described in the table below speed selection through keyboard commands or jumper setting speed CPU local bus ISA bus setting speed speed speed Fast 25 33 50 25 33 50 8 33 MHz MM MM slow 8MHz 25 33 50 8 33 MHz MHz DX2 50 and DX2 66 systems run internally at 50 and 66 MHz but run e...

Page 121: ... board expandable to 2MB using two ZIP chips Supports shadowing of system and video BIOS ROM into RAM Supports relocation of 256KB of memory from AOOO0h to BFFFFh and D0000h to EFFFFh to extended memory 8KB of internal cache supports 64KB 128KB or 256KB of external cache using 28 pin 8 x 8 20ns DIP chips or 28 pin 32 x 8 20ns DIP chips Math coprocessor built into the microprocessor for DX DX2 and ...

Page 122: ...p to two IDE hard disk drives with built in controller BIOS provides hard disk auto sensing function VGA interface for fixed or multi frequency monitor built into system board low power standby mode for Energy Star compliant monitors 15 pin D shell connector One standard 8 bit parallel bidirectional interface built into main system board 25 pin D shell connector Two RS 232C programmable asynchrono...

Page 123: ...rive systems one l bit slot is unavailable because of the CPU heat sink fan assembly Speaker Internal Mass storage Internal mounts Two 3 inch wide one inch drives with three or more option cards installed the power supply only supports one internal drive Externally accessible mounts One 3 inch wide third height drive and one 5 inch wide half height drive Diskette drives 3 5 inch diskette drive 720...

Page 124: ...function keys SETUP Program Stored in ROM accessible by pressing F2 during boot System security User and supervisor level passwords 8 characters available for system boot or diskette access Virus protection Write protection feature for the hard disk drive boot sector periodic reminder message for running virus detection utility Physical Characteristics Width 15 6 inches 396 mm Depth 14 5 inches 36...

Page 125: ...Volts 5 volts 12 volts 12 volts For all slots 3 3 Amps 0 1 Amps 1 0 Amps 0 1 Amps Based on a system containing one hard disk drive and one diskette drive Environmental Requirements condition Temperature Operating Non operating range storage range 41 to 90 F 4 to 140 F 4 to 140 F 5 to 32 C 20 to 60 C 20 to 60 C Humidity 20 to 90 10 to90 10 to 90 non condensing Altitude 330 to 9 900 ft 330 to 39 600...

Page 126: ...0 800x600 1024x768 1 16 43 5 60 70 72 4 bit planes 1280 x 1024 Memory Color Requirements MB 256 32K 64K 16 8M True Color 16 Vertical Remarks Frequencies HZ 60 72 8 bits pixel 60 16 bits pixel 60 24 bits pixel 56 60 72 4 bit planes 1 2 5 6 56 60 72 8 b i t p i x e l 1 256 43 5 60 70 72 8 bit pixel 2 64K 43 5 16 bits pixel 16 43 5 4 bit planes 2 256 43 5 8 bits pixel Non interlaced and interlaced In...

Page 127: ...ature When you press Enter with the cursor positioned on the Autotype Placed Disk option in SETUP the system detects the type of hard disk drive you have installed and fills in the drive information using values in the following table Hard disk drive types A 8 Specifications ...

Page 128: ...Hard disk drive types continued Specifications A 9 ...

Page 129: ...Drive Option Information l Select 1 or none for the precomp value lf neither of these options are available select the maximum available precomp value A 10 Specifications ...

Page 130: ...DMA Assignments Specifications A 11 ...

Page 131: ...A 12 Specifications ...

Page 132: ...System I O Address Map Specifications A 13 ...

Page 133: ...A 14 Specification ...

Page 134: ...Specifications A 15 ...

Page 135: ...A 16 Specifications ...

Page 136: ...Speaker connector pin assignments J21 Specifications A 17 ...

Page 137: ...A 18 Specification ...

Page 138: ...Specifications A 19 ...

Page 139: ...your system Microsoft MS DOS 3 1 to 5 0 6 0 and 6 20 Novell DR DOS 6 0 Novell NetWare 2 2 3 12 and 4 01 Novell NetWare Lite 1 1 IBM OS 221 SCO UNIX release 3 2 version 4 2 SC0 Open Desk top 3 0 Microsoft Windows 3 0 and 3 1 Microsoft Windows for WorkGroups 3 11 Microsoft Windows NT 3 1 l Certified as Workstation tested as File server Your system has also received Novell s Yes NetWare tested and ap...

Page 140: ...nitors Keyboards 101 or 102 USA 102 International language Mouse 6 pin PS 2 type mouse Mass storage devices 5 25 and 3 5 inch diskette drives Hard disk drives from 80 to 340MB Tape backup drives Upgrade kits 4MB 8MB and 16MB SIMM memory expansion kits 486SX DX DX2 and Pentium OverDrive processor upgrade kits Printers 9 pin and 24 pin dot matrix printers Laser printers Ink jet printers Software Mic...

Page 141: ... load MS DOS It configures the installed system devices and sets various user preferences See also Batch file Base memory see Conventional memory Batch file A file that executes commands automatically Batch files are text files with the filename extension BAT When you type the filename the operating system sequentially executes the commands in that file BIOS Basic Input Output System Routines in R...

Page 142: ...faster Your computer includes 8KB of internal cache expandable to 256KB with external cache chips See also External cache and lnternal cache CMOS Complementary Metal de Semiconductor A low power silicon chip used for RAM and switching applications that is backed up by a battery Conventional memory The memory in the computer below 1MB that is available to MS DOS and application programs usually 64O...

Page 143: ...o called video card This computer does not support optional display adapter cards A VGA display adapter is built into your computer s main system board Expanded memory Memory that specially written MS DOS programs can use when an expanded memory manager program maps that memory into an accessible area Extended memory Memory above 1MB that is accessed by 386 or 486 microprocessors when they are ope...

Page 144: ...that connects two pins on a device s circuit board Jumpers alter the operation of a particular function Key disk A diskette containing a copy protected program that must remain in a diskette drive while you use the program See also Copy protected program Kilobyte KB A unit used to measure storage space in a computer s memory or on a disk One kilobyte equals 1024 bytes Local bus An internal bus tha...

Page 145: ... A unit used to measure oscillation frequency such as that of a computer s internal clock A megahertz is one million cycles per second Memory module A small circuit board commonly called a SIMM single inline memory module that contains surface mounted memory chips You can add memory modules to the main system board to expand your computer s memory Microprocessor A small CPU on one semiconductor ch...

Page 146: ...and a second 8KB internal cache for read write data and the ability to execute instructions in parallel Power on diagnostics Tests stored in a computer s ROM that the computer runs to check its internal circuitry peripheral device configuration and operating status each time you turn it on or reset it Processor speed The speed at which the computer s processor can execute commands usually expresse...

Page 147: ...ker Reset To restart a computer without turning it off You can reset your computer by pressing Ctrl Alt Del Resetting erases all data stored in RAM and reloads your operating system ROM Read Only Memory Memory that can only be read and cannot be modified ROM retains its contents even when you turn off the computer by using power from a backup battery Roof directory The main directory in a hierarch...

Page 148: ... files in a directory within another directory or the root directory SVGA Super VGA Video Graphics Array In addition to supporting standard VGA modes your computer s built in SVGA controller supports resolutions up to 1280 x 1024 in 16 colors on a compatible monitor If you upgrade the video memory to 2MB the SVGA controller supports this resolution in 256 colors True color A VGA feature that suppo...

Page 149: ...from being changed by setting the write protect switch on a 3 5 inch diskette or by placing a write protect tab over the notch on a 5 25 inch diskette You cannot change data on a write protected diskette ZIF socket Zero Insertion Force The type of socket on your system board that holds the microprocessor With this type of socket it is easy to remove and install processor chips ZIP chip Zig zag Inl...

Page 150: ...se 1 8 3 5 power 1 7 8 RESET 1 7 3 6 6 1 C Cable diskette drive S 17 20 hard disk drive 5 2 7 5 14 5 18 monitor 1 3 4 power supply 5 4 5 6 7 5 17 19 printer 1 5 serial device 1 6 Cache memory banks 4 22 4 24 configuration 4 22 configuring 2 7 external Intro l Intro 3 2 7 45 48 422 24 6 14 15 A 2 installing 4 22 24 internal Intro 1 A 2 jumpers 4 8 4 22 24 location 4 5 problems with 6 14 setting in ...

Page 151: ...te drive 4 7 A 3 had disk drive 4 7 A 3 parallel port A 3 problems 6 14 SVGA Intro 2 A 3 Conventional memory 2 4 conventions manual Intro 6 Coprocessor math Intro 1 Intro 4 A 2 Cover removing 4 2 3 replacing 4 4 CPU see Processors CTRL ALT 3 9 CTRL ALT 3 9 CTRL ALT DEL 3 6 7 6 4 CTRL BREAK 3 5 CTRL C 3 5 Cursor 2 3 Customer support Intro 7 8 D Data losing 3 5 Date setting 2 4 DB 9P connector 1 6 D...

Page 152: ...shock 1 6 4 3 Electrical circuitry 1 8 6 3 outlet 1 5 6 6 3 Electromagnetic interference 1 2 Energy Star description Intro 3 3 3 monitors Intro 2 2 13 3 2 6 5 6 A 1 A 3 problems 6 5 6 6 9 6 1 1 settings 2 2 2 13 14 Energy conserving 3 2 Environmental conditions 1 1 Epson America Forum CompuServe Intro8 Epson Connection Intro 7 Ergonomic tips 3 1 Errors disabling messages 2 9 diskette drive 2 10 6 ...

Page 153: ...ements 5 12 preformatted 2 5 problems 6 8 removing 5 14 5 19 SETUP options 2 5 2 14 slave 5 12 Hard disk drive standby mode Intro 1 3 2 2 2 13 14 3 3 6 9 6 11 A 1 time out Intro 3 2 13 14 types 2 5 5 2 user defined 2 6 Hardware interrupts A 11 Heat sink installing 4 28 limitations A 4 Height computer A 5 Help screen SETUP 2 3 Help where to get Intro 7 High speed video memory A 3 Humidity A 6 I I O...

Page 154: ...e A 3 speed A 1 video Intro 1 2 Intro 5 2 1 A 1 A 3 Location choosing 1 1 Lockout timer option 2 13 6 5 Low processor speed 3 8 9 6 11 6 13 A 1 Low level format 6 9 Low power standby mode Intro 1 3 2 2 2 13 14 3 3 6 6 9 6 11 A 1 A 3 L PTn see Parallel port M Main system board see System board Manual conventions intro 6 Mass storage Intro 2 Intro 4 5 1 A 4 5 Master hard disk drive 5 12 Math coproce...

Page 155: ... N NetWare 2 6 A 20 Num lock 6 5 Numeric coprocessor Intro 1 Intro 4 A 2 Numeric keypad 3 9 6 5 O On line support CompuServe Intro 8 Operating range A 6 Operating system diskette 3 6 6 3 installing 1 9 2 16 MS DOS 2 4 4 7 pre configured Intro 3 prompt 1 9 reloading 3 5 version number 6 2 Optical drives Intro 4 5 1 5 14 A 5 Option card connector board installing 4 7 locating 4 5 pin assignments A 1...

Page 156: ...installation procedures 4 29 Power button 1 7 8 inlet AC 1 5 6 6 3 light 1 7 6 3 6 6 Power cable computer 1 5 7 4 2 4 4 diskette drive 5 17 19 6 8 hard disk drive 5 6 7 monitor 1 4 5 6 6 Power requirements monitor 1 5 option cards 4 15 6 4 5 6 13 with two hard disk drives 5 12 Power supply cables 5 4 5 6 7 5 17 19 connector pin assignments A 15 frequency A 6 input ranges A 6 limitations 4 15 5 12 ...

Page 157: ...scription Intro 1 jumpers 4 7 location 1 3 pin assignments A 15 reassigning 4 7 SETUP program Autotype fixed disk 2 5 boot options 2 8 cache memory 2 7 changing values 2 4 chipset registers 2 8 date and time function 2 4 disabling prompt 2 9 display type 2 4 drive configuration 2 5 6 exiting 2 15 factory default settings 2 15 fixed disk 2 5 function keys 2 3 hard disk drive 2 5 help screen 2 3 Mai...

Page 158: ...r A 3 drivers Intro 3 Intro 5 2 1 2 16 2 18 interface A 3 jumper settings 4 8 local bus Intro 1 2 2 1 A 1 A 3 monitor 1 4 System BIOS Intro 1 2 1 2 2 5 4 5 6 1 2 A 2 A 12 board 4 5 4 7 4 10 5 5 configuration 245 2 15 6 1 I O address map A 13 14 identifying 6 1 memory Intro 1 Intro 3 1 8 2 4 2 7 A 1 2 A 12 memory map A 12 optimizing performance 2 8 4 1 shadowing 2 6 speed 3 8 A 1 startup informatio...

Page 159: ... resolutions A 3 ROM 2 7 sockets 4 5 4 20 21 standby mode Intro 1 3 2 2 2 13 14 3 3 6 5 6 A 1 A 3 time out Intro 3 2 13 Video memory adding Intro 4 4 19 21 configuration 4 19 A 12 installing 4 20 21 location 4 5 on system board Intro 1 RAM 2 7 sockets 4 5 4 19 type 4 19 A 2 ZIP chips 4 20 21 A 2 Virus protection options 2 10 2 12 A 5 W Weight computer A 5 Width computer A 5 Windows mouse driver 1 ...

Page 160: ...nos Aires Argentina Tel 541 322 7487 Fax 541 322 4637 Epson Chile S A Santiago Chile Tel 562 232 8966 Fax 562 233 3197 Epson Costa Rica S A San Jose Costa Rica Tel 506 34 6666 Fax 506 25 6709 E M Mexico S A De C V exico D F Mexico Tel 525 395 9897 Fax 525 395 9499 Epson Do Brasil Sao Paulo SP Brazil Tel 5511 813 3044 Fax 5511 210 9290 Epson Venezuela S A Caracas Venezuela Tel 582 241 0433 Fax 582 ...

Page 161: ...50 Telex 315132 Epson Hong Kong Ltd 25 F Harbour Centre 25 Harbour Road Wanchai Hong Kong Phone 831 4600 Fax 572 5792 Telex 65542 EPSCO HX Epson Australia Pty Ltd 17 Rodborough Road Frenchs Forest N S W 2086 Australia Phone 2 452 0666 Fax 2 451 0251 Telex n 75052 Epson Electronics Trading Ltd Taiwan Branch 1OF No 287 Nanking E Road Sec 3 Taipei Taiwan R O C Phone 886 2 717 7360 Free phone 886 080 ...

Page 162: ... 60234 Fax 595 61 60566 Control De Procesos lnformaticos Lima Peru Tel 5114 328 384 Fax 5114 355 017 Intetfase S A Montevideo UN y Tel 598 249 4600 Fax 598 249 3040 Siser Ltda La Paz Bolivia Tel 591 2 34 32 45 Fax 591 2 35 92 68 McSiiver S A Bogota Colombia Tel 571 230 1014 Fax 571 230 9205 C I L D S E Quito Ecuador Tel 593 2 54 3418 Fax 593 2 55 4780 A J Vierci CLA Asuncion Paraguay Tel 595 21 44...

Page 163: ...809 328 0304 Fax 809 328 0307 Compusupplies Ltd Kingston Jamaica Tel 809 925 8382 Fax 809 925 8115 Boolchand Pessomal N V Curacao Netherlands Antilles Tel 599 961 7545 Fax 599 961 7876 Micro Internacional S A Santo Domingo Republica Dominicana Tel 809 533 7096 Fax 809 535 3218 Complete Computer Systems Port of Spain Trinidad Tel 809 625 1204 Fax 809 623 5426 Equipos Electronicos Valdez y Cia San S...

Reviews: