background image

17

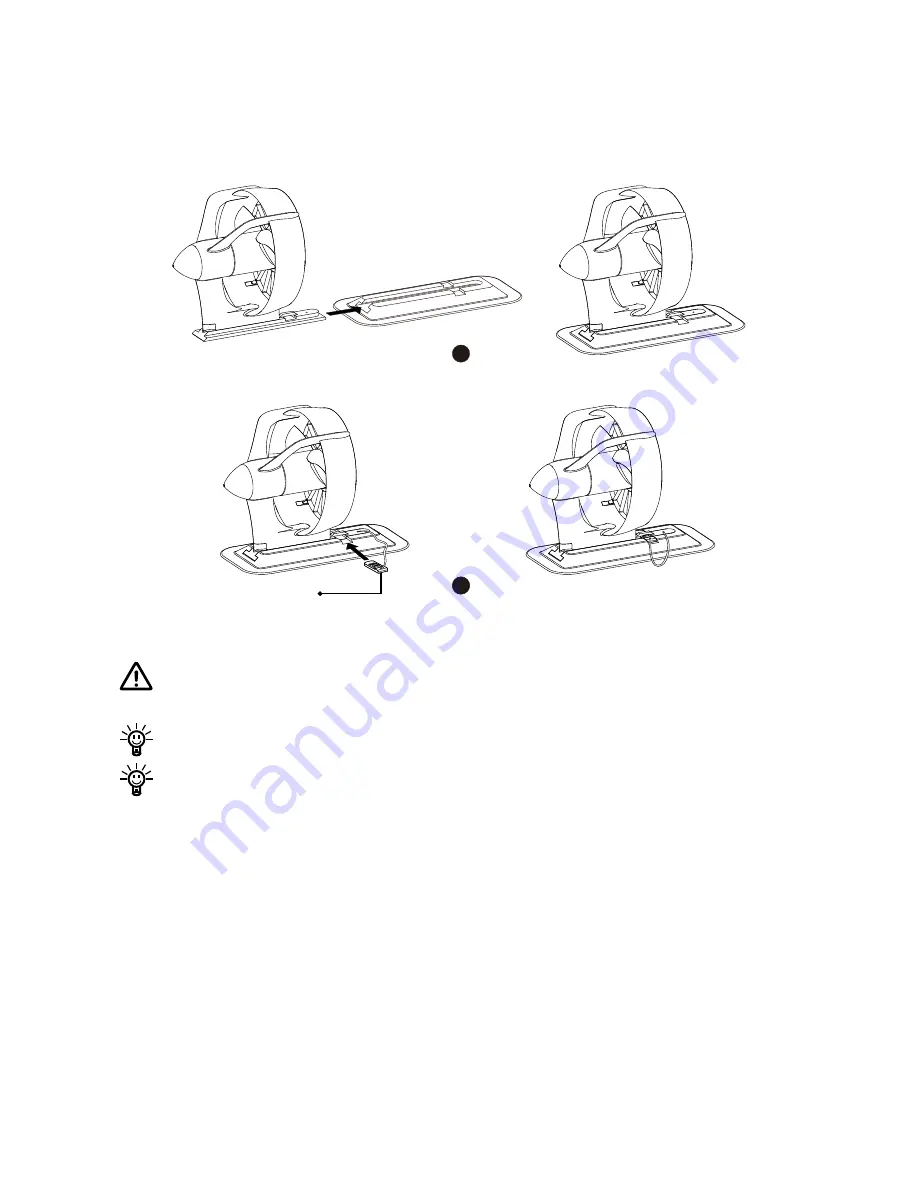
2)  Turn the SUP board/kayak bottom up to attach the inflatable SUP fin box. 

 Slide the standard adapter fully into the fin box.

 Insert the retaining clip to lock the adapter (Figure 3-4). 

1

retaining clip

2

Figure 3-4

Do not force the adapter into the fin box. If the adapter can’t fit into the 
fin box properly, slide it out and check if the installing direction is correct.

The propeller should face the tail of the SUP board/kayak, etc.

Make sure the fin box is clean before installing the motor. 

3.1.2 Installing with VAQUITA Universal Adapter

If the SUP board/kayak, etc. has no fin box or if both the two standard 

adapters can’t fit into the existing fin mounting system, it’s suggested to use 

VAQUITA universal adapter to attach VAQUITA Motor.  

  Turn the SUP board/kayak, etc. bottom up.

② 

 Penetrate the two ratchet straps through the side opening of the universal 

adapter and attach the universal adapter onto the relatively flat part on 

the bottom. 

Summary of Contents for VAQUITA

Page 1: ...VAQUITA USER MANUAL Feb 2019 Version 1 1 Copyright 2019 ePropulsion All Rights Reserved ...

Page 2: ......

Page 3: ...oing optimization of our products ePropulsion reserves the rights of constantly adjusting the contents described in the manual ePropulsion also reserves the intellectual property rights and industrial property rights including copyrights patents logos and designs etc This manual is subject to update without prior notice please visit our website www epropulsion com for the latest version If you fin...

Page 4: ...Temperature 20 C 50 C 4 F 122 F KEEP AWAY FROM FIRE HEAT SOURCE DVA B1H4 0001 CAUTIONS FCC ID 2AKHE LAGOON READ USER MANUAL FIRST DO NOT DISASSEMBLE Model VAQUITA Battery Rated Capacity 324Wh Rated Voltage 21 6V Charging Temperature 0 C 45 C 32 F 113 F Discharging Temperature 20 C 50 C 4 F 122 F KEEP AWAY FROM FIRE HEAT SOURCE Figure 0 1 MODEL VAQUITA S N DVAR1H40001 FCC ID 2AKHE LAGOON MODEL VAQU...

Page 5: ...alling with VAQUITA Universal Adapter 17 3 2 Fixing VAQUITA Battery 19 3 3 Connecting Battery to Motor 21 3 4 Attaching VAQUITA Remote Control 21 4 Operation 23 4 1 Using the Battery 23 4 1 1 Battery LEDs 23 4 1 2 Switching On Off VAQUITA Battery 25 4 1 3 Charging the Battery 26 4 2 Use of VAQUITA Remote Control 27 4 2 1 Switching On Off the Remote Control 27 4 2 2 Controlling the Motor 28 4 2 3 R...

Page 6: ...4 6 Transport and Storage 37 6 1 Transport 37 6 2 Storage 37 7 Routine Maintenance 38 8 Warranty 39 8 1 Warranty Policies 39 8 2 Out of Warranty 40 8 3 Warranty Claim Procedures 40 ...

Page 7: ...ake sure the remote control works well by wireless connection Familiarize yourself with all the operations related to this product Check applicable local water safety rules and boating regulations before use Observe the surrounding environment in advance to avoid unfavorable conditions such as strong winds waves currents or rapids etc During Operation Do not rotate the motor in shallow water or ou...

Page 8: ...art normally Never get close to the running propeller Never dismantle or repair the product on your own or by any unauthorized third party Keep it away from flammable gas corrosive and other dangerous substance Store it in a dry and ventilated place without direct sun rain exposure and store it far away from dangerous substances Pay attention to battery safety and operate it in the right way to av...

Page 9: ...n kit supports over 1 hour of full speed running perfectly backing you up whether you need a rest or want to go further 2 1 In the Package Unpack the package and check if there is any damage caused during transport Check all the items inside the package against the below list If there is any transport damage or lack of any listed item please contact your dealer immediately No Items Qty Unit Figure...

Page 10: ...bag Warranty Quick Start Quality Certificate Attach the VAQUITA Motor to the bottom of the watercrafts by using a standard adapter which is compatible with the fin box on the watercraft or using the VAQUITA universal adapter for watercrafts that have different fin boxes or without a fin mounting system Other accessories mentioned in this manual are not included in the package Please place addition...

Page 11: ...wer Cable VAQUITA Battery Figure 2 1 Overview Propeller Motor Module Power Cable Motor Base Side View Front View Protective Cover Figure 2 2 VAQUITA Motor Power Button LED Lights Charge Discharge Port Battery Buckles Bottom View Front View Figure 2 3 VAQUITA Battery ...

Page 12: ...Button Loop Band Signal Reception Area Figure 2 4 VAQUITA Remote Control Inflatable SUP fin box adapter US fin box adapter VAQUITA universal adapter Ratchet Strap Strap Buckle Screw Back Nut Retaining Clip Figure 2 5 Adapters ...

Page 13: ...UITA Battery Battery type Lithium ion Rated capacity 324 Wh Rated voltage 21 6 V Final charging voltage 25 2 V Cutoff voltage 18 V Weight 2 5 kg Cycle life 500 cycles 80 of rated capacity Charging time 3 hrs Temperature range Charging 0 C 45 C 32 F 113 F Discharging 20 C 50 C 4 F 122 F Dimension 216 mm x 178 mm x 100mm 8 5 x 7 x 4 VAQUITA Remote Control Type Wireless Throttle speed 8 levels Forwar...

Page 14: ... 50 Hz 60 Hz Input current 3 A Output voltage DC 25 2 V 7 A Temperature range Operating 29 C 45 5 C 20 2 F 113 9 F Storage 40 C 75 C 40 F 167 F Efficiency 87 Battery performance is dependent on many external factors such as operating environment and conditions of SUP board kayak etc ...

Page 15: ... 1 2006 A1 2006 A2 2011 EN 55014 2 2015 EN 61000 3 2 2014 EN 61000 3 3 2013 EN 60204 1 2016 EN ISO 12100 2010 EN 301 489 3 V2 2 0 EN 301 489 1 V2 2 1 The original certificate was issued by Shenzhen An Teng Testing Service Co Ltd in Shenzhen China CE Test Report No ATT11803260080E ATT11803260080M ATT11803260080D Issued Date March 27 2018 This device complies with part 15 of the FCC Rules Operation ...

Page 16: ...nterference to radio or television reception which can be determined by turning the equipment off and on the user is encouraged to try to correct the interference by one or more of the following measures Reorient or relocate the receiving antenna Increase the separation between the equipment and receiver Connect the equipment into an outlet on a circuit different from that to which the receiver is...

Page 17: ...e package US fin box adapter and inflatable SUP fin box adapter These two standard adapters have compatible fin boxes Choose one and follow the below steps to attach VAQUITA Motor to the standard fin box a Installing with US fin box adapter 1 Attach the US fin box adapter onto the motor base Figure 3 1 First align the adapter with the motor base then insert the adapter into the motor base until it...

Page 18: ...o the US fin box 1 2 4 3 back nut screw Figure 3 2 The propeller should face the tail of the SUP board kayak etc b Installing with inflatable SUP fin box adapter 1 Attach an inflatable SUP fin box adapter onto the motor base Figure 3 3 First align the adapter with the motor base then insert the adapter into the motor base until it is well attached 2 1 Figure 3 3 ...

Page 19: ...t The propeller should face the tail of the SUP board kayak etc Make sure the fin box is clean before installing the motor 3 1 2 Installing with VAQUITA Universal Adapter If the SUP board kayak etc has no fin box or if both the two standard adapters can t fit into the existing fin mounting system it s suggested to use VAQUITA universal adapter to attach VAQUITA Motor Turn the SUP board kayak etc b...

Page 20: ...18 1 2 Figure 3 5 Penetrate the strap into the buckle Repeat unfolding and folding the buckle to tense the strap Fold the buckle when the strap is tensed 3 4 Figure 3 6 ...

Page 21: ...er make sure the adapter is in alignment with the bottom centerline of the SUP board kayak etc 3 2 Fixing VAQUITA Battery a Fixing VAQUITA Battery on SUP board There are mainly two ways to fix VAQUITA Battery on a SUP board For SUP board with bungee system the battery can be fixed with bungee cords SUP board bungee cord Velcro tape Figure 3 8 Fix the battery with bungee cords ...

Page 22: ...elcro tape Ratchet strap Battery bottom buckles Figure 3 9 Fix the battery by ratchet strap Fix the redundant power cable with a Velcro tape b Fixing VAQUITA Battery on Kayaks For kayaks with enough cabin space the battery can be simply placed inside the cabin For some kayaks the battery can also be fixed on the rear part of the kayak with its bungee cords as shown in below figure Figure 3 10 ...

Page 23: ...rning the SUP board kayak etc Make sure VAQUITA Battery is switched off and the connectors are dry before installing the motor 3 4 Attaching VAQUITA Remote Control VAQUITA Remote Control can be attached to a paddle or wrist for easy access You need to penetrate the band through the side opening of VAQUITA Remote Control and bind the strap tightly around the wrist or paddle as shown in Figure 3 12 ...

Page 24: ...22 Wear VAQUITA Remote Control on the wrist Method 1 Method 2 Attach VAQUITA Remote Control to a paddle Figure 3 12 ...

Page 25: ...e four LEDs of VAQUITA Battery display battery level indicate errors and show pairing status Find the LEDs in below figure LED 0 LED 1 LED 2 LED 3 Figure 4 1 This table illustrates LED status while charging and discharging Battery Condition Description Battery Level L R Charging 0 40 40 60 60 80 80 99 100 Discharging 0 20 20 40 40 60 60 80 80 100 Note refers to steady light refers to flashing ligh...

Page 26: ...tart the VAQUITA Battery Error3 Other errors of the battery Please restart the VAQUITA Battery Error4 VAQUITA Battery over temperature Stop operation and wait until the temperature falls within the normal operating temperature range Note refers to flashing light an interval of 0 2s a frequency of 5Hz If error1 occurs L0 and L1 flash alternately with L2 and L3 If an error occurs in a non charging s...

Page 27: ...f if the power button is re leased before all the four LEDs light off and all the four LEDs will flash simultaneously Before mounting VAQUITA Motor make sure VAQUITA Battery is switched off and the connectors are dry Before switching on VAQUITA Battery make sure VAQUITA Motor is safely mounted on the bottom of the SUP board kayak etc If no electrical activity is detected within an hour after the b...

Page 28: ...th the motor Remove the battery off the SUP board kayak and take it to a dry and safe place 2 Plug the output cable of VAQUITA Charger into the charge discharge port of VAQUITA Battery and tighten the connector Then plug the input cable of VAQUITA Charger into the socket Please refer to 4 1 1 Battery LEDs for LED charging status Figure 4 3 Indicator Normal Status Description Charger indicator Soli...

Page 29: ...low battery warning the remote control will resume normal and can last only for a short period of time Please prepare a new button cell model CR2032 and replace the battery as soon as possible Please refer to section 4 2 3 to learn how to replace the button cell If it is not at the pairing mode but the LED is flashing quickly it is warning that there is a communication failure and the remote contr...

Page 30: ...ll fail to start the motor Operations Description LED Speed control Slide the throttle forward to speed up and slide the throttle backward to slow down Figure 4 5 On Stop a Normal condition Slide the throttle back to zero position and the motor will stop slowly On b In emergency Short press the remote s on off button and the motor will stop immediately throttle not at zero position Flash Restart a...

Page 31: ...built battery model CR2032 If the remote beeps every 1s for 5 successive times when normally switching on the remote control it indicates the remote control is running out of power and it is necessary to replace a new button cell of the same type Replace a new button cell by below steps Step1 Screw the battery cover counterclockwise from to to unlock Step2 Open the battery cover and replace a new ...

Page 32: ...attery LEDs simultaneously enter slow flash mode This mode lasts only a few seconds during which execute otherwise you have to repeat Press the battery power button again and hold for about 5s until all LEDs flash quickly which indicates the battery has entered pairing mode successfully Then release the button The battery s pairing mode only continues for a limited period of time so execute step 2...

Page 33: ...k etc by below procedures 1 Long press the power button to switch off the VAQUITA Battery 2 Disconnect the VAQUITA Motor with the VAQUITA Battery 3 Take out the battery and place it in a dry and safe place Then place your SUP board kayak etc bottom up in a flat surface a Detaching from US fin box adapter Step1 Loosen and take out the screw Figure 5 1 Step2 Take VAQUITA Motor and adapter out of the...

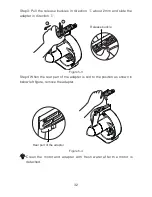
Page 34: ...adapter in direction Release buckle 1 2 Figure 5 3 Step4 When the rear part of the adapter is slid to the position as shown in below left figure remove the adapter Rear part of the adapter Figure 5 4 Clean the motor and adapter with fresh water after the motor is detached ...

Page 35: ...ning clip from the inflatable SUP fin box Figure 5 5 Step2 Slide VAQUITA Motor and adapter out of the fin box Figure 5 6 Step3 Hold the motor then obliquely pull the release buckle about 2mm and slide the adapter backward in the direction of arrow Figure 5 7 Release buckle 2 1 ...

Page 36: ...the adapter Figure 5 8 Clean the motor and adapter with fresh water after getting them detached c Detaching from universal adapter Step1 Loosen the ratchet strap buckles Figure 5 9 First press the limiting stopper and unfold the strap buckle by 180 Second pull the longer side of the strap 180 Press the limiting stopper Figure 5 9 ...

Page 37: ... from the SUP board kayak Figure 5 10 Figure 5 10 Hold VAQUITA Motor while loosening the ratchet strap Step3 Hold the motor then obliquely pull the release buckle about 2mm and slide the universal adapter in the direction of arrow Figure 5 11 Release buckle 2 1 ...

Page 38: ... is slid to the position as shown in below left figure take out the adapter Figure 5 12 If you are not going to use the universal adapter very soon it s advised to detach the ratchet straps from the adapter Clean the motor and adapter with fresh water after getting them detached ...

Page 39: ...Storage If you are not going to use VAQUITA for a long time it is advised to clean and check it prior to storage It is recommended to pack VAQUITA with its original package for storage Important notes before storage Make sure that each part of the product is dry before storing it in the package Get adequate damping protection before storage Store VAQUITA Battery in a clean dry and well ventilated ...

Page 40: ... use Do not drop VAQUITA Battery and avoid it from direct sun rain exposure for a long time Check the battery level on a regular basis Stop discharging VAQUITA Battery and charge it soon if the battery gets low Before the first time use or reuse after long term storage charge VAQUITA Battery to its full capacity in order to achieve its best performance Only use VAQUITA Charger designed for VAQUITA...

Page 41: ...nths since the date of maintenance Notes 1 If the three month period overlaps with the original product warranty period the warranty against these replaced or repaired parts still expire one year after the date of purchase 2 If the three month period exceeds the original product warranty period the repaired or replaced parts continue applying to warranty during the extended period In order to vali...

Page 42: ...unauthorized repair Dropping improper care or storage You should be noted that minor faults like normal wear and tear that pose no influence on the intended function of the product are also not covered by the warranty Consumables are out of warranty scope 8 3 Warranty Claim Procedures If you find your product defective you can make a claim to your dealer following below procedures 1 Fill in the Wa...

Page 43: ...ized dealer the defective or faulty components will be repaired or replaced based on actual condition 6 In case your warranty claim be rejected please refer to out of warranty policies an estimated repair charge with delivery cost included will be sent for confirmation ePropulsion authorized service point will conduct maintenance accordingly only after your confirmation If warranty expires you can...

Page 44: ......

Page 45: ......

Page 46: ...u have any concerns or find any problems while reading please don t hesitate to contact us We are delighted to offer service for you Dongguan ePropulsion Intelligence Technology Limited Website www epropulsion com Email service epropulsion com ...

Reviews: