Epic EER20W Owner'S Use And Care Manual Download Page 4

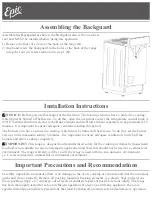
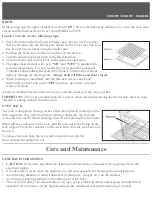
Assemble the Backguard as shown: the Backguard also is the oven heat 

vent and MUST be installed before using this appliance.
1) Remove the four (4) screws at the back of the range (B).

2) Align and screw the backguard to the holes at the back of the range 

  using the four (4) screws removed in step 1 (B).


NOTICE:

 Before you use this range for the first time: The heating elements have a protective coating, 

which must be burned off before use. To do this, open the oven door and set the temperature control knob to 

450°F. Turn the function selector to the Bake element and the Broil element separately to approximately 15 

minutes. It is important to ensure adequate ventilation during this period.
The burners also have a protective coating, which must be burned off before use. To do this, set the burner 

selector to the maximum setting 5 minutes. It is important to ensure adequate ventilation. Switch off the 

burners and allow cooling completely.
 

IMPORTANT:

 This range is designed and manufactured solely for the cooking of domestic (household) 

food and is not suitable for any non domestic application and therefore should not be used in a commercial

environment. The range warranty will be void if the range is used within a non domestic environment 

i.e. a semi commercial, commercial or communal environment.

Carefully unpack the and ensure there is no damage to the oven, cooktop or structure and that the oven door 

opens and closes properly. Remove all packing materials Packing elements (i.e. plastic bags, polystyrene 

foam, packing straps, etc.) and keep out of reach of children to prevent possible serious injury. The range 

has been thoroughly tested for safe and efficient operation. However, as with any appliance, there are 

specific installation and safety precautions that must be followed to ensure safe and satisfactory operation.

Assembling the Backguard

Installation Instructions

4

!

4

!

4

!

4

!

4

!

4

!

Important Precautions and Recommendations

Summary of Contents for EER20W

Page 1: ...EER20W EER24W EER24BL Electric Range Owners use and care guide V 01...

Page 2: ...ury DANGER It is recommended that a separate circuit serving only your appliance be provided Never clean appliance parts with flammable fluids These fumes can create a fire hazard or explosion Never u...

Page 3: ...iance must be installed and grounded by a qualified technician in accordance with the National Electrical Code ANSI NFPA No 70 Latest Edition and local electrical code requirements Replacement Parts O...

Page 4: ...dequate ventilation Switch off the burners and allow cooling completely IMPORTANT This range is designed and manufactured solely for the cooking of domestic household food and is not suitable for any...

Page 5: ...any possibility of entrapment suffocation or injury Do Not Use Water on Grease Fires Smother fire or flame or use dry chemical or foamtype extinguisher Use Proper Pan Size This appliance is equipped w...

Page 6: ...of Oven or Areas Near Units Surface units and heating elements may be hot even though they are dark in color Area near surface and interior surfaces of an oven become hot enough to cause burns During...

Page 7: ...e cooktop surface should be avoided If cabinet storage is to be provided the risk can be reduced by installing a range hood that projects horizontally a minimum of 5 inches beyond the bottom of the ca...

Page 8: ...with the floor so that the cord runs parallel with the floor The range must be level to operate safely and properly There are four leveling legs located at the corners on the bottom of the range The...

Page 9: ...the range must be secured by installing the anti tip device included with this appliance The Anti tip bracket can be installed on either the right or left back leg Place the anti tip bracket on the f...

Page 10: ...setting position BURNER CONTROL KNOB The range comes with four burners To operate the burners simply push in and turn the knob to the desired position These controls go from low to high power output...

Page 11: ...revents spill overs from contacting the heat surface and burning in Using a smaller pan than the element is a waste of energy To avoid spattering and to maximize efficiency pan bottoms should be clean...

Page 12: ...d ON Heat is distributed by natural convection The thermostat can be set from WARM to 450 F During the operating the oven indicator light is turned ON During operation the oven indicator light is alwa...

Page 13: ...oven is hot outside surfaces of the range get hot IMPORTANT Always use suitable protective gloves when inserting removing the broiler pan shelves pans and other cooking utensils from the oven OVEN RAC...

Page 14: ...g Clean the burners and reflector bowls with mild detergent and warm water Wring excess water out of the sponge or cloth when cleaning them Replace the burners and reflector bowls as following Line up...

Page 15: ...t but sturdy surface To re install the door repeat the steps above in reverse order REMOVABLE STORAGE DRAWER For cleaning you can remove the drawer by pulling it out until the stop point and lifting i...

Page 16: ...s not work Light bulb is loose or defective Switch operating oven light is broken Oven does not work You have blown a household fuse or tripped a circuit breaker You have not set the control knobs cor...

Page 17: ...losses due to failure of the unit Commercial or Rental Use Limited to 90 days Parts Labor Plastic parts such as door bins panels door shelves racks light bulbs etc Punctures to the evaporator system...

Reviews: