background image

22

TROUBLESHOOTING

Most treadmill problems can be solved by following the steps below. Find the symptom that applies, and
follow the steps listed. If further assistance is needed, please see the front cover of this manual.

PROBLEM: The power does not turn on

SOLUTION:

a. Make sure that the power cord is plugged into a surge suppressor, and that the surge suppressor

is plugged into a properly grounded outlet (see page 13). Use only a single-outlet surge suppres-
sor that meets all of the specifications described on page 13. Important: The treadmill is not com-
patible with GFCI-equipped outlets.   

b. After the power cord has been plugged in, make sure that the key is inserted into the console.

c. Check the reset/off circuit breaker located on the

treadmill frame near the power cord. If the switch pro-
trudes as shown, the circuit breaker has tripped. To
reset the circuit breaker, wait for five minutes and
then press the switch to the reset position. 

PROBLEM: The power turns off during use

SOLUTION:

a. Check the reset/off circuit breaker (see the drawing above). If the circuit breaker has tripped, wait

for five minutes and then press the switch to the reset position.

b. Make sure that the power cord is plugged in. If the power cord is plugged in, unplug it, wait for five

minutes, and then plug it back in.

c. Remove the key from the console. Reinsert the key into the console. 

d. If the treadmill still will not run, please see the front cover of this manual.

PROBLEM: The displays of the console do not function properly

SOLUTION:

a. Remove the key from the console and

UNPLUG THE

POWER CORD.

Place the treadmill in the storage po-

sition (see HOW TO FOLD AND MOVE THE TREAD-
MILL on page 21). 

Next, remove the two indicated 3/4" Screws (4). 

Lower the treadmill (see HOW TO LOWER THE
TREADMILL FOR USE on page 21). Remove the four
indicated 3/4" Screws (4), and remove the Hood (44).

Tripped

Reset

c

a

4

4

44

4

Summary of Contents for ECTL09706.1

Page 1: ...ial number in the location shown below Write the serial number in the space above for reference QUESTIONS As a manufacturer we are com mitted to providing complete customer satisfaction If you have qu...

Page 2: ...MBLY 7 OPERATION AND ADJUSTMENT 13 HOW TO FOLD AND MOVE THE TREADMILL 21 TROUBLESHOOTING 22 CONDITIONING GUIDELINES 25 PART LIST 26 ORDERING REPLACEMENT PARTS Back Cover LIMITED WARRANTY Back Cover No...

Page 3: ...se a properly functioning surge suppressor could result in damage to the con trol system of the treadmill If the control sys tem is damaged the walking belt may change speed accelerate or stop unexpec...

Page 4: ...lectrode 28 An outside antenna system should not be lo cated in the vicinity of overhead power lines or other electric light or power circuits or where it can fall into such power lines or cir cuits W...

Page 5: ...Antenna Lead in Wire Ground Wire Ground Wire Antenna Discharge Unit To External Antenna Terminal of Treadmill Mast Service Entrance Equipment Power Service Grounding Electrode System e g Interior Met...

Page 6: ...this manual please see the front cover of this man ual To help us assist you please note the product model number and serial number before contacting us The model number of the treadmill is ECTL09706...

Page 7: ...ntheses is the quantity needed for assembly Note Some small parts may have been preassembled If a part is not in the parts bag check to see if it has been preassembled To avoid damaging plastic parts...

Page 8: ...t may be necessary to tip the tops of the Uprights forward slightly as you thread the Upright Bolts 72 into the Uprights Hold the Left Upright 73 near the Left Base Cover 76 and insert the TV Cable 49...

Page 9: ...HE POWER IS TURNED ON 71 Console Assembly 4 75 74 5 Connect the TV Cable 49 and the AV Cable 97 to the cables extending from the console assembly Then insert the connectors down into the Uprights 73 7...

Page 10: ...CR must be connected to the 75 ohm antenna terminal see page 12 8 9 Make sure that all parts are properly tightened before you use the treadmill Keep the included hex key in a secure place the hex key...

Page 11: ...two included Small Screws B 3 Connect the Wire C on the receiver to the wire extending from the Console Assembly A Make sure that no wires are pinched Reattach the Pulse Receiver Cover 70 to the Cons...

Page 12: ...the power cord HOW TO CONNECT A VCR 1 Connect one end of a 75 ohm CATV cable to the video output jack on your VCR 2 Plug in the power cord of your VCR See your VCR user s manual for proper grounding i...

Page 13: ...th of least resistance for electric current to reduce the risk of elec tric shock This product is equipped with a cord having an equipment grounding conductor and a grounding plug Plug the power cord...

Page 14: ...rograms seven Aerobic Fitness programs and seven Performance programs Each program automati cally controls the speed and incline of the treadmill as it guides you through an effective workout Whether...

Page 15: ...program press any of the program buttons Walking Pgms Weight Loss Aerobic Fitness or Performance re peatedly until a track appears in the display Start the walking belt and adjust the speed To start t...

Page 16: ...be dis played on the right side of the screen the bottom of the screen or the information can be turned off while you watch the television Press the Display button repeatedly to select the desired dis...

Page 17: ...e one position to the right Note The program diagram can only be displayed when the television is in Console mode To select the Console mode press the TV button repeatedly until the word Console appea...

Page 18: ...elect a different channel press the Channel Chan but tons The selected channel number will appear on the screen for a few seconds Note The television is equipped with a channel memorizing function tha...

Page 19: ...or hue level indicator appears Adjust the settings if desired by pressing the Volume buttons Press the TV button again and add or delete channels After all valid channels available in your area have b...

Page 20: ...SOR An optional chest pulse sensor offers hands free oper ation as it monitors your heart rate during your work outs To purchase the optional chest pulse sensor call the toll free telephone number on...

Page 21: ...dmill convert the treadmill to the stor age position as described above Make sure that the latch knob is locked in the storage position 1 Hold the handrails and place one foot against one of the wheel...

Page 22: ...ipped To reset the circuit breaker wait for five minutes and then press the switch to the reset position PROBLEM The power turns off during use SOLUTION a Check the reset off circuit breaker see the d...

Page 23: ...n the treadmill for a few minutes Repeat until the walking belt is properly tightened c If the walking belt still slows when walked on please see the front cover of this manual PROBLEM The walking bel...

Page 24: ...he key in the console press one of the Incline buttons While the incline is changing re move the key After a few seconds re insert the key The treadmill will automatically rise to the maximum incline...

Page 25: ...ivity that requires large amounts of oxygen for prolonged periods of time This increases the demand on the heart to pump blood to the muscles and on the lungs to oxygenate the blood For aerobic exerci...

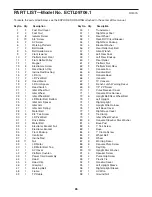
Page 26: ...Top 41 1 AV Cover 42 2 Platform Cushion 43 1 Power Cord Assembly 44 1 Hood 45 4 Hood Clip 46 2 Grommet 47 1 Walking Belt 48 1 Frame 49 1 TV Cable 50 1 Transformer 51 1 Right Rear Foot 52 4 Rear Wheel...

Page 27: ...pacer 109 1 Static Decal 110 1 Console Plate 111 2 TV Cable Nut 112 1 TV Cable Star Washer 113 1 Lower Latch Bolt 114 4 Handrail Cover Fastener 115 1 Audio Video Wire Harness 116 2 Console Clamp 117 1...

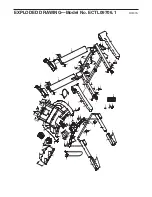
Page 28: ...43 36 13 37 18 17 19 16 15 2 2 1 8 4 11 72 38 52 52 24 38 34 4 4 4 4 4 4 4 4 4 30 30 25 9 8 61 61 105 56 48 103 106 107 108 4 44 4 4 4 45 45 42 42 13 50 98 55 33 55 55 117 38 113 38 3 115 3 3 3 3 3 3...
Page 29: ...94 75 65 67 75 63 64 90 114 114 88 4 4 88 4 4 82 81 4 4 4 4 4 80 5 49 76 77 4 4 4 4 90 72 90 72 90 41 88 88 4 4 4 4 110 92 111 112 102 97 97 49 84 116 116 84 80 4 4 4 4 120 121 66 71 122 69 123 46 4 4...

Page 30: ...responsible or liable for indirect special or consequential damages arising out of or in con nection with the use or performance of the product or damages with respect to any economic loss loss of pro...

Reviews: