Eonon E1015 User Manual Download Page 7

5

5.RESET

1) If unit is dad abnormal status appear because of wrong operation, press RES 
button on panel by penpoint, unit will resume work.
2) After reset, all setting will resume to setting before leaving factory.
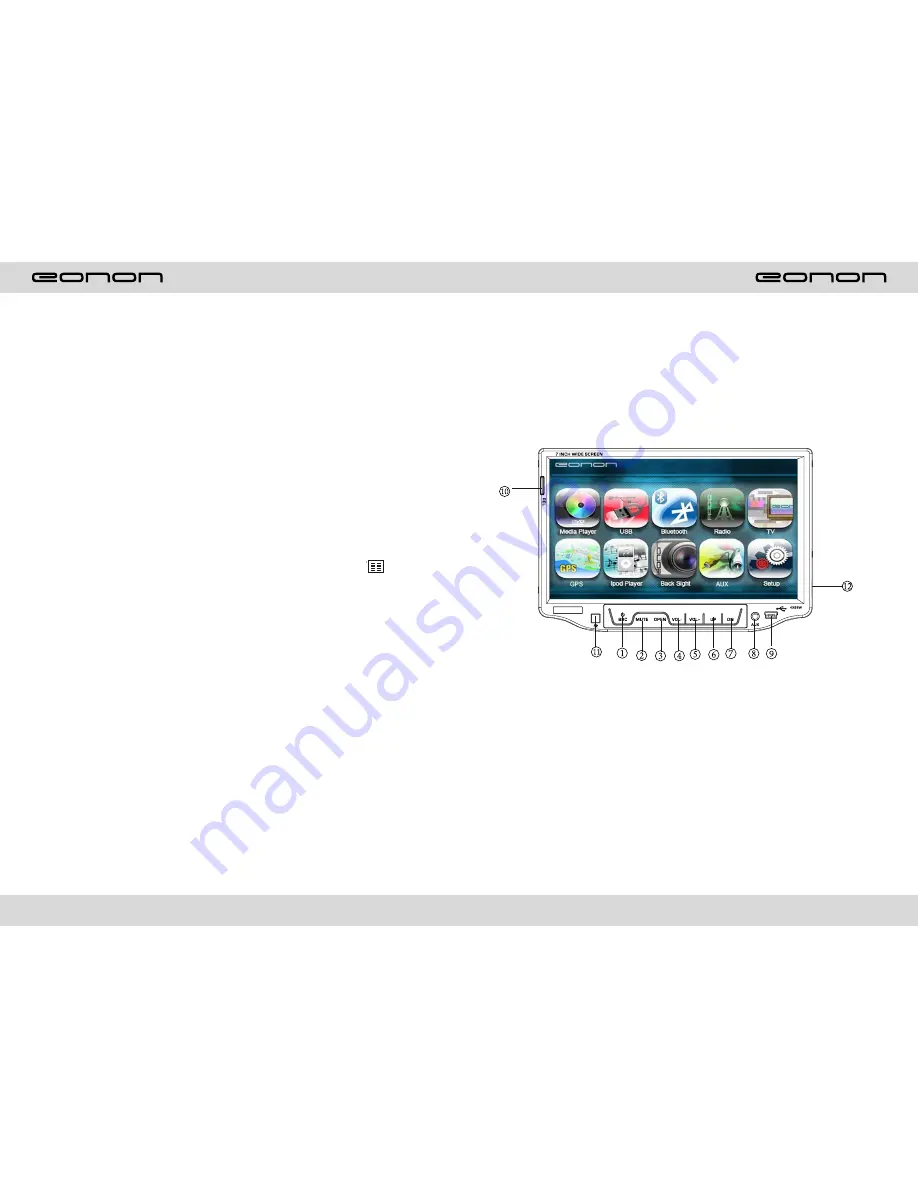
PANEL ARRANGEMENT

8.AUX IN JACK

9.USB PORT

10.REL BUTTON

11.Reception window on remote 

control selection button

12.SD port

1.SRC BUTTON

2.MUTE BUTTON

3.OPEN BUTTON

4.VOL- BUTTON

5.VOL+ BUTTON

6.UP  BUTTON

7.DN BUTTON

44

OTHER PLAY MODE

AUX IN:

AUX IN OPERATION

1)


Press “Source” button on remote control or touch “AUX” on the touch screen, switch 

to 
AUX mode.
2)


Make video input plug connect to AUX video input outlet, audio input connect to 

AUX audio input outlet.
3)This unit only supply 1pcs video input & 1 pair audio input.

CCD (Car backsight function)

1)


If there is a car back 

camera on your car, please connect car back control line “BACK” to your car camera 
control terminal, and connect video input line to the video output terminal of your car 
camera.
2)


When car is back, the unit will auto switch to CCD mode, and there is a “         ” 

appeared on the screen.
3)


You can set CCD image according to your car's own position in general setting mode.

Summary of Contents for E1015

Page 1: ...E1015 User Manual Pleare read this manual before using and save this manual for future reference...

Page 2: ......

Page 3: ...bring you some inconvenience 2 Playing disk for long time or high volume level will influence the lift of unit To protect this unit please work with radio middle level volume level during long time us...

Page 4: ...environment of inside car is not good too much dirty please clean the laser by laser cleanser timely Do not work under terribly hot or cold environment please ensure the temperature in car is in 20 6...

Page 5: ...rmance fast connection accurate and sensible search of devices in range 4 Support A2DP AVRCP HS HF for handing calls and playing music LCD DISPLAY 1 7inch 16 9 TFT LCD display 2 Touch screen 3 Auto ad...

Page 6: ...tivated 2 After 5 seconds you choose desired mode do not adjust volume button the mode will auto to back to status before adjustment 45 TROUBLE SHOOTING PROBLEM CAUSE SOLUTION Can not power on Check w...

Page 7: ...N 1 Press Source button on remote control or touch AUX on the touch screen switch to AUX mode 2 Make video input plug connect to AUX video input outlet audio input connect to AUX audio input outlet 3...

Page 8: ...4 You can switch between the Bluetooth hand free mode and the cell phone mode 5 You can use your voice to dial a new number valid only for cell phones with voice dialing function 6 With the Bluetooth...

Page 9: ...s You can use these number keys to enter a phone number Phone number display The phone number that you have just entered is Displayed here Contact book mode switching You can touch this button under t...

Page 10: ...e mode will be switched to the cell phone mode Voice dialing function If you touch the Voice dial button at the lower left corner of the screen under the Bluetooth hand free mode and the cell phone mo...

Page 11: ...DS radio channels or AM state you should adjust the time 40 TV Touch TV mode of the menu or press SOURCE button on remote control to switch to TV mode auto scan and store channels Press AMS RPT button...

Page 12: ...de Rock POP Aus Rock Tonality adjust to adjust panel definition Clangorous effects press once off clangorous press again to come back Resume standard video 39 TV MODE Channel choosing Disc open close...

Page 13: ...s button to choose AUTO PAL or NTSC system 11 LOC RDM button In radio mode press this button to switch between local and direction In VCD CD mode press this key to randomly play 12 STOP button Press t...

Page 14: ...In VCD mode press this button to display all song menu work with number button to choose songs 22 UP DOWN LEFT RIGHT ENTER button In DVD mode press this button to move cursor up down left right to ch...

Page 15: ...13 Note When loading a disc touch screen function can not be used LOADING This white bar shows the rate of process of loading a disc 36 MUSIC SURROUNDINGS SETTING...

Page 16: ...the first song input your desired song for example the sixth song and press number button 6 on the remote control Program the second song press button move the cursor to 2 Input your desired song for...

Page 17: ...trol or touchbutton on display to pause Press again to back to normal play 5 Stop play In playing mode 1 Press button on remote control to enter the pause mode the position will be stored in unit At t...

Page 18: ...e button to turn off Note 1 This function can be worked by the control 2 PBC is suitable for the SVCD and VCD 2 0 disc 3 In PBC mode you can not press number button only to choose song 16 VCD program...

Page 19: ...de short press OSD on remote control to show all information of present disc 9 Number button In VCD mode press 0 9 number button to input song For example you want to choose th th 13 song press 10 but...

Page 20: ...ch button on main menu can to play 1 Pause play In playing mode press button on remote control or touchbutton on display to pause Press again to back to normal play 2 Stop play In playing mode 1 Press...

Page 21: ...t has FM1 FM2 FM3 AM1 AM2 band Each band can preset 6 stations total 30preset stations Note After preset station unit will cancel the former preset stations 4 Mono Stereo Selection In radio mode press...

Page 22: ...o operate 4 Previous next song play In playing mode press SEEK SEEK on remote control or touch button on display to choose previous next song 5 Switch system In playing mode short press the BAND P N b...

Page 23: ...the DVD disc means that it was recorded by multi language audio system 4 In VCD mode press the AUDIO button to select the L R or STEREO track 12 Multi subtitle If the DVD disc is recorded with multi s...

Page 24: ...remote control 16 Digital album Play the disc contains JPEG pictures read the picture menu first 1 Press button on remote control the pictures will be browsed automatically It also can be worked to pr...

Page 25: ...following touch menu LANGUAGE SETUP 1 Press or button 2 Press or button Then to enter LANGUAGE SETUP LANGUAGE SETUP LANGUAGE SETUP LANGUAGE SETUP LANGUAGE SETUP LANGUAGE SETUP OSD LANGUAGE AUDIO LANG...

Page 26: ...RATING DEFAULT EXIT SETUP 4 3PS 4 3LB 16 9 SYSTEM SETUP SYSTEM SETUP SYSTEM SETUP SYSTEM SETUP SYSTEM SETUP SYSTEM SETUP TV SYSTEM VIDEO TV TYPE PASSWORD RATING DEFAULT EXIT SETUP TV SYSTEM VIDEO TV...

Reviews: