background image

4

INSTALLATION INSTRUCTIONS

Fig.4

Fig.2

Fig.1

1.   Loosen the two plastic screws and remove front 

cover. (Fig 1.)

2. 


Carefully withdraw central cartridge from 

the carcass. Disconnect green male/female 

connector. (Fig 2.)

3.   Drill Ø107mm hole in chosen position ensuring 

clearance around fan. Insert ducting to suit (not 

supplied).

4.   Use  back  carcass  as  a  template,  mark  fixing 

holes, drill, plug and screw back carcass with 

screws provided (4x 8x”1.5”). Fit the 3 blanking 

plugs into holes in top chamber. (Fig 3.)

5.   Please note that a suitable isolation switch or 

fuse spur rated at 3amp should be used in the 

fixed wiring.

SELV Version (if installing 230V please see page 5)

6.   This fan must be installed by a competent person. 

Complete electrical wiring of fan. Tighten cable 

gland. Low voltage requires connection via 

power supply provided. Ensure red to red and 

check mains connection in fused spur (3amp 

fuse only).

7.   Offer  up  the  central  cartridge  join  green  male/

female connector (12V DC) and carefully insert 

central cartridge into back carcass. Insert four silver 

screws to fix central cartridge in place. N.B. Take 

care not to trap cables. (Fig 4.)

Alternative fixings

(blansk to be used)

100mm ducting (Ø106)

125mm ducting (Ø131)

Wall fixings

Cable gland

NO CABLES

Avoid cable entry 

into shaded areas

Fig.3

Summary of Contents for cyclone 7

Page 1: ......

Page 2: ... a flexible cable and NOT solid core twin and earth if the fan is mishandled or a solid core twin and earth cable is forced into the terminals you WILL break it this will invalidate the warranty If it is necessary to use twin and earth you must not take it into the fan Use a terminal block to make the connection between the flexible cable supplied with the fan and your solid core twin and earth ca...

Page 3: ...d ventilation to maintain a healthy environment Vapour tracking As standard the unit is fitted with vapour tracking The fan senses the amount of moisture being created in the room which causes the fan to increase in speed to match the rising humidity and reduce in speed to match falling humidity This intelligent function reduces your energy costs wear and tear on the motor and ensures a long quiet...

Page 4: ... SWITCH This is a constant trickle fan which requires permanent electrical supply DO NOT REMOVE OR TAMPER WITH ELECTRONIC CIRCUIT BOARD This is not a user function This appliance can be used by children aged from 8 and above and persons with reduced physical sensory or mental capabilities or lack of experience and knowledge if they have been given supervision or instruction concerning use of appli...

Page 5: ...itch or fuse spur rated at 3amp should be used in the fixed wiring SELV Version if installing 230V please see page 5 6 This fan must be installed by a competent person Complete electrical wiring of fan Tighten cable gland Low voltage requires connection via power supply provided Ensure red to red and check mains connection in fused spur 3amp fuse only 7 Offer up the central cartridge join green ma...

Page 6: ...d commission fan by setting slider switch as appropriate Fig 5a 5b Fix supplied gasket over selector switches 8 Check impeller is fitted correctly ensure click action engaged cleanly Fig 6 9 Fixfrontcover Ensurepullcordnestlesintogroove N B Fan will not operate unless front cover is in position Fig 7 place Fig 5a Fig 5b Fig 6 Fig 7 1 LEFT Humidity Tracking RIGHT Two Speed 2 SLIDER NOT USED 1 LEFT ...

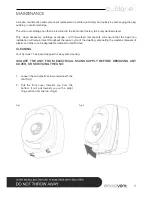
Page 7: ...orked This when necessary cartridge exchange with re worked components will ensure that the basic fan installation will remain intact throughout the repair cycle of the dwelling eliminating the wasteful disposal of plastic and other non biodegradable material to landfill sites CLEANING Your Cyclone 7 has been designed for easy safe cleaning 1 Loosen the two plastic screws underneath the fan Fig 1 ...

Page 8: ...roll NO SOLVENTS Fig 3 Fig 4 IQ CONTROL OPTIONAL Remote Control Boost Switch The Cyclone 7 operates continuously at a low rate known as trickle to ensure that your kitchen or bathroom is ventilated at the appropriate level The Cyclone 7 will automatically vary its extract rate when it senses an increase in the moisture level running through the fan By pressing the button once on the remote control...

Page 9: ...ELV red wire to plus symbol blue wire to minus symbol Have you removed printed circuit board for any reason Cartridge correctly seated no stray wires trapped Does impeller spin freely Check click Is the front cover in place Does pull cord activate freely Duty l s Power W Sound dB A 3M 15 2 30 8 35 7 36 60 25 46 2 Airflow l s ...

Page 10: ...cation in Harrogate North Yorkshire We are confident that you will be delighted with the performance of the system and the resulting improvement in air quality in your home after the installation of the unit However it is important that you register your purchase This will ensure the prompt and efficient handling of any communication in the event that your unit requires attention during the 7 year...

Page 11: ......

Page 12: ...8PA T 01423 859 395 F 01423 301 022 E enquiries envirovent com www envirovent com AFTER INSTALLING THIS FAN PLEASE PASS ONTO END USER DO NOT THROW AWAY Please read carefully to ensure simple installation and a long trouble free life for the user We want to hear from you Your feedback is important to us as we strive to improve our products services and overall customer experience Please email us to...

Reviews: