background image

57

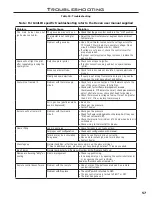
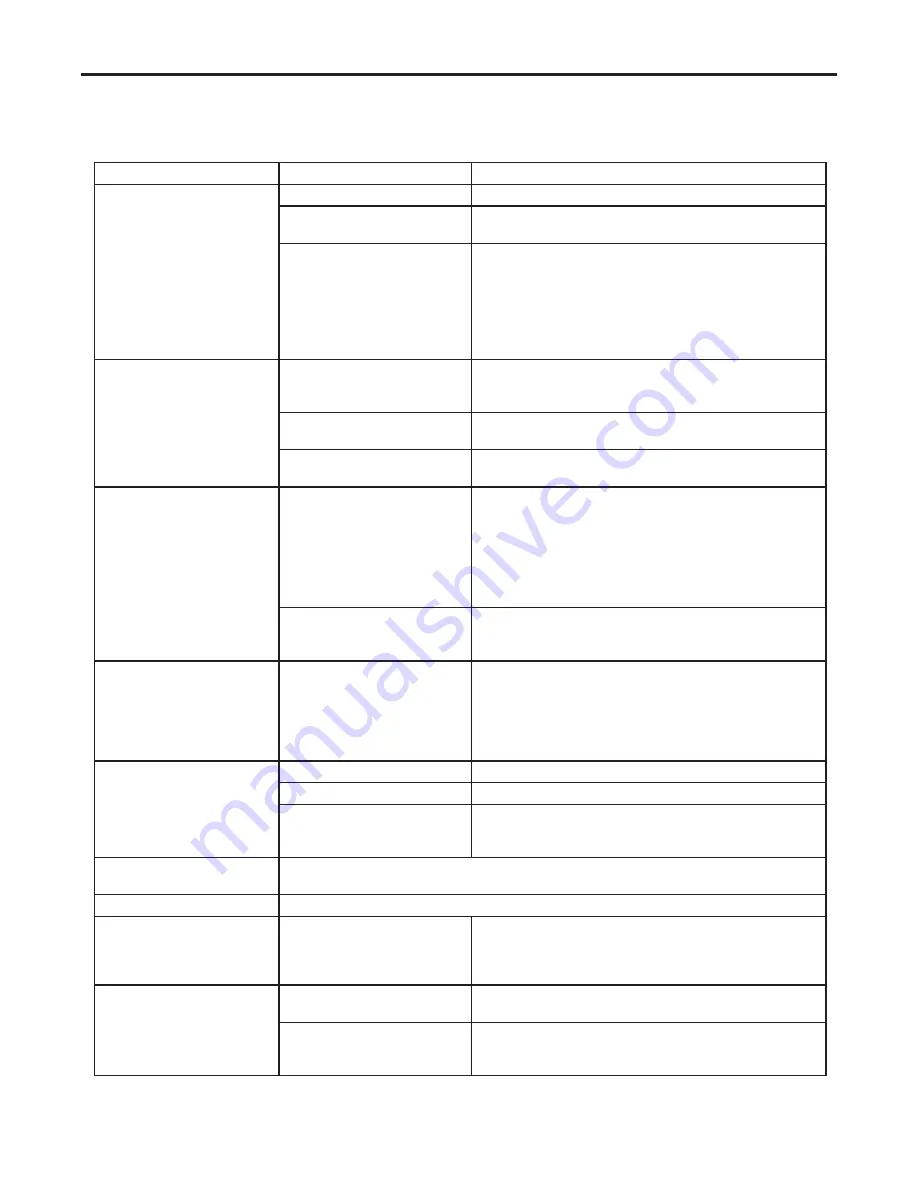
Troubleshooting

Problem

Possible Cause

Solution

The main burner does not 

ignite when called for.

The gas valve may not be on.

• Check that the gas control knob is in the “ON” position.

Thermostat is not calling for 

heat.

• Adjust the thermostat several degrees above ambient 

temperature.

Problem with gas valve.

• Use a DC voltmeter to measure the voltage across the 

TPTH and TP terminals. Main operator voltage: Open 

circuit ≥ 325mV Closed circuit ≥ 100mV

• If voltage is not present, check the control circuit for 

proper operation.

• If proper control system voltage is present, replace the 

gas control.

Spark will not light the pilot 

after repeatedly pressing the 

spark ignitor.

Defective piezo ignitor.

• Check connections to ignitor.

• If ignitor connections are good but no spark, replace 

ignitor.

Broken spark electrode.

• Check for broken ceramic insulation, replace electrode if 

broken.

Misaligned spark electrode.

• If spark is not arcing from electrode to pilot, loosen the 

screws on the pilot base adjust and tighten.

Pilot will not remain lit.

Problem with thermocouple 

circuit.

• Check for proper connection of the thermocouple to the 

rear of the valve. If loose, fully tighten.

• Check pilot for full flame impingement around 

thermocouple.  If flame is too small, check gas pressure, 

adjust pilot rate screw, check pilot head for damage.

• Check thermocouple voltage at valve. It must be greater 

than 5 mV.  If low, replace thermocouple.

Air in gas line (pilot dies while 

knob is depressed).

• Bleed line.

• Check gas line pressure.

• Contact dealer.

Burners will not remain lit.

Problem with thermopile 

circuit.

• Check gas line pressure .

• Check for flame impingement on thermopile. If low, see 

“Pilot will not remain lit”.

• Check thermopile for minimum of 300 mV when burner is 

switched on.

• Check wiring to thermostat for breaks.

Flame lifting

Leak in vent pipe

• Check for leaks in vent connections.

Improper vent configuration

• Check vent configuration with manual.

Terminal may be recirculating 

flue gases

• Check to see if terminal is on correctly.

• May need to install high wind termination cap.

• Contact dealer.

Glass fogs up

Normal Condition: after the appliance warms up the glass will clear.

**Due to additives in gas, glass may get hazy during operation** Clean as needed.

Blue Flames

Normal during start up: flames will yellow as the fireplace heats up.

Flames are burning “dirty” or 

sooting

Flame impingement

• Check log positioning.

• Increase primary air by opening the venturi shutter and/

or by opening the vent restrictor.

See also “Burners will not remain lit.”

Remote control doesn’t work Problem with the remote

• One or more of the batteries are dead. See remote 

control instructions.

Problem with fireplace

• The on/off switch is turned to OFF.

• The gas control valve is turned to PILOT or OFF.

• The pilot has gone out.

Table 10: Troubleshooting

Note: For G42LID specific troubleshooting refer to the Dexen user manual supplied 

Summary of Contents for G42LI

Page 1: ...tion and service must be performed by a qualified installer service agency or the gas supplier Version Française www enviro com fr html C 4001609 W A R R A N T Y R E G I S T R A T I O N e n v i r o c o m w a r r a n t y G42LI G42LID D I R E C T V E N T F I R E P L A C E I P I CERTIFIED TO ANSI Z21 88 CSA 2 33 VENTED GAS FIREPLACE HEATERS CSA 2 17 GAS FIRED APPLIANCES FOR HIGH ALTITUDES ...

Page 2: ...g immediately Immediately call your gas supplier from a neighbor s phone Follow the gas supplier s instructions If you cannot reach your gas supplier call the fire department Installation and service must be performed by a qualified installer service agency or the gas supplier Massachusetts installations Warning This product must be installed by a licensed plumber or gas fitter when installed with...

Page 3: ...ust be performed by a qualified installer service agency or gas supplier This installation must conform to local codes or in the absence of local codes with the National Fuel Gas Code ANSI Z223 1 NFPA 54 or the Natural Gas and Propane Installation Code CSA B149 1 To prevent injury do not allow anyone who is unfamiliar with the stove to operate it To prevent injury if the pilot or pilot and burners...

Page 4: ...mber Lights Removal 19 Top Light Replacement 20 Fuel Conversion 21 Initial Installation 23 Introduction 23 Unit Install Preparation 23 Placement and Framing 27 Vent Heat Shields 28 Cool Surface Framing 29 Cool Surface Activation 32 Floor Protection 33 Mantel Requirements 33 Flat Wall Installation 34 Recess Installation 35 Corner Installation 36 Minimum Venting Requirements 37 Flex Venting 38 Clear...

Page 5: ...I Z21 88 CSA 2 33 VENTED GAS FIREPLACE HEATERS CSA 2 17 GAS FIRED APPLIANCES FOR HIGH ALTITUDES This ENVIRO G42 Fireplace Has been certified for use with either natural gas or propane see rating label Is not for use with solid fuels Is approved for a bedroom or bed sitting room IN CANADA must be installed with a listed wall thermostat IN USA see current ANSI Z223 1 for installation instructions Mu...

Page 6: ...ortant information for your fireplace is on this label as well as the model specific serial number which you will need for warranty information The sheet is located inside the cabinet under the gas valve Figure 1 G42 Dimensions 242 9 1 2 1025 40 3 8 964 38 19 3 4 864 34 683 26 7 8 1092 43 1067 42 946 37 1 4 180 7 1 8 45 1 3 4 218 8 5 8 58 2 1 4 1267 49 7 8 768 30 1 4 1219 48 578 22 3 4 211 8 3 8 2...

Page 7: ...t has been under water Immediately call a qualified service technician to inspect the appliance and to replace any part of the control system and any gas control which has been under water OPERATING INSTRUCTIONS 1 STOP Read the safety information above on this label 2 Read the owner s manual including the section on Remote Control operation 3 Turn off all electric power to the appliance 4 Do not a...

Page 8: ...NANCE OF THE IFC TURN OFF MAIN GAS SUPPLY TO THE APPLIANCE PRIOR TO REMOVING OR REINSERTING THE BATTERIES IN THE BATTERY HOLDER Blue Back lit LCD display UP DOWN Arrow Key ON OFF Key THERMOSTAT Key MODE Key Remote Control Operations Proflame 2 is a modular remote control system that directs the functions of the fireplace The Proflame 2 remote transmitter is configured to control the on and off fun...

Page 9: ...A battery back up if there is a power outage Only main burner control can be used while operating with the battery back up auxiliary components such as the convection fan cannot be used Use the reset button see Figure 5 to synchronize the remote transmitter to the IFC for the first time or after batteries have been replaced CAUTION Property Damage Hazard Excessive heat can cause property damage Th...

Page 10: ...nce Press the ON OFF key on the transmitter to turn the fireplace off The IFC will confirm your command with a single beep The pilot light IPI and the main burner will turn off The pilot will remain lit if the fireplace is in CPI mode Room temperature information will still be displayed on the remote when the unit is off Note It is recommended to use CPI mode when the temperature outside is below ...

Page 11: ...Level 1 Flame Level 5 Maximum Flame Level Operating Instructions Room Thermostat Transmitter Operation The remote transmitter acts as a room thermostat The thermostat can be set to a desired temperature to control the comfort level in a room Press the THERMOSTAT key to activate this function The transmitter display will indicate the thermostat is ON and the set temperature can be adjusted with the...

Page 12: ...cating low battery power for the IFC The IFC will emit a beep when the ON OFF key is pressed indicating the batteries are low The system will need to be initialized after battery replacement see Initializing the System The life span of the batteries depends on various factors such as battery quality ignition attempts remote usage and power outage duration Figure 12 Key Lock Key lock This function ...

Page 13: ...h the transmitter The Proflame 2 remote control system has six 6 light intensity levels Adjust the light intensity using the UP DOWN key each time the button is pressed the IFC will beep to confirm your command The remote display will show what level the ember lights are currently at Top Light Control The top light is used to illuminate the log set in the fireplace even when the flame is off The o...

Page 14: ... more open If you cannot attain a healthy flame by making air shutter adjustments you may have the incorrect restrictor setting or venting problem If the flame is very flickery fast moving and low then increase the restriction If the flame is very tall lazy and dirty then decrease the restriction More details can be found in the venting section of this manual Caution Wear heat resistent gloves whe...

Page 15: ...the amount of use the glass should require cleaning no more than two or three times a season WARNING Do not clean the glass when it is hot Cleaning The Firebox Carefully remove the logs they are fragile Gently remove all the media and place on a paper towel Vacuum the bottom of the firebox thoroughly Carefully clean any dust off the logs and remove any lint from the burner and pilot At this time i...

Page 16: ...uick wipe with denatured alcohol on a soft cloth BEFORE lighting the fireplace Never clean the face when it is hot Do not use other cleaners as they may leave a residue which can become permanently etched into the surface Figure 19 Surround Removal WARNING Do not attempt to remove the surround panel until the unit has completely cooled There are four mounting hooks that hold the surround into posi...

Page 17: ...o remove the glass door if the fireplace is not completely cold WARNING Never operate the fireplace with the glass door removed Figure 20 Door Cover Removal Door Cover Removal D S Figure 21 Glass Door Removal WARNING Do not touch or attempt to remove the glass door if the fireplace is not completely cold To remove the door cover remove the two 2 wing nuts using your fingers then lift up and outwar...

Page 18: ...ess to the two lower T20 screws Once the specified screws are removed lift up to remove To re install the burners follow steps above in reverse When placing the burners back in the unit be sure not to move the air shutter Do not over tighten the burner screws or they might strip just get them snug Figure 22 Front Burner Removal Figure 23 Rear Burner Removal Rear Burner Removal 1 Remove the front b...

Page 19: ...ut along with the light tray see Figure 25 Disconnect the wire connectors to fully remove Do not ever remove merettes 6 Wear cotton gloves when replacing halogen bulbs Grab bulb firmly at the base and pull straight out to remove replace bulb as necessary Grab new bulb by the styrofoam sleeve it is vital that your bare fingers to not contact the bulb see Figure 26 The oils from your fingers will gr...

Page 20: ...connectors firmly at the base to disconnect them from the bulb assembly Remove assembly from unit then disconnect the ground wire T 20 Screw X2 Light Cover Top Light Assembly Light Gasket Light Retainer 6 Remove the light cover by removing the two 2 T 20 screws If light gasket is damaged contact your ENVIRO dealer for replacement 7 Replace the bulb or light assembly as necessary and assemble back ...

Page 21: ...t Parts List for G42LI Model 2 Burner Orifices LP Front 53 Rear 56 DMS as marked 1 Pilot Orifice NG 0 2 or LP 0 14 1 LP Stepper Motor w Hardware 1 Installation Instruction Sheet 4 Conversion Labels Carefully inspect all parts supplied with this conversion kit If any parts have been damaged or are missing contact your dealer distributor or courier company to have them replaced before starting this ...

Page 22: ...t of Gas Designed Appliances installed at elevations above 2000 610 m feet is to be reduced 4 for each 1000 feet 305 m above sea level Refer also to local authorities or codes which have jurisdiction in your area regarding the de rate guidelines In Canada When the appliance is installed at elevations above 4500 feet 1372 m the certified high altitude rating shall be reduced at the rate of 4 for ea...

Page 23: ... Unit Install Preparation Review the diagram below to familiarize yourself with the parts included with the unit Please review the following instructions carefully to ensure the unit is prepared properly before installation Item Number Item Description Quantity 1 Cool Surface System Bezel 1 2 Heat Shield Support 1 3 Standoff Brace 1 4 Top Heat Shield 1 5 Vertical Heat Shield 1 6 Top Standoff 2 7 R...

Page 24: ...standoffs by hand to form general shape Figure 36 Top Standoff Shape Step 2 There are four 4 nailing flanges to secure the unit to the framing they are assembled flat from the manufacturer Remove the upper T 20 screw and rotate each nailing flange upward until the bare nailing flange hole lines up and reinstall the T 20 screw Bend the flange 90 degrees making it flush with the cabinet face Figure ...

Page 25: ... position using supplied T 20 screws Initial Installation QUALIFIED INSTALLERS ONLY Step 4 Install heat shield support using four 4 supplied T 20 screws Figure 38 Heat Shield Support Install Figure 39 Standoff Brace Install Step 5 Install standoff brace using nine 9 supplied T 20 screws ...

Page 26: ...ep 7 Install the supplied non combustible facing board with eight 8 supplied 8 32 x 75 fasteners and a 1 4 inch socket These screws can be found in the manual bag remove them and install the board Line up the holes and drill fasteners into the board until the screw head is flush with facing board CAUTION DO NOT DRILL INTO THE BOARD ANY FURTHER OR IT MAY CRACK This board is mandatory if it is damag...

Page 27: ...opening should have the following dimensions see Figure 42 The fireplace must be placed on a strong and level surface The gas line must be run to the right side of the fireplace there is a 3 8 NPTM fitting to connect the gas line to The electrical wiring must be brought to the left side The location of the fireplace should be chosen so there will be at least a 36 inches 914 mm clearance from drape...

Page 28: ...imately 1 inch 254mm above the top of the vent pipe Figure 44 Rear Heat Shield Vent Heat Shields All vent configurations require installation of the vertical vent heat shield Remove the three 3 T 20 screws from their respective locations and use to secure the shield in position see Figure 43 The horizontal vent heat shield is only required for minimum vertical rise vent configurations Use three 3 ...

Page 29: ... Figure 45 Finishing Edge Dims Cool Surface Activation WARNING IT IS ESSENTIAL THAT THE CHASE IS VENTED IN A MANNER THAT RELIEVES THE ADDITIONAL HEAT ENTERING THE CHASE ENSURE ONE OF THE AVAILABLE FRAMING OPTIONS HAVE BEEN CONSTRUCTED IN ACCORDANCE WITH THIS MANUAL FAILURE TO DO SO CAN CREATE AN OVERHEATING SITUATION THAT COULD LEAD TO BUILDING FIRE Ensure your chase has been constructed in a mann...

Page 30: ...terial may be layered on top of the supplied Non combustible board Supplied board not needed for thick non combustible finishes like rock Cool Surface System Extended Install Using the supplied long finishing edge combustible material may be layered on top of the supplied Non combustible board Supplied board is not needed for thicker combustible finishes 1 2 13mm 7 8 22mm Mimimum Supplied Non Comb...

Page 31: ... accordance to this manual There are a few different options available to finish the CSS Figure 48 Framing Option 1 Initial Installation QUALIFIED INSTALLERS ONLY Framing Option 1 Front Discharge flush wall installations Construct the framing in a way that provides a minimum 48 inch 1219mm by 3 inch 76mm gap at the top of the facing wall It is essential that these dimensions are respected and not ...

Page 32: ...sing combustible materials Consider Optional 3 Valance to work in conjunction with this option Option 3 Valance A valance may be desired to accentuate or hide the CSS outlet Consider framing option 1 or 2 to utilize the valance feature This is an optional decorative feature that covers up the CSS outlet gap Minimum opening and valance dimensions must be followed to ensure safe heat dissipation Com...

Page 33: ...e the chase see Figure 53 Note If you wish to construct a similar cutout part way up a tall wall then it is essential to build a false ceiling inside the chase at the desired height to direct the rising heat out of the gap Figure 53 Option 3 Bezel Optional False Ceiling If your ceiling dimension is greater than the minimum See figure 42 You may want the CSS Air discharge lower on the wall To do th...

Page 34: ...stible Board supplied 4 102mm Initial Installation QUALIFIED INSTALLERS ONLY Figure 57 Flat Wall Installation Minimum Height to Ceiling Flat Wall Installation These are the minimum allowable dimensions required to safely operate the fireplace Plan your entire installation before proceeding ...

Page 35: ...ard supplied Initial Installation QUALIFIED INSTALLERS ONLY Recess Installation These are the minimum allowable dimensions required to safely operate the fireplace Plan your entire installation before proceeding The maximum allowable depth for a recess in 3 1 2 90mm Figure 58 Recess Installation ...

Page 36: ...um allowable framing dimensions required to safely operate the fireplace in a corner install Plan your entire installation before proceeding Figure 59 Corner Installation 3 7 6 m m 3 i n 7 6 m m 2 8 1 4 7 1 8 m m 1 9 1 2 4 9 7 m m 8 4 i n 2 1 3 7 m m 4 2 i n 1 0 6 8 m m 6 0 i n 1 5 1 1 m m ...

Page 37: ... 6 7 8 9 10 11 12 13 14 M A N T E L H E I G H T M A N T E L D E P T H Minimum Mantle Clearances 8 MANTEL 4 MANTEL 52 51 50 49 48 47 46 44 45 12 MANTEL Diagram 2 Mantel Graph Floor Protection Figure 60 Air Gap Warning 3 4 19mm The fireplace must be placed on a solid and level floor plywood is recommended for basic installations A protective hearth is not required but highly recommended for the long...

Page 38: ... Deviation from the minimum vertical length can create difficulty in burner start up and sooting Allow several minutes for the flame to stabalize after ignition under extreme vent configurations It is recommended for vent lengths that pass through unheated spaces garages attics crawl spaces be insulated to minimize condensation NOTE At least 3 76mm of clearance is required above vent when passing ...

Page 39: ...TALLATION NOTES Do not bend flex vent over 90 degrees All horizontal runs should have a minimum 1 4 6mm rise per foot for optimal performance Do not allow the inner flex pipe to contact the outer pipe keep it pulled tight and use spacer springs Spacers are required at the start middle and end of each elbow to ensure gap is maintained Do not add any extensions to the preset kits if more length is r...

Page 40: ... fireplace to an adjacent wall composed of combustible material Mantel It is not necessary to install a mantel but if one is desired the guidelines as shown in Initial Installation Mantel Requirements Floor The unit must be raised to accommodate flooring thickness Always ensure convective air gaps around the unit remain unobstructed Combustible flooring can be used but make sure to review the maxi...

Page 41: ... depth Recess Mantel Installation Always maintain minimum clearances see Figure 65 The total depth of the TV and wall mount as well as the recess depth will determine the minimum whether or not a mantel is recommended A mantel may not be needed if the TV and Mount are low profile enough A mantle is not mandatory but highly recommended for protection of a TV If choosing to not use a mantel you shou...

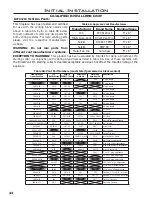
Page 42: ...er line extended above me ter regulator assembly I 3 ft 91 cm 3 ft 91 cm Radial clearance around service regulator vent outlet Table 4 Vent Termination Clearances Vent Termination Restrictions WARNING Follow the venting instructions exactly for safe and proper appliance operation Use Mill Pac or high temp RTV silicone for all venting aconnections Risk of fire explosion or asphyxiation if improper ...

Page 43: ...l vent pipe Around a horizontal vent pipe the clearance to combustibles should be 3 76 mm above and 1 25 mm on the sides and bottom When combustible materials are directly above the first 90 elbow 5 127 mm of clearance is necessary Table 5 Vent Pipe Minimum Clearances Vertical Pipe to the Side Walls Horizontal Pipe to the Sides Bottom Above First Elbow Above Subsequent Elbows Above Horizontal Vent...

Page 44: ... HTS 4DHWS 8DVTS Wind Heat Shield 5DAL 3 to 10 pipe adjustable 58DVA 17TA 11 to 17 pipe adjustable 58DVA 24TA 17 to 24 pipe adjustable 5DLA30 16 5 to 29 pipe adjustable 5DLS1 1 7 8 to 9 slip length pipe 5DLS2 1 7 8 to 21 slip length pipe 58DVA F6 6EFA 5DT AF6 5DF 5DF Flashing 0 12 to 6 12 roof pitch 58DVA F12 6EFB 5DT AF12 5DF12 5DF 12 Flashing 7 12 to 12 12 roof pitch 58DVA FF 6EF 5DFT Flat Roof ...

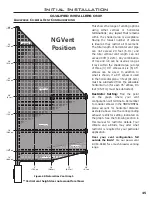
Page 45: ...for each 45 elbow 1 feet 45 7cm must be subtracted Restrictor Setting Find the point on the graph where your vent configuration will terminate Remember to consider elbows in the HORIZONTAL plane account for horizontal distance as stated above Use the corresponding exhaust restrictor setting indicated on the graph See the following section in this manual for restrictor details Your climate and alti...

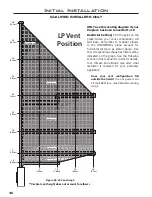
Page 46: ...llowing section in this manual for restrictor details Your climate and altitude may alter what restrictor is required for your particular application 5 1 52m 4 1 22m 18 0 46m 10 3 05m 10 3 05m 15 4 57m 15 1 52m 20 6 1m 20 6 1m 25 7 62m 30 9 14m 35 10 7m 40 12 2m LP Vent Position RESTRICTOR 1 RESTRICTOR 1 RESTRICTOR 2 RESTRICTOR 2 RESTRICTOR 3 RESTRICTOR 3 RESTRICTOR 4 RESTRICTOR 4 RESTRICTOR 5 RES...

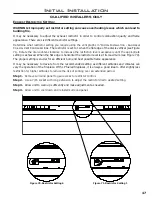
Page 47: ...s horizontal the restrictor level is at its maximum see Figure 70 The proper setting is crucial for an efficient burn and best possible flame appearance It may be necessary to deviate from the recommended setting as different altitudes and climates can vary the operation of the fireplace With LP fueled fireplaces it is always a good idea to offer slightly less restriction for higher altitudes to r...

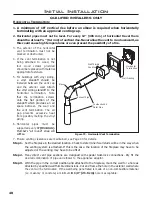
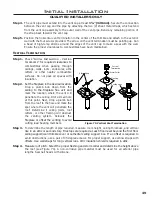
Page 48: ...ation screws onto the flat portion of the standoff which provides an air space between the wall and the vent termination The air gap prevents excessive heat from possibly melting the vinyl siding 6 Horizontal pipes must be supported every 3 914 mm Plumber s all round strap will suffice 7 Ensure venting clearances are maintained see Page 43 for details Step 1 Set the fireplace in the desired locati...

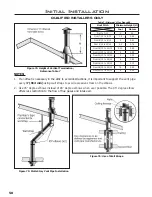
Page 49: ...s Do not pack air spaces with insulation Step 2 Set the fireplace in the desired location Drop a plumb bob down from the ceiling to the fireplace flue exit and mark the location where the vent will penetrate the ceiling Drill a small hole at this point Next drop a plumb bob from the roof to the hole and mark the spot where the vent will penetrate the roof Determine if ceiling joists roof rafters o...

Page 50: ... 2 13 Over 18 12 to 20 12 7 5 2 29 Over 20 12 to 21 12 8 2 44 Figure 74 Height of Vertical Termination Reference Table 7 45 elbows x2 Wall strap Plumber s tape connected to wal strap Figure 76 Use of Wall Straps Figure 75 Multi Story Vent Pipe Installation NOTES 1 If an offset is necessary in the attic to avoid obstructions it is important to support the vent pipe every 3 914 mm using wall straps ...

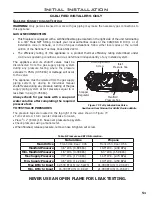
Page 51: ...sure testing where the pressure exceeds PSIG 3 45 KPa or damage will occur to the valve The appliance must be isolated from the gas supply piping system by closing its individual manual shutoff valve during any pressure testing of the gas supply piping system at test pressures equal to or less than psig 3 45 KPa Always check for gas leaks with a soap and water solution after completing the require...

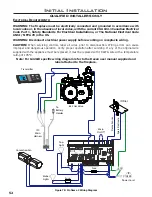
Page 52: ...wires prior to disconnection Wiring errors can cause improper and dangerous operation Verify proper operation after servicing If any of the original wire supplied with the appliance must be replaced it must be replaced with 18 AWG wire with a temperature rating of 105 C Initial Installation QUALIFIED INSTALLERS ONLY IFC Main Harness Transmitter 885 Gas Valve IPI Pilot Convection Fan Main On Off Po...

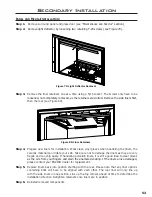
Page 53: ...al can irritate your skin Take care not to damage the liners as they are very fragile and can chip easily If handeling porcelain liners it is still a good idea to wear gloves as the oils from your fingers and stain the enameled coating If the liners arrive damaged please contact your ENVIRO dealer for replacement Step 5 Replace liners back into position starting with the rear Please note that any ...

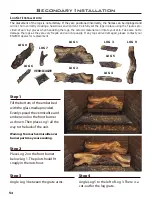
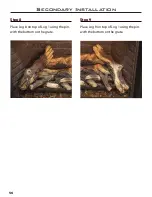
Page 54: ...ip easily If any logs arrive damaged please contact your ENVIRO dealer for replacement LOG 1 LOG 8 LOG 7 LOG 4 LOG 6 LOG 5 LOG 3 LOG 2 VERMICULITE LOG 9 Step 2 Place Log 2 on the front burner below Log 1 The pilot should fit snugly in the notch out Step 1 Fill the bottom of the ember bed with the glass media provided Evenly spread the vermiculite and ember wool on the front burner as shown Then pl...

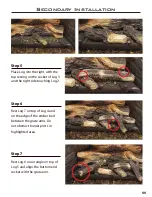
Page 55: ... socket of Log 3 and the right side touching Log 2 Step 6 Rest Log 7 on top of Log 4 and on the edge of the ember bed between the grate arms Do not obstruct burner ports in highlighted area Step 7 Rest Log 6 on an angle on top of Log 5 and align the bottom end socket with the grate arm ...

Page 56: ...56 Step 8 Place Log 8 on top of Log 1 using the pin with the bottom on the grate Step 9 Place Log 9 on top of Log 1 using the pin with the bottom on the grate Secondary Installation ...

Page 57: ...voltage at valve It must be greater than 5 mV If low replace thermocouple Air in gas line pilot dies while knob is depressed Bleed line Check gas line pressure Contact dealer Burners will not remain lit Problem with thermopile circuit Check gas line pressure Check for flame impingement on thermopile If low see Pilot will not remain lit Check thermopile for minimum of 300 mV when burner is switched...

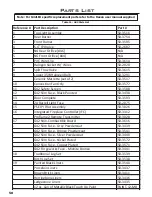
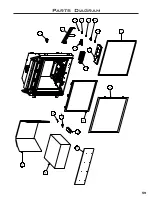
Page 58: ...2075 15 PSE IPI Pilot Assembly 50 3026 16 Integrated Fireplace Controller IFC 50 3312 Proflame 2 Remote Transmitter 50 3028 17 G42 Slim Face Black Painted 50 3438 G42 Slim Face Grey Powdercoat 50 3439 G42 Slim Face Bronze Powdercoat 50 3541 G42 Slim Face Silver Powdercoat 50 3440 G42 Slim Face Nickel Plated 50 3572 G42 Slim Face Copper Plated 50 3571 G42 Forgeworks Face Midnite Bronze 50 3441 18 Tr...

Page 59: ...59 Parts Diagram 19 18 1 2 5 6 7 8 9 4 10 3 11 13 12 17 16 14 15 ...

Page 60: ... mesh Exclusions An expanded list of exclusions is available at www enviro com help warranty html This warranty does not cover Damage as a result of improper usage or abuse Damage caused from over firing due to incorrect setup or tampering Damage caused by incorrect installation To the Dealer Provide name address and telephone number of purchaser and date of purchase Provide date of purchase Name ...

Reviews: