MN-28671
Rev 2 • 230V Enthermics Fluid Warming Cabinet Operation & Care Manual • 11
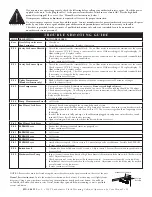
T R O U B L E S H O O T I N G G U I D E
CODE DESCRIPTION
ACTION REQUIRED
door
Door left open for more
than 3 minutes
• Close door
• Verify door switch operation. Replace if necessary.
E-10
Cavity Air Sensor Shorted
• Detach the sensor from the terminal block. Use an Ohm meter to measure the resistance of the sensor.
Check sensor at 32°F (0°C) using a container of ice water. If Ohm reading is 100, replace display. If
Ohm reading is ±10, replace sensor.
• Check wires for integrity. Check for proper and secure connections at the control and terminal block.
If necessary, re-secure the faulty connections.
• If error continues call Service.
E-11
Cavity Air Sensor Open
• Detach the sensor from the terminal block. Use an Ohm meter to measure the resistance of the sensor.
Check sensor at 32°F (0°C) using a container of ice water. If Ohm reading is 100, replace display. If
Ohm reading is ±10, replace sensor.
• Check wires for integrity. Check for proper and secure connections at the control and terminal block.
If necessary, re-secure the faulty connections.
• If error continues call Service.
E-30
Under Temperature
(Blanket warmers only)
• Blanket chamber temperature has been lower than the set temperature for 90 minutes or longer.
• Check that door is closed.
E-31
Over Temperature
• Unit may be overloaded. Redistribute inventory.
Do not exceed height of insert.
• Check sensor at 32°F (0°C) using a container of ice water. The sensor reading should be 100 ohms.
• Check wires for integrity. Check for proper and secure connections at the control and terminal block.
If necessary, re-secure the faulty connections.
• Relay may be defective.
• If error continues call Service.
E-50
Temp. Measurement Error
• Call Service.
E-60
Real-Time Clock Error
• Unit may have been unplugged for an extended period of time.
• To resolve, turn circuit breaker switch to ON position for 1 minute, then turn circuit breaker switch to
the OFF position for 5 seconds, and then back to ON. The error message should no longer appear in
the display.
• In order for the unit to fully recharge, it should remain plugged in and power circuit breaker switch
turned ON for at least 24 hours after resetting.
• Upon resolving an E-60 error, check that the date and time are correct.
E-61
Real-Time Clock Error
• Call Service.
E-80
EEPROM Error
• Ensure that all temperature and times are properly set.
• If error continues call Service.
E-81
EEPROM Error
• Call Service.
E-82
EEPROM Error
• Call Service.
E-83
EEPROM Error
• Call Service.
E-87
EEPROM Error
• Stored offsets corrupted. Offsets reset to 0. Control may need a recalibration. Possible bad EEPROM.
• If error continues call Service.
E-90
Button Stuck
• A button has been held down for >60 seconds. Adjust control. Error will reset when the problem has
been resolved.
E-99
Hardware Over Temp
• Inspect connections and condition of high limit bimetal thermostat and the fan switch (fl uid warmers
only). Adjust if necessary.
• Check operation of cavity fan motor (fl uid warmers only). Air movement from the cavity fan blade
should move the safety sail switch to the closed position. Adjustment to the fan blade may be needed
or replacement of the fan motor.
• If error continues call Service.
NOTE:
All error codes must be cleared using the circuit breaker switch or power switch on the rear of the unit.
Manual Reset Instructions:
Locate the manual reset button on back of unit. (Location may vary slightly from
diagram.) Using a pen, screwdriver or other long, thin implement, fi rmly push reset button. You will hear
an audible click when the button is reset. If reset button trips again while unit is running, contact a qualifi ed
service technician.
Circuit
breaker
Manual reset button
If your unit is not operating properly, check the following before calling your authorized service agent. Check the power
applied to the unit. Is the plug in outlet? Is the power circuit breaker switch in rear of unit OK? Has the high limit
manual reset tripped? If so, reset. (See “Manual Reset Instructions” below.)
If temperature calibration adjustment is required, call service for proper instruction.
Do not attempt to repair or service beyond this point. Contact manufacturer for nearest authorized service agent. Repairs
made by any other service agent without prior authorization by manufacturer will void the warranty on the unit.
This chart is provided for the assistance of qualified technicians only and is not intended for use by untrained or
unauthorized service personnel.


