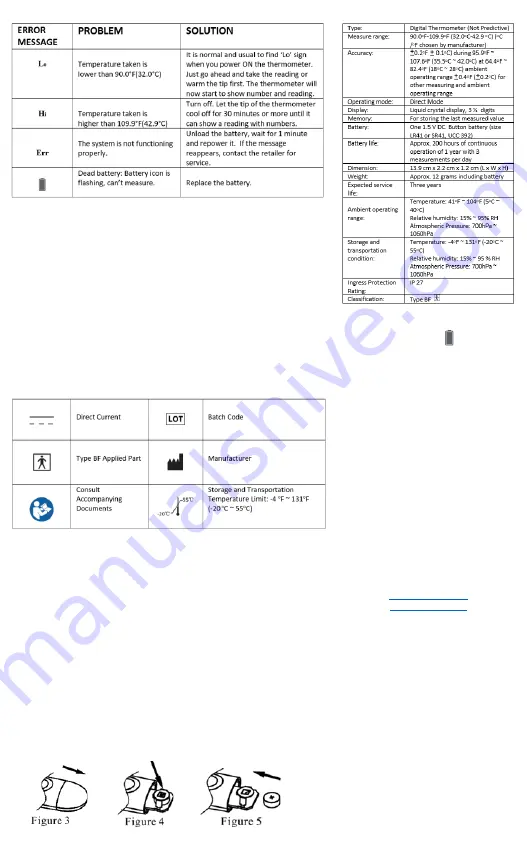
TROUBLE SHOOTING
HOW TO CALIBRATE YOUR THERMOMETER
The thermometer is initially calibrated at the time of manufacturing. If the thermometer
is used according to the manual, periodic readjustment is not required. However, we
recommend conducting a quick calibration to confirm that your unit didn't get damaged
during shipment. A quick way to calibrate your unit is by doing the water test. Dip the
tip of the thermometer into a cup of cold water for a few seconds. Your display should
show 'Lo' (meaning low temperature, not low battery) or a low-temperature reading
number (for example it shows 33 °C or 91°F). Power it OFF then let it sit for two minutes
or three, power it ON, dip the tip into a cup of hot water this time for a few seconds.
Wait for your thermometer to show 'Hi' or a high-temperature reading number on its
LCD display (for example it shows 38 °C or 100 °F). Power it OFF, Leave it at room
temperature for 30 to 45 minutes and start using it, and it will mean that you have
successfully checked your thermometer and that you are good to go! If you find that
your reading is very low and/or not changing the display of the number on the LCD
screen at all, please get in touch with us through email with your Amazon Order ID.
SYMBOL EXPLANATION
CLEANING & DISINFECTION
Wipe the thermometer with a soft clean cloth. For stubborn stains, wipe the
thermometer with a cloth that has been dampened in water or in neutral detergent
solution and then wring thoroughly. Finish by wiping with a soft dry cloth. For
disinfection, 75% Ethanol or Isopropyl alcohol can be used. Observe the following to
prevent damage to the thermometer:
•
Do not use benzene, thinner, gasoline or other strong solvents to clean the
thermometer.
•
Do not attempt to disinfect the sensing section (tip) of the thermometer by immersing
in alcohol or in hot water (water over 122oF/50oC).
•
Do not use ultrasonic washing to clean the thermometer.
o
F/
o
C SWITCHABLE
Temperature readings are available in the Fahrenheit or Celsius scale (
o
F/
o
C; located in
the upper right corner of LCD). By default, the thermometer is set to
o
F. If you want to
switch to
o
C, turn the unit off, press and hold On/Off Button for approximately 2 seconds
to change the current setting. To go back to
o
F, power off, and press and hold for 2
seconds again. It will change back to
o
F.
SPECIFICATIONS
BATTERY REPLACEMENT
1.
Replace battery when
appears in the
lower right corner of LCD display.
2.
Pull battery cover off as shown in Figure 3.
3.
Gently pull out plastic circuit board with
battery chamber approximately 1 cm
(slightly less than
½”
.) (See Figure 4)
4.
Use pointed object such as a pen to
remove old battery. Discard battery
lawfully. Replace with new 1.5 V DC button
type LR41 or SR41, UCC392, or equivalent.
Be sure battery is installed with
“+” p
olarity facing up. (See Figure 5)
5.
Slide battery chamber back into place and
attach cover.
All rights reserved.
HAPPY CARE BY ENJI
Enji Prime Copyright 2020


