GW 10 791 GW 14 791
Cronotermostato EIB - da parete
EIB wall timer-thermostat
Chronothermostat EIB - mural
Cronotermostato EIB - de pared
EIB Thermostattimer für Wandmontage
Page 1: ...GW 10 791 GW 14 791 Cronotermostato EIB da parete EIB wall timer thermostat Chronothermostat EIB mural Cronotermostato EIB de pared EIB Thermostattimer für Wandmontage ...
Page 2: ......
Page 3: ...Forzatura temporanea della temperatura 22 Funzione Party 23 Funzione Holiday 24 Copia del programma festivo 25 Segnalazione pile in esaurimento 26 Reset e ripristino dei valori preimpostati 26 Programmi preimpostati 27 Parametri preimpostati 28 Comportamento alla caduta e al ripristino dell alimentazione bus 28 Sostituzione pile 29 Pulizia del cronotermostato 30 ISTRUZIONI D INSTALLAZIONE Corretto...
Page 4: ...omestico e similare in ambienti non polverosi e dove non sia necessaria una protezione speciale contro la penetrazione di acqua L organizzazione di vendita GEWISS è a disposizione per chiarimenti e informazioni tecniche Gewiss SpA si riserva il diritto di apportare modifiche al prodotto descritto in questo manuale in qualsiasi momento e senza alcun preavviso n 1 Cronotermostato EIB da parete n 1 B...
Page 5: ...bile programmare un profilo orario indipendente con risoluzione di 15 minuti e senza limite di variazioni giornaliere Il cronotermostato prevede 2 tipi di funzionamento riscaldamento e condizionamento 5 modalità di funzionamento OFF Economy Precomfort Comfort e Automatica 4 temperature di regolazione per il riscaldamento TECONOMY TPRECOMFORT TCOMFORT TANTIGELO 4 temperature di regolazione per il c...
Page 6: ...modalità di funzionamento verso termostati slave con trasmissione del set point verso termostati slave Scenari memorizzazione e attivazione di 8 scenari valore 0 63 Altre funzioni impostazione del set point OFF ECONOMY PRECOMFORT COMFORT dal bus impostazione del tipo di funzionamento riscaldamento condizionamento dal bus impostazione di giorno e ora dal bus trasmissione di giorno e ora sul bus ver...
Page 7: ...DESCRIZIONE GENERALE 7 I T A L I A N O Posizione dei comandi posteriori LED di programmazione indirizzo fisico Tasto di programmazione indirizzo fisico ...
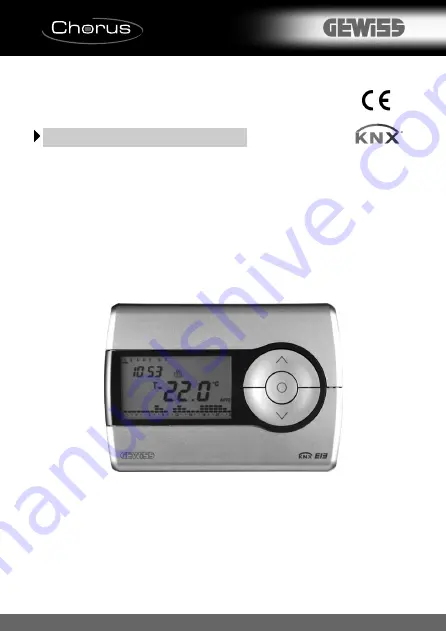
Page 8: ...termostato è dotato di un display di 3 pulsanti di comando sempre accessibili e di 7 pulsanti di comando accessibili a sportello aperto 14 15 16 17 19 18 13 10 9 8 7 1 6 5 4 3 2 11 28 27 26 20 25 24 23 22 21 12 Posizione dei comandi ...
Page 9: ...tura Selezione parametri SEGNALAZIONI A DISPLAY Modalità di funzionamento 10 Unità di misura temperatura 14 Temperatura ambiente misurata Profilo programma giornaliero 21 Attivazione condizionamento 11 Attivazione riscaldamento 11 Differenziale termico 19 Orologio 14 Giorno della settimana 14 Attivazione funzione autoapprendimento 19 Set point temperatura Modalità di funzionamento 15 Funzionamento...
Page 10: ...e il simbolo del set point relativo al quarto d ora corrente Nel profilo orario lampeggia la colonnina relativa all ora corrente con la rappresentazione del set point attivo Nei funzionamenti economy precomfort e comfort il cronotermostato utilizza permanentemente i set point di temperatura corrispondenti Sul display appaiono la temperatura ambiente misurata e il simbolo o SIGNIFICATO DI Simbolo R...
Page 11: ...ta Durante il funzionamento l attivazione del riscaldamento o del condizionamento sono segnalate nel modo seguente Riscaldamento Il simbolo indica che il comando di attivazione è stato inviato all attuatore di comando della caldaia Se via ETS sono state attivate le notifiche dal carico e il cronotermostato non riceve dall attuatore il riscontro dell avvenuta attivazione il simbolo inizia a lampegg...
Page 12: ...condizionamento Per impostare i parametri del cronotermostato 1 selezionare con il tasto il tipo di funzionamento riscaldamento o condizionamento 2 premere una volta il tasto Sul display appaiono la scritta SET e l orologio mentre la barra del giorno della settimana inizia a lampeggiare A questo punto secondo il tipo di funzionamento è possibile modificare in sequenza Selezione riscaldamento condi...
Page 13: ... Set Point TPROTEZIONE ALTE TEMPERATURE P05risc Logica di controllo P05cond Logica di controllo Se logica di controllo 2 punti Se logica di controllo proporzionale Per scorrere la sequenza confermando il valore del parametro visualizzato premere il tasto finché non appare il parametro che si desidera modificare L uscita dalla procedura di impostazione dei parametri avviene premendo nuovamente il t...
Page 14: ...mpostare l ora con i tasti Per confermare il valore impostato premere il tasto entro 30 secondi Impostazione dei minuti Quando le cifre dei minuti lampeggiano impostare i minuti con i tasti Per confermare il valore impostato premere il tasto entro 30 secondi Impostazione unità di misura temperatura Quando il simbolo C o F della temperatura inizia a lampeggiare selezionare l unità di misura della t...
Page 15: ...giare Regolare il valore di TCOMFORT con i tasti Per confermare il valore impostato premere il tasto entro 30 secondi P02risc Impostazione Set Point riscaldamento All apparire del simbolo il valore di temperatura inizia a lampeggiare Regolare il valore di TPRECOMFORT con i tasti Per confermare il valore impostato premere il tasto entro 30 secondi P02cond Impostazione Set Point condizionamento All ...
Page 16: ...tro 30 secondi P04risc Impostazione valore temperatura antigelo All apparire del simbolo il valore di temperatura inizia a lampeggiare Regolare il valore della temperatura antigelo con i tasti Per confermare il valore impostato premere il tasto entro 30 secondi P04cond Impostazione valore protezione alte temperature All apparire del simbolo il valore di temperatura inizia a lampeggiare Regolare il...
Page 17: ...2 punti saltare al punto P09 per il controllo proporzionale andare al punto P06 CONTROLLO A 2 PUNTI L impianto di termoregolazione viene disattivato quando la temperatura ambientale è pari a set point e riattivato quando la temperatura è pari o inferiore a set point per il riscaldamento la temperatura è pari o superiore a set point per il condizionamento I grafici che seguono mostrano i due tipi d...
Page 18: ...Per confermare il valore impostato premere il tasto entro 30 secondi P07 Impostazione valore differenziale di regolazione proporzionale All apparire della scritta P07 impostare il valore del differenziale di regolazione con i tasti Possibili valori da 0 4 C a 3 2 C con passo di 0 4 C Si possono impostare valori differenziali di regolazione diversi per riscaldamento e condizionamento Per confermare...
Page 19: ... entro 30 secondi L autoapprendimento permette di ottimizzare l anticipo max 2 ore sull attivazione del riscaldamento Il cronotermostato gestisce automaticamente l anticipo in modo da garantire la temperatura impostata all inizio di ogni periodo del profilo programmato Questa funzione si attiva solo in riscaldamento nella modalità di funzionamento automatico I parametri seguenti sono significativi...
Page 20: ...a impostata e con la frequenza specificata in P13 Per confermare il valore impostato premere il tasto entro 30 secondi Se si è scelta l opzione 04 passare al punto P13 altrimenti saltare al punto P14 P13 Periodo di invio giorno ora All apparire della scritta P13 è possibile impostare il periodo di invio di data e ora per allineare questi parametri nei dispositivi impostati come slave etc 00 ogni 6...
Page 21: ...erato con i tasti Per confermare la selezione premere il tasto entro 30 secondi Dopo la conferma del giorno sul display viene visualizzato il profilo corrente relativo al giorno scelto L orario inizia a lampeggiare I passi da eseguire per la personalizzazione sono 1 selezione dell orario di inizio della variazione di temperatura 2 impostazione del nuovo set point di temperatura 3 completamento del...
Page 22: ...i passa automaticamente alla programmazione del giorno successivo Al termine della programmazione settimanale premere il tasto per tornare al funzionamento normale Per attivare il programma selezionare la modalità di funzionamento AUTO premendo il tasto fino all apparire sul display della scritta AUTO Nelle modalità di funzionamento AUTO Economy Precomfort e Comfort è possibile forzare temporaneam...
Page 23: ...atura desiderata Tramite i tasti impostare poi il numero delle ore di attivazione della funzione Party che viene visualizzato in alto a sinistra sul display Premere il tasto o attendere 5 secondi per confermare l impostazione Quando la funzione è attiva si possono modificare il valore del set point premendo i tasti e quello del periodo di attivazione tramite i tasti Durante il funzionamento il con...
Page 24: ...unzione Holiday che viene visualizzato in alto a sinistra sul display Premere il tasto o attendere 5 secondi per confermare l impostazione Quando la funzione è attiva si possono modificare il valore del set point premendo i tasti e quello del periodo di attivazione tramite i tasti Durante il funzionamento il conteggio dei giorni viene decrementato La funzione Holiday resta attiva fino allo scadere...
Page 25: ... profilo del giorno festivo Premere il tasto o attendere 30 secondi per confermare l impostazione Quando la funzione è attiva premendo il tasto si visualizza il giorno sul quale è stato copiato il profilo del giorno festivo sul display la barra corrispondente lampeggia Se si desidera disattivare la funzione premere nuovamente il tasto se si desidera modificare il giorno della settimana utilizzare ...
Page 26: ...one del bus KNX EIB tutte le altre impostazioni sono mantenute in memoria non volatile In presenza della tensione bus il funzionamento è comunque garantito anche in assenza di pile Premendo contemporaneamente i tasti e si effettua un reset completo del cronotermostato Attenzione tutti i parametri impostati e i programmi personalizzati vengono cancellati Alla riaccensione il cronotermostato utilizz...
Page 27: ...MMA RISCALDAMENTO Lunedì Venerdì Sabato Domenica PROGRAMMA CONDIZIONAMENTO Tutti i giorni della settimana Questi programmi preimpostati possono essere modificati e personalizzati secondo le proprie esigenze Per modificare i parametri preimpostati seguire le indicazioni contenute nel paragrafo Personalizzazione programma giornaliero Programmi preimpostati ...
Page 28: ...peratura C Alla caduta dell alimentazione bus il dispositivo non compie nessuna azione Ora e data sono mantenute dall alimentazione tampone pile mentre tutte le altre impostazioni sono conservate in una memoria non volatile Il dispositivo è pienamente operativo entro massimo 5 secondi dal ripristino dell alimentazione bus In assenza dell alimentazione tampone pile al ripristino dell alimentazione ...
Page 29: ...to frontale e staccare il cronotermostato dalla base di supporto seguendo la sequenza illustrata in figura Togliere il coperchietto di chiusura del vano pile e sostituire le pile esauste con altre due da 1 5 V tipo AAA rispettando le polarità indicate 2 3 1 Sostituzione pile I T A L I A N O ...
Page 30: ...are data e ora Sostituire tutte le pile contemporaneamente Non utilizzare insieme pile vecchie e nuove Utilizzare pile dello stesso tipo non mischiare pile alcaline con pile allo zinco carbone Non gettare le pile nel fuoco Le pile sono rifiuti speciali il cui smaltimento è regolamentato da precise predisposizione di legge e devono essere conferite agli appositi centri di raccolta Per pulire il cro...
Page 31: ... deve essere installato in nicchie vicino a porte o finestre accanto a termosifoni o condizionatori e non deve essere colpito da correnti d aria e dall illuminazione solare diretta La base di supporto va posta ad una altezza da terra di 160 cm circa e può essere fissata direttamente a parete con dei tasselli oppure sopra una scatola a 3 posti ATTENZIONE Nel fissare la base di supporto rispettare i...
Page 32: ...bus tra il cronotermostato EIB e il più lontano dispositivo KNX EIB da comandare non deve superare i 700 metri 3 Per evitare segnali e sovratensioni non voluti non dar vita se possibile a circuiti ad anello 4 Mantenere una distanza di almeno 4 mm tra i cavi singolarmente isolati della linea bus e quelli della linea elettrica 5 Non danneggiare il conduttore di continuità elettrica della schermatura...
Page 33: ...la memoria tampone vedere paragrafo Sostituzione pile 2 Connettere il filo rosso del cavo bus al morsetto rosso del terminale e il filo nero al morsetto nero Al terminale bus si possono collegare fino a 4 linee bus fili dello stesso colore nello stesso morsetto 3 Isolare lo schermo il conduttore di continuità elettrica e i rimanenti fili bianco e giallo del cavo bus nel caso in cui si utilizzi un ...
Page 34: ... negli appositi piedini del dispositivo Il corretto senso di inserzione è determinato dalle guide di fissaggio Agganciare il cronotermostato sulla base di supporto seguendo la sequenza illustrata in figura e fissarlo con la vite in dotazione 1 Completamento 2 3 ...
Page 35: ...llo di visualizzazione 0 45 C temperatura Elementi di misura 1 sensore NTC risoluzione di misura 0 1 C accuratezza di misura 0 5 C a 20 C intervallo tra misurazioni successive 1 minuto Intervalli di regolazione temperature TANTIGELO 2 7 C TPROTEZIONE ALTE TEMPERATURE 30 40 C Altri set point 5 40 C Ambiente di utilizzo Interno luoghi asciutti Temperatura di funzionamento 5 45 C Temperatura di stocc...
Page 36: ......
Page 37: ...ature forcing 56 Party Function 57 Holiday Function 58 Copying the holiday programme function 59 Low Battery indicator 60 Reset and reinstatement of default settings 60 Preset programs 61 Preset parameters 62 Behaviour on the failure and reinstatement of the bus power supply 62 Replacing the batteries 63 Cleaning the timer thermostat 64 INSTALLATION INSTRUCTIONS Correct installation position 65 As...
Page 38: ...d CEI 64 8 for devices for domestic use and similar in non dusty atmospheres and where special protection against water penetration is not required The GEWISS sales organisation is at your disposal for clarifications and technical information Gewiss SpA reserves the right to make changes to the product described in this manual at any time and without giving any notice n 1 EIB wall timer thermostat...
Page 39: ...of the week with a 15 minute resolution and without limits to the daily variations The timer thermostat comprises 2 function types heating and air conditioning 5 operation modes OFF Economy Precomfort Comfort and Automatic 4 temperature settings for the heating function TECONOMY TPRECOMFORT TCOMFORT TFROSTPROTECT 4 temperature settings for the air conditioning function TECONOMY TPRECOMFORT TCOMFOR...
Page 40: ...th transmission of the operation mode to the slave thermostats with transmission of the set point to the slave thermostats Scenes memorising and activating the 8 scenes value 0 63 Other functions setting of the OFF ECONOMY PRECOMFORT COMFORT set point by the bus setting the function type heating air conditioning by the bus setting of the time and day by the bus transmission of the time and day fro...
Page 41: ...GENERAL DESCRIPTION 41 E N G L I S H Position of the rear controls Physical address programming LED Physical address programming button ...
Page 42: ... is fitted with a display 3 control buttons which are always accessible and 7 control buttons which can be accessed when the cover is open 14 15 16 17 19 18 13 10 9 8 7 1 6 5 4 3 2 11 28 27 26 20 25 24 23 22 21 12 Position of the control buttons ...
Page 43: ...erature regulation select settings SCREEN SIGNALS Operation mode 44 Temperature unit of measurement 48 Ambient temperature measured Daily program profile 55 Activation of air conditioning 45 Activation of heating 45 Thermal differential 53 Clock 48 Day of the week 48 Activation of self learning function 53 Temperature set point operation mode 49 Heating function 45 Parameter setting status 46 Air ...
Page 44: ...e to the current quarter hour are displayed on the screen The column relative to the current time with the representation of the active set point blinks in the time profile In the economy precomfort and comfort function modes the timer thermostat permanently uses the corresponding temperature set points The current ambient temperature and the symbol or appear on the screen MEANING OF Symbol Heatin...
Page 45: ... the screen The activation of the heating or air conditioning functions are indicated as followed Heating The symbol indicates that the activation command has been sent to the actuator which controls the boiler If the load notice has been sent via the ETS and the timer thermostat does not receive confirmation from the actuator that the same has been activated the symbol starts to flash Subsequentl...
Page 46: ... indicates the air conditioning mode To set the timer thermostat parameters 1 use the key to select the function type heating air conditioning 2 Press the key once The word SET and the clock appears on the screen and the day of the week cursor starts to flash According to the function type it is now possible to sequentially modify Selecting heating air conditioning Setting parameters ...
Page 47: ...nd Set Point THIGH TEMPERATURE PROTECTION P05heat Control logic P05cond Control logic If the control logic 2 points If the control logic proportional To scroll the sequence confirming the values displayed on the screen press the key until you reach the parameter you want to change Press the key again to exit the parameter setting procedure or it will exit automatically after a 30 time out It is ne...
Page 48: ... the hour using the keys Press the key within 30 seconds to confirm the value set Setting the minutes When the minutes figures blink set the minutes using the keys Press the key within 30 seconds to confirm the value set Setting the temperature unit of measurement When the temperature symbols C or F starts to blink select the temperature unit of measurement using the keys Press the key within 30 s...
Page 49: ...s Regulate the value TCOMFORT using the keys Press the key within 30 seconds to confirm the value set P02heat Set Point setting heating The temperature value starts to blink when the symbol appears Regulate the value Tprecomfort using the keys Press the key within 30 seconds to confirm the value set P02cond Set Point setting air conditioning The temperature value starts to blink when the symbol ap...
Page 50: ...s to confirm the value set P04heat Set frostprotect temperature value The temperature value starts to blink when the symbol appears Regulate the frostprotect temperature value using the buttons Press the key within 30 seconds to confirm the value set P04cond Set high temperature protection value The temperature value starts to blink when the symbol appears Regulate the high temperature protection ...
Page 51: ...P09 for proportional control move on to point P06 2 POINT CONTROL The thermal regulation system is switched off when the room temperature is equal to the set point and is switched back when the temperature is equal to or lower than the set point for heating the temperature is equal to or higher than the set point for air conditioning The diagrams below show the two function types HEATING AIR CONDI...
Page 52: ...unctions Press the key within 30 seconds to confirm the value set P07 Setting the proportional regulation differential value When the P07 code appears on the screen set the PMW regulation differential value using the keys Possible values from 0 4 C to 3 2 C with a pitch of 0 4 C It is possible to set different regulation differentials for the heating and air conditioning functions Press the key wi...
Page 53: ...ning function optimises the activation of the heating in advance max 2 hours The timer thermostat manages the advance automatically so as to guarantee the set temperature at the beginning of every period of the programmed profile This function is activated in heating in automatic operation mode only The following parameters are only significant if the timer thermostat has been configured via ETS t...
Page 54: ... indicated in P13 Press the key within 30 seconds to confirm the value set If the 04 option has been selected move on to point P13 otherwise move on to point P14 P13 Day time sending period When the P13 code appears on the screen it is possible to set the sending period for the date and time to align these parameters in the slave devices etc 00 every 6 hours 01 every 12 hours 02 every 24 hours 03 ...
Page 55: ...ing the keys Press the key within 30 seconds to confirm the selection After confirmation of the day the current profile relative to the day selected is displayed on the screen The time will start to blink Follow the steps below to customise the settings 1 select the starting time for the change in temperature 2 set the new temperature set point 3 completing the customisation process 1 select the s...
Page 56: ...by pressing the key within 30 seconds this moves the programming on to the next day automatically Press the key on completion of weekly programming to return to normal operation To activate the program select AUTO operation mode by pressing the key until the message AUTO is displayed on the screen It is possible to temporarily force the active temperature set point in AUTO Economy Precomfort and C...
Page 57: ...rature Use the keys to set the number of hours for which the Party function should be enabled which is then indicated in the top left hand corner of the screen Press the key or wait 5 seconds to confirm the setting made When the function is enabled it is possible to change the set point value pressing the keys and the activation period using the keys The count of the hours is decremented during op...
Page 58: ...y function should be enabled which is then indicated in the top left hand corner of the screen Press the key or wait 5 seconds to confirm the setting made When the function is enabled it is possible to change the set point value pressing the keys and the activation period using the keys The count of the days is decremented during operation The Holiday function remains on until the set expiry date ...
Page 59: ...should be copied Press the key or wait 30 seconds to confirm the setting made When the function is enabled press the key to view the day to which the holiday profile was copied the corresponding cursor will flash on the display If you wish to disable the function press the again if you wish to change the day of the week use the keys and press the key or wait 30 seconds to confirm the new settings ...
Page 60: ...s when there is no bus KNX EIB power all the other settings are stored in the non volatile memory When the bus power is present it will always function even without batteries Press the and keys all together to completely rest the timer thermostat Caution all the previously set parameters and customised programmes will be cancelled When it is turned back on the timer thermostat will use the default...
Page 61: ...PROGRAM Monday Friday Saturday Sunday AIR CONDITIONING PROGRAM Every day of the week These preset programs can be modified and personalised according to one s own requirements To change the preset parameters follow the instructions provided in the Customising the daily programme paragraph Preset programs E N G L I S H ...
Page 62: ...ment C When the bus power supply fails the device performs no actions The time and date are maintained by the buffer power system batteries whilst all the other settings are saved to a non volatile memory The device is in full operating mode within a maximum of 5 seconds from reinstatement of the bus power supply If the buffer power battery is absent the timer thermostat will restart in OFF mode w...
Page 63: ...cover and remove the timer thermostat from the support base as seen in the figure below Remove the battery holder cover and replace the dead batteries with another two 1 5 V AAA batteries paying attention to the direction of the poles 2 3 1 Replacing the batteries E N G L I S H ...
Page 64: ... and date Replace all the batteries at the same time Never use old and new batteries together Always use the same type of batteries do not mix alkaline and carbon zinc batteries Never throw the batteries into a fire The batteries are a special waste product and therefore they must be disposed of according to the laws in force and taken to a special collection centre Use a dry cloth to clean the ti...
Page 65: ...t not be installed in an alcove near a door or window next to radiators or air conditioner units and must not be placed in direct sunlight or in draughty areas The support base should be positioned at 160 cm from the ground and can be mounted on the wall using dowels or on top of a 3 place box WARNING When mounting the support base make sure you follow the directions indicated by the arrow Mountin...
Page 66: ...e bus line between the EIB timer thermostat and the most distant KNX EIB device must not exceed 700 metres 3 If possible do not create ring circuits so as to prevent undesirable signals and overloads 4 Keep a distance of at least 4mm between the individually insulated cables of the bus line and those of the electric line 5 Do not damage the electrical continuity conductor of the shielding Warnings...
Page 67: ...eries paragraph 2 Connect the bus cable s red wire to the terminal s red connector and the black wire to the black connector Up to 4 bus lines wires of the same colour in the same connector can be connected to the bus terminal 3 Insulate the screen the electrical continuity conductor and the remaining white and yellow wires of the bus cable should a bus cable with 4 conductors be used which are no...
Page 68: ...or into the special feet of the device The fastener guides determine the direction it should be inserted Position the timer thermostat on the support base as seen in the figure below and fix it in place using the supplied screws 1 Completing installation 2 3 ...
Page 69: ...play range 0 45 C Reading elements 1 NTC sensor read resolution 0 1 C read accuracy 0 5 C to 20 C intervals between the next readings 1 minute Temperature regulation ranges TFROSTPROTECT 2 7 C THIGH TEMPERATURE PROTECTION 30 40 C Other set points 5 40 C Ambit of use Indoors dry places Operating temperature 5 45 C Storage temperature 25 70 C Relative humidity Max 93 no condensation Bus connection S...
Page 70: ......
Page 71: ...ge temporaire de la température 90 Fonction Party 91 Fonction Holiday 92 Copie du programme jours de fête 93 Signalisation piles en cours d épuisement 94 Reset et rétablissement des valeurs préréglées 94 Programmes prédéfinis 95 Paramètres préréglés 96 Comportement à la chute et au rétablissement de l alimentation bus 96 Remplacement des piles 97 Nettoyage du chronothermostat 98 INSTRUCTIONS POUR ...
Page 72: ...s dans des environnements non poussiéreux et là où il n est pas nécessaire de mettre en place une protection spéciale contre la pénétration de l eau L organisation de vente de la Société GEWISS est à votre disposition pour tous éclaircissements et toutes informations techniques Gewiss SpA se réserve le droit de faire des modifications sur le produit décrit dans ce manuel à n importe quel moment et...
Page 73: ...rogrammer un profil horaire indépendant avec une résolution de 15 minutes et sans limites de variations quotidiennes Le chronothermostat prévoit 2 types de fonctionnement chauffage et climatisation 5 modes de fonctionnement OFF Economie Préconfort Confort et Automatique 4 températures de réglage pour le chauffage TÉCONOMIE TPRÉCONFORT TCONFORT TANTIGEL 4 températures de réglage pour la climatisati...
Page 74: ...mission du mode de fonctionnement vers les thermostats slave avec transmission du set point vers les thermostats slave Scénarios mémorisation et activation de 8 scénarios valeur 0 63 Autres fonctions programmation du set point ARRET ECONOMIE PRECONFORT CONFORT par le bus programmation du type de fonctionnement chauffage climatisation par le bus programmation du jour et de l heure par le bus transm...
Page 75: ...DESCRIPTION GENERALE 75 F R A N Ç A I S Position des commandes postérieures LED de programmation adresse physique Touche de programmation adresse physique ...
Page 76: ...ostat est muni d un afficheur de 3 boutons de commande toujours accessibles et de 7 boutons de commande accessibles quand le volet est ouvert 14 15 16 17 19 18 13 10 9 8 7 1 6 5 4 3 2 11 28 27 26 20 25 24 23 22 21 12 Position des commandes ...
Page 77: ...élection des paramètres SIGNALISATIONS SUR L AFFICHEUR Modes de fonctionnement 78 Unité de mesure température 82 Température ambiante mesurée Profil du programme journalier 89 Activation climatisation 79 Activation chauffage 79 Différentiel thermique 87 Horloge 82 Jour de la semaine 82 Activation fonction autoapprentissage 87 Set point température Mode de fonctionnement 83 Fonctionnement en chauff...
Page 78: ...le du set point relatif au quart d heure courant Dans le profil horaire la petite colonne relative à l heure courante avec la représentation du set point activé clignote Dans les fonctionnements économie préconfort et confort le chronothermostat utilise de façon permanente les set points de température correspondants Sur l afficheur apparaissent la température ambiante mesurée et le symbole ou SIG...
Page 79: ...ET et la température ambiante mesurée Pendant le fonctionnement l activation du chauffage ou de la climatisation est signalée de la façon suivante Chauffage Le symbole indique que la commande d activation a été envoyée à l actionneur de commande de la chaudière Si via ETS les notifications ont été activées par la charge et que le chronothermostat ne reçoit pas de l actionneur la réponse que l acti...
Page 80: ...la climatisation Pour programmer les paramètres du chronothermostat 1 sélectionner avec la touche le type de fonctionnement chauffage ou climatisation 2 appuyer une fois sur la touche Sur l afficheur apparaissent le symbole SET et l horloge et la barre du jour de la semaine commence à clignoter On peut alors suivant le type de fonctionnement modifier en séquence Sélection chauffage climatisation P...
Page 81: ...chauff Logique de contrôle P05climat Logique de contrôle Si logique de contrôle 2 points Si logique de contrôle proportionnelle Pour faire défiler la séquence en confirmant la valeur du paramètre affiché appuyer sur la touche jusqu à ce que le paramètre que l on désire modifier apparaisse Pour sortir de la procédure de programmation des paramètres appuyer à nouveau sur la touche ou bien la sortie ...
Page 82: ...firmer la valeur programmée appuyer sur la touche dans les 30 secondes qui suivent Programmation minutes Quand les chiffres des minutes clignotent programmer les minutes avec les touches Pour confirmer la valeur programmée appuyer sur la touche dans les 30 secondes qui suivent Programmation de l unité de mesure de la température Lorsque le symbole C ou F de la température commence à clignoter il f...
Page 83: ... avec les touches Pour confirmer la valeur programmée appuyer sur la touche dans les 30 secondes qui suivent P02chauff Réglage du Set point chauffage Quand le symbole apparaît la valeur de température commence à clignoter Régler la valeur de TPRÉCONFORT avec les touches Pour confirmer la valeur programmée appuyer sur la touche dans les 30 secondes qui suivent P02climat Réglage du Set point climati...
Page 84: ...rogrammation de la valeur température antigel Quand le symbole apparaît la valeur de température commence à clignoter Régler la valeur de la température antigel avec les touches Pour confirmer la valeur programmée appuyer sur la touche dans les 30 secondes qui suivent P04climat Programmation de la valeur de protection hautes températures Quand le symbole apparaît la valeur de température commence ...
Page 85: ...sauter au point P09 pour le contrôle proportionnel aller au point P06 CONTROLE A 2 POINTS L installation de régulation thermique se désactive quand la température ambiante est égale au set point et se réactive quand la température est égale ou inférieure au set point T pour le chauffage la température est égale ou supérieure au set point T pour la climatisation Les graphiques ci après montrent les...
Page 86: ...mer la valeur programmée appuyer sur la touche dans les 30 secondes qui suivent P07 Définition de la valeur du différentiel de réglage proportionnel Quand le message P07 apparaît programmer la valeur du différentiel de réglage avec les touches Valeurs possibles de 0 4 C à 3 2 C avec un pas de 0 4 C Il est possible de programmer des valeurs de différentiels de réglage différentes pour le chauffage ...
Page 87: ...dans les 30 secondes qui suivent L autoapprentissage permet d optimiser l avance max 2 heures sur l activation du chauffage Le chronothermostat gère automatiquement l avance de façon à garantir la température programmée au début de chaque période du profil programmé Cette fonction ne s active qu en chauffage dans le mode de fonctionnement automatique Les paramètres suivants n ont une importance qu...
Page 88: ...mer la valeur programmée appuyer sur la touche dans les 30 secondes qui suivent Si l on a choisi l option 04 passer au point P13 sinon sauter au point P14 P13 Période d envoi jour heure Quand le message P13 apparaît il est possible de définir la période d envoi de la date et de l heure pour aligner ces paramètres dans les dispositifs programmés comme slaves etc 00 toutes les 6 heures 01 toutes les...
Page 89: ... Sélectionner le jour désiré avec les touches Pour confirmer la sélection appuyer sur la touche avant 30 secondes Après la confirmation du jour l afficheur visualise le profil courant relatif au jour choisi L horaire commence à clignoter Les étapes à exécuter pour la personnalisation sont 1 sélection de l heure du début de la variation de température 2 programmer la nouvelle valeur du set point de...
Page 90: ...sse automatiquement à la programmation du jour suivant Quand on a terminé la programmation de toute la semaine appuyer sur la touche pour revenir au fonctionnement normal Pour activer le programme sélectionner le mode de fonctionnement AUTO en appuyant sur la touche jusqu à ce que le symbole AUTO apparaisse sur l afficheur Dans les modalités de fonctionnement AUTO Economie Préconfort et Confort il...
Page 91: ...Avec les touches programmer ensuite le nombre des heures d activation de la fonction Party qui est affiché en haut à gauche sur l afficheur Appuyer sur la touche ou attendre 5 secondes pour confirmer la programmation Quand la fonction est activée on peut modifier la valeur du set point en appuyant sur les touches et la valeur de la période d activation en appuyant sur les touches Pendant le foncti...
Page 92: ...tion de la fonction Holiday qui est affiché en haut à gauche sur l afficheur Appuyer sur la touche ou attendre 5 secondes pour confirmer la programmation Quand la fonction est activée on peut modifier la valeur du set point en appuyant sur les touches et la valeur de la période d activation en appuyant sur les touches Pendant le fonctionnement le comptage des jours diminue La fonction Holiday rest...
Page 93: ... du jour de fête Appuyer sur la touche ou attendre 30 secondes pour confirmer la programmation Quand la fonction est activée appuyer sur la touche pour afficher le jour sur lequel on a copié le profil du jour de fête sur l afficheur la barre correspondante clignote Si l on désire désactiver la fonction appuyer à nouveau sur la touche si l on désire modifier le jour de la semaine utiliser les touch...
Page 94: ... bus KNX EIB toutes les autres programmations sont maintenues dans une mémoire non volatile Quand le bus est alimenté le fonctionnement est de toute façon garanti même en cas d absence de piles Si on appuie en même temps sur les touches et on effectue le reset complet du chronothermostat Attention tous les paramètres programmés et les programmes personnalisés seront annulés Au rallumage le chronot...
Page 95: ...AGE Lundi Vendredi Samedi Dimanche PROGRAMME CLIMATISATION Tous les jours de la semaine Ces programmes prédéfinis peuvent être modifiés et personnalisés suivant les exigences propres Pour modifier les paramètres prédéfinis suivre les indications contenues dans le paragraphe Personnalisation du programme quotidien Programmes prédéfinis F R A N Ç A I S ...
Page 96: ... l alimentation du bus le dispositif n effectue aucune action L heure et la date sont maintenues par l alimentation de secours piles tandis que tous les autres réglages sont conservés dans une mémoire non volatile Le dispositif redevient pleinement opérationnel environ 5 secondes au maximum après le rétablissement de l alimentation bus En absence de l alimentation de secours piles au rétablissemen...
Page 97: ...r le chronothermostat de la base de support en suivant la séquence illustrée sur la figure Enlever le petit couvercle de fermeture du logement des piles et remplacer les piles épuisées par deux autres piles de 1 5 V type AAA tout en respectant les polarités indiquées 2 3 1 Remplacement des piles F R A N Ç A I S ...
Page 98: ...mplacer toutes les piles en même temps Ne pas utiliser en même temps des piles vieilles et des piles neuves Utiliser des piles du même type ne pas mélanger des piles alcalines avec des piles au zinc carbone Ne pas jeter les piles au feu Les piles sont des déchets spéciaux dont l élimination est réglementée par des dispositions légales précises elles doivent être apportées dans les centres de colle...
Page 99: ... des niches ni à côté des portes ou fenêtres ni à côté des radiateurs ou des conditionneurs d air et il ne doit pas être touché par les courants d air ni par l éclairage direct du soleil La base de support doit être placée à une hauteur de 160 cm environ du sol elle peut être fixée directement au mur avec des chevilles ou bien au dessus d une boîte à 3 places ATTENTION En fixant la base de support...
Page 100: ...re le chronothermostat EIB et le dispositif KNX EIB à commander le plus éloigné ne doit pas dépasser 700 mètres 3 Pour éviter tous signaux et surtensions non désirés ne pas créer si possible de circuits en boucle 4 Maintenir une distance d au moins 4 mm entre les câbles isolés un par un de la ligne bus et les câbles de la ligne électrique 5 Ne pas endommager le conducteur de continuité électrique ...
Page 101: ...ire de secours voir le paragraphe Remplacement des piles 2 Connecter le fil rouge du câble bus à la borne rouge du terminal et le fil noir à la borne noire On peut relier au terminal bus jusqu à 4 lignes bus fils de la même couleur dans la même borne 3 Isoler l écran le conducteur de continuité électrique et les fils restants blanc et jaune du câble bus au cas où l on utilise un câble bus à 4 cond...
Page 102: ...e bus dans les pieds du dispositif prévus Le sens correct d insertion est déterminé par les guides de fixation Accrocher le chronothermostat sur la base de support en suivant la séquence illustrée sur la figure et le fixer avec la vis fournie 1 Achèvement 2 3 ...
Page 103: ...valle d affichage de température 0 45 C Eléments de mesure 1 capteur NTC résolution de mesure 0 1 C précision de la mesure 0 5 C à 20 C intervalle entre les mesurages successifs 1 minute Intervalles de régulation températures TANTIGEL 2 7 C TPROTECTION HAUTES TEMPERATURES 30 40 C Autres set points 5 40 C Milieu d utilisation A l intérieur lieux secs Température de fonctionnement 5 45 C Température...
Page 104: ......
Page 105: ...orzado temporal de la temperatura 124 Función Party 125 Función Holiday 126 Copia del programa festivo 127 Señalización pilas agotadas 128 Réset y reajuste de los valores preprogramados 128 Programas preprogramados 129 Parámetros preprogramados 130 Comportamiento a la caída y al reajuste de la alimentación bus 130 Sustitución pilas 131 Limpieza del cronotermostato 132 INSTRUCCIONES DE INSTALACIÓN ...
Page 106: ... aparatos para uso doméstico y similar en ambientes sin polvo y donde no sea necesaria una protección especial contra la penetración de agua La organización de venta GEWISS se encuentra a disposición para informaciones técnicas Gewiss SpA se reserva el derecho de aportar cambios al producto descrito en este manual en cualquier momento y sin preaviso n 1 Cronotermostato EIB de pared n 1 Base de sop...
Page 107: ...perfil horario independiente con resolución de 15 minutos y sin límite de variaciones diarias El cronotermostato prevé 2 tipos de funcionamiento calefacción y acondicionamiento 5 modalidades de funcionamiento OFF Económico Preconfort Confort e Automatica 4 temperaturas de regulación para el calefacción TECONÓMICO TPRECONFORT TCONFORT TANTIHIELO 4 temperaturas de regulación para el acondicionamient...
Page 108: ...lidad de funcionamiento hacia termostatos slave con transmisión del set point hacia termostatos slave Escenarios memorización y activación de 8 escenarios valor 0 63 Otras funciones configuración del set point OFF ECONOMICO PRECONFORT CONFORT desde el bus configuración del tipo di funcionamiento calefacción acondicionamiento desde el bus configuración de día y hora desde el bus transmisión de día ...
Page 109: ...DESCRIPCIÓN GENERAL 109 E S P A Ñ O L Posición de los mandos posteriores LED de programación dirección física Tecla de programación dirección física ...
Page 110: ...mostato está dotado de una pantalla de 3 pulsadores de mando siempre accesibles y de 7 pulsadores de mando accesibles de ventanilla abierta 14 15 16 17 19 18 13 10 9 8 7 1 6 5 4 3 2 11 28 27 26 20 25 24 23 22 21 12 Posición de los mandos ...
Page 111: ...ón parámetros SEÑALIZACIONES EN LA PANTALLA Modalidad de funcionamiento 112 Unidad de medida temperatura 116 Temperatura ambiente medida Perfil programa diario 123 Activación acondicionamiento 113 Activación calefacción 113 Diferencial térmico 121 Reloj 116 Día de la semana 116 Activación función autoaprendizaje 121 Set point temperatura Modalidad de funcionamiento 117 Funcionamiento en calefacció...
Page 112: ... point relativo al cuarto de hora corriente En el perfil horario parpadea la columna relativa a la hora corriente con la representación del set point activo En los funcionamientos económico preconfort y confort el cronotermostato utiliza permanentemente los set point de temperatura correspondientes En la pantalla aparecen la temperatura ambiente medida y el símbolo o SIGNIFICADO DE o Símbolo Calef...
Page 113: ...rante el funcionamiento la activación de la calefacción o del acondicionamento están señaladas de la manera siguiente Calefacción El símbolo indica que el mando de activación se ha enviado al actuador de mando de la caldera Si mediante ETS se han activado las notificaciones de la carga y el cronotermostato no recibe del actuador el reconocimiento de la activación efectuada el símbolo empieza a par...
Page 114: ...ondicionamiento Para programar los parámetros del cronotermostato 1 seleccionar con la tecla el tipo de funcionamiento calentamiento o acondicionamiento 2 presionar una vez la tecla En la pantalla aparecen la nota SET y el reloj mientras que en la barra del día de la semana empieza a parpadear En este momento según el tipo de funcionamiento es posible modificar en secuencia Selección calefacción c...
Page 115: ...RATURAS P05calef Lógica de control P05acond Lógica de control Si lógica de control 2 puntos Si lógica de control proporcional Para desplazar la secuencia confirmando el valor del parámetro visualizado presionar la tecla hasta que no aparezca el parámetro que se desea modificar La salida del procedimiento de configuración de los parámetros se efectúa presionando nuevamente la tecla o automáticament...
Page 116: ... las teclas Para confirmar el valor programado presionar la tecla antes de 30 segundos Configuración de los minutos Cuando las cifras de los minutos parpadean programar los minutos con las teclas Para confirmar el valor programado presionar la tecla antes de 30 segundos Configuración unidad de medida temperatura Cuando el símbolo C o F de la temperatura empieza a parpadear seleccionar la unidad de...
Page 117: ...lor de TCONFORT con las teclas Para confirmar el valor programado presionar la tecla antes de 30 segundos P02calef Configuración Set Point calefacción Cuando aparezca el símbolo el valor de temperatura empezará a parpadear Regular el valor de TPRECONFORT con las teclas Para confirmar el valor programado presionar la tecla antes de 30 segundos P02acond ConfiguraciónSetPoint acondicionamiento Cuando...
Page 118: ...30 segundos P04calef Configuración valor temperatura antihielo Cuando aparezca el símbolo el valor de temperatura empezará a parpadear Regular el valor de la temperatura antihielo con las teclas Para confirmar el valor programado presionar la tecla antes de 30 segundos P04acond Configuración valor protección altas temperaturas Cuando aparezca el símbolo el valor de temperatura empezará a parpadear...
Page 119: ...nal ir al punto P06 CONTROL DE 2 PUNTOS La instalación de termorregulación se desactiva cuando la temperatura ambiente es equivalente a set point y se reactiva cuando la temperatura es equivalente o inferior a set point para la calefacción la temperatura es equivalente o superior a set point para el acondicionamiento Los gráficos que siguen muestran dos tipos de funcionamiento CALEFACCIÓN ACONDICI...
Page 120: ...mar el valor programado presionar la tecla antes de 30 segundos P07 Configuración valor diferencial de regulación proporcional Cuando aparezca el símbolo P07 programar el valor del diferencial de regulación con las teclas Posibles valores de 0 4 C a 3 2 C con paso de 0 4 C Se pueden programar valores diferenciales de regulación diferentes para calefacción y acondicionamiento Para confirmar el valo...
Page 121: ... autoaprendizaje permite optimizar el avance máx 2 horas en la activación de la calefacción El cronotermostato efectúa automáticamente el avance de manera que se garantice la temperatura programada al principio de cada periodo del perfil programado Esta función se activa solo en calefacción en la modalidad de funcionamiento automático Los parámetros siguientes son significativos solo si el cronote...
Page 122: ...ncia especificada en P13 Para confirmar el valor programado presionar la tecla antes de 30 segundos Si se ha elegido la opción 04 pasar al punto P13 de lo contrario saltar al punto P14 P13 Período de envío día hora Cuando aparezca la nota P13 es posible programar el período de envío de fecha y hora para alinear estos parámetros en los dispositivos programados como slave etc 00 cada 6 horas 01 cada...
Page 123: ...seado con las teclas Para confirmar la selección presionar la tecla antes de 30 segundos Después de la confirmación en la pantalla se visualiza el perfil corriente relativo al día elegido El horario empieza a parpadear Los pasos a seguir para la personalización son 1 selección del horario de inicio de la variación de temperatura 2 configuración del nuevo set point de temperatura 3 finalización de ...
Page 124: ... de 30 segundos se pasa automáticamente a la programación del día sucesivo Cuando termine la programación semanal presionar la tecla para volver al funcionamiento normal Para activar el programa seleccionar la modalidad de funcionamiento AUTO presionando la tecla hasta que aparezca en la pantalla la nota AUTO En modalidad de funcionamiento AUTO Económico Preconfort y Confort es posible forzar temp...
Page 125: ...deseada Con las teclas programar el número de las horas de activación de la función Party que se visualiza arriba a la izquierda en la pantalla Presionar la tecla o esperar 5 segundos para confirmar la programación Cuando la función está activa se pueden modificar el valor del set point presionando las teclas y el del periodo de activación mediante las teclas Durante el funcionamiento el recuento ...
Page 126: ...función Holiday que se visualiza arriba a la izquierda en la pantalla Presionar la tecla o esperar 5 segundos para confirmar la programación Cuando la función está activa se pueden modificar el valor del set point presionando las teclas y el del periodo de activación mediante las teclas Durante el funcionamiento el recuento de los días disminuye La función Holiday permanece activa hasta que pasa e...
Page 127: ...estivo Presionar la tecla o esperar 30 segundos para confirmar la programación Cuando la función es activa presionando la tecla se visualiza el día en el cual se ha copiado el perfil del día festivo en la pantalla la barra correspondiente parpadea Si se desea desactivar la función presionar nuevamente la tecla si se desea modificar el día de la semana utilizar las teclas y presionar la tecla o esp...
Page 128: ...ón del bus KNX EIB las demás programaciones se mantienen en memoria no volátil En presencia de la tensión bus el funcionamiento está garantizado también en ausencia de pilas Presionando contemporáneamente las teclas y se efectúa un reajuste completo del cronotermostato Atención todos los parámetros programados y los programas personalizados se anulan Cuando se vuelven a encender el cronotermostato...
Page 129: ...FACCIÓN Lunes Viernes Sábado Domingo PROGRAMA ACONDICIONAMIENTO Todos los días de la semana Estos programas preprogramados pueden modificarse y personalizarse según las propias exigencias Para modificar los parámetros preprogramados efectuar las indicaciones contenidas en el parágrafo Personalización programa diario Programas preprogramados E S P A Ñ O L ...
Page 130: ...a C Al caer la alimentación bus el dispositivo no cumple ninguna acción Hora y fecha están mantenidas por la alimentación tampón pilas mientras que todas las demás programaciones están conservadas en una memoria no volátil El dispositivo es completamente operativo dentro máximo 5 segundos desde el reajuste de la alimentación bus En ausencia de la alimentación tampón pilas al reajuste de la aliment...
Page 131: ...tapa frontal y desenchufar el cronotermostato de la base de soporte siguiendo la secuencia ilustrada en la figura Quitar la tapa de cierre del compartimento pilas y sustituir las agotadas con otras dos de 1 5 V tipo AAA respetando las polaridades indicadas 2 3 1 Sustitución pilas E S P A Ñ O L ...
Page 132: ...ver a actualizar fecha y hora Sustituir todas las pilas contemporáneamente No utilice pilas viejas y nuevas a la misma vez Utilizar pilas del mismo tipo no mezcle pilas alcalinas con pilas de cinc carbón No tire las pilas al fuego Las pilas son desechos especiales cuya eliminación está reglamentada por precisas disposiciones de ley y deben ser conferidas a los centros especiales de recogida Para l...
Page 133: ...do en recintos cerca de puertas o ventanas al lado de calefactores o acondicionadores y no debe ser golpeado por corrientes de aire y por la iluminación solar directa La base de soporte se coloca a una altura desde tierra de 160 cm aproximadamente y puede fijarse directamente a la pared con tacos o encima de una caja de 3 unidades ATENCIÓN Al fijar la base de soporte respete la dirección del monta...
Page 134: ... bus entre el cronotermostato EIB y el más lejano dispositivo KNX EIB a dirigir no debe superar los 700 metros 3 Para evitar señales y sobretensiones no deseadas si es posible no de vida a circuitos de anillo 4 Mantener una distancia de al menos 4 mm entre los cables individualmente aislados de la línea bus y los de la línea eléctrica 5 No dañe el conductor de continuidad eléctrica del blindaje Ad...
Page 135: ...moria tampón ver parágrafo Sustitución pilas 2 Conectar el cable rojo del cable bus a la borna roja del terminal y el cable negro a la borna negra Al terminal bus se pueden conectar hasta 4 líneas bus cables del mismo color en la misma borna 3 Aislar la pantalla el conductor de continuidad eléctrica y los cables blanco y amarillo del cable bus en el caso de que se utilice un cable bus de 4 conduct...
Page 136: ...pecíficos del dispositivo El sentido correcto de inserción está determinado por las guías de fijación Volver a enganchar el cronotermostato en la base de soporte siguiendo la secuencia ilustrada en la figura y fijarlo nuevamente con el tornillo suministrado 1 Finalización 2 3 ...
Page 137: ...de visualización temperatura 0 45 C Elementos de medida 1 sensor NTC resolución de medida 0 1 C exactitud de medida 0 5 C de 20 C intervalo entre medidas sucesivas 1 minuto Intervalos de regulación temperaturas TANTIHIELO 2 7 C TPROTECCIÓN ALTAS TEMPERATURAS 30 40 C Otros set point 5 40 C Ambiente de uso Interno lugares secos Temperatura de funcionamiento 5 45 C Temperatura de almacenaje 25 70 C H...
Page 138: ......
Page 139: ...ges Übersteuern der Temperatur 158 Funktion Party 159 Funktion Holiday 160 Kopie des Feiertagsprogramm 161 Anzeige Batterie entladen 162 Rückstellung und Wiederherstellung der Werkseinstellung 162 Voreingestellte Programme 163 Voreingestellte Parameter 164 Verhalten bei Ausfall und Wiederherstellung der Busversorgung 164 Batteriewechsel 165 Reinigung des Thermostattimers 166 INSTALLATIONSANWEISUNG...
Page 140: ...taubarmer Umgebung wo kein besonderer Schutz gegen Eindringen von Wasser erforderlich ist installiert werden Die GEWISS Verkaufsabteilung steht für weitergehende Erläuterungen und technische Informationen gerne zur Verfügung Gewiss S p A behält sich das Recht vor das in diesem Handbuch beschriebene Produkt jederzeit und ohne Vorankündigung zu ändern 1 St EIB Thermostattimer für Wandmontage 1 St Ha...
Page 141: ... mit 15 Minuten Schritten und beliebig vielen täglichen Änderungen erstellt werden Der Thermostattimer ermöglicht 2 Funktionsarten Heizung und Klimatisierung 5 Betriebsarten AUS Absenkung Prekomfort Komfort und Automatik 4 Solltemperaturen für die Heizung TABSENKUNG TPREKOMFORT TKOMFORT TFROSTSCHUTZ 4 Solltemperaturen für die Klimatisierung TABSENKUNG TPREKOMFORT TKOMFORT TÜBERTEMPERATURSCHUTZ Der...
Page 142: ...ung mit Übertragung der Betriebsart an die Slave Thermostate mit Übertragung des Sollwerts an die Slave Thermostate Szenen Speicherung und Aktivierung von 8 Szenen Wert 0 63 Andere Funktionen Einstellung des Sollwerts AUS ABSENKUNG PREKOMFORT KOMFORT über den Bus Einstellen der Funktionsart Heizung Klimatisierung über den Bus Einstellen des Tages und der Uhrzeit über den Bus Übertragen des Tages u...
Page 143: ...ALLGEMEINE BESCHREIBUNG 143 Position der hinteren Bedienelemente LED für Programmierung physikalische Adresse Taste für Programmierung physikalische Adresse D E U T S C H ...
Page 144: ...ermostattimer ist mit einem Display 3 immer zugänglichen Bedientasten und 7 bei öffener Klappe zugänglichen Bedientasten ausgestattet 14 15 16 17 19 18 13 10 9 8 7 1 6 5 4 3 2 11 28 27 26 20 25 24 23 22 21 12 Position der Bedienelemente ...
Page 145: ...ätigung Temperaturregelung Parameterauswahl DISPLAYANZEIGEN Betriebsart 146 Temperatureinheit 150 Gemessene Raumtemperatur Profil des Tagesprogramms 157 Aktivierung Klimatisierung 147 Aktivierung Heizung 147 Temperaturdifferenz 155 Uhr 150 Wochentag 150 Aktivierung Selbstlernfunktion 155 Temperatursollwert Betriebsart 151 Heizungsbetrieb 147 Status Parametereinstellung 148 Klimatisierungsbetrieb 1...
Page 146: ...e Raumtemperatur und das Symbol des Sollwerts der aktuellen Viertelstunde Im Stundenprofil blinkt die Spalte der aktuellen Uhrzeit mit der Darstellung des aktiven Sollwerts Der Thermostattimer verwendet bei den Betriebsarten Absenkung Prekomfort und Komfort ständig die entsprechenden Temperatursollwerte Auf dem Display erscheint die gemessene Raumtemperatur und das Symbol oder BEDEUTUNG VON Symbol...
Page 147: ...nd die gemessene Raumtemperatur Während des Betriebs wird das Einschalten der Heizung oder der Klimatisierung auf die folgende Weise angezeigt Heizung Das Symbol zeigt an dass der Einschaltbefehl vom Antrieb der Heizkesselsteuerung erfasst wurde Wenn über ETS die Verbraucherbenachrichtigungen aktiviert wurden und der Thermostattimer vom Antrieb nicht die Bestätigung der erfolgten Einschaltung erhä...
Page 148: ...nnzeichnet die Klimatisierung Zur Einstellung des Parameter des Thermostattimers 1 Mit der Taste die Funktionsart Heizung Klimatisierung auswählen 2 Ein Mal die Taste drücken Auf dem Display erscheint die Anzeige SET und die Uhr der Balken des Wochentags beginnt zu blinken Nun können je nach Funktionsart nacheinander folgende Punkte geändert werden Auswahl Heizung Klimatisierung Parametereinstellu...
Page 149: ...UTZ P05Heiz Regellogik P05Klima Regellogik Wenn Regellogik 2 Punkt Wenn Regellogik proportional Die Taste zum Durchblättern der Sequenz und Bestätigung der angezeigten Werte drücken bis der Parameter angezeigt wird der geändert werden soll Das Verlassen der Parametereinstellprozedur erfolgt durch erneutes Drücken der Taste oder automatisch 30 Sekunden nach dem letzten Tastendruck Zum Einstellen de...
Page 150: ...ellen Zur Bestätigung des eingestellten Werts die Taste innerhalb von 30 Sekunden drücken Einstellung der Minuten Wenn die Minutenziffern blinken diese mit den Tasten einstellen Zur Bestätigung des eingestellten Werts die Taste innerhalb von 30 Sekunden drücken Einstellung der Temperatureinheit Wenn das Symbol C oder F der Temperatur anfängt zu blinken kann die Temperatureinheit mit den Tasten gew...
Page 151: ...en Tasten einstellen Zur Bestätigung des eingestellten Werts die Taste innerhalb von 30 Sekunden drücken P02Heiz Einstellung Sollwert Heizung Bei der Anzeige des Symbols beginnt der Temperaturwert zu blinken Den Wert TPREKOMFORT mit den Tasten einstellen Zur Bestätigung des eingestellten Werts die Taste innerhalb von 30 Sekunden drücken P02Klima Einstellung Sollwert Klimatisierung Bei der Anzeige ...
Page 152: ...e innerhalb von 30 Sekunden drücken P04Heiz Einstellung Frostschutztemperaturwert Bei der Anzeige des Symbols beginnt der Temperaturwert zu blinken Den Wert der Frostschutztemperatur mit den Tasten einstellen Zur Bestätigung des eingestellten Werts die Taste innerhalb von 30 Sekunden drücken P04Klima Einstellung Übertemperaturschutzwert Bei der Anzeige des Symbols beginnt der Temperaturwert zu bli...
Page 153: ... Proportionalregelung zum Punkt P06 gehen 2 PUNKT REGELUNG Die Temperaturregelung wird deaktiviert wenn die Raumtemperatur dem Sollwert entspricht und wird wieder aktiviert wenn die Temperatur für die Heizung gleich oder kleiner dem Sollwert ist die Temperatur für die Klimatisierung gleich oder größer dem Sollwert ist Nachfolgende Grafiken zeigen die beiden Funktionsarten HEIZUNG KLIMATISIERUNG We...
Page 154: ...Werts die Taste innerhalb von 30 Sekunden drücken P07 Einstellung Differenzwert der Proportionalregelung Bei der Anzeige von P07 den Differenzwert der Regelung mit den Tasten einstellen Mögliche Werte Von 0 4 C bis 3 2 C mit Schritten von 0 4 C Für Heizung und Klimatisierung können unterschiedliche Regeldifferenzwerte eingestellt werden Zur Bestätigung des eingestellten Werts die Taste innerhalb v...
Page 155: ...ekunden drücken Die Selbstlernfunktion ermöglicht die Optimierung der vorzeitigen Einschaltung der Heizung max 2 Stunden Der Raumtemperaturregler steuert die vorzeitige Einschaltung automatisch um die eingestellte Temperatur zu Beginn jeder Periode des programmierten Zeitraums zu garantieren Diese Funktion aktiviert sich ausschließlich in der Betriebsart Automatik des Heizbetriebs Die folgenden Pa...
Page 156: ... Häufigkeit übermittelt Zur Bestätigung des eingestellten Werts die Taste innerhalb von 30 Sekunden drücken Wenn die Option 04 gewählt wurde zum Punkt P13 wechseln andernfalls zum Punkt P14 springen P13 Übermittlungszeitraum Tag und Uhrzeit Bei der Anzeige von P13 kann der Zeitraum für die Übermittlung von Datum und Uhrzeit eingestellt werden um diese Parameter bei den Slave Geräten usw abzugleich...
Page 157: ...Den gewünschten Tag mit den Tasten wählen Zur Bestätigung der Auswahl die Taste innerhalb von 30 Sekunden drücken Nach der Bestätigung des Tags wird auf dem Display das aktuelle Profil des gewählten Tags angezeigt Die Stunde beginnt zu blinken Nachfolgend die Schritte die für die Anpassung erforderlich sind 1 Auswahl des zeitlichen Beginns derTemperaturänderung 2 Einstellung des neuen Temperaturso...
Page 158: ...nnerhalb von 30 Sekunden gedrückt wird der Wechsel zur Programmierung des nächsten Tages erfolgt automatisch Am Ende der Wochenprogrammierung die Taste drücken um zum normalen Betrieb zurück zu kehren Zur Aktivierung des Programms die Betriebsart AUTO wählen indem die Taste gedrückt wird bis auf dem Display die Anzeige AUTO angezeigt wird In den Betriebsarten AUTO Absenkung Prekomfort und Komfort ...
Page 159: ...gewünschte Temperatur einstellen Mit den Tasten dann die Stundenanzahl der Aktivierung der Party Funktion einstellen die oben links im Display angezeigt wird Die Taste drücken oder 5 Sekunden warten um die Einstellung zu bestätigen Solange die Funktion aktiv ist kann der Temperatursollwert mit den Tasten und der Aktivierungszeitraum mit den Tasten verändert werden Während des Betriebs läuft die ei...
Page 160: ...iday Funktion einstellen die oben links im Display angezeigt wird Die Taste drücken oder 5 Sekunden warten um die Einstellung zu bestätigen Solange die Funktion aktiv ist kann der Temperatursollwert mit den Tasten und der Aktivierungszeitraum mit den Tasten verändert werden Während des Betriebs läuft die eingestellte Tagesanzahl rückwärts Die Funktion Holiday bleibt bis zum Ablauf des eingestellte...
Page 161: ...Die Taste drücken oder 30 Sekunden warten um die Einstellung zu bestätigen Solange die Funktion aktiv ist kann durch Drücken der Taste der Tag angezeigt werden auf den das Feiertagsprofil kopiert wurde der entsprechende Balken blinkt im Display Wenn die Funktion deaktiviert werden soll die Taste erneut drücken wenn der Wochentag geändert werden soll die Tasten verwenden und die Taste drücken oder ...
Page 162: ...lle anderen Einstellungen werden in nicht flüchtigen Speichern gesichert Bei anliegender Busspannung ist die Funktion auch bei fehlenden Batterien gewährleistet Für eine vollständige Rückstellung des Thermostattimers gleichzeitig die Tasten und drücken Achtung Alle eingestellten Parameter und angepasste Programme werden gelöscht Beim erneuten Einschalten verwendet der Thermostattimer die werksseit...
Page 163: ...RAMM Montag Freitag Samstag Sonntag KLIMATISIERUNGSPROGRAMM Alle Wochentage Diese voreingestellten Programme können entsprechend der persönlichen Anforderungen geändert und angepasst werden Für die Änderung der voreingestellten Programme wird auf die Anweisungen des Abschnitts Anpassung des Tagesprogramms verwiesen Voreingestellte Programme D E U T S C H ...
Page 164: ...usfall der Busversorgung führt das Gerät keinerlei Aktion aus Datum und Uhrzeit werden durch die Pufferbatterien gespeichert alle anderen Einstellungen werden in einem nicht flüchtigen Speicher gesichert Das Geräte ist max 5 Sekunden nach Wiederherstellung der Busversorgung wieder voll funktionsfähig Ohne Pufferbatterien wird der Thermostattimer bei Wiederherstellung der Busspannung im Modus AUS e...
Page 165: ...kel entfernen und den Thermostattimer gemäß folgender Abbildung vom Haltesockel entfernen Den Deckel des Batteriefachs entfernen und die entladenen Batterien durch zwei andere 1 5 V Batterien Typ AAA ersetzen dabei auf die Polung achten 2 3 1 Batteriewechsel D E U T S C H ...
Page 166: ...stellt werden Alle Batterien gleichzeitig austauschen Alte und neue Batterien dürfen nicht zusammen verwendet werden Nur gleichartige Batterien verwenden keine Alkali Batterien zusammen mit Zink Kohle Batterien verwenden Keine Batterien ins Feuer werfen Die Batterien sind Sondermüll ihre Entsorgung wird durch besondere gesetzliche Vorgaben geregelt sie müssen besonderen Entsorgungsstellen zugeführ...
Page 167: ...en Türen oder Fenster neben Heizkörpern oder Klimageräten montiert werden und er darf keinem direkten Luftzug oder direkter Sonnenbestrahlung ausgesetzt werden Der Haltesockel wird in einer Höhe von 160 cm über Fußbodenhöhe montiert und kann direkt mit Dübeln an die Wand oder auf ein UP Gehäuse 3 Module geschraubt werden ACHTUNG Bei der Befestigung des Haltesockels muss die mit dem Pfeil angegeben...
Page 168: ...er und dem am weitesten entfernt liegenden zu steuernden KNX EIB Gerät darf 700 Meter nicht überschreiten 3 Um unerwünschte Signale und Überspannungen zu vermeiden sind Ringkreise so weit wie möglich zu vermeiden 4 Es muss ein Mindestabstand von 4 mm zwischen den einzeln isolierten Kabeln der Buslinie und den Kabeln der Stromleitung eingehalten werden 5 Der elektrische Durchgangsleiter der Abschir...
Page 169: ...sel 2 Die rote Ader des Buskabels an die rote Klemme des Terminals und die schwarze Ader an die schwarze Klemme anschließen Es können bis zu 4 Buslinien an den Busterminal angeschlossen werden Adern der gleichen Farbe in die gleiche Klemme 3 Die Abschirmung den elektrische Durchgangsleiter und die verbleibenden weißen und gelben Adern des Buskabels falls ein Buskabel mit 4 Leitern verwendet wird d...
Page 170: ...kkontakte des Gerätes einsetzen Die korrekte Montagerichtung wird durch die Befestigungsführungen vorgegeben DenThermostattimer gemäß der in derAbbildung dargestellten Folge auf dem Haltesockel einrasten und mit der mitgelieferten Schraube befestigen 1 Vervollständigung 2 3 ...
Page 171: ...mmier LED für physikalische Adresse Bereich der Temperaturanzeige 0 45 C Messelemente 1 NTC Sensor Auflösung 0 1 C Messgenauigkeit 0 5 C bei 20 C Intervall zwischen zwei Messungen 1 Minute Temperaturregelbereich TFROSTSCHUTZ 2 7 C TÜBERTEMPERATURSCHUTz 30 40 C Andere Sollwerte 5 40 C Funktionsumgebung Innen trockene Standorte Betriebstemperatur 5 45 C Lagertemperatur 25 70 C Relative Luftfeuchtigk...
Page 172: ...a 2 della Direttiva Europea 2004 108 CE si informa che responsabile dell immissione del prodotto sul mercato Comunitario è According to article 9 paragraph 2 of the European Directive 2004 108 EC the responsible for placing the apparatus on the Community market is GEWISS S p A Via A Volta 1 24069 Cenate Sotto BG Italy Tel 39 035 946 111 Fax 39 035 945 270 E mail qualitymarks gewiss com ...