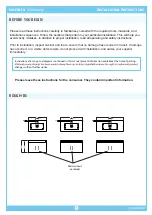
Englefield VALENCIA Slim Vanity Installation Instructions Download Page 2

BEFORE YOU BEGIN

ROUGH-IN

INSTALLATION INSTRUCTIONS

VALENCIA

TM


Slim Vanity

Please read these instructions carefully to familiarise yourself with the required tools, materials, and 

installation sequences. Follow the sections that pertain to your particular installation. This will help you 

avoid costly mistakes. In addition to proper installation, read all operating and safety instructions.

Prior to installation, inspect cabinet and top to ensure that no damage has occurred in transit. If damage 

has occurred, or a visible defect exists, do not proceed with installation, and advise your supplier 

immediately.

       Please leave these instructions for the consumer. They contain important information. 


Instructions, drawings, and diagrams contained in this manual present information available at the time of printing. 

changes without further notice.

ENGLEFIELD

2

Drain cut out 

centered

600

750

900

420

395

90

90

90

50

50

50

Summary of Contents for VALENCIA Slim Vanity

Page 1: ...S FURNITURE VALENCIATM Slim Vanity Contemporary design and quality construction providing affordable storage for bathrooms of any size or style It s the details that Englefield cares about from pioneering the latest technology to innovative design 1 ...

Page 2: ... operating and safety instructions Prior to installation inspect cabinet and top to ensure that no damage has occurred in transit If damage has occurred or a visible defect exists do not proceed with installation and advise your supplier immediately Please leave these instructions for the consumer They contain important information Instructions drawings and diagrams contained in this manual presen...

Page 3: ...rawer is now only held by the runner hooks at the back and can be pulled out in the direction shown CONSTRUCTION REQUIREMENTS INSTALLATION TOOLS AND MATERIALS REQUIRED Not Supplied INSTALLATION INSTRUCTIONS VALENCIATM Slim Vanity To suit pipework To suit screws TOOLS MATERIALS Not supplied must be purchased separately Fixing washers 20mm Head Screws 10g x 75mm Pan 3 Stud finder Locator pin Runner ...

Page 4: ...um height of 240mm between the bottom of the basin to the base of the trap 2 Water supply and waste pipe holes a Measure and mark the centres for water supply and waste pipes on the back of the cabinet 4 Vanity top a Unpack the top and check for any damage that might have occured in transit Check and confirm the fit of your selected tapware b Apply a continuous bead of silicone not supplied to the...

Page 5: ...ly to the taps and waste pipe to the waste outlet d Run hot and cold water and check for leaks When satisfied with the results move on to the next section ENGLEFIELD 5 Locator pin Runner hook 5 Waste and tapware CLEANING AND MAINTENANCE INSTRUCTIONS For cleaning instructions please refer to the Owner s Information Leaflet CONTACT AND WARRANTY INFORMATION Please visit our website for warranty and o...

Reviews: