Energy CCM CcMaster Instruction Manual Download Page 8

5. CONNECT AND LINK EXTERNAL "AUTHORIZED" DEVICES TO THE 

CCMASTER

The CcMaster is able to communicate not only with native 

CcM devices, but also with external devices that are autho-

rized by Energy CcM. Click here to consult the list of autho-

rised external devices.

It will be possible to connect external devices through the 

following communication ports:

- RS-485

: Using the external RS-485 port on the right side, 

and the green terminals supplied.

- TCP/IP

: Via WiFi or Ethernet, by connecting a network 

cable to the RJ-45 connector on the front.

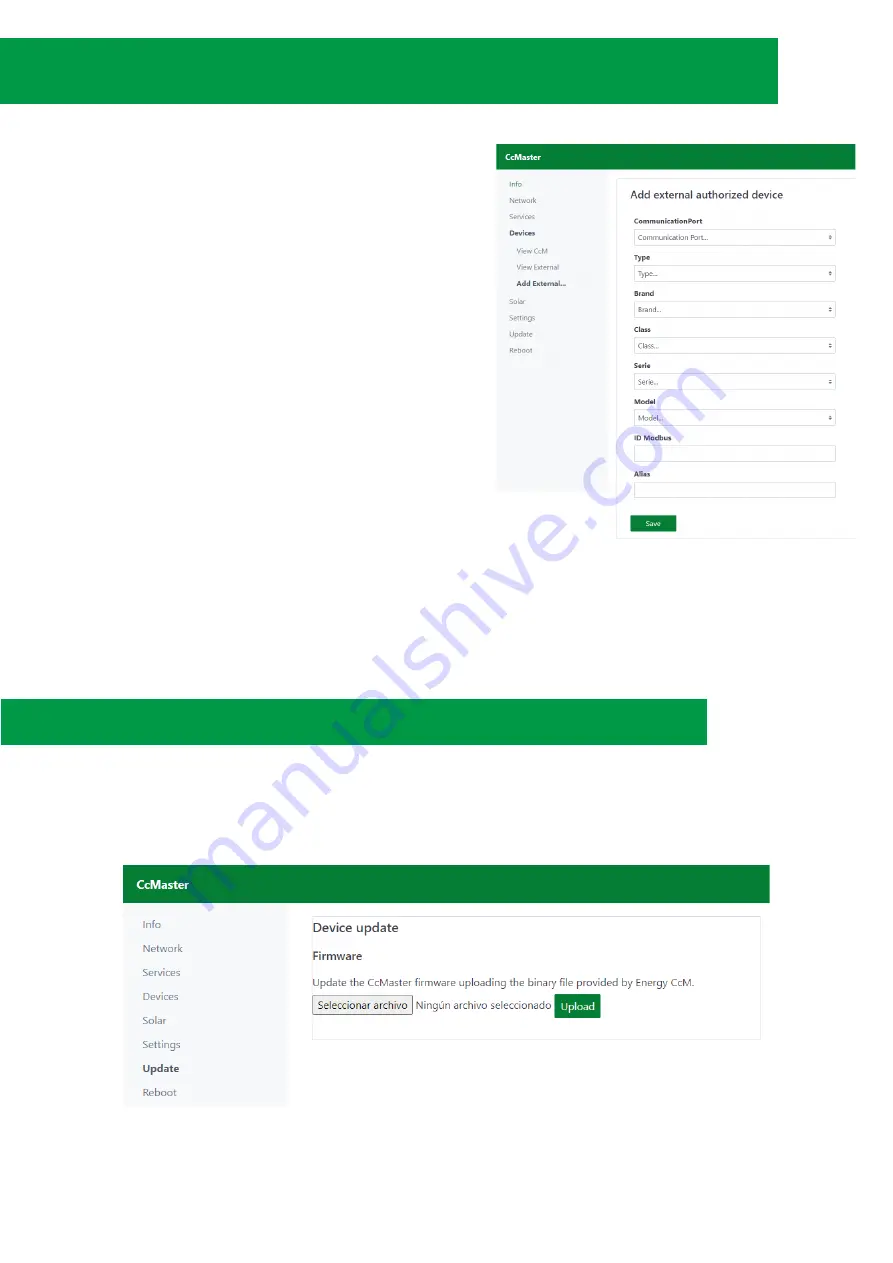
Once  physically  connected,  the  user  must  configure  the 

CcMaster through the web server, entering the sub-menu 

“Devices > Add External”.

The  device  in  question  shall  be  selected  by  filling  in  the 

form, from the list of authorised devices.

1. 

If the selected port is RS-485, the user shall indicate the 

provide Modbus ID.

2. 

If the selected port is TCP/IP, the user shall indicate the 

provide Modbus ID, as well as the IP and port.

Pressing the "Save" button will add the device and it will 

automatically appear in the “Devices -> View External” 

sub-menu.

6. FIRMWARE UPDATE

It is possible to update the firmware of the CcMaster locally, through the web server.

Select the sub-menu “Update” from the left side menu. A screen like the one below shall appear:

8

Summary of Contents for CcMaster

Page 1: ...MORE THAN METERING www energyccm com The intelligent multi device hub designed to provide up to six possible connectivity solutions INSTALLATION MANUAL 1 Module DIN rail...

Page 2: ...the bus that terminates in the ND connector see CcM1 C and CcM3 C manual NOTE 6 Up to 10 Principal CcM devices more may be connected via a CcM Wi device apart from the 32 Principal CcM devices connect...

Page 3: ...tions Each sub menu will be described separately below The Info submenu is displayed as the home screen The essential information to identify the CcMaster is displayed in this screen Through the Devic...

Page 4: ...he Ethernet output to avoid excessive consumption Pressing the Save button will save the con gu ration 3 1 VIA WIFI Con guration of the WiFi interface to upload data available on all CcMaster models B...

Page 5: ...parameters are APN Access Point Network user and password The Technology and Operator options are optional they speci cally de ne the connection and operator technology to be used by the CcMaster The...

Page 6: ...r all the Principal devices to be connected to the CcMaster Principal CcM devices have the Modbus ID 1 by default Therefore the Principal CcM device connected to the NDsp port and powering the CcMaste...

Page 7: ...nt of the CcMaster multi function button shall be pressed again for a few seconds until the blue LED stops ashing and returns to reading mode leaving the synchronization mode 5 When the process is nis...

Page 8: ...front Once physically connected the user must con gure the CcMaster through the web server entering the sub menu Devices Add External The device in question shall be selected by lling in the form from...

Page 9: ...The process may take several minutes please wait until the message Update rmware upload appears Once nished the user should reload the web server page and check in the Info submenu that the Firmware...

Reviews: