background image


Safety Instructions 


-


To protect the floor or carpet from damage, place a mat under the treadmill. 

-


Turn off the power whilst the treadmill is not in use and remove the safety key. 

-


In case of emergency please place both feet at the same time on the side reins. 

-


To activate an emergency stop, please detach the safety key from the console. 

-


Ensure that an area of 2000 x 1000 mm behind the treadmill is free from any obstacles. 

-


This product is made for home use only and tested up to a maximum body weight of 120 kilograms. 

-


We take no responsibility for personal injury or damage sustained by or through the use of this treadmill. 

-


The noise creation of treadmill is under 70 db. 

-


The unit requires a power supply of 220V – 230V / 50 HZ. 

-


The function of the immobilization method: the purpose of immobilizing the treadmill is to prevent 

unauthorized use. This can be accomplished by removing the safety key from the console, unclipping it 

from the cord and putting it in a non-accessible place. 

-


The emergency dismount: Follow the steps listed below if you experience pain, feel faint or need to stop 

your treadmill in an emergency situation: 

1.) Grip handrails for support. 

2.) Step onto the lateral platform. 

3.) Pull the Safety key off the console. 

-


The function of the emergency stop: The safety key functions as the emergency stop. In an emergency 

situation, remove the safety key from the console and the treadmill will come to a stop. 

-


Noise compliance: This treadmill meets the requirements of the noise pollution standards. 

-


Search for noisy parts: If you should notice unusual noises, like grinding, clacking etc. try to locate it and 

have it repaired by a professional. Make sure the treadmill is not used until after repairs have been 
made. 


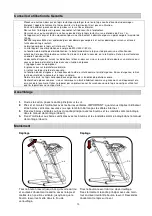
1. 

Open the carton, put the main frame on the ground. 

2. 

Fold and move up the computer together with the uprights. IMPORTANT: When you upfoald the 

computer and the uprights, make sure the metal does not damage the inside wires!  

3. 

Fix the uprights to the lower main frame with the bolts and washers as indicated in the set up (drawing) 

manual. 

4. 

Fix the computer to the uprights with the bolts and washers as indicated in the set up (drawing) manual 


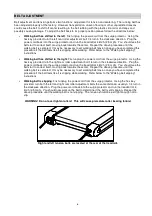
Upfolding 


Pull the Spring Knob until it unlocks the hole, and 

gently lift the frame. Lift up the running deck and 

move it into an upright position, until the Spring 

Knob moves into the locking hole. 

Unfolding 


Pull out the spring knob from the locking hole. 

Tightly fix the main frame with one hand while 

unlocking the spring knob. Gently lower the 

running deck to the ground. 

Assembly 

Handling  

Summary of Contents for POWER RUN 2.7

Page 1: ...POWER RUN 2 7 GB FR ES SI CS BA RO...

Page 2: ...CS no se hace responsable de los errores que se produzcan debido a la traducci n o cambio de las especificaciones t cnicas del producto SI Ta navodila so samo za kupca ENERGETICS ne more garantirati z...

Page 3: ...d inspection of the home exerciser Always start with a warm up session Only use original ENERGETICS parts as delivered see checklist Follow the steps of the assembly instruction carefully Only use sui...

Page 4: ...teral platform 3 Pull the Safety key off the console The function of the emergency stop The safety key functions as the emergency stop In an emergency situation remove the safety key from the console...

Page 5: ...he instructions below Please use a non pertroleum based silicone To apply luburicant to the walking belt 1 Position the walking belt so that the seam is located on top and in center of the walking boa...

Page 6: ...g belt has shifted to the right First unplug the power cord from the surge protector Using the hex key provided turn the right rear roller adjustment bolt 1 4 turn in the clockwise direction Plug the...

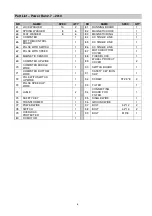
Page 7: ...3 PULLING PIN 1 43 SCREW ST4 2 16 2 14 PULLING PIN SPRING 1 44 BOLT M8 40 L20 6 15 PULLING PIN COVER 1 45 BOLT M8 50 L20 2 16 MOTOR TOP COVER 1 46 BOLT M10 55 2 17 BOTTOM BOARD 1 47 BOLT M6 45 1 18 CO...

Page 8: ...68 MAGNETIC SENSOR 1 88 FIXED BLOCK 1 69 COMPUTER UP WIRE 1 89 WHEEL PROTECT COVER 2 70 COMPUTER MIDDLE WIRE 1 90 SWITCH BOARD 1 71 COMPUTER BOTTOM WIRE 1 91 SAFETY KEY IRON SLIP 1 72 PULE WITH SWITCH...

Page 9: ...ntenues dans la livraison Voir la liste de contr le Proc dez au montage de l appareil d apr s les instructions de montage N utilisez que des outils appropri s de montage et faites vous le cas ch ant a...

Page 10: ...acez vous sur la plateforme lat rale 3 retirez la cl de s ret de la console La fonction d arr t d urgence les fonctions de la cl de s ret comme l arr t d urgence En cas d urgence retirez la cl de s re...

Page 11: ...ion suppl mentaire Si vous sentez une s cheresse suivez les instructions ci dessous Veuillez utiliser de la silicone sans p trole Application du lubrifiant sur le tapis 1 Positionnez le tapis de fa on...

Page 12: ...oulant glisse Le tapis roulant se d place sur la droite D branchez d abord la prise lectrique A l aide de la cl fournie tournez le bouton de r glage droit d un quart de tour dans le sens des aiguilles...

Page 13: ...VILLE 1 43 VIS ST4 2 16 2 14 RESSORT CHEVILLE 1 44 BOULON M8 40 L20 6 15 COUVERCLE CHEVILLE 1 45 BOULON M8 50 L20 2 16 COUVERCLE MOTEUR 1 46 BOULON M10 55 2 17 PLATEAU DU BAS 1 47 BOULON M6 45 1 18 CO...

Page 14: ...UR MAGNETIQUE 1 88 BLOC FIXE 1 69 CABLE ORDINATEUR HAUT 1 89 COUVERCLE ROUE 2 70 CABLE ORDINATEUR MILIEU 1 90 PANNEAU DE COMMUTATEUR 1 71 CABLE ORDINATEUR BAS 1 91 FICHE METAL CLE DE SURETE 1 72 POULS...

Page 15: ...ecklist Siga cuidadosamente las instrucciones de uso Para armarlo utilize s lo herramientas adecuadas y preg nte por asistencia si fuera necesario Coloque el ejercitador en una superficie no resbaladi...

Page 16: ...andolo y guardandolo en un lugar inaccesible La bajada de emergencia Siga los siguientes pasos si siente dolor d bil o necesita parar la cinta de correr en una situaci n de emergencia 1 Agarre los sop...

Page 17: ...rior de la cinta Aspire debajo de la cinta una vez a la semana Lubricaci n de la plataforma La cinta andadora ha sido lubricada en la f brica Sin embargo es recomendable que compruebe peri dicamente l...

Page 18: ...dar la cinta de correr a 4 km h 2 5 mph Usted deber ver que la cinta se arregla por s misma movi ndose hacia el centro Repita el procedimiento anterior hasta que la cinta sea centrada Si usted siente...

Page 19: ...2 14 MUELLE 1 44 TORNILLO M8 40 L20 6 15 POMO DEL PIN 1 45 TORNILLO M8 50 L20 2 16 CARCASA SUPERIOR 1 46 TORNILLO M10 55 2 17 CARCASA INFERIOR 1 47 TORNILLO M6 45 1 18 CARCASA SUPERIOR DEL MONITOR 1...

Page 20: ...ACI N 1 69 CABLE SUPERIOR DEL MONITOR 1 89 PROTECTOR DE LA RUEDA 2 70 CABLE CENTRAL DEL MONITOR 1 90 PLACA DE INTERRUPTOR 1 71 CABLE INFERIOR DEL MONITOR 1 91 ACTUADOR LLAVE DE EMERGENCIA 1 72 CABLE P...

Page 21: ...vsa navodila faze sestavljanja Pri sestavljanju uporabljajte le primerno orodje in e je potrebno prosite za pomo pri sestavi Napravo za doma o uporabo namestite na ravno in nedrse o podlago Na ta na i...

Page 22: ...pravilnosti v delovanju naprave sledite spodaj opisanim korakom 1 oprimite se ro k za podporo 2 stopite na stransko plo o 3 povlecite varnostni klju iz konzole Funkcija urgentne zaustavitve naprave va...

Page 23: ...go ki s asoma pronica pod napravo Enkrat tedensko o istite tudi povr ino pod napravo PODMAZANJE TEKA A Teka je bil podmazan e predhodno v tovarni Seveda vam priporo amo da ob asno preverite podmazanos...

Page 24: ...rovalo in trak naj te e s hitrostjo 4km h Sedaj bi morali videti da se trak sam poravnava v sredino Zgornji postopek nadaljujte vse dokler pohodni trak ne bo isto v sredini Lahko se zgodi da boste mor...

Page 25: ...2 14 Vzmetna zaponka na izvlek 1 44 Vijak za matico M8 40 L20 6 15 Pokrov ek zaponke na izvlek 1 45 Vijak za matico M8 50 L20 2 16 Zgornji pokrov motorja 1 46 Vijak za matico M10 55 2 17 Spodnja plo...

Page 26: ...88 Plo a za fiksiranje 1 69 Zgornja i ka ra unalnika 1 89 Za itni pokrov koles 2 70 Srednja i ka ra unalnika 1 90 Plo a s stikali 1 71 Spodnja i ka ra unalnika 1 91 elezni listi varnostnega klju a 1...

Page 27: ...ENERGETICS delove koji su Vam dostavljeni sa spravom videti listu delova Sledite pa ljivo uputstva za sastavljanje Koristite samo prigodan alat za sastavljanje i potra ite stru nu pomo ako je neophodn...

Page 28: ...iz bilo kog hitnog razloga morate da zaustavite pokretnu traku pratite dole navedene korake 1 Uhvatite se za dr ke sa strane kao potporu 2 Stanite na bo nu ivicu trena era 3 Izvucite sigurnosi klju iz...

Page 29: ...era Podmazivanje pokretne trake Traka je ve fabri ki podmazana Ipak preporu ujemo da redovno proveravate da li je traka dovoljno podmazana i tako osigurate optimalan rad trena era Pokretnoj traci nij...

Page 30: ...nje etvrt okretaja u smeru kazaljke na satu Utaknite trena er u struju i pustite traku da ide na brzini od oko 4 km h 2 5mph Traka e se sama ispraviti i centrirati Ponavljajte ovaj postupak sve dok tr...

Page 31: ...N 1 43 Vijak ST4 2 16 2 14 PULLING PIN SPRING 1 44 Vijak M8 40 L20 6 15 PULLING PIN COVER 1 45 Vijak M8 50 L20 2 16 Gornja oplata motora 1 46 Vijak M10 55 2 17 Donja daska 1 47 Vijak M6 45 1 18 Gornji...

Page 32: ...tni sensor 1 88 Fiksirani blok 1 69 Gornja ica ra unara 1 89 Za titni poklopac na to kovima 2 70 Srednja ica ra unara 1 90 Panel sa prekida ima 1 71 Donja ica ra unara 1 91 Prorez za sigurnosni klju i...

Page 33: ...e ure aja po tujte uputstvo za monta u Prilikom monta e koristite samo prikladni alat te po potrebi potra ite pomo druge osobe Ure aj postavite na ravnu podlogu otpornu na klizanje radi osiguranja vr...

Page 34: ...e upute U slu aju da se u toku tr anja pojave bolovi osje aj slabine ili ako biste u nu nom slu aju traku hitno morali zaustaviti 1 Dr ite se vrsto za oslonce sa strane 2 Stanite na za titnu oblogu sa...

Page 35: ...obu e mo e u i u traku Ispod trake usisavajte jednom tjedno Podmazivanje plo e Pokretna traka je podmazana tvorni ki Naime preporu uje se redovna kontrola podmazivanja trake radi osiguranja optimalne...

Page 36: ...i nice Iza toga pomo u esterokutnog klju a lijevi vijak za pode avanje okrenite za 90 u pravcu kazaljke na satu Napravu opet uklju ite u zidnu uti nicu i pustite traku na brzinu od 4 km h 2 5 mil h Po...

Page 37: ...R 5 5mm 1 42 VIJAK M8 25 L15 4 13 KLIN ZA IZVLA ENJE 1 43 VIJAK ST4 2 16 2 14 OPRUGA KLINA 1 44 VIJAK M8 40 L20 6 15 KAPICA KLINA 1 45 VIJAK M8 50 L20 2 16 GORNJI POKROV MOTORA 1 46 VIJAK M10 55 2 17...

Page 38: ...POKRVO MOTORA 1 68 MAGNETSKI SENZOR 1 88 VRSTI BLOK 1 69 GORNJI KABAO RA UNALA 1 89 ZA TITNI POKROV KOTA A 2 70 SREDNJI KABAO RA UNALA 1 90 RAZVODNIK 1 71 DONJI KABAO RA UNALA 1 91 LETVA SIGURNOSNOG...

Page 39: ...are Check List n timpul opera iei de montare a aparatului respecta i exact instruc iunile de montaj Pentru montaj utiliza i doar scule potrivite i eventual cere i ajutorul unei alte persoane A eza i a...

Page 40: ...rii apar dureri impresia de sl biciune sau dac ar trebui s opri i urgent banda de alergare 1 ine i v ferm de suporturile laterale 2 Sta i cu picioarele pe platforma lateral 3 Scoate i cheia de sigura...

Page 41: ...n fiecare s pt m n aspira i praful de sub band Ungerea pl cii Banda de alergare a aparatului a fost uns n fabrica de produc ie Recomand m a se controla periodic dac placa aparatului este uns pentru a...

Page 42: ...ndreapt i se va centra singur Repeta i procedeul acesta p n c nd banda de alergare va fi centrat Dup efectuarea acestui procedeu poate s fie necesar reglarea tensiunii n cazul n care banda de alergare...

Page 43: ...8 16 10 12 CHEIE IMBUS NR 5 5mm 1 42 URUB M8 25 L15 4 13 BOL AMOVIBIL 1 43 URUB ST4 2 16 2 14 ARC BOL 1 44 URUB M8 40 L20 6 15 C P CEL BOL 1 45 URUB M8 50 L20 2 16 CAPAC MOTOR SUPERIOR 1 46 URUB M10 5...

Page 44: ...TEZEI 1 87 CAPAC MOTOR INFERIOR 1 68 SENZOR MAGNETIC 1 88 BLOC FIX 1 69 CABLU COMPUTER SUPERIOR 1 89 AP R TOARE RO I 2 70 CABLU COMPUTER MIJLOCIU 1 90 DISTRIBUITOR 1 71 CABLU COMPUTER INFERIOR 1 91 IP...

Page 45: ...Woelflistrasse 2 CH 3006 Bern Switzerland Copyright ENERGETICS 2010...

Reviews: