background image

5

Version 2.1

English

that could impair your vision, physical strength, dexterity, 

judgment, or other mental capacity.

10. No modifications and/or alterations may be made to this 

sprayer. Any such modifications not only void the sprayer 

Discover More Helpful Tips:


blog.enduraplas.com/spraying

Watch Instruction Videos:


www.youtube.com/enduraplas

1.  Wear tightly fitted clothing while connecting and 

disconnecting your sprayer.

2.  Check to make sure all PTO shields and guards are in 

place when you are spraying.

3.  Disengage the PTO, shut off the tractor, and remove the 

keys before connecting or disconnecting your PTO pump.

4.  Do not reach over the back of the tractor to adjust the 

PTO or throttle.

5.  Never step over a revolving PTO shaft even if shielded.

PTO WARNINGS

!

Summary of Contents for LAND CHAMP SLC050FG8GR

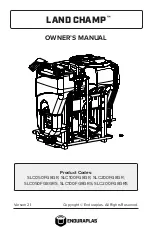
Page 1: ...LAND CHAMP OWNER S MANUAL Version 2 1 Copyright Enduraplas All Rights Reserved Product Codes SLC050FG8GR SLC100FG8GR SLC200FG8GR SLC050FG8GRS SLC100FG8GRS SLC200FG8GRS SLC100FG8GR SLC200FG8GR ...

Page 2: ... Land Champ English CONTENTS INTRODUCTION 3 WARNINGS 4 5 GETTING STARTED 6 21 CALIBRATING 22 23 MAINTAINING 24 25 CLEANING 26 27 WINTERIZING 28 TROUBLESHOOTING 29 30 WARRANTY 31 35 PARTS BREAKDOWNS 36 51 ...

Page 3: ...me of extreme performance No sprayer is tougher No sprayer will last lon ger Take a look through this owner s manual to learn how the pros use their Enduraplas sprayer Discover More Helpful Tips blog enduraplas com spraying Watch Instruction Videos www youtube com enduraplas Order Genuine Enduraplas Parts Accessories parts enduraplas com ...

Page 4: ...mage adjacent non target vegetation It is recommended that a speed of 6mph is not exceeded 5 Once the spraying operation has been completed decontaminate the spray tank and spray accessories Dispose of tank rinsing s in compliance with current environmental work place health and safety regulations 6 Personal Protection Equipment must still be worn while decontaminating your sprayer as per warning ...

Page 5: ... spraying Watch Instruction Videos www youtube com enduraplas 1 Wear tightly fitted clothing while connecting and disconnecting your sprayer 2 Check to make sure all PTO shields and guards are in place when you are spraying 3 Disengage the PTO shut off the tractor and remove the keys before connecting or disconnecting your PTO pump 4 Do not reach over the back of the tractor to adjust the PTO or t...

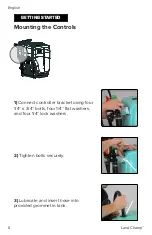
Page 6: ... Connect controller bracket using four 1 4 x 3 4 bolts four 1 4 flat washers and four 1 4 lock washers 2 Tighten bolts securely 3 Lubricate and insert hose into provided grommet in tank Mounting the Controls GETTING STARTED ...

Page 7: ...kets to the tank using two 3 8 x 3 4 bolts two 3 8 flat washers and two 3 8 lock washers 2 Bolt hose clips onto brackets with two pan head screws and nuts 3 Wrap hose around and insert gun into clips Mounting the Hose Gun Clips GETTING STARTED ...

Page 8: ...wo lower hitch arms to the mounting point pins on the sprayer then secure with lock pin 3 Insert Pin to Top Link Hook up top three point arm on tractor to the third top mounting point on the sprayer and insert the lock pin 4 Connect Pump Align and connect the pump to the PTO shaft and hook on the torque chain to keep the pump from turning along with the PTO shaft Hitching to a Tractor GETTING STAR...

Page 9: ... the tractors hydraulics lift your sprayer off the ground to insure it is secured properly Discover More Helpful Tips blog enduraplas com spraying Watch Instruction Videos www youtube com enduraplas Hitching to a Tractor GETTING STARTED ...

Page 10: ...ll 3 8 washer and 3 8 lock nuts loosely Mounting Your Boom 3 To install your boom to the brackets loosen the carriage bolts on the boom leaving nuts and washers on bolts Align carriage bolts with quick attach brackets and slide them into the brack et slots then lower the boom down to desired height 4 When the boom is set to desired height tighten the hardware making sure the square neck on the car...

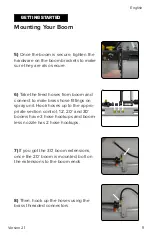
Page 11: ...to male brass hose fittings on spray unit Hook hoses up to the appro priate section control 12 20 and 30 booms have 3 hose hookups and boom less nozzle has 2 hose hookups Mounting Your Boom 7 If you got the 30 boom extensions once the 20 boom is mounted bolt on the extensions to the boom ends 8 Then hook up the hoses using the brass threaded connectors GETTING STARTED ...

Page 12: ...ded bolts 10 Hook up hoses from boomless noz zle to brass ports on back of sprayer Mounting Your Boomless Nozzle GETTING STARTED Please refer to the spray boom owner s manual for boom assembly and parts breakdown Discover More Helpful Tips blog enduraplas com spraying Watch Instruction Videos www youtube com enduraplas GETTING STARTED ...

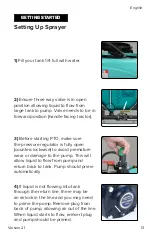
Page 13: ...rn line there may be an airlock in the line and you may need to prime the pump Remove plug from back of pump allowing air out of the line When liquid starts to flow reinsert plug and pump should be primed Setting Up Sprayer 3 Before starting PTO make sure the pressure regulator is fully open counterclockwise to avoid premature wear or damage to the pump This will allow liquid to flow from pump and...

Page 14: ... This will lessen the liquid flow from the tank and redirect to the spray boom 6 Once you have set your desired pres sure test the spray boom by turning on Right Center and Left section controls When controls are in the up position the sprayer boom should be engaged 7 When using the hose wrap make sure the valve to the hose wrap is open GETTING STARTED ...

Page 15: ...r 3 8 x 3 4 bolts with 3 8 flat washers and lock washers through hose reel into inserts in tank Secure tightly 3 Run 3 8 hose from the hose reel to the black handled valve coming out of the top of the three way valve bank connect and tighten clamp Optional Hose Reel GETTING STARTED ...

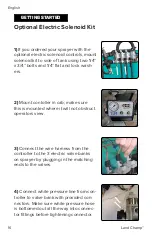
Page 16: ...yer by plugging in the matching ends to the valves 4 Connect white pressure line from con troller to valve bank with provided con nectors Make sure white pressure hose is bottomed out all the way into connec tor fittings before tightening connector 1 If you ordered your sprayer with the optional electric solenoid controls mount solenoid kit to side of tank using two 1 4 x 3 4 bolts and 1 4 flat an...

Page 17: ...d connect to battery red to positive and black to negative 6 Turn on vehicle key to power up controller and turn on master switch on controller Optional Electric Solenoid Kit 8 Fill tank 1 4 full with water 7 To make sure your solenoids have power switch the 3 valve controls on and off listening for the valves to click open and shut on the sprayer GETTING STARTED ...

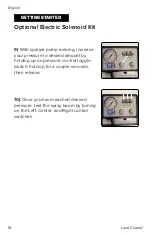
Page 18: ... spray boom by turning on the Left Center and Right control switches 9 With sprayer pump running increase your pressure to desired amount by holding up on pressure control toggle switch hold up for a couple seconds then release Optional Electric Solenoid Kit GETTING STARTED ...

Page 19: ... hand wash tank by sliding tank into cradle brackets and inserting the clip mounts through the tank When the tank is in position flip the clip lock to secure 4 Wrap threads on spigot with sealant tape and thread spigot into tank 1 Insert hand wash clip bolts into the holes on the brackets and tighten bolts GETTING STARTED ...

Page 20: ...nd into the first bracket that was loosely connected 4 Slide the second bracket onto the other end of the stand and mount it to the sprayer frame Then tighten all bolts Repeat on the other side of the frame to complete stand 1 Loosely connect the first stand bracket to the sprayer stand with two bolts GETTING STARTED ...

Page 21: ...on valve 2 Adjust pressure to 40 PSI 3 Switch valve to pull from the flush tank 4 Run for 5 seconds or until line is discharging clean water back into tank 5 Open all valves to purge booms and hand wand Depress wand handle to spray until purged 6 Disengage PTO Steps to Flush Your Sprayer System CXLT0021 Note Disengage PTO as soon as your system has been flushed This will conserve your fresh water ...

Page 22: ...e distance with flags or between fence posts A tape measure capable of measuring farther than 200 ft will make this step easier 3 Drive Measured Distance Timed Driving the sprayer at the intended spraying speed time how long it takes to travel between the marked distance Repeat this procedure and average the two measurements 4 Set Correct Spraying Pressure With the sprayer parked and the pump runn...

Page 23: ... nozzle equals the gallons per acre application rate eg 16 ounces 16 gallons per acre 6 Clean Nozzles If Needed If any one nozzle s output deviates from the manufacturers guidelines by more than 10 the nozzle should be replaced or cleaned A toothbrush works perfect 8 Compare Recommended Rate If the gallons per acre rate is not within 5 of the intended rate you will have to adjust the pressure you ...

Page 24: ...ou length en the life of the sprayer Everyone knows that when you look after something it lasts longer Sprayer maintenance can seem a huge task if you don t have the right tools Discover More Helpful Tips blog enduraplas com spraying Watch Instruction Videos www youtube com enduraplas ...

Page 25: ...r daily Weekly or every 40 operating hours After the first 5 operating hours Every 250 operating hours o once a year If damaged If required Complete machine Visual inspection condition leaks X Clean X Tank hoses and fittings Clean X Drain X Filter basket inside lid Clean X X In line filter Clean X X Spray lance nozzle Clean X Replace X All accessible screws and nuts Re tighten X Safety labels Repl...

Page 26: ...n area that will not contaminate water supplies streams or crops 2 Pressure Wash Inside Tank After draining the tank rinse the inside by spraying clean water with a pressure washer 3 Add Clean Water It s now time to shut the pump off and fill the tank with clean water 4 Flush Clean Water Through System Turn the pump on and spray the clean water through the boom and hand wand ...

Page 27: ...r tank let it sit for about eight hours This will allow the solution to remove any herbicide from the residues inside the tank 7 Clean Nozzles Screens and Filters It s now time to rinse all nozzles screens and filters To clean thoroughly put them in a bucket of cleaning agent and water 8 Rinse Entire System with Water When all nozzles etc are back in place give the entire system a complete rinse t...

Page 28: ... air blow out the hose lines to remove all water from the sys tem 3 Flush with Anti freeze Pour a small amount of anti freeze into the tank and run the pump until there is no more of this colored liquid coming through the spray ends 4 Store Sprayer Inside Turn off the sprayer ends so the remain ing anti freeze does not leak out If you have a boom attachment that hangs low er than the sprayer we wo...

Page 29: ...ine is not kinked 4 Lock filter cap into position 5 Replace filter gas ket 6 Take small plug out of back of pump allowing air to blead out of system when liquid begins to flow reinsert plug Refer to step 4 on pg 13 Pressure drops fluctuates during standard operation 1 Restriction on suc tion line 2 Pump sucking air 3 Plugged filter 4 Damaged regulator 1 Inspect tank and suction lines and remove re...

Page 30: ... youtube com enduraplas CONDITION CAUSE REMEDY Hand gun loses pressure 1 Debris in hose or nozzle 2 Pump losing prime 3 Pump pressure dropping fluctuating 1 Unthread nozzle tip and clean 2 See Remedy for Pump will not prime or loses prime 3 See Remedy for Pressure drops fluctuates during standard operation ...

Page 31: ...t to other terms in this Limited Warranty Manufacturer warrants to the original end user that products and parts manufactured by Manufacturer other than tanks will be free from material defects caused during the manufacturing process for a period of 1 year from the Purchase Date unless otherwise expressly stated in writing by Manufacturer that an extended warranty applies 2 Other Warranties Discla...

Page 32: ...r than Manufacturer b the improper installation of the Goods or deterioration of the base on which any of the Goods rest or are mounted to c any damage to the Goods caused by storm wash away landslide mudslide lightning or any other natural phenomenon vermin or other pests and any undermining of the base of the Tank through any cause whatsoever d the repositioning of the Goods from their original ...

Page 33: ...e a vented lid at the time of manufacture Any subsequent pressurization of the Tank by removing the vent sealing the vent or otherwise will cause this Limited Warranty as to such Tank to be null and void d The liability of Manufacturer under this Limited Warranty is limited to at Manufacturer s discretion e providing a replacement Good including shipping but excluding other replacement costs f ref...

Page 34: ...r of the Limited Warranty e Good s mean Tanks and or other products or parts manufactured by Enduraplas LLC f Limited Warranty means this written Limited Warranty 7 State Law Some states do not allow the exclusion or limitation of incidental or consequential damages so the above limitation and exclusion may not apply to certain parties Some states do not allow limitation on how long an implied war...

Page 35: ...35 Version 2 1 English REGISTERING WARRANTY Serial Number Location How to Activate To double your 5 year tank warranty visit enduraplaswarranty com and register this product ...

Page 36: ...36 Land Champ English SLC050FG8GR ...

Page 37: ...1 23 34 36 33 30 32 61 22 63 56 55 60 29 1 20 19 6 28 39 27 39 64 65 5 26 17 24 31 View B 70 70 71 71 71 45 66 69 Detail View CPA0015 78 67 79 To Enable Flow Ensure Cap Lock Is Pushed In And Turned To The Locked Position Filter Screen Part CA3182003030 83 82 View A ...

Page 38: ...38 Land Champ English DETAIL VIEW A 7 72 18 12 8 10 15 11 16 40 38 74 14 73 37 48 11 10 12 11 12 7 18 9 9 76 43 71 49 72 View A 56 54 57 4 55 4 55 62 58 View B 77 13 72 46 47 55 ...

Page 39: ...39 Version 2 1 English DETAIL VIEW B 7 12 8 10 38 74 73 11 10 9 43 71 49 72 56 54 62 57 67 68 4 3 55 55 4 55 62 59 58 View B 25 80 81 69 55 84 ...

Page 40: ...9 CV3EL12HB 1 2 X 1 2 hose barb 90 degree 2 20 CPFG10 5 8 Top hat grommet 2 21 CLUVGC02502 Site gauge hose 1 22 AZKF0012 hose wrap for 3pt sprayers 2 23 CLUVGC02502 Site gauge hose 1 24 CPSB01 10MM Site Glass Ball Level Indicator 2 25 CFBU02C Brass Cap GH 3 26 CPPDR001 Torque Bar and Chain Assembly 1 27 APD19G006R 6 Roller CI pump 1 28 CPPDR002 Coupler 1 375 x 625 PTO Adaptor 1 29 CVGC100 Wand Cli...

Page 41: ...SS LOCKNUT 2 62 CHNZN0325 3 8 Nylock Nut 12 63 CHBZ030425 3 8 x 3 4 bolt 2 64 CHBZ010325 1 4 X 3 4 Bolt 4 65 CHWZF015 1 4 Flat Washer 4 66 CHWZL015 1 4 Lock Washer 4 67 CHWZL025 5 16 Lock Washer 5 68 CHBZ8014088125 8 x 1 25 x 20MM Hex Head Bolt 3 69 CFCC002 CLAMP FOR 3 8 HOSE 8 70 CFCC003 Clamp for 1 2 Hose 6 71 CFCW001 Clamp For 3 4 Hose 9 72 CFCW003 Clamp For 1 Hose 8 73 CXSC0002 Cable Tie 8 5 7...

Page 42: ...3 6 CA10012 Large Fork Pin 1 7 CA10002 Small Fork Pin 5 8 CA463000040 1 inch Male BSP adapter 1 9 CA463080A19 3 4 Hose barb for valve 463 1 10 CA463911100 Mounting Bracket 2 11 CA2002040 Fly Nut 1 inch 1 12 3 Pt Bolt Bolt for Pro Valve Bank 4 13 3 Pt Lock Nut Lock Nut on Pro Valve Bank 4 14 3 Pt washer Washer on Pro Valve Bank 4 15 CAG10041 Gasket 20mm hosetail 1 16 CA116420 Hosetail D 3 4 90 for ...

Page 43: ... TAPERED HANDLE 1 6 CFRB07 STAINLESS PIPE 3 8 THREAD BOTH ENDS 1 7 CVSW038 3 8 FPT X 3 8 MPT SWIVEL 1 8 CFPS01M01B 3 8 MPT x 3 8 Hose Barb Straight 1 9 CFRB06 1 4 3 8 BSP FEMALE ELBOW 1 10 CFRB08 3 8 X 1 4 BALL BEARING SWIVEL 1 11 CFRB05 1 4 MALE THREAD X 3 8 HOSE BARB 2 12 CFCC002 CLAMP FOR 3 8 HOSE 4 13 CHWZF105 1 SAE Flat Washer 1 14 CHBZ030425 3 8 x 3 4 bolt 4 15 CHNZN0325 3 8 Nylock Nut 4 16 ...

Page 44: ...44 Land Champ English ELECTRIC SOLENOID KIT SLC100FG8GR ES SLC200FG8GR ES ...

Page 45: ... 34 53 13 35 83 79 81 72 48 51 49 5 82 38 37 9 View B View C 58 61 8 7 View A 74 44 47 43 84 85 34 73 50 51 78 52 50 33 To Enable Flow Ensure Cap Lock Is Pushed In And Turned To The Locked Position Filter Screen Part CA3182003030 89 91 OVERVIEW ...

Page 46: ...46 Land Champ English 75 6 36 68 67 66 39 17 32 30 26 16 76 51 29 51 27 28 53 28 51 DETAIL A DETAIL VIEW A ...

Page 47: ...47 Version 2 1 English 15 25 24 23 21 14 22 71 65 18 29 15 31 28 22 24 23 25 15 27 11 12 10 28 20 63 65 64 51 77 86 51 80 24 19 87 88 DETAIL B DETAIL VIEW B ...

Page 48: ...48 Land Champ English DETAIL C 1 57 62 59 56 61 60 54 55 40 42 41 57 59 62 53 93 DETAIL VIEW C ...

Page 49: ...ut 1 1 4 inch 1 20 CA100519 1 1 4 BSP X 3 4 HOSE BARB 1 21 CFPE05M05B 1 MNPT X 1 HOSE BARB 90 1 22 CFPS05M05B 1 HOSE BARB 2 23 CBTEE100 1 FNPT PIPE TEE 2 24 CFPN05M05M 1 SHORT POLY NIPPLE 3 25 CBRN100 075 1 X 3 4 POLY REDUCING NIPPLE 2 26 CBCR075 3 4 POLY PIPE CROSS 1 27 CFPS04M04B 3 4 MNPT TO 3 4 HOSE SHANK 2 28 CFPE04M04B 3 4 MNPT X 3 4 HOSE BARB 90 4 29 CFPT04B 3 4 HOSE BARB TEE 2 30 CFPN04M04M...

Page 50: ...EX BOLT 2 64 CHWZF025 5 16 FLAT WASHER 2 65 CHWZL025 5 16 LOCK WASHER 5 66 CHBZ010325 1 4 X 3 4 BOLT 2 67 CHWZF015 1 4 FLAT WASHER 2 68 CHWZL015 1 4 LOCK WASHER 2 69 CHMS900213 10 32 1 2 PAN HEAD SCREW 2 70 CHNSN903 10 32 18 8 SS LOCKNUT 2 71 CHBZ8014088125 8 X 1 25 X 20MM HEX HEAD BOLT 3 72 CLUESB020005 1 EPDM HOSE 1 73 CLUESB020005 1 EPDM HOSE 1 74 CLUESB020004 3 4 EPDM HOSE 1 75 CLUESB020004 3 ...

Page 51: ... AMTHSL100FG 100 Gal 3 Point Spray Tank 1 90 AMTHSL200FG 200 Gal 3 Point Spray Tank 1 91 AMSLRT11FG Rinse Tank for 100 Gal 3 Pt 1 92 AMSLRT18FG Rinse Tank for 200 Gal 3 Pt 1 93 AZFP1003 100 Gal 3 Point Frame 1 94 AZFP2003 200 Gal 3 Point Frame 1 PARTS LIST ...

Page 52: ...om 113 1st Street Neche ND 58265 USA Version 2 1 Copyright Enduraplas All Rights Reserved Discover More Helpful Tips blog enduraplas com spraying Watch Instruction Videos www youtube com enduraplas Order Genuine Enduraplas Parts Accessories parts enduraplas com ...

Reviews: