background image

ENMUV-2 – User’s Manual 

11 


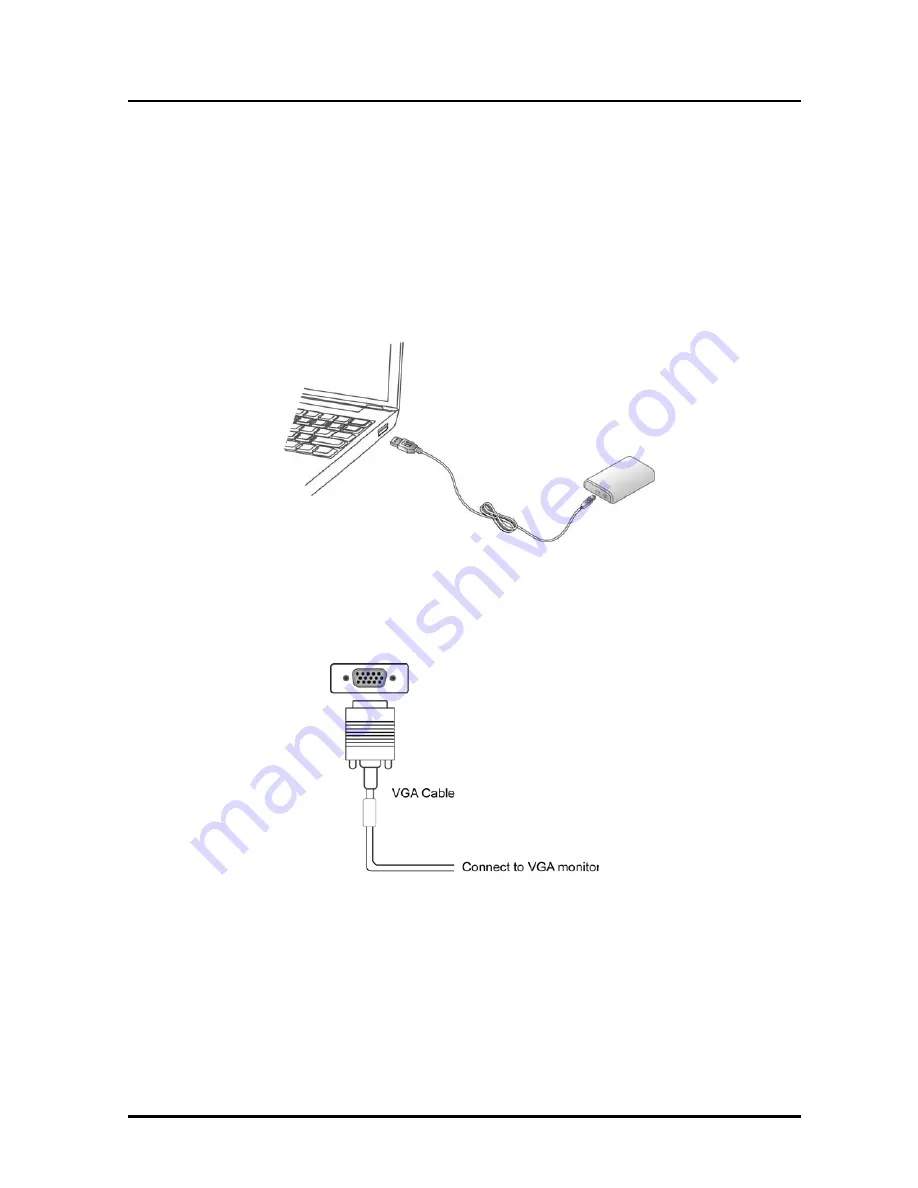
2.2 Connected to the ENMUV-2 and monitor 

Connect the ENMUV-2 to your computer and monitor. Then power on your monitor. 


For VGA model: 

Use a VGA cable (not provided) to connect the VGA jack to a monitor equipped with 

VGA input jack. 


For DVI model: 

The equipped DVI-I (DVI-Integrated) connector transmits both the digital and analog 

signals. It can be connected to a DVI-D (digital) monitor using a DVI cable. Or, it can be 

connected to an analog VGA monitor using the provided DVI-I to VGA adapter and a 

VGA cable. After you connect the ENMUV-2, Windows will automatically complete the 

installation. And then an extended screen will appear on the add-on monitor. 


Summary of Contents for ENMUV-2

Page 1: ...ENMUV 2 External USB Video Adapter DVI VGA User Manual ...

Page 2: ... in it may be reproduced transmitted transcribed stored in a retrieval system or translated into any language in any form or by any means except documentation kept by the purchaser for backup purposes without the express written permission of us Product warranty or service will not be extended if z The product is repaired modified or altered unless such repair modification of alteration is authori...

Page 3: ... Chapter 3 Getting Started 13 3 1 Display Modes 13 3 1 1 Extend Mode Default 14 3 1 2 Mirror Mode 17 3 1 3 To Be The Primary Display Monitor 19 3 2 Adjusting Resolution Color Depth and Refresh Rate 20 3 3 Standby and Hibernate Shut Down and Restart 24 3 4 Disconnecting the ENMUV 2 24 3 5 Using Dual ENMUV 2 24 3 6 Verifying the Driver Installation 26 3 7 Uninstall the ENMUV 2 and Driver 27 Chapter ...

Page 4: ...st obvious one is that you get more desktop area to have more applications visible at one time For example you may work on one monitor while your family watching video on the other No more stacking windows within the confines of a single display Or you may span an application e g spreadsheets across two sides of displays What s more ENMUV 2 is hot pluggable If you are not using the extra monitor j...

Page 5: ...s on one screen while viewing reference material on the other 2 Compare two documents simultaneously across two screens Financial analysis 1 Have one monitor per data stream 2 View charts and live data at the same time Entertainment 1 View videos TV on one screen and reviews on the other 2 Get additional perspectives when playing games 1 2 Features Easy to Install No need to open computer cases Ma...

Page 6: ...x USB2 0 port for each USB Video Adapter 30 MB free disk space Windows 7 XP SP2 2000 SP4 Windows Vista SP1 Super VGA 800 x 600 or higher resolution monitor To play DVD on the ENMUV 2 connected monitor in addition to the requirements above the following requirements should also be met With dual core CPU at 2 0 GHz or faster The screen resolution is set to 800x600 with 16 bit color In addition to th...

Page 7: ... USB 2 0 Video Output VGA or DVI I Adapter included Connectors Video output 1 VGA HDDE 15 pin Female Connector 2 DVI HDDE 29 pin Female Connector Host upstream link USB Mini B Type Female Connector Connectivity Up to 6 additional Monitors Each monitor needs an individual ENMUV 2 and USB port RAM 8 MB x 16 DDR Synchronous DRAM SDRAM Power Mode Bus powered Power Consumption 430 mA Operation System S...

Page 8: ...A 60 75 85 60 75 85 1280x800 WXGA 60 60 1280x1024 SXGA 60 75 85 60 75 1366x768 WXGA 60 60 1400x1050 SXGA 60 75 85 60 75 85 1600x1200 UXGA 60 60 1680x1050 WSXGA 60 60 1920x1080 1080p 60 60 Note that interlaced modes and reduced blanking modes are not supported Housing ABS Plastic Dimensions 84 5 L x 55 5 W x18 H mm USB Cable z Separated from the body z Type USB A Type Male to 5pin Mini USB B Type M...

Page 9: ...allation Do not connect the ENMUV 2 to the USB port at this point You will be asked to do so later on in this installation procedure 1 Insert the provided CD into the CD ROM drive The setup screen should automatically appear 2 Click the Driver Utility icon ...

Page 10: ...oftware Your screens may temporarily go black or flash during this process 5 Click Yes to restart the computer We recommend you to reboot the computer after driver installation If the reboot prompt doesn t appear make sure to manually reboot your computer 6 When finished the installation screen will disappear and you will return to your desktop ...

Page 11: ...th VGA input jack For DVI model The equipped DVI I DVI Integrated connector transmits both the digital and analog signals It can be connected to a DVI D digital monitor using a DVI cable Or it can be connected to an analog VGA monitor using the provided DVI I to VGA adapter and a VGA cable After you connect the ENMUV 2 Windows will automatically complete the installation And then an extended scree...

Page 12: ...s Manual 12 If the add on monitor is blank please reboot your system again If required you can connect and disconnect the add on monitor any time without disconnecting the ENMUV 2 from the USB port on your computer ...

Page 13: ... icon to select Advanced 3 1 Display Modes There is several ways you can utilize the monitor attached on ENMUV 2 The add on monitor can be configured to use either mirror mode extended mode or be the primary display as described in this section z Extend The screen is part of the extended desktop z Set as Main Monitor The screen is the primary screen z Notebook monitor off The Notebook screen is bl...

Page 14: ...the primary display This mode allows you to perform multiple tasks more effectively without overlapping windows Easy Setting 1 Click on the DisplayLink Device icon and select Extend 2 Select Extend to and then you can choose the add on monitor position Right Left Above Below Windows 7 I 1 Click the arrow sign and right click the DisplayLink Device icon to select Advanced ...

Page 15: ...Settings 2 Choose the option with the string DisplayLink Graphics Adapter in the Display drop down menu 3 Windows 7 Choose Extend these displays in Multiple Displays drop down menu Windows Vista Click the Extend the desktop onto this monitor box Windows XP 2000 Click the Extend my Windows desktop onto this monitor box 4 Drag the icons in the window at the top of the screen to match the physical ar...

Page 16: ...d it s possible that your cursor has moved to the extended desktop so that you cannot find it on the primary display To solve the problem in such a case connect the add on monitor to the ENMUV 2 or keep moving your mouse to try or unplug the ENMUV 2 first to restore the cursor Video and DVD Playback in Extended Mode On Windows Vista with extended mode it s suggested that you run video or DVD playb...

Page 17: ...primary display will be mirrored to the add on monitor Easy Setting Click on the DisplayLink Device icon and select Mirror Windows 7 I 1 Click the arrow sign and right click the DisplayLink Device icon to select Advanced 2 You can change Display Properties of the add on monitor here ...

Page 18: ...ue to the primary monitor only supports a resolution of up to 1280x1024 If you change the video output to mode and then want to switch back to mirror mode follow these steps 1 Position the mouse anywhere on your computer desktop right click and select Windows 7 Choose Screen Resolution Windows Vista Personalize Display Settings Windows XP 2000 Properties Settings 2 Choose the option with the strin...

Page 19: ...Display drop down menu 3 Windows 7 Widows Vista Click the This is my main monitor box Windows XP 2000 Click the Use this device as the primary monitor box On some PCs and laptops it is necessary to disable the main display i e uncheck the Extend the desktop onto this monitor or Extend my Windows desktop onto this monitor box for the main display as part of the same settings change 4 Then click OK ...

Page 20: ...set of common screen modes for the monitor The resolutions and refresh rates available to the user through Windows are a comprise of the support from the following elements The ENMUV 2 The primary monitor and the add on monitor The primary video card on your computer and installed drivers Therefore for example if your monitor doesn t support a resolution of 1920x1080 then 1920x1080 is not possible...

Page 21: ...68 WXGA 60 75 85 60 75 85 1280x800 WXGA 60 60 1280x1024 SXGA 60 75 85 60 75 1366x768 WXGA 60 60 1400x1050 SXGA 60 75 85 60 75 85 1600x1200 UXGA 60 60 1680x1050 WSXGA 60 60 1920x1080 1080p 60 60 To configure the three components resolution color depth and refresh rate of a screen mode follow these steps Easy Setting Click on the DisplayLink Device icon and then you can choose Color Quality Screen R...

Page 22: ...puter setting resolution support of monitor and else Manually Setting 1 Position the mouse anywhere on your computer desktop right click and select Win 7 Choose Screen Resolution Vista Personalize Display Settings XP 2000 Properties Settings 2 In the Display drop down menu select the option with DisplayLink Graphics Adapter 3 To adjust screen resolution or color quality slide the Resolution bar ...

Page 23: ... 23 4 To change the refresh rate click Advanced and then click Monitor 5 Select a refresh rate from the Screen refresh rate drop down list and then click Apply 6 Click OK to close the settings screen Step4 Step4 Step3 Step3 ...

Page 24: ...tor If the computer is shut down restarted and logged in the add on monitor returns to the same mode as it shutdown before 3 4 Disconnecting the ENMUV 2 When you unplug the ENMUV 2 from the computer and the add on monitor goes blank Then all the windows and icons will move back to primary monitor If you plug it again the add on monitor returns to the same mode as it unplug before But windows and i...

Page 25: ...t DisplayLink Graphics Adapter is configurable You can make sure display video driver mode 1 Double click Computer on your desktop Then choose Device Manager 2 Then expand the Display adapters item What is Vista XDDM mode XDDM refers to Windows XP Driver Mode It is a video card driver mode used in some legacy computers that running the new generation Vista OS It provides an interface similar to Wi...

Page 26: ... Double click Uninstall a Program Vista Double click Programs and Features XP 2000 Double click Add or Remove Programs 3 A string similar to DisplayLink Core Software and DisplayLink Graphics should be displayed 4 If there is a question or exclamation mark next to that item then the driver is not properly installed Please delete the item unplug the ENMUV 2 and repeat the installation steps ...

Page 27: ... Features on Vista or Add or Remove Programs on XP 2000 2 Select DisplayLink Graphics or DispalyLink Core Software and then click Uninstall or Remove 3 Click Yes to confirm the removal 4 During the removal process a couple of DOS windows will pop up 5 Click Yes to restart your computer and then unplug the ENMUV 2 now ...

Page 28: ...on is properly made If problem still exists uninstall the driver unplug the ENMUV 2 and reinstall the driver to try again Q2 The add on monitor is flickering Answer This is usually caused by a low refresh rate To solve this problem In mirror mode increase the refresh rate of the main monitor This will in turn increase the refresh rate of the add on monitor In extended mode increase the refresh rat...

Page 29: ...e hardware acceleration level of the primary display NOT the add on monitor to levels 1 2 or 3 and restarting the media player The hardware acceleration can be found by right clicking on your desktop and click Properties Settings Advanced Troubleshoot Some players use this setting even when playing on a different display The video playback may be unusual when the add on monitor is mirroring the pr...

Page 30: ... the user s authority to operate the equipment Use an approved phone set CE This equipment is in compliance with the requirements of the following regulations EN 55 022 CLASS B WEEE Information For EU European Union member users According to the WEEE Waste electrical and electronic equipment Directive do not dispose of this product as household waste or commercial waste Waste electrical and electr...

Reviews: