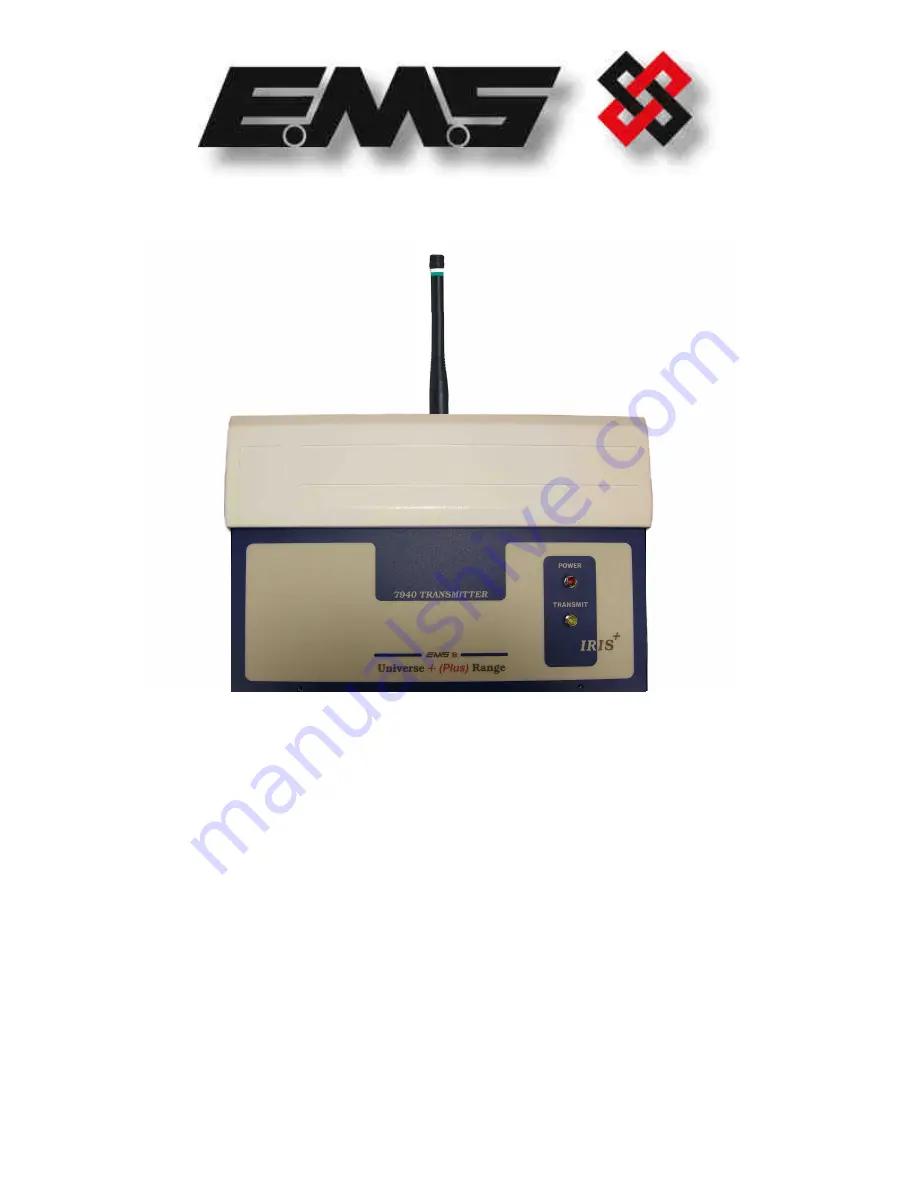
SYSTEM 7000
7940
HIGH POWERED UHF
CONTACT OPERATED TRANSMITTER
INSTALLATION AND PROGRAMMING
INSTRUCTIONS
Page 1: ...SYSTEM 7000 7940 HIGH POWERED UHF CONTACT OPERATED TRANSMITTER INSTALLATION AND PROGRAMMING INSTRUCTIONS ...
Page 2: ...PMENT 3 3 EQUIPMENT REQUIRED 4 4 PROGRAMMING CONNECTION DETAILS 6 5 TRANSMITTER PROGRAMMING 7 6 ID 14 7 CON 15 8 TXD 15 9 QUIT 15 10 ADDING A TRANSMITTER INTO THE IRIS RADIO RECEIVER 16 11 ASSIGNING TEXT DESCRIPTION FOR A TRANSMITTER 18 12 ADDING A TRANSMITTER INTO THE 7703 RADIO RECEIVER 19 13 INTERNAL INPUT WIRING 20 ...
Page 3: ...ving a maximum of 48 transmitters in total added 1 2 As each input is opto isolated a negative is required to be applied to one side of the input To trigger the input a positive voltage should be applied if the contact is programmed as normally open or removed if normally closed see Figure 4 on page 20 for full wiring details The unit when supplied will have the negatives of the inputs pre wired a...
Page 4: ...e extension depending upon the customer s specification and requirements Please note both the contact operated transmitter and the IRIS receiver will require an external power supply whilst the 7703 receiver is available with a built in power supply part number 7703 P Figure 1 shows a typical IRIS radio system whilst Figure 2 shows an alternative system using a Single Channel 7703 Receiver Figure ...
Page 5: ...EMS 7000 IRIS 7940 ENGINEERS GUIDE v2 2 13 04 10 5 Figure 2 7940 Half Watt Txer 7940 Half Watt Txer 7940 Half Watt Txer 7703 Rxer Four Input Data Transmissions Four Input Data Transmissions ...
Page 6: ...n details are as follows COMPUTER ISOLATED RS 232 PORT PIN 2 TX OUT PIN 3 RX IN PIN 5 COMMON CONNECT 4 2 All Computer to HyperTerminal connections are shown below in Figure 3 Figure 3 TAMPER LOOP 0V 12V DC SUPPLY COMMON CONNECT RX RX RX TX COMMON IN OUT CONNECT ISOLATED RS485 ISOLATED RS232 2 3 5 TO POWER SUPPLY 9 PIN SERIAL CONNECTOR ...
Page 7: ...y open or normally closed CON A full explanation of the input settings and the operation of the inputs is described in more detail in the following paragraphs under their menu commands headings 5 2 To allow access into the programming menu the computer should be set up with Windows HyperTerminal as follows PLEASE NOTE Examples shown below are from Windows XP Other versions of Windows may vary To s...
Page 8: ...EMS 7000 IRIS 7940 ENGINEERS GUIDE v2 2 13 04 10 8 Now enter your desired connection description Then click on the OK button and the screen will change to the following ...
Page 9: ...EMS 7000 IRIS 7940 ENGINEERS GUIDE v2 2 13 04 10 9 Now select the Comm Port required as below ...
Page 10: ...EMS 7000 IRIS 7940 ENGINEERS GUIDE v2 2 13 04 10 10 Now select the following settings Once completed click on the Apply button and then the OK button The screen will change to display ...
Page 11: ...EMS 7000 IRIS 7940 ENGINEERS GUIDE v2 2 13 04 10 11 Now select Call and Disconnect and the screen will change to display Now select File and Properties The screen will change to display ...
Page 12: ...EMS 7000 IRIS 7940 ENGINEERS GUIDE v2 2 13 04 10 12 Now select the Settings tab and the screen will change as below The Settings should be set as follows ...
Page 13: ...the settings are as follows Once the settings are as above click on the OK button then on the next window click on the OK We can now establish a connection by selecting Call and Call as below Once completed HyperTerminal is configured Please Note To save future reconfiguration the HyperTerminal session can be saved for future use ...
Page 14: ...d the transmitter ID settings checked The new transmitter can then be added to the system ensuring that the new ID does NOT correspond with any already programmed into the IRIS unit If a 7703 receiver is being used additional transmitters when adding into the receiver will be shown as already in use if an ID code matches an existing transmitter This is shown by the Low Battery LED not flashing thr...
Page 15: ...will then change to show the next contact input Contact 2 is N O Change Y N If a change is not required press N or Enter The display will then change to show the next input This continues until all 8 contacts are looked at On answering Y N to contact 8 the display will change to show the command menu To check settings type con to re enter menu 8 TXD 8 1 The txd function when entered causes the tra...
Page 16: ...the button the screen will change to display Main Menu Pins Access System Support 2 Help 13 27 10 5 Press until the screen displays Time and Date Radio Setup Output Setup 2 Help 16 37 10 6 Press the 1 button and the screen will change to display Radio Setup Add Transmitter Txer Details 2 Help 16 37 10 7 Press the 1 button and the screen will change to display Add Transmitter Add Handpush Add Money...
Page 17: ...te Transmitter Again or press Escape to cancel 16 38 10 12 Using the same operation once again generate a transmission after a short period of time the screen will change to display Hand Push 001 Added Push any key 16 38 10 13 You may now add additional transmitters by repeating the actions detailed If no further transmitters are to be added escape from this menu by pressing the 3 button on the ke...
Page 18: ...xer Details Name by Number Name by Tx 2 Help 16 37 11 6 Press until the screen displays Name by Number Name by Tx View Names 2 Help 16 37 11 7 Press the 1 button and the screen will display Operate Transmitter NOW or press Escape to cancel 16 38 11 8 Generate a transmission by activating the transmitters onboard tamper switch and the screen will change to display Release all buttons NOW 16 38 11 9...
Page 19: ...nboard tamper switch 12 5 The green Local LED will now flash and a buzzer sound 12 6 Activate the tamper switch again The yellow Low Battery LED will light and the buzzer will sound three times to acknowledge the transmitter has been added into the system 12 7 Repeat the above procedure for any further transmitters to be added KEY FUNCTION 0 Enters a blank space into the new device name being ente...
Page 20: ...EMS 7000 IRIS 7940 ENGINEERS GUIDE v2 2 13 04 10 20 13 Internal Input Wiring Figure 4 ...
Page 21: ...EMS 7000 IRIS 7940 ENGINEERS GUIDE v2 2 13 04 10 21 ...
Page 22: ...group co uk Dealer Information The information contained within this literature is correct at time of publishing The EMS Group reserves the right to change any information regarding products as part of its continual development enhancing new technology and reliability The EMS Group advises that any product literature issue numbers are checked with its head office prior to any formal specifications...