background image

 
16X DVD-ROM Drive 


4


Hardware Installation 


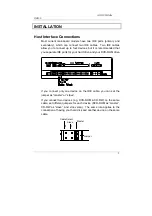
1.  Turn off the power to the computer system. 

2.  Disconnect the power cord and all cables from the back of your 

computer, and then remove the cover of the computer. 

3.  Insert the drive into one of the vacant 5.25" drive bays and 

secure it with screws to your PC. 

4.  Connect one end of the 40-pin IDE cable to the IDE connector of 

this drive and the other end to the IDE port on your mainboard. 
Also, connect the power supply cable to the back of the drive. 


Make sure to align and connect the red-edge of the IDE cable to Pin 1 on 

the drive.  

5.  If you have a sound card that can be connected to this drive, you 

can also connect the drive (as Audio-Out) and the sound card 
(as Audio-in) with a 4-pin audio cable.  

If your mainboad is integrated with built-in sound system, plug 
the 4-pin audio cable into the CD-IN connector on the 
mainboard as Audio-in.   

6. 

Re-attach the cover of your computer, and reconnect the power 
cord and all cables. 

Summary of Contents for DVD-ROM Drive 16X

Page 1: ...16X DVD ROM DRIVE User s Manual...

Page 2: ...D OUVERTURE EVITER TOUTE EXPOSITION AUX RAYONS Copyright Statement It is a criminal offence under applicable copyright laws to make unauthorised copies of copyright protected material including compu...

Page 3: ...ay cause harmful interference to radio communications However there is no guarantee that interference will not occur in a particular installation If this equipment does cause harmful interference to r...

Page 4: ...NECTIONS 3 HARDWARE INSTALLATION 4 DRIVER INSTALLATION 5 For Windows Environment 5 SOFTWARE INSTALLATION 5 DVD REGION CODING 6 Region Playback Control Management 6 Region Codes 6 DVD Video Decoder for...

Page 5: ...e side and up to 17GB on double side and dual layer Other than that a DVD is MPEG 2 compressed video compatible and has Dolby Digital Surround Sound audio known as AC 3 capabilities That is the combin...

Page 6: ...2000 XP To run DVD titles with DVD playback software installed the basic requirements recommended MicrosoftTM Windows 95 98 98SE Me NT4 0 SP5 2000 XP Intel Pentium II 350MHz or above At least 64 MB R...

Page 7: ...at you separate IDE ports for your hard drive and your DVD ROM drive If you connect only one device on the IDE cable you can set the jumper as master or slave If you connect two devices e g DVD ROM CD...

Page 8: ...the other end to the IDE port on your mainboard Also connect the power supply cable to the back of the drive Make sure to align and connect the red edge of the IDE cable to Pin 1 on the drive 5 If yo...

Page 9: ...ayback software offers maximum video and audio playback entertainment on the PC It comes with leading video and audio technologies to deliver the highest quality viewing and listening experience possi...

Page 10: ...management DVD ROM drives of this kind don t play a part in controlling the playback region It solely depends on the decoder RPC Phase 2 as RPC2 RPC2 drives maintain the region change count informati...

Page 11: ...ck software work together for region code setting DVD Drive DVD Decoder RPC Phase 1 RPC Phase 2 Type 1 Decoder Decoder Drive Type 2 Decoder Decoder Drive Type 3 Decoder Decoder Drive About This DVD RO...

Page 12: ...n press the Close Eject button or gently push the tray to close it 3 Emergency Eject Hole When the Close Eject button doesn t work properly and the disc tray can t be opened you can insert a paper cli...

Page 13: ...to your sound card with a 4 pin audio cable 3 Device Configuration Jumper Set the jumper to Master Slave or Cable Select according to your system configuration 4 IDE Interface Connector Plug one end o...

Page 14: ...nd 120mm discs Disc Data Capacity DVD ROM Single layer 4 7GB Dual layer 8 5GB one side CD ROM 74min 650MB Mode 1 80min 700MB Mode 1 Disc Format Compatibility CD Family CD DA CD ROM CD ROM XA CD I Phot...

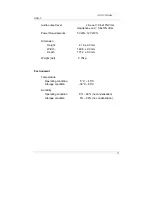
Page 15: ...Power Requirements 5V 5 12V 10 Dimension Height 41 8 0 3 mm Width 148 6 0 3 mm Depth 177 2 0 3 mm Weight net 0 75kg Environment Temperature Operating condition 5 C 45 C Storage condition 30 C 60 C Hu...

Page 16: ......

Page 17: ......

Page 18: ...3100553210 Version 1 0 Dec 2005...

Reviews: