


After completing the operation with the gas, close all
on-off valves of the system and proceed as follows:
• Slowly loosen the fitting located on the upper part of
the filter (key 40A);
• Remove the connection on the upper intake of
the filter;
• Unscrew and remove the upper closing cap
(key 40A) of the filter;
• Take out the cartridge filter (key 40F) by means of
a small screwdriver; Take out the O-rings (keys 40K
and 40B);
• Fit back the new cartridge filter (key 40F) and
O-rings (keys 40K and 40B) and place back the
closing cap (key 40A);
• Open all valves and make sure that there are no leaks;
• Restart the system.
Three Way Pressure/Depressure
Solenoid Valve
For Maintenance and Installation refer to ASCO
Bulletin 8320 Form No. V6055R2.
Two Way Filling Solenoid Valves
For Maintenance and Installation refer to ASCO
Bulletin 8262/8263 Form No. V5256R9.
Two Way Injection Solenoid Valve
The injection solenoid valve is mounted in the reverse
orientation as compared to what ASCO documentation
suggest. This is correct according to the application.
For Maintenance and Installation (considering the note
above) refer to ASCO Bulletin 8262/8263
Form No. V5256R9
.
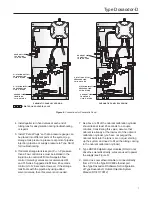
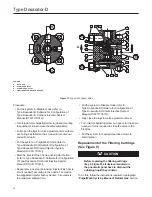
Maintenance Procedure (refer to Figure 10)
Before replacing the O-rings, the odorizing liquid that
is contained in the devices mounted on the pneumatic
panel must be drained out. Follow the instructions in
paragraph “Purge/Wash Cycle by Means of Natural
Gas” - Type Dosaodor-D Software for Configuration
of Type Dosaodor-D Odorant Injection System
Manual (D103117X012).
When the operation is accomplished, close all on-off
valves of the system and proceed as follows:
• Slowly loosen the fittings located on the two way
injection solenoid valve;
• Remove the connections on the intakes of the two
way injection solenoid valve;
• Apply the ASCO Installation and Maintenance
Instructions form No. V5256R9 for replacing parts
supplied in ASCO rebuild kit;
• Before replacing the body valve O-rings,
count the turns unscrewing counterclockwise
key 39G completely;
• Unscrew the four screws (keys 39B);
• Unscrew key 39F;
• Unscrew key 39G;
• Take out the O-rings keys 39C, 39E and 39H;
• Fit back the new O-rings keys 39C, 39E and 39H;
• Reassemble keys 39G, 39F and 39D;
• Place back the four screws (keys 39B);
• Replace the key 39G in the previous position.
Consider the warnings that are included in the
ASCO documentation about checking the valve for
proper operation before starting service;
• Open all valves and make sure that no leaks exist;
• Restart the system.
Type SA/2 (See Figure 11)
Maintenance
Replacing filter
1. Remove screw (key 2), cover (key 11). Replace
felt (key 12) and O-ring (key 13).
Replacing stabilizer diaphragm and seal pad
1. Remove cover (key 19); spring (key 1) and
diaphragm assembly (keys 21, 20, 3, 4, 18
and 17). Replace diaphragm if necessary.
2. Unscrew seat (key 5), replace O-ring (key 15) and
O-ring (key 6).
3. Reassemble by reversing the above sequence.
21
Type Dosaodor-D


