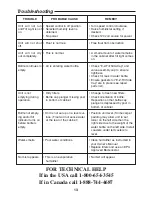
background image

13

Troubleshooting

PROBABLE CAUSE

•  Speed control in off position.
•  Selected humidity level is

obtained.

• No power.

• Float is not free.

•  This is normal.

• Air is entering water bottle.

• Dirty filters.
• Bottle cap plunger missing post

in bottom of cabinet.

• Unit is not set up on a level sur-

face. (Float will not sense water
at the rear of the cabinet.)

• Poor water conditions.

• This is an evaporative 

humidifier.

TROUBLE

Unit will not run
and Fill Light is not
on.

Unit will not shut
off.

Unit will not dry
out completely.

Bottle continues to
empty.

Unit is not 
emptying during
operation.

Bottle not empty-
ing and/or fill 
indicator turns on
before bottle is
empty.

Water smells.

No mist appears.

REMEDY

•  Turn speed control clockwise.
• Raise humidistat setting if

desired.

• Check 120 volt source for power.

• Free float from obstruction.

• A small amount of water remains

in the cabinet after fill light comes
on.

• Check “E-Z-Fill Side-Cap” and

valve assembly cap to ensure
tightness.

• Check for leak in water bottle.
• Ensure gaskets for “E-Z-Fill Side

Cap” are in place (see repair
parts list).

• Change to fresh new filters.
• Check orientation of bottle.

Reposition so that bottle cap
plunger is depressed by post in
bottom of cabinet.

• Position unit level. (Some carpet

padding may allow unit to set
lower on the left side than the
right side due to the weight of the
water bottle on the left side. Install
coasters under left casters to
level.

• Clean humidifier as instructed in

your Owner’s Manual

• Replace filters and use an EPA

Approved Bacteriostat.

• No mist will appear.

FOR TECHNICAL HELP

If in the USA call 1-800-654-3545

If in Canada call 1-888-744-4687

Summary of Contents for HD7002-1

Page 1: ...d in Canada CAUTION Read all instructions carefully before installation Save this Owner s Manual for future reference MoistAIR HD7002 HD7005 Evaporative Console Humidifier Owner s Manual EMERSON Model Nos HD7002 1 HD7005 0 ...

Page 2: ...leaning GENERAL SAFETY INSTRUCTIONS Limited Warranty All products covered by this Owner s Manual are warranted against defects in workman ship and materials for one year from the date of sale except for motors which are war ranted for two years This warranty does not apply to damage from accident misuse or alteration nor where the connected voltage is more than 5 above the nameplate volt age nor t...

Page 3: ...mber of Filters 2 Fill Light Yes Auto Humidistat Yes Auto Shut Off Yes Controls Rotary CUL Listed Yes Volts 120 A C Hertz 60 Amps 1 14 Watts 65 Know Your Humidifier Controls Fan Assembly Bottle Cover Filter Support Assembly Filters Replacement No HDC 2R or HDC411 NOTE HDC411 provides two filter changes Based on an area with average insulation and an 8 foot ceiling height ...

Page 4: ...treatment products for Roto belt or Ultrasonic humidifiers Humidified Air is Then Released Through the Top Dry Air Enters Through the Rear CAUTION Keep your humidifier clean While humidifiers do not cause colds some studies suggest that dirty humidi fiers can cause cold like symptoms in some people To avoid this clean your humidifier weekly with cleaners specifi cally recommended for evaporative h...

Page 5: ...tion humidifier Location Instructions Water Fill WARNING To reduce the risk of shock always unplug humidifier before cleaning or servicing WARNING To reduce the risk of fire or shock hazard do not pour or spill water into control or motor area If controls get wet let them dry com pletely and have unit checked by an authorized service personnel before plugging in This humidifier is designed for use...

Page 6: ...nk 2 Press up on valve cap plunger for about one second to let out a little water 3 Release the plunger 4 Listen for air bubbles Look for leaks around fill cap 5 If you hear air bubbles or see leaks retighten cap and check for leaks again NOTE If either the fill cap or the valve cap leaks water may overflow and leak out the rear vents of the cabinet Wipe off excess water from the bottle Position t...

Page 7: ...d but there are times when a low or high amount of humidity may be pre ferred For constant operation of humidifier rotating knob all the way clockwise allows for the maximum amount of humidity to be evaporated into the air continuously IMPORTANT Water damage may result if condensation starts to form on windows or walls Humidity Control setting should be lowered until condensation no longer forms A...

Page 8: ...nit under this condition turn Humidity Control all the way to clockwise and unit should begin to operate After the unit has been tested set Humidity Control to medium or desired level Allow 24 hours for humidifier to adjust If humidity level in home is sufficient the humidifier will only operate with Humidity control set on or near position IMPORTANT Water damage may result if condensation starts ...

Page 9: ... Take care not to damage paper To replace the evaporative wicking filter in your Emerson humidifier follow the instructions below 1 Unplug humidifier and proceed to clean Before removing the filters we recom mend moving the humidifier to an area where floor coverings are not suscepti ble to water damage i e kitchen or bath areas 2 To remove parts Remove the water bottle cover Lift the fan assembly...

Page 10: ...nto the filters Make sure the filters are captured inside the side flanges of the filter housing e Position fan assembly onto the cabi net Make sure the fan venturi low est cylinder section below the fan is placed inside the filter housing The left edge of the fan assembly hous ing should rest in the groove of the cabinet f Replace water bottle and the water bottle cover The right edge of the wate...

Page 11: ... 10 to remove parts if necessary NOTE Before removing the internal parts of the humidifier cabinet we recommend moving the humidifier to an area where floor coverings are not susceptible to water damage i e kitchen or bath area 2 Remove the bottle cover and water bot tle Grasp the fan assembly at the front center and rear center and lift it off the cabinet Set aside on a clean flat sur face 3 Lift...

Page 12: ...after 20 minutes Rinse with water until bleach smell is gone Allow unit to dry out completely 3 Water bottle should be cleaned in the same manner End of Season Maintenance 1 Follow Bi Weekly Maintenance instructions at end of humidification season 2 Remove and throw away filters 3 Let humidifier dry completely before storing Do not store with water inside cabinet or water bottle 4 Store in cool dr...

Page 13: ...ise Raise humidistat setting if desired Check 120 volt source for power Free float from obstruction A small amount of water remains in the cabinet after fill light comes on Check E Z Fill Side Cap and valve assembly cap to ensure tightness Check for leak in water bottle Ensure gaskets for E Z Fill Side Cap are in place see repair parts list Change to fresh new filters Check orientation of bottle R...

Page 14: ...14 Repair Parts PARTS LIST FOR EMERSON HUMIDIFIER MODEL NO HD7002 1 HD7005 0 ...

Page 15: ...8534 11 Housing Filter 825848 825848 12 Filter Evaporative HDC 2R HDC 2R or HDC411 or HDC411 13 Rail Kick 825847 1 825847 15 Caster Twin Wheel 828515 828515 16 Cabinet 825867 1 825867 3 17 Float Water Level 823712 2 823712 2 18 Retainer Float 824101 1 824101 1 19 Screw Pan Head Ty AB 8 x 3 8 808872 3 808872 3 20 Cover Electronics 825806 825806 21 Switch Micro 823728 823728 22 Retainer Micro Switch...

Page 16: ...arkham Ontario Canada L3P 3J3 Part No SP6470 Form No SP6470 Printed in Canada 06 02 FOR TECHNICAL HELP CALL 800 654 3545 FROM USA OR 888 744 4687 FROM CANADA Please have complete model number TM 2002 Emerson Electric Co ...

Reviews: