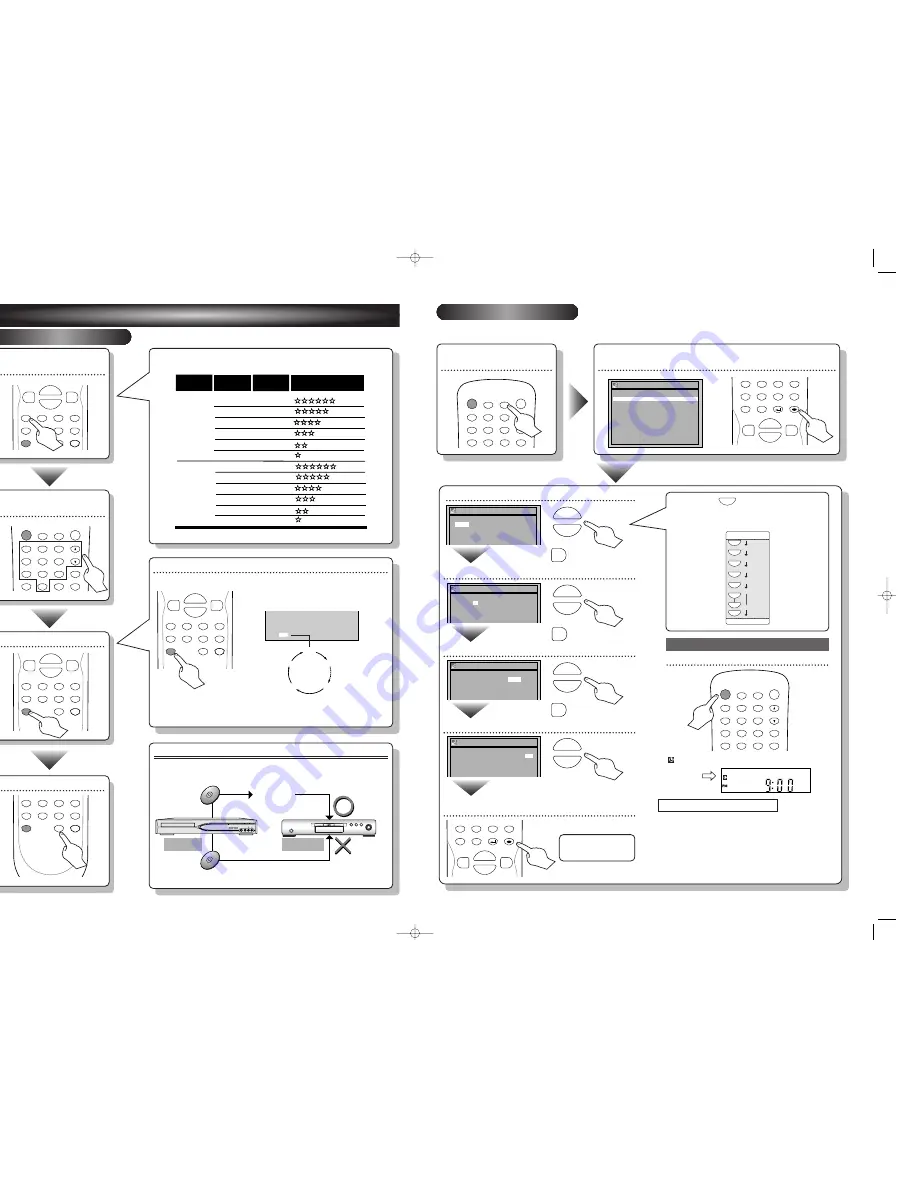
Set the date
Set start and end time
Select the channel number to record
Select the recording speed
ENTER!
Timer Programming
2. ---
3. ---
4. ---
1. JAN/01 12:57AM 1:57AM CH8 1H
Date
Start
End
CH
Speed
Timer Programming
2. ---
3. ---
4. ---
1. JAN/01 12:57AM 1:57AM CH8
Date
Start
End
CH
Speed
Timer Programming
2. ---
3. ---
4. ---
1. JAN/01 12:57AM
--:--
L1
Date
Start
End
CH
Speed
3
– 2
Timer Recording
After all recordings, finalize your disc!
After recording, you must finalize the disc in order to play on
other units.
This Unit
DVD player
Not Playable
* You cannot finalize discs in other DVD recorders.
Playable
Finalizing*
Finalizing*
S-VIDEO
VIDEO
AUDIO
L
R
OPEN/CLOSE
CH
REV
FWD
STOP
PLAY
POWER
REC/OTR
REC SPEED
Select the recording
speed
REC SPEED
REC
MONITOR
REC/OTR
PAUSE
SKIP
SKIP
PLAY
CM SKIP
FWD
REV
H
G
B
C
{
B
K
L
h
g
F
STOP
Record!
REC SPEED
REC
MONITOR
REC/OTR
PAUSE
SKIP
SKIP
PLAY
CM SKIP
FWD
REV
H
G
B
C
{
B
K
L
h
g
F
STOP
Select the desired TV
channel
ZOOM
DISPLAY
SETUP
REPEAT
TIMER
PROG.
CLEAR
1
2
3
4
5
6
7
8
9
SPACE
0
A
CH
.@/:
ABC
DEF
GHI
JKL
MNO
PQRS
TUV
WXYZ
To stop recording
REC SPEED
REC
MONITOR
REC/OTR
PAUSE
SKIP
SKIP
PLAY
CM SKIP
FWD
REV
H
G
B
C
h
g
F
STOP
How to select the recording speed:
Recording
speed
XP (
1
H)
SP (2H)
LP (4H)
EP (6H)
SLP (8H)
SEP (
1
0H)
Recording
time *
1
8 min
36 min
72 min
1
08 min
1
44 min
1
80 min
Video/Sound Quality
Disc Size
8cm Disc
XP (
1
H)
SP (2H)
LP (4H)
EP (6H)
SLP (8H)
SEP (
1
0H)
60 min
1
20 min
240 min
360 min
480 min
600 min
1
2 cm Disc
(poor)
(poor)
(good)
(good)
Hit repeatedly
to select desired recording time
Display the Timer
Programming Screen
POWER
ZOOM
REPEAT
OPEN/CLOSE
TIMER
PROG.
1
2
3
4
5
6
7
8
9
A
CH
.@/:
ABC
DEF
GHI
JKL
MNO
PQRS
TUV
WXYZ
• You can set up to 8 programs (once, daily or weekly).
• Be sure to set the clock before starting a timer programming.
Timer Programming display appears.
Select any blank line and hit [ENTER].
DISPLAY
SETUP
TOP MENU MENU/LIST
REPEAT
CLEAR
7
8
9
SPACE
0
ENTER
RETURN
PQRS
TUV
WXYZ
{
B
K
L
Timer Programming
2. ---
3. ---
4. ---
5. ---
6. ---
7. ---
8. ---
1. ---
Date
Start
End
CH
Speed
Move to next
Move to next
B
Move to next
B
B
K
L
K
L
K
L
K
L
DISPLAY
SETUP
TOP MENU MENU/LIST
CLEAR
SPACE
0
ENTER
RETURN
{
B
K
L
1
VMN20552 / E6720UD_QG
★★★★★
Rrecording times appear on the TV
screen (30 minutes to 4 hours).
Recording will start.
When the unit reaches the specified
time, recording will stop automatically.
0:30
(Normal Recording)
4:00
3:30
1
:00
I
0:30
Set the Timer Standby mode
3
– 1
Easy Recording
3
DVD Recording
REC SPEED
REC
MONITOR
REC/OTR
PAUSE
SKIP
SKIP
PLAY
CM SKIP
FWD
REV
H
G
B
C
{
B
K
L
h
g
F
STOP
When hitting
at the current date,
Timer Recording mode will change as follows:
e.g. January
1
st at present
L
Daily
MON-SAT
JAN/0
1
JAN/3
1
MON-FRI
SAT
FRI
SUN
L
L
L
L
L
L
L
L
indicator will appear on the front display.
Timer Programming
2. ---
3. ---
4. ---
1. JAN/01
--:--
--:--
L1
Date
Start
End
CH
Speed
POWER
ZOOM
DISPLAY
SETUP
REPEAT
OPEN/CLOSE
TIMER
PROG.
CLEAR
1
2
3
4
5
6
7
8
9
SPACE
0
A
CH
.@/:
ABC
DEF
GHI
JKL
MNO
PQRS
TUV
WXYZ
Turn the unit off
Timer Recording
is now set.
I
Formatting is not needed when inserting a blank
disc.
UNIT AUTOMATICALLY
PREPARES THE DISC FOR RECORDING
.
I
For playback on other DVD players, be sure to
record on Video mode and to finalize the disc
once recording is finished.
OTHER PLAYER
MUST PLAY BACK DVD-R or DVD-RW
.
Hints for DVD Recording
E6720UD_QG_EN.qx3 05.2.21 7:00 PM Page 2


