background image

options 


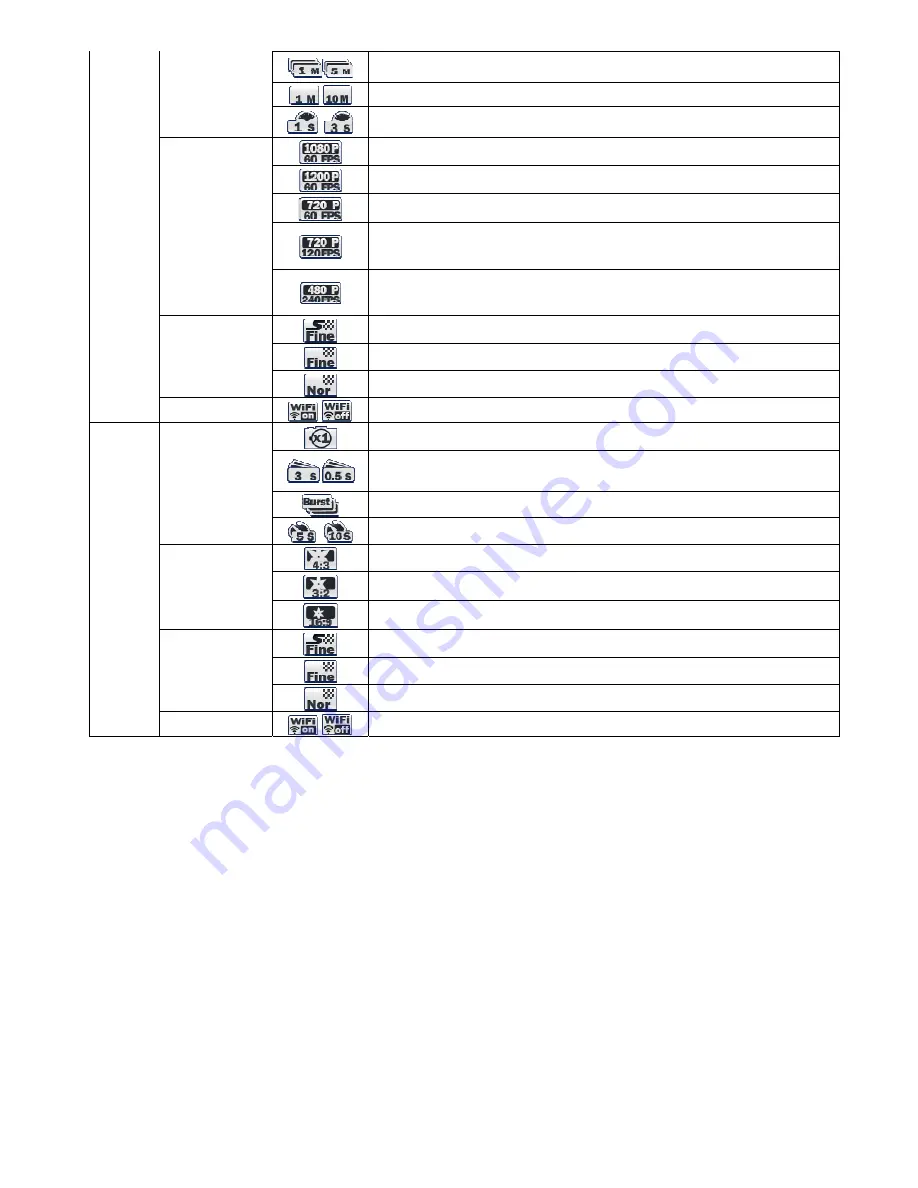
Record consecutive videos files of setup time continuously. 

(1min/5min/10min/30min) 

Press shutter button to stop. 


Recording automatically stops in setup time. 


Captures each image of setup time and save as video file. 

(1sec/3sec/5sec/10sec/30sec) 

Press shutter button to stop. 

Resolutions 


Full HD (1920x1080) 60fps / 30fps video recording 


UXGA (1600x1200) 60fps / 30fps video recording 


Real HD (1280x720) 60fps / 30fps video recording 


Real HD (1280x720) 120fps high speed video recording 
High speed recording file is played with 1/4 speed slow motion video. 

* In high speed recording, camera zoom and audio recording will be disabled. 


WVGA (848x480) 240fps high speed video recording. 
High speed recording file is played with 1/4 speed slow motion video. 

* In high speed recording, camera zoom and audio recording will be disabled.


Image quality 


Super fine video image quality 

*Use CLASS10 memory card only


Fine video image quality 


Normal video image quality 

WiFi Hotkey 


Shows WiFi connectivity (WiFi on/off) 

Photo 

Photo shoot 

options 


Single photo shooting 


Captures each image of setup time and save as photo. 

(0.5sec/1sec/3sec/5sec/10sec/30sec/60sec)


Press shutter button to stop. 

* In high speed time lapse mode (0.5sec/1sec), use CLASS10 memory only. 


Burst photo shooting (11 photo images per second) 


Self-timer photo 

Image Size 


12MP (4000x3000) 4:3 ratio 


8.5MP (3648 x 2432) 3:2 ratio 


7.2MP (3648 x 2052) 16:9 ratio 

Image quality 


Super fine video image quality 

*Use CLASS10 memory card only


Fine video image quality   


Normal video image quality 

WiFi Hotkey 


Shows WiFi connectivity (WiFi on/off) 


6. Video recording 

1) After the camera is turned on, press REC. (#1) button to start video recording. 
2) When the camera starts to record, LED light blinks and shows recording time on LCD. 
3) Press REC. (#1) button to stop recording. 
4) Without entering user setting menu, user can select video 'QUICK SETUP' before start recording. 

* If 'Auto LED off' option is selected in user setup, LED light will not blink. 


7. Photo shoot 

- Press MODE (#3) button and hold for two seconds to change to photo camera mode. 
- Mode changes as (video mode 

 photo mode 

 playback mode 

 video mode) in turn. 

 
1) Press REC. (#1) button to shoot photo. 
2) In time lapse photo mode, press REC. (#1) button to stop photo shooting. 
3) Without entering user setting menu, user can select photo 'QUICK SETUP' before start shooting. 
 

8. Quick setup 

- Without entering user setting menu, user can adjust various quick setups in live screen. 
 
1) Press QUICK SETUP (#2) button to select quick setup options on bottom of the screen. 
2) Quick setup mode changes as (recording option 

 resolution 

 image quality 

 zoom 

 exit) in turn. 

3) Select the quick setup option and press SELECT (#1) button to adjust setting option. 

Summary of Contents for ISAW EXTREME

Page 1: ...port No EMC FCC R0111 User manual EMC compliance Ltd 480 5 Shin dong Yeongtong gu Suwon city Gyunggi do 443 390 Korea 82 31 336 9919 Main 82 31 336 4767 Fax This test report shall not be reproduced ex...

Page 2: ...ISAW EXTREME USER MANUAL Ver 1 3...

Page 3: ...seconds to switch modes Video Photo Playback Quick Setup 2 Press the QUICK SETUP button to change quick setup before recording Enter Quick Setup 1 Press the SELECT button to confirm to enter the quick...

Page 4: ...ry Shows battery capacity status Recording option While shooting video or photo it shows current recording option Resolution While shooting video or photo it shows resolution and speed Image quality W...

Page 5: ...o shooting 11 photo images per second Self timer photo Image Size 12MP 4000x3000 4 3 ratio 8 5MP 3648 x 2432 3 2 ratio 7 2MP 3648 x 2052 16 9 ratio Image quality Super fine video image quality Use CLA...

Page 6: ...cording speed Use UP DOWN 2 3 button to choose option Press SELECT 1 to confirm setting option Video quick setup screen Press QUICK SETUP 2 button to go to quick setup Select image quality Use UP DOWN...

Page 7: ...480p 240fps 480p 200fps Recording option Manual Timer 1min 5min 10min 30min Multi file REC 1min 5min 10min 30min record consecutive video files of setup time Time lapse 1sec 3sec 5sec 10sec 30sec cap...

Page 8: ...LCD screen of the camera 1 In playback mode press SELECT 1 button to select the file type to playback video or photo 2 Thumbnail of recorded file will be displayed Press UP DOWN 2 3 button to use cont...

Page 9: ...or better Before connect the camera download ISAW Viwer application from smartphone app store Search for ISAW VIEWER in iPhone App Store or Google Play Store While smartphone is connected to the camer...

Page 10: ...ISAW Viewer is not connected to ISAW EXTREME Setup WiFi connection between the camera and the smartphone Enter Setup of smartphone Select iCam_xxxxxx in WiFi setting Default password is 12345678...

Page 11: ...port to your computer via USB cable 3 Status LED will be turned on and battery recharging will be started 4 LED will be turned off when it is fully charged 14 Transferring data to computer compatible...

Page 12: ...p High speed slow motion recording 720p 120fps 480p 240fps Maximum 11 burst photo shots per second H 264 codec saved as MP4 format Rechargeable Li ion battery Battery running time Approximately 120 mi...

Page 13: ...direct damages caused by the failure of hardware Do not attach the camera to the outside of vehicles if you are participating in public traffic or if the camera is causing danger to others in a possib...

Reviews: