EL1358 Service Guide
9
Navigating through the Setup Utility
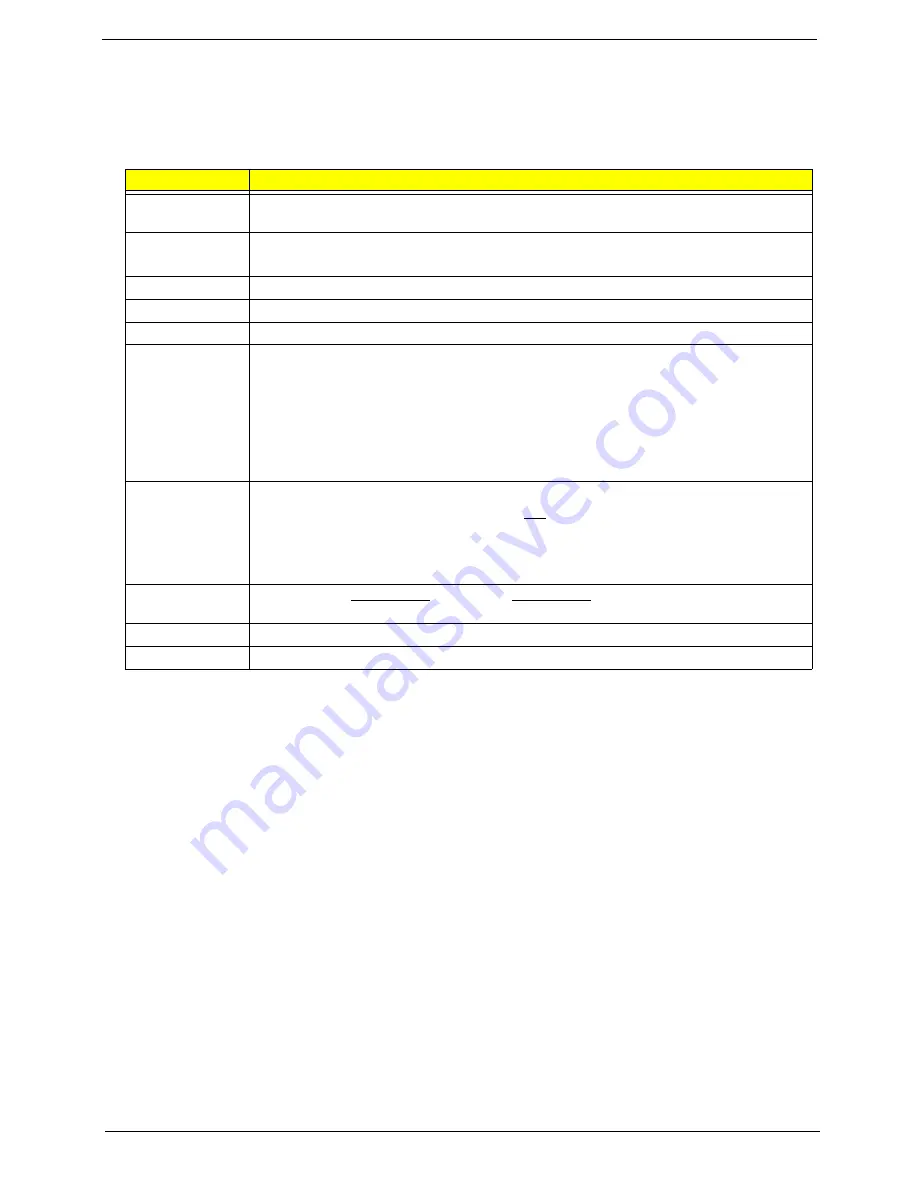
Use the keys listed in the legend bar on the bottom of the Setup screen to work your way through the various
menu and submenu screens of the Setup Utility. The table below lists these legend keys and their respective
functions.
Setup Utility Menus
The Setup Utility has twelve menus for configuring the various system functions. These include:
Key
Function
Up/Down/Left/
Right arrow keys
Move the cursor to the menu/field you want.The currently selected field will be highlighted.
Enter
• To open the page for the currently selected menu/submenu
• To apply a field value.
PgUp and PgDn
Move the cursor to the previous and next page of a multipage menu.
Home
Move the cursor to the first page of a multipage menu.
End
Move the cursor to the last page of a multipage menu.
+ and -
To select a value for the currently selected field (only if it is user-configurable). Press these
keys repeatedly to display all possible entries. A parameter that is enclosed in square
brackets [ ] is user-configurable. Grayed-out parameters are not user-configurable for one
of the following reasons:
• The field value is auto-configured or auto-detected.·
• The field value is informational only.
• The field is password-protected.
Esc
If you press this key:
• On one of the primary menu screens, the Exit menu displays.
• On a submenu screen, the previous screen displays.
• When you are making selections from a pop-up menu, closes the pop-up without making
a selection.
F1
To bring up the General Help window. The General Help window describes other Setup
navigation keys that are not displayed on the legend bar.
F9
Press to load default system values.
F10
Press to save changes and close the Setup Utility.
• Product Information
• Standard CMOS Features
• Advanced BIOS Features
• Advanced Chipset Features
• Integrated Peripherals
• Power Management Setup
• PC Health Status
• Frequency/Voltage Control
• BIOS Security Features
• Load Default Settings
• Save & Exit Setup
• Exit Without Saving
NOTES
• The screenshots used in this section are for illustration only. The values displayed may not be
the same as those in your computer.
• In the descriptive tables following each of the menu screen illustrations, settings in
boldface
are
the default and suggested settings.
Summary of Contents for EL1358
Page 1: ...eMachines EL1358 Service Guide PRINTED IN TAIWAN...
Page 6: ...vi EL1358 Service Guide...
Page 14: ...6 EL1358 Service Guide...
Page 46: ...38 EL1358 Service Guide 7 Remove the front I O and card reader assembly from the bracket...
Page 80: ...72 EL1358 Service Guide...
Page 94: ...EL1358 Service Guide 86...
Page 98: ...90...


