background image

11

© 2022, Elon Group AB. All rights reserved.

WARNING!

Fire danger!

– The oil residue in the grease filter may catch fire.Clean 
the grease filter at least once every 3 months.Never 
operate the device without the grease filter .
– The oil residue in the grease filter may catch fire. Never 
work with open flame (ex. flambe) near the device. The 
apparatus is allowed to be installed near a solid fuel (e.g. 
wood or coal) heater only if it has a non-removable cover. 
No sparks should be scattered.
– Hot oils and fats catch fire easily. Hot oils and fats 
should never be left unattended. Never try to put out fire 
with water. Turn off the cooker. Kill the flames carefully 
using a cover, fire blanket or a similar material.
– Gas operated cookers that do not have a cooking pot 
on create high heat during operation. A ventilation device 
placed over the cookers can be damaged or burned for 
this reason. Operate gas cookers only when there
is a cooking pot on them.
– Operating multiple gas cookers simultaneously creates 
high heat. A ventilation device placed over the cookers 
can be damaged or burned for this reason. Never 
operate two gas cookers longer than 15 minutes on high 
flame setting. A large burner over 5kW (Wok) has the 
power of two gas burners.

WARNING!

Electrocution hazard!

– A malfunctioning device may cause electric shock. 
Never turn on a malfunctioning device. Pull the power 
plug and switch off the circuit breaker. Call customer 
service.
– Unsuitable repairs pose hazards. Repairs and 
replacement of damaged power cords must be 
performed only by a customer services technician trained 
by us. If the device is malfunctioning pull the power plug 
and switch off the circuit breaker. Call customer service.
– Water leaking into the device may cause electric shock. 
High pressure or steam cleaners must not be used.

Summary of Contents for CSF2600X

Page 1: ...User manual Kitchen Hood Bruksanvisning K ksfl kt CSF2600X...

Page 2: ...av v r produkt Denna bruksanvisning medf ljer f r att hj lpa dig att anv nda produkten Med hj lp av instruktionerna kan du l ra dig om din nya produkt s snabbt som m jligt Kontrollera att produkten du...

Page 3: ...3 2022 Elon Group AB All rights reserved WARRANTY Guarantee of quality for the consumer does not include wear parts GARANTI Kvalitetsgaranti g ller f r konsument omfattar ej f rbrukningsdelar...

Page 4: ...4 2022 Elon Group AB All rights reserved CONTENTS INNEH LL ENGLISH 5 SVENSKA 33...

Page 5: ...K DANGER OF POISONING 10 USAGE WITH AND WITHOUT CARBON FILTER 15 CARBON FILTER REPLACEMENT 16 CLEANING AND PREVENTIVE MAINTENANCE 17 APPLIANCE POSITION 18 CONTENT OF PACKAGE 20 OVERVIEW OF HOOD 20 ASS...

Page 6: ...lace If you pass the device onto others make sure you also give this guideline and safety data Disregarding this guideline may result in severe injuries and defects in the device Please keep in mind t...

Page 7: ...7 2022 Elon Group AB All rights reserved TECHNICAL DRAWING Fig 1 600 20 41 284 500 462 223 134 5 0 4 0 284 AX 425 174...

Page 8: ...nstallation Make sure that the installation place allows the user to easily unplug the power cable in case of any danger Do not touch your product s lamps when they work for a long time The lamps may...

Page 9: ...ical service or any other personnel qualified at the same level in order to avoid any dangerous situation In case of any deflagration de energize the cooker hood and cooking appliances and cover the f...

Page 10: ...oxic gases through flue such as ventilated gas oil wood or coal burning heaters shower heaters water heaters etc Fig 2 Ventilated goods e g gas oil wood or coal burning heaters shower heaters water he...

Page 11: ...ntilation device placed over the cookers can be damaged or burned for this reason Operate gas cookers only when there is a cooking pot on them Operating multiple gas cookers simultaneously creates hig...

Page 12: ...e appliance to cool before cleaning or maintenance process Switch off the fuse or pull out the mains plug from the socket There is risk of damage due to ingress of moisture in the electronics Do not c...

Page 13: ...me level in order to avoid any dangerous situation CAUTION Accessible components might be heated when used with cooking devices NOTICE When the bulbs of the device malfunction switch off the circuit b...

Page 14: ...Never clean the control elements with a wet cloth The surface could be damaged due to a wrong cleaning process Clean stainless steel surfaces only in their brushing direction Do not use a stainless s...

Page 15: ...he circulating air Consult your authorized dealer to know the different opportunities available for enabling the appliance to function in circulating air mode You can buy the accessories required for...

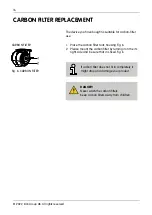
Page 16: ...your product 1 Place the carbon filter to its housing Fig 6 2 Please mount the carbon filter by turning it on the its right side and be sure that it is fixed Fig 6 The device you have bought is suita...

Page 17: ...t may scratch materials that require rubbing and other aggressive cleaning agents containing sand soda acid or chlorine Clean the stainless steel surfaces in their brushing direction only Do not use s...

Page 18: ...without jamming When the hood is installed the product must have at least 65cm clearance with the electricity cookers and 75cm with cookers operating on gas or other fuels Fig 7 Fig 7 Washing in Dishw...

Page 19: ...not allow children to play with the packaging materials Save energy Ensure there is adequate air inlet to enable your good to work efficiently with low operating noise Adjust the fan speed according t...

Page 20: ...ONTENT OF PACKAGE OVERVIEW OF HOOD Fig 8 Disposal in environmentally compliant way Dispose of the packaging material in an environmentally compliant way This appliance is marked in accordance with Eur...

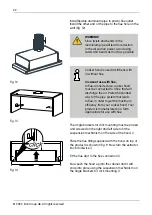
Page 21: ...king hood Fig 9 1 Flap Pin Socket 2 Flap Pin Insert the plastic pin area no 2 on the pin socket on the motor exhaust area no 1 Fig 10 Fig 10 Then bend the flap lightly to insert the other pin on the f...

Page 22: ...tion Now push the hood up into the cabinet and it will snap into place using the suspension mechanism on the angle brackets for click mounting Fig 12 Fig 13 Fig 14 Cooker hood is used in kitchens with...

Page 23: ...he side of the cabinet to fit the hood Now mount the product using screws directly on the angle brackets at points A B C D Note New holes can be drilled for the angle brackets on the hood if the exist...

Page 24: ...e the device in second level switch the key to position Fig 18 C 4 Switch the on off button on the control panel to to turn the device off Fig 18 C 5 Switch the light on off button on to to turn the d...

Page 25: ...peed level 3 Fig 20 Touch Button To activate timer function press and hold any of buttons and for 3 seconds Then 15 minute timer function will be activated and the product will turn off automatically...

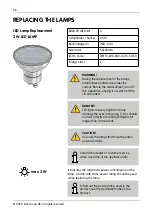
Page 26: ...ct see the declaration label in the product It indicates the maximum power consumption of the lamp A lamp with same power rating should be used when replacing the lamp CAUTION Use only the lamps that...

Page 27: ...otection metal halide lamp must be used Ensure that the lamp is popping out by pressing the lamp from behind Remove the lamp by turning a quarter of a round in counterclockwise Fig 16 Replace the lamp...

Page 28: ...ails To find out the power rating used in the product see the declaration label in the product It indicates the maximum power consumption of the lamp A lamp with same power rating should be used when...

Page 29: ...ance is connected as well as the main fuse of your house Is the outlet diameter of the appliance s flue adequate min 120 mm Are the metal filters clean Please check If you use the hood without flue ma...

Page 30: ...oduct s Air Intake is Weak Check The Aluminium Filter The aluminium cartridge filter should be washed once a month under normal conditions I Product s Air Intake is Weak Check The Air Outlet Flue Air...

Page 31: ...LE This product complies with the 2014 30 EC Regulation on Electromagnetic Compliance and 2014 35 EC Regulation on Low Voltage Devices LVD Directives This device complies with the Directive on the Con...

Page 32: ...32 2022 Elon Group AB All rights reserved...

Page 33: ...RA OCH RISK F R F RGIFTNING 34 ANV NDNING MED OCH UTAN KOLFILTER 39 MONTERING AV KOLFILTER 40 RENG RING OCH UNDERH LL 41 MONTERING INSTALLATION AV PRODUKTEN 42 PAKETETS INNEH LL 44 VERSIKT VER FL KTEN...

Page 34: ...enheten till andra se till att du ocks tillhandah ller denna riktlinje och s kerhetsdata Om du ignorerar denna riktlinje kan det resultera i allvarliga skador och defekter i enheten T nk p att vi inte...

Page 35: ...35 2022 Elon Group AB All rights reserved TEKNISK RITNING Fig 1 600 20 41 284 500 462 223 134 5 0 4 0 284 AX 425 174...

Page 36: ...h nder Produkten r designad f r anv ndning i hemmet till konventionell matlagning Om produkten anv nds f r ej avsedda syften kan reklamationsr tten bortfalla F lj myndigheters regler och lagar g llan...

Page 37: ...Om str mkabeln r skadad ska den utbytas av tillverkaren eller dennes serviceavdelning eller annan personal med motsvarande beh righet f r att undvika farliga situationer Vid brand koppla ifr n fl kte...

Page 38: ...i n rheten av denna luftstr m Fig 2 Ett tillr ckligt intag av frisk luft b r d rf r alltid s kerst llas Fig 3 Fig 2 Risk f r f rgiftning Fig 3 FARA Varning Kv vningsrisk F rpackningsmaterialet r farl...

Page 39: ...entilationsanordning placerad ver spisarna kan skadas eller br nnas av denna anledning Anv nd gasspisar endast d r r en kokk rl p dem Att anv nda flera gasspisar samtidigt skapar h g v rme En ventilat...

Page 40: ...tar L t apparaten svalna innan reng ring eller underh ll Sl av s kringen eller dra ut stickkontakten ur uttaget Det finns risk f r skador p grund av att fukt tr nger in i elektroniken Reng r inte kon...

Page 41: ...f r att undvika farliga situationer VARNING Tillg ngliga komponenter kan v rmas upp n r de anv nds med matlagnings utrustning OBSERVERA Om enhetens gl dlampor inte fungerar st ng av str mbrytaren och...

Page 42: ...sk f r skador Reng r aldrig kontrollelementen med en bl t trasa Ytan kan skadas p grund av en fel reng ringsprocess Reng r ytor av rostfritt st l endast i deras borstningsriktning Anv nd inte ett reng...

Page 43: ...lera ett aktivt kolfilter f r att f nga upp de mnen som orsakar illam ende i den cirkulerande luften R dfr ga din auktoriserade terf rs ljare f r att veta vilka olika m jligheter som finns f r att l t...

Page 44: ...t inte passar in helt kan det tappa och skada din produkt Enheten du har k pt r l mplig f r anv ndning av kolfilter 1 Placera kolfiltret i dess h lje Fig 6 2 Montera kolfiltret genom att vrida det p h...

Page 45: ...material som kr ver gnidning och andra aggressiva reng ringsmedel som inneh ller sand soda syra eller klor Reng r ytorna av rostfritt st l endast i deras borstriktning Anv nd inte reng ringsmedel av r...

Page 46: ...i diskmaskinen utan att det fastnar F r envis smuts kan du anv nda ett speciellt fettl sningsmedel Du kan k pa en s dan agent fr n den auktoriserade f rs ljningscentralen Mjuka upp metallfettfiltren...

Page 47: ...ill terf rs ljaren L t inte barn leka med f rpackningsmaterialet Spara energi Se till att det finns tillr ckligt med luftintag f r att din vara ska kunna arbeta effektivt med l gt driftsljud Justera f...

Page 48: ...ff 1 Kabinett 2 Frontpanel 3 Aluminiumfilter 4 Spisbelysning Avfallshantering p ett milj v nligt s tt Kassera f rpackningsmaterialet p ett milj v nligt s tt Denna apparat r m rkt i enlighet med det eu...

Page 49: ...adaptern i plast p spisk pans luftutsl pp Fig 9 1 Klaffstiftssockel 2 Flikstift S tt i plaststiftet omr de nr 2 p stifthylsan p motoravgasr ret omr de nr 1 Fig 10 Fig 10 B j sedan klaffen l tt f r att...

Page 50: ...umr ret leder till minskning av luftsugkraften undvik att anv nda vridningar och b jar s mycket som m jligt Montera ett flexibelt aluminiumr r till r kgasutloppet i plast Montera den andra nden av r r...

Page 51: ...vinkelf stena med skruvarna p sidan av sk pet f r att passa huven Montera nu produkten med skruvar direkt p vinkelf stena vid punkterna A B C och D Obs Nya h l kan borras f r vinkelf stena p huven om...

Page 52: ...n p andra niv n st ll nyckeln till l ge Fig 18 B 3 F r att st lla in enheten p andra niv n st ll nyckeln till l ge Fig 18 C 4 Vrid p av knappen p kontrollpanelen till f r att st nga av enheten Fig 18...

Page 53: ...e hastighetsniv n n r du trycker p knappen Fig 20 Touch Knappar F r att aktivera timerfunktionen h ll ned en av knapparna eller i 3 sekunder P detta s tt aktiveras en 15 minuters timerfunktion och fl...

Page 54: ...p vilken effekt som anv nds i produkten se deklarationsetiketten p produkten Den indikerar lampans maximala str mf rbrukning En lampa med samma effekt ska anv ndas vid byte av lampa OBSERVERA Anv nd...

Page 55: ...er sj lvskyddande metallhalogenlampa f r anv ndas Se till att lampan hoppar ut genom att trycka p lampan bakifr n Ta bort lampan genom att vrida ett kvarts varv moturs fig 22 Byt ut lampan genom att i...

Page 56: ...apparatens lampor g r s nder F r att ta reda p vilken effekt som anv nds i produkten se deklarationsetiketten p produkten Den indikerar lampans maximala str mf rbrukning En lampa med samma effekt ska...

Page 57: ...kringen som apparaten r ansluten till samt huvuds kringen i ditt hus r utloppsdiametern p apparatens r kkanal tillr cklig min 120 mm r metallfiltren rena Kontrollera Om du anv nder huven utan r kkana...

Page 58: ...rna m ste fungera Produktens luftintag r svagt Kontrollera aluminium filtret Aluminiumpatronfiltret b r tv ttas en g ng i m naden under normala f rh l landen Produktens luftintag r svagt Kontrollera l...

Page 59: ...L Den h r produkten f ljer direktiven 2014 30 EC f rordning om elektromagnetisk verensst mmelse och 2014 35 EG f rordning om l gsp nningsenheter LVD Denna enhet verensst mmer med direktivet om kontrol...

Page 60: ...Elvita products are distributed and marketed by Elon Group AB Elon Group AB B cklundav gen 1 702 03 rebro Sweden ELON GROUP 46 0 10 220 40 00 ELONGROUP SE Support and service ELVITA SE...

Reviews: