background image

Cover

Release

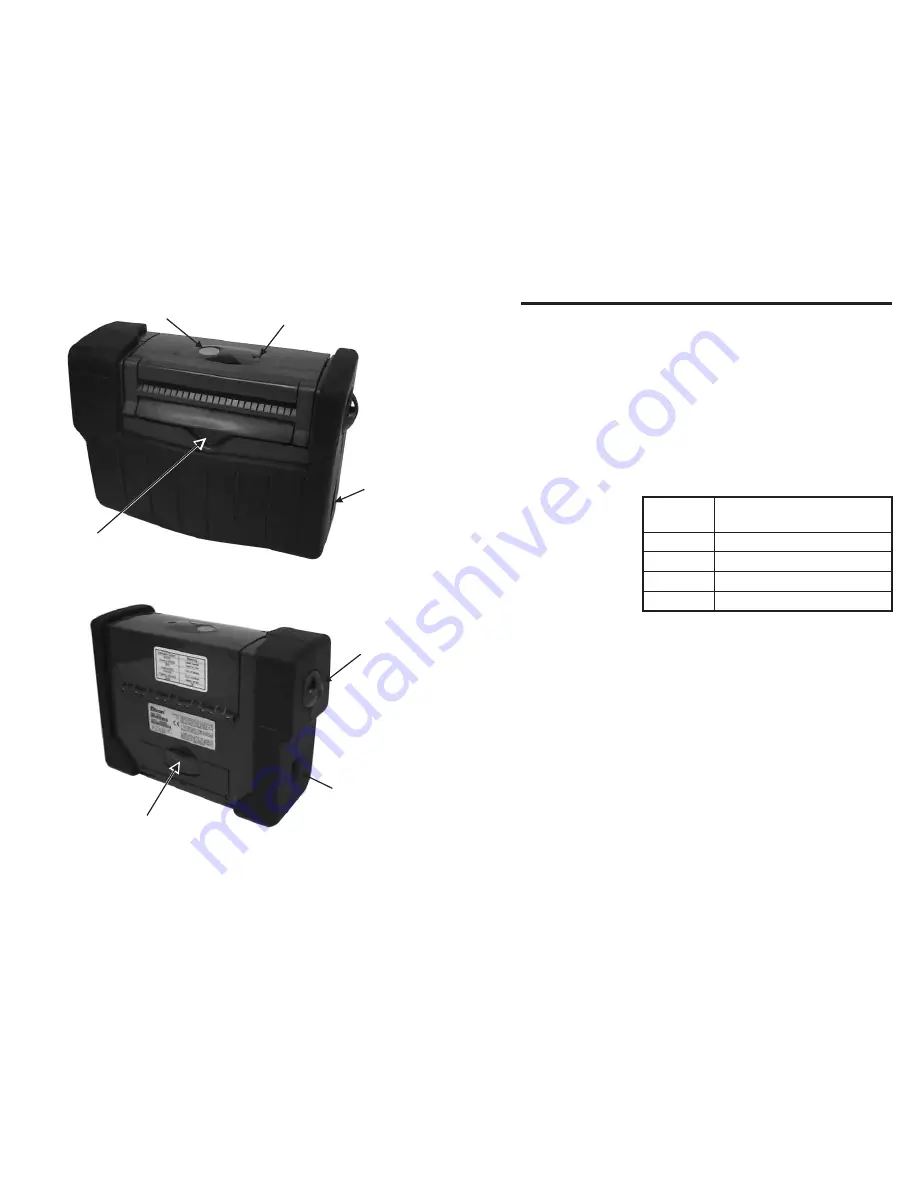
FEED Control

POWER/FAULT

Indicator

Power

Port

Serial

Interface

Connector

Battery Door

Release

Strap

Mount

Figure 2-1

Controls & Indicators

Operation

10

980088-001 Rev. A

The POWER

Indicator

The POWER/FAULT indicator depicts the cur-
rent printer state of operation. To maximize
battery life, the printer automatically switches
between two power modes: ON & SLEEP
MODE.

Sending data to the printer or pressing the
FEED control will cause the printer to automat-
ically switch from SLEEP MODE to ON mode.
This feature means that the printer is

Always

Ready

for use, provided a charged battery is

installed.

Indicator

Color

Meaning

GREEN

On Mode

RED

Paper Empty

DARK

Sleep Mode

ORANGE

Error condition, see Appendix A

If an error condition should occur, the indicator
will glow ORANGE. After 10 seconds, the error
condition will be automatically reset and the
indicator will change to GREEN. Tapping the
FEED control will also reset the error condition.

If the POWER indicator should fail to light,
glow RED even when labels are loaded, or flash
in an erratic fashion, refer to the Trouble Shoot-
ing section in Appendix A.

The  operation of  the indicator will change
when the overnight charger is attached. Refer
to the

Charging The Battery

section for in-

dicator operation when charging.

Operation

980088-001 Rev. A

11

Summary of Contents for P2242 Series

Page 1: ...41 Moreland Road Simi Valley CA 93065 805 579 1800 FAX 805 579 1808 980088 001A User s Manual No 980088 001 Rev A 1996 Eltron International Inc P2242 Series Portable Direct Thermal Printers User s Manual ...

Page 2: ...ed from ELTRON by calling 1 800 344 4003 Description Part Number BT1 NiCad Battery Pack 104005 001 BE1 12V Battery Eliminator 104006 001 BE2 24V 36V Battery Eliminator 104006 002 CG1 2 Slot Fast Charger 104003 001 VH1 Vehicle Mount Bracket 104004 001 Serial Interface Cable 6 DB 9 to RJ 11 300065 001 User s Manual Programmers Manual 980068 001 980009 001 Supplies 980088 001 Rev A 25 ...

Page 3: ...e RG2 OHP England 800 344 4003 44 0 1734 752 024 FAX 805 579 1808 FAX 44 0 1734 752 005 e mail techsup eltron com BBS 805 579 3445 RETURN MATERIALS AUTHORIZATION Before returning any equipment to Eltron for in warranty or out of warranty repair contact Repair Administration for a Return Materials Authorization RMA number Repack the equipment in the original packing material and mark the RMA number...

Page 4: ...rated in a commercial environment This equipment generates uses and can radiate radio frequency energy and if not installed and used in accordance with the instructions may cause harmful interference to radio communications However there is no guarantee that interference will not occur in a particular installation Operation of this equipment in a residential area is likely to cause harmful interfe...

Page 5: ...n print head Printing stops and POWER indicator lights ORANGE 1 Possible problem with label gap sensor Perform AutoSense adjustment 2 Possible problem with label stock Use only Eltron approved labels and tags 3 Possible label jam 4 Communication error Check interface cable and communication settings 5 Possible software problem Check for syntax error Check for memory overrun error Form Storage Area...

Page 6: ...s http www eltron com eltron e mail techsup eltron com BBS 805 579 3445 The BBS supports data rates up to 28 8 BPS with No Parity 8 data bits and 1 stop bit n 8 1 Communications software should have an ANSI Terminal Mode not MS Win dows Terminal such as Mustang Software s Q Modem CompuServe e mail 102251 1164 Customer Service 800 344 4003 To order printer supplies and accessories Eltron accepts Ma...

Page 7: ... model CG1 is available from Eltron Refer to Appendix B for accessories Do not open dispose of in fire or short circuit P2242 batteries Prolonged short circuiting can cause high battery temperatures which can result in personal injury and or permanent battery damage WARNING Operation 20 980088 001 Rev A 1 Getting Started This section provides information on printer setup and installation of access...

Page 8: ...TTERY CONSERVATION MODE The printer will automatically reduce the print speed to 1 5 ips inches per second and continue operating When the battery is low a label with the message BATTERY LOW will be printed and the printer will con tinue operating at 1 0 ips When the battery is too low to print a label with consistent quality the printer will print a label with the message BATTERY VERY LOW Thebatt...

Page 9: ... across the amber area of the print head Allow the print head to dry for 1 minute before re loading labels Operation 18 980088 001 Rev A Check List Your printer kit contains the items listed below The P2242 printer The rechargeable battery and overnight charger Interface Cable and Shoulder strap Create A Label Tools software disk with on line documentation Printer User s Guide EPL2 Programming Man...

Page 10: ...arted 4 980088 001 Rev A AutoSense Gap Sensor Adjustment To activate the AutoSense feature first remove the printer battery Load labels into the printer do not use the dispenser then press and hold the FEED Control while re installing the bat tery Release the FEED Control when the indi cator starts flashing RED The printer will advance 3 4 labels while performing the ad justment When the adjustmen...

Page 11: ...ndicator will switch from GREEN to ORANGE or RED If this condition occurs the AutoSense Gap Sensor Adjustment feature on the following page should be activated to ad just the sensitivity of the sensor Operation 16 980088 001 Rev A Step Charge Battery Before using the printer for the first time the battery must be charged After inserting the battery attach the overnight charger to the charger port ...

Page 12: ...ng refer to Appendix A Trouble Shooting Getting Started 6 980088 001 Rev A Step Close the top cover and lift the head latch so that it engages the slots on both sides of the top cover Press down on both sides as shown to lock the print head Tap the FEED control once the POWER indi cator will switch to GREEN when the printer is ready for printing Latches Figure 2 5 Close The Cover Operation 980088 ...

Page 13: ...f the leader through the print head latch Figure 2 3 Insert the Roll Figure 2 4 Automatically Dispensed Label Threading Operation 14 980088 001 Rev A Step Install Software Start your computer After DOS has loaded insert the Create A Label Tools diskette into your floppy disk drive From the DOS prompt enter B INSTALL or A INSTALL if you placed the diskette in drive A Press the Enter key Follow the ...

Page 14: ...ls linerless labels tags and continuous pa per To load the P2242 open the top cover by lifting up on the print head latch as shown in Figure 2 2 Pull the print head latch forward and tilt the top cover back to access the roll holder Figure 2 2 Open The Cover Operation 980088 001 Rev A 13 ...

Page 15: ...ect thermal paper direct thermal adhesive backed labels or non adhesive tags If adhesive backed labels are used that DO NOT lay flat on the backing liner the exposed edges may stick to the printhead inside the printer causing the label to peel off from the liner and jam the printer Always use high quality Eltron approved labels Supplies can be ordered from ELTRON by calling 1 800 344 4003 If you s...

Page 16: ... Ready for use provided a charged battery is installed Indicator Color Meaning GREEN On Mode RED Paper Empty DARK Sleep Mode ORANGE Error condition see Appendix A If an error condition should occur the indicator will glow ORANGE After 10 seconds the error condition will be automatically reset and the indicator will change to GREEN Tapping the FEED control will also reset the error condition If the...

Reviews: