background image

  IPTV Set-Top Boxes NV-720. User manual. Firmware version 1.1.0

18

4.2  Universal Bluetooth console for set-top box and TV

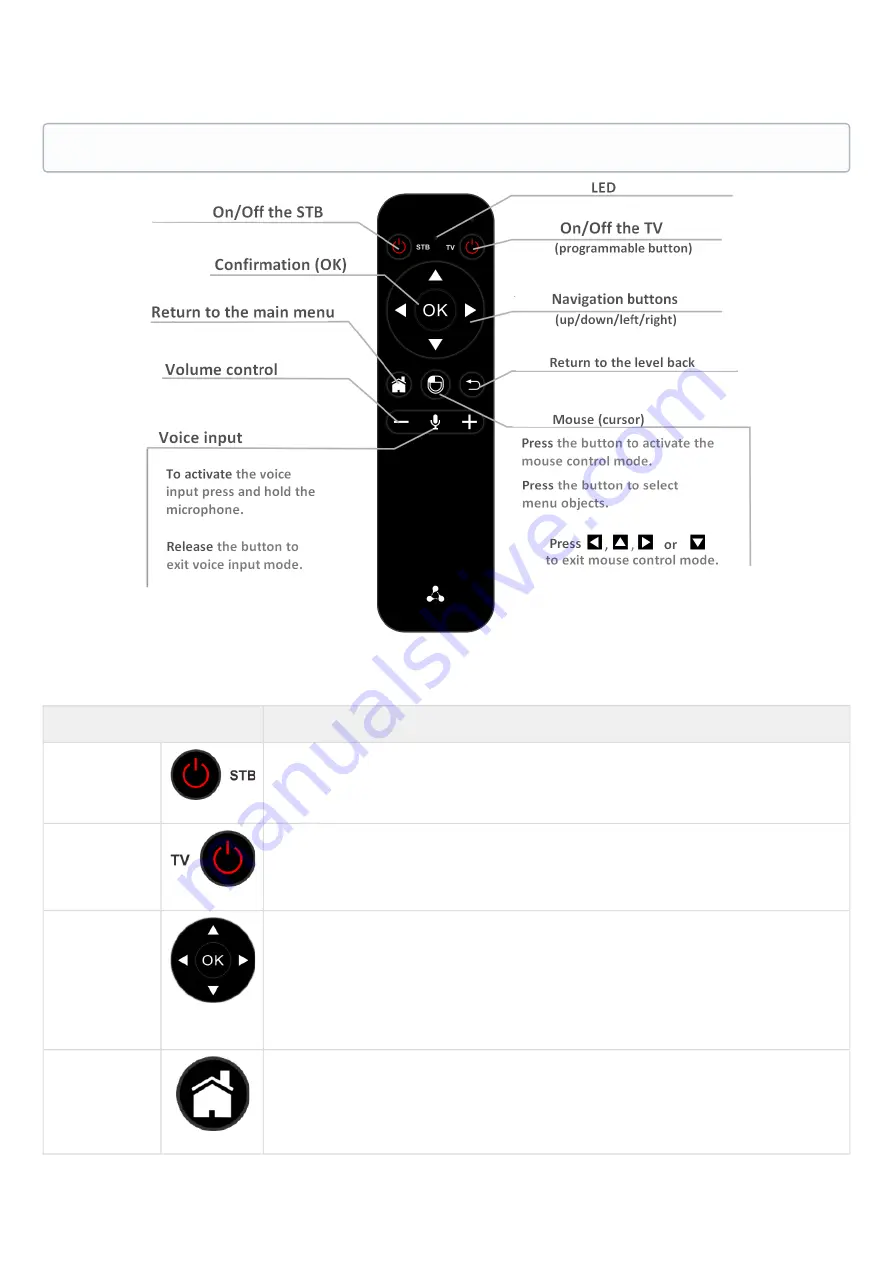
Figure 7 — Universal Bluetooth RC for mediacenter and TV controlling

Та

ble 6 — Bluetooth RC buttons assignment

Buttons

Target

On/Off STB

Power on/standby. Turns the set-top box on or puts it on standby mode.

On/Off TV

TV power on/standby. Turns the TV on or puts it on standby mode.

To assign the function to the button, it should be programmed, see 

Appendix B

Navigation 
buttons

Buttons «up», «down», «right», «left» are used to select menu items.

When playing video and music, the «right», «left» buttons are used to move to the 
required episode.

«

ОК

» button is used to select or confirm an option.

HOME

Return to the main menu.


Supported only in NV-720-WB

Summary of Contents for NV-720

Page 1: ...Set top boxes NV 720 NV 720 WB User manual Firmware version 1 1 0 ...

Page 2: ...emote control URC of set top box and TV 14 4 2 Universal Bluetooth console for set top box and TV 18 5 Delivery Package 20 6 Installation Procedure 21 6 1 Safety measures 21 6 2 Set top box installation rules 21 6 3 Startup rules 21 7 Set top box control 25 7 1 Interface elements and general control principles 25 7 1 1 General parameters 25 7 1 2 General principles of typing 26 7 1 3 Video and mus...

Page 3: ...ection Device configuration 50 9 1 4 Section Add a device 58 10 Set top box firmware update 59 10 1 General information 59 10 2 Update from USB drive 61 10 3 Factory default restoring 62 10 4 Update and configuration via ACS 63 11 Appendix А Manual for programming the URC 64 12 Appendix B Manual for programming the button ON OFF TV for bluetooth RC 65 ...

Page 4: ...IPTV Set Top Boxes NV 720 User manual Firmware version 1 1 0 4 Document version Issue date Revisions Version 1 0 28 09 2020 First issue Firmware version 1 1 0 Android Version 9 ...

Page 5: ...er referred to as a mediacenter IPTV set top box Before working with the device it is recommended to read the following manual 1 2 Symbols Symbol Description KEY Keyboard keys are written in upper case and enclosed in angle brackets Notes and Warnings Notes contain important information tips or recommendations on device operation and setup Warnings inform users about hazardous conditions which may...

Page 6: ...Player The device is a universal media player that allows you to play media content via local wireless wired network for example from a PC or other devices connected to a local network from external storage external hard drive USB flash drive The player has a clear interface and supports functions for working with files copy delete move Internet applications The mediacenter functionality can be ex...

Page 7: ... USB mouse wired wireless connection Figure 1 Application diagram 2 3 Main technical parameters Таble 1 Main technical parameters General parameters CPU Amlogic S905X2 RAM DDR3 RAM 2 GB ROM eMMC system memory 8 GB OS Android 9 Protocols IPv4 HTTP DHCP IGMP V2 V3 ICMP RTP RTSP DLNA SAMBA HLS 1 Supported only in NV 720 WB ...

Page 8: ...ile formats M3U XSPF Web browser HTML 3 2 HTML 4 01 HTTP 1 1 1 0 RFC2068 DHTML JavaScript V1 1 1 2 1 5 Unicode UTF 8 CSS3 support Display modes UHD 4K FHD 1080p i HD 720p i File systems NTFS FAT32 EXT2 EXT3 Ethernet interface parameters Number of interfaces 1 Electrical connector RJ 45 Data rate Mbps auto detection 10 100 duplex half duplex Standards support 10 100BASE T Wireless interface paramet...

Page 9: ...nternal Configuration Control Local control using the built in graphical interface Remote control with SSH TR 069 ADB protocols Physical specifications and ambient conditions Supply voltage 5 3 V DC Power consumption up to 12 W USB port load capacity up to 0 5 А Operating temperature range from 5 to 40 С Relative humidity up to 80 Dimensions WxHxD 102х20х89 mm Weight 0 1 kg 1 Supported only in NV ...

Page 10: ... front panel indicate the current state of the device The list of LEDs status is described in the table 2 Таble 2 Device status LED indication LED status Device state Solid green The device is turned on and ready to go Solid red The device is plugged in but is in standby mode Off The device is unplugged or defective 3 2 Rear panel of the device The rear panel of device is depicted in figure 3 Figu...

Page 11: ...r supply connector 3 HDMI HDMI connector for high quality digital video and audio transmission to a TV 4 AV OUT AV OUT connector is designed to transmit analog video and audio to the acoustic system or TV 5 LAN 10 100 Ethernet LAN interface RJ 45 connector for service provider network connection 6 IR Remote IR receiver connector ...

Page 12: ...d out in 100BASE T mode Flashes Disabled Data transfer is carried out in 100BASE T mode 3 3 Side panel of the device USB port Figure 5 Side panel of the device There is a USB 2 0 connector on the side panel of the device labeled with for connecting peripherals such as external hard drives flash drives and input devices keyboard and mouse to the device You can connect external devices such as USB H...

Page 13: ...PTV Set Top Boxes NV 720 User manual Firmware version 1 1 0 13 Warning Careless handling of this function can lead to device malfunctions Before using the F button refer to the Factory default restoring ...

Page 14: ...nment Figure 6 Infrared URC for set top box and TV URC can operate in two modes TV control unit of TV CONTROL set top box control Only the TV unit buttons are used to control the TV The remaining buttons are used for set top box controlling For TV controlling the TV CONTROL buttons should be assigned to the TV RC buttons The description of the RC buttons programming is given in the Appendix A ...

Page 15: ...n s functionality is set depending on the application Green button The button s functionality is set depending on the application Yellow button The button s functionality is set depending on the application Blue button The button s functionality is set depending on the application Playback control Playback control buttons PLAY Pause continue playback REW Rewind FWD Fast forward MUTE Mute unmute RE...

Page 16: ...ursor control mode and back MENU Used in the Explorer application to bring up the context menu Navigation buttons Buttons up down right left are used to select menu items During the video and music playback the right and left buttons are used to navigate to the desired part ОК button is used to select or confirm an option HOME Return to the main menu RETURN Return to level back Volume Volume contr...

Page 17: ...rsion 1 1 0 17 CH Sequential channel switching In ZOOM mode adjust the image size Digital keyboard Used to navigate through the channels digits entering DEL Delete characters when typing F The button functionality is set depending on the menu section ...

Page 18: ...rns the set top box on or puts it on standby mode On Off TV TV power on standby Turns the TV on or puts it on standby mode To assign the function to the button it should be programmed see Appendix B Navigation buttons Buttons up down right left are used to select menu items When playing video and music the right left buttons are used to move to the required episode ОК button is used to select or c...

Page 19: ...ursor control mode Press to select menu objects similar to the function of mouse left button To exit mouse cursor control mode press up down right or left RETURN Return to level back Volume voice input Adjust the volume with and To activate the voice input press and hold the microphone button located in between the button Release the button to exit voice input mode ...

Page 20: ...y Package Standard delivery package includes Set top box Power supply adapter 5 3 V 2 А Infrared RC Batteries for RC 2 pcs HDMI cable Category 5e Ethernet cable optional Remote infrared receiver optional Bluetooth control optional Installation and initial configuration guide ...

Page 21: ...ormal conditions prior to turning it on The device should be installed in a horizontal position following the safety instructions 6 3 Startup rules STEP 1 Connecting the set top box to the TV Connect the HDMI cable to the device and HDMI connector Figure 8 Figure 8 Connecting mediacenter to the TV STEP 2 Connecting the set top box to the provider s network The Ethernet cable provided by your ISP i...

Page 22: ...ction method you need a home Wi Fi router Wi Fi router usage allows you to create a local network When choosing this connection method the device can play media content from the home network Enable Wi Fi on your router for more information see your router documentation Next you need to connect the set top box to your Wi Fi network router To do that refer to the section Co nnecting to the Wi Fi net...

Page 23: ...adapter to the 5 V power connector of the device Next connect the adapter to a power supply Figure 12 Figure 12 Example of mediacenter connecting STEP 4 Turning the set top box on After connecting the device to the power supply wait until the device is fully loaded this may take about a minute Then switch the TV to the signal source to which the device is connected for more information see the doc...

Page 24: ...Figure 13 Mediacenter screensavers through set top box launching When the set top box is turning on for the first time a firmware update may begin Please don t impede this As soon as the firmware is updated you will be able to fully enjoy all features of the device ...

Page 25: ...ch section contains its own navigation and control subsystem A detailed description of the main sections is given below The device can be controlled using the RC included in the delivery package keyboard mouse set by the user if necessary This section describes the general device control principles The table 7 shows assignment of the keyboard keys and RC buttons Таble 7 General principles of set t...

Page 26: ...nges press RETURN button Keyboard settings are configured in the Settings Keyboard detailed description is given in the Keyboard section 7 1 3 Video and music management This section describes the RC usage principles when playing video music 1 Playback control to start playback press the PLAY or OK button to pause playback press the PLAY or ОК to stop playback and return to the main menu press the...

Page 27: ...tles press the SUBT button or use the navigation buttons up down choose the required option and press ОК button 7 Screen size changing To zoom the image in or out press the button to switch to the ZOOM mode Use the navigation buttons to select the required display mode Box image broadcasting without zooming Full the image will be enlarged to fit the screen Panscan the image will be stretched acros...

Page 28: ...e the cursor backwards and forwards to the desired place ZOOM zoom in or out VOL volume adjustment MUTE turn the sound off on AUDIO audio track selection SUB select disable subtitles 7 1 4 Image viewing This section describes the remote control usage principles when viewing images ZOOM start stop the ZOOM mode ...

Page 29: ...gation buttons left right previous next image in the ZOOM mode move the image left and right Navigation button up down in the ZOOM mode move the image up and down PLAY start stop the slideshow RETURN return to the level back CH in the ZOOM mode zoom in or out the image ...

Page 30: ... Visual indication of the provider s network connection current status Layout Description Connection to the provider s network is performed via a wired Ethernet interface Highlighted with white Ethernet interface is connected Highlighted with grey Ethernet interface is not connected Connection to the provider s network is provided via Wi Fi 1 Highlighted with white connection via Wi Fi is made Hig...

Page 31: ...The Application store menu contains various applications that can be installed and used in the set top box IPTV application The application allows to view IP TV channels and the TV program provided by the Internet operator Control by voice commands is available Voice search by program description and tags Menu File Manager Menu allows multimedia files selection and viewing from external hard drive...

Page 32: ...ttons right left on the RC choose Store and confirm with the ОК button To exit the Store menu and return to the main menu press the HOME button Figure 15 Store menu layout To navigate through the Store app bookmarks use the navigation buttons right left Use the up and down buttons to select an application To confirm your choice press ОК Application composition and the main menu layout may be diffe...

Page 33: ...and hold the F button on the RC A dialog box will appear with enter PIN code query Enter the PIN code for example 0000 four zeros and press ОК PIN code may differ depending on the firmware version and provider customization In appeared dialog box select eltex media ru or enter another address information about which can be obtained from your provider 8 2 1 3 Application Management 8 2 1 3 1 Instal...

Page 34: ...V 720 User manual Firmware version 1 1 0 34 1 2 8 2 1 3 2 Removal To remove the application from the system Using navigation buttons choose the application and press ОК Press the Remove button in personal application menu ...

Page 35: ...2 1 3 3 Update If an update is available for the application the application description will indicate Update available To install the new application version Using navigation buttons choose the application and press ОК Press the Update button in personal application menu ...

Page 36: ...ication press Install button If you do not want to receive notifications about new applications check the box Update automatically and press Install You can cancel these settings in the Settings section of the Store menu 8 2 1 3 4 Update parameters configuration To perform update settings use the left and right buttons to select the Settings ...

Page 37: ...be updated automatically Update firmware manually if enabled you can only update firmware manually unless the ISP publishes mandatory firmware with the Forced flag 8 2 2 IPTV application 8 2 2 1 General Description The IPTV application allows you to view IPTV channels and TV programs provided by the Internet service provider You can open your playlist from a flash drive or specify the playlist URL...

Page 38: ...accessing media resources of a local network from your computer and other devices included in it connected hard disks and flash drives Use the navigation buttons left and right to navigate to the Explorer menu using the RC choose Explorer and confirm the choice by pressing ОК button To exit the Explorer menu and return to the main menu press the HOME button ...

Page 39: ...s external hard drives DLNA server USB driver is a directory that contains a list of files stored on external USB drives connected to the device USB flash drives and disks Network resources is a directory that contains a list of available samba resources on the local network DLNA servers is a directory that contains a list of available DLNA server resources Field to view the contents of the specif...

Page 40: ...ight left navigation buttons To open the folder or file press the ОК 2 Files playback Select a file from the list using the navigation buttons and press the ОК button See sections Video and Music management and Images viewing for more information about video music and picture playback RC operating 3 Context menu Explorer provides the ability to copy delete move files as well as create and delete f...

Page 41: ...IPTV Set Top Boxes NV 720 User manual Firmware version 1 1 0 41 4 Information viewing In this menu you can view information about the file or folder To call the information window press the INFO button ...

Page 42: ...h includes the names of the main items with the ability to navigate to the parameters The composition of the Settings menu may differ depending on the provider s customization used Таble 10 Description of the configuration sections Section Description Network and Internet Wi Fi 1 Wi Fi network setup Ethernet Wired network setup Proxy server setup Proxy server setup IP address setup Allow the confi...

Page 43: ... of the Power button on the RC Image density Allow setting the dpi value HDMI CEC HDMI CEC parameters setting Playback settings Adjusting HDMI frequency to the frequency of the content Change the HDMI frequency to the content frequency before playback starts Initial bitrate for HLS Allow selecting the initial bitrate for HLS playback UDP to HTTP proxy settings Allow enabling and assigning the para...

Page 44: ...t Proxy server settings proxy server parameters setting IP address settings set the Ethernet interface statically or using DHCP Reset the network settings reset the network settings to the default settings 9 1 1 1 Connecting to the Wi Fi network Choose the Network Turn on Wi Fi press ОК on the RC to see the available networks Use the navigation buttons to select a wireless network from the list of...

Page 45: ...IPTV Set Top Boxes NV 720 User manual Firmware version 1 1 0 45 4 In the dialog window specify the password to connect to the wireless network ...

Page 46: ...IP address MAC address of Wi Fi Signal level Proxy server setup IP address setup The network can be deleted disconnect from the network and delete the network from the saved by pressing Forget network Section Accounts and Log in Settings Аccounts and Log in The option to use the Google account is available Account will be used in services and applications of Google Play Market Youtube etc ...

Page 47: ...IPTV Set Top Boxes NV 720 User manual Firmware version 1 1 0 47 ...

Page 48: ...Applications Settings Applications The Applications allows you to control the system and downloaded applications Downloaded applications are applications that have been installed by the provider through the application store or applications that the user has installed by himself ...

Page 49: ...options Оpen launch an application Stop stop the application close the application Remove remove an application Size in memory application size in MB Remove the data reset the default settings Clear the cash clear the buffer memory area used by this application Delete the default settings if the default settings are set Notifications enable disable notifications from the application Permissions al...

Page 50: ... 1 0 50 9 1 3 Section Device configuration Settings Device configuration 9 1 3 1 1 About Settings Device configuration About The section About is for informational purposes In this section you can find out the device model firmware number and Android version ...

Page 51: ...ion Language The Language section allows selecting the system language Russian and English languages are available 9 1 3 4 4 Кeyboard Settings Device configuration Кeyboard The Keyboard section allows configuring the virtual keyboard input settings and language settings for the connected external keyboard By default the Android AOSP is set for virtual keyboard For the external keyboard it is possi...

Page 52: ...device that was before entering the sleeping mode Go to launcher after exiting the sleeping mode the screen will display the launcher Behavior with a short press on the POWER button of the POWER button on the RC Available options To do nothing set top box will not react to the short press of the POWER button Sleep the set top box will switch to the sleeping mode Interpret as long press after you p...

Page 53: ...touch play automatic detection of the TV when the set top box is on If the TV is on standby mode it will turn on automatically Auto power state the set top box will automatically turn on off with the TV Or TV will automatically turn on off with the set top box Auto change language the language on the set top box is the same as on TV ...

Page 54: ...ters can be set in the Playback settings section The following settings are available Adaptation of HDMI frequency to frequency of content before starting playback changes the HDMI frequency to the content frequency Start HLS bitrate selection of the start bitrate while HLS playback UDP to HTTP proxy Configuration enabling and setting the Udpxy server ...

Page 55: ... Sound section you can enable system sounds and disable the build in decoder in case of an external decoder receiver or TV ussage Additional sound settings Digital sound PCM use build it decoder LPCM audio is decoding using the build in decoder HDMI RAW audio is decoding using the external decoder audio receiver or TV ...

Page 56: ... on the external drives 9 1 3 10 10 Google Аssistant Settings Device settings Audio The parameters for the personal assistant settings are available in the Google Assistant menu item 9 1 3 11 11 Screen saver Settings Device settings Screen saver Allows to activate the screen saver mode select the period of inactivity at which the screen saver will start 9 1 3 12 12 Safety and limitations Settings ...

Page 57: ...IPTV Set Top Boxes NV 720 User manual Firmware version 1 1 0 57 ...

Page 58: ...oth RC to the set top box it is necessary to Go to the Settings Add the device Simultaneously press and buttons to activate the bluetooth RC The LED will light up and then go out for 3 seconds When the light flashes you can release the buttons If the set top box detects the RC the name of the RC which is ELT 01 will appear on the screen After detecting the ELT 01 RC press ОК to connect the RC The ...

Page 59: ...date system with the removal of all user data or restore the device to work in case of damage to the working firmware power off the device during the update disconnect during the update etc To ensure that the firmware can be changed in the absence of the Internet or in the absence of an update server provider it is possible to update the firmware from the local drive Any drive with a USB port can ...

Page 60: ...et Top Boxes NV 720 User manual Firmware version 1 1 0 60 If there is no firmware in the application store you will see a corresponding inscription You may also see a notification that an update is available ...

Page 61: ...update 10 2 Update from USB drive A prerequisite for updating firmware from a USB drive is the presence of the installed File manager and Application store these applications are included in all firmwares The procedure for updating from USB drive Copy the firmware file to the root or any other directory of the USB drive Connect the USB drive to any set top box USB port Run the File manager applica...

Page 62: ...and press the ОК button on the remote control Confirm the start of the update process The update progress dialog will start After the update process device will automatically restart 10 3 Factory default restoring The procedure for updating via recovery All user data and applications will be saved with this updating method ...

Page 63: ...A zip Update through USB disk Choose the ota firmware image file After that the update will begin When the update process is complete you must reboot the set top box 10 4 Update and configuration via ACS By default the set top box is configured to communicate with the ACS server with acs eltex local host address You can get more information on how to configure and connect the set top box to the AC...

Page 64: ... brighter red LED appears about 3 seconds It means that the transition to the button programming mode is done Press the button which should be programmed The red LED will start to flash Direct the infrared transmitter of the programmable RC to the TV RC hold the remotes at a distance of 3 5 cm and press the button on the RC of the TV which functions you want to transfer After successful programmin...

Page 65: ... button again When LED starts to flash the RC button is ready to receive the new function Point the set top box and the TV RC at each other keep the distance around 3 5 Press the On Off button on the TV RC If teaching is successful the red light will flash 3 times after that it will be on permanently If teaching is not successful the red light will flash fast and after 10 seconds it will be on per...

Page 66: ...pport downloads For technical assistance in issues related to operation of ELTEX Enterprise Ltd equipment please contact our Service Centre If you have a Service desk account log in and submit a request detailing the problem follow the link https servicedesk eltex co ru sd If you do not have a Service desk account use the feedback form on our website https eltex co com support ...

Reviews: