


12
Installation and start-up
Sensor Sewi KNX TH-L-Pr
• Version: 17.11.2016 • Technical changes and errors excepted.
2.5. Notes on mounting and commissioning
Never expose the device to water (e.g. rain) or dust. This can damage the electronics.
You must not exceed a relative humidity of 95%. Avoid condensation.
The air slots on the side must not be closed or covered. The brightness sensor and the
motion sensor must not be painted over or covered.
After the bus voltage has been applied, the device will enter an initialisation phase last-
ing a few seconds. During this phase no information can be received or sent via the
bus.
The motion sensor has a start-up phase of approx. 15 seconds during which no motion
detection takes place.
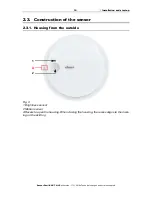
Fig. 6
Lead the bus cable through the cable bushing
in the skirting.
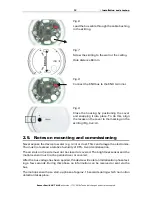
Fig. 7
Screw the skirting to the wall or the ceiling.
Hole distance 60 mm.
60 mm
Fig. 8
Connect the KNX bus to the KNX terminal.
Fig. 9
Close the housing by positioning the cover
and snapping it into place. To do this, align
the recess on the cover to the marking on the
skirting (Fig. 3+4: A).