


45
z
Réglez le bouton de sélection de point sur «
$VROD
,PSRVWD]LRQHGHOODPDFFKLQD
3XQWR
/XQJKH]]DGHOSXQWR
²
7HQVLRQHGHOILOR
²
3LHGLQRSUHPLVWRIID
3LHGLQRSHUDVROH
&RQWUDVVHJQDUHDWWHQWDPHQWHODOXQJKH]]D
GHOO·DVRODVXOWHVVXWR
3RUUHLOWHVVXWRVRWWRLOSLHGLQRFRQLOFRQWUDVVHJQR
GHOO·DVRODULYROWRYHUVRO·XWHQWH
0XRYHUHLOFRUVRLRYHUVRO·XWHQWHLQPRGRFKHLO
VHJQRVXSHULRUH VXOFXUVRUHFRUULVSRQGDDO
VHJQRGLSDUWHQ]D
$OOLQHDUHLVHJQLVXOSLHGLQRDOVHJQRVXSHULRUHGHO
WHVVXWR
$EEDVVDUHLOSLHGLQR
6HJQRGLSDUWHQ]D
6HJQRVXSHULRUH
)LORGHOODJR
)LORGHOODVSROLQD
127$
/DVFDODVXOFXUVRUHqLQGLFDWDLQFHQWLPHWUL
,PSRVWDUHLOTXDGUDQWHVHOHWWRUHGLPRWLYLVX´´
&XFLUHLQDYDQWLILQFKpVLUDJJLXQJHLOFRQWUDVVHJQR
DQWHULRUHGHOO·DVROD)HUPDUHODFXFLWXUDDGXQ
SXQWRDVLQLVWUD
,PSRVWDUHLOTXDGUDQWHVHOHWWRUHGLPRWLYLVX´´
&XFLUHSXQWL)HUPDUHODFXFLWXUDDGXQSXQWRD
GHVWUD
,PSRVWDUHLOTXDGUDQWHVHOHWWRUHGLPRWLYLVX´´
&XFLUHILQFKpVLUDJJLXQJHLOFRQWUDVVHJQR
SRVWHULRUHGHOO·DVROD)HUPDUHODFXFLWXUDDGXQ
SXQWRDGHVWUD
,PSRVWDUHLOTXDGUDQWHVHOHWWRUHGLPRWLYLVX´´
&XFLUHDOFXQHEDVWHHVROOHYDUHO·DJRGDOWHVVXWR
,PSRVWDUHLOFRPDQGRGHOODOXQJKH]]DGHOSXQWRVX
´´HLOVHOHWWRUHGLPRWLYLVXFXFLWXUDGLULWWD
&XFLUHDOFXQLSXQWLGLFKLXVXUD
7RJOLHUHLOWHVVXWRGDOODPDFFKLQDHWDJOLDUHLOILORGL
FXFLWXUD
,QVHULUHXQRVSLOORQHOODEDVWD
4XLQGLWDJOLDUHO·DSHUWXUDFRQXQGLYDULFDWRUH
)DUHDWWHQ]LRQHDQRQWDJOLDUHLSXQWL
5HJROD]LRQHGHOODGHQVLWjGHOSXQWRSHUDVROH
,PSRVWDUHLOFXUVRUHGHOODOXQJKH]]DGHOSXQWRWUD´´
SHUUHJRODUHODGHQVLWjGHOSXQWRDGRFFKLHOOR
».
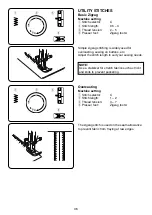
Marquez soigneusement la longueur de la
boutonnière sur le tissu.
Placez le tissu sous le pied-de-biche, en situant
la marque de la boutonnière vers vous.
Tirez le fil de l’aiguille et le fil de canette vers
la gauche. Déplacez la glissière vers vous
afin que le repère supérieur
w
de la glissière
corresponde à la marque de départ
q
.
q
Marque de départ
w
Repère supérieur
e
Fil d'aiguille
r
Fil de canette
x
Cousez vers l’avant jusqu’à ce que vous
atteignez le repère avant de votre boutonnière.
Arrêtez la couture par un point de gauche.
c
Relevez l’aiguille jusqu’à sa position la plus haute.
Réglez le bouton de sélection de point sur «
$VROD
,PSRVWD]LRQHGHOODPDFFKLQD
3XQWR
/XQJKH]]DGHOSXQWR
²
7HQVLRQHGHOILOR
²
3LHGLQRSUHPLVWRIID
3LHGLQRSHUDVROH
&RQWUDVVHJQDUHDWWHQWDPHQWHODOXQJKH]]D
GHOO·DVRODVXOWHVVXWR
3RUUHLOWHVVXWRVRWWRLOSLHGLQRFRQLOFRQWUDVVHJQR
GHOO·DVRODULYROWRYHUVRO·XWHQWH
0XRYHUHLOFRUVRLRYHUVRO·XWHQWHLQPRGRFKHLO
VHJQRVXSHULRUH VXOFXUVRUHFRUULVSRQGDDO
VHJQRGLSDUWHQ]D
$OOLQHDUHLVHJQLVXOSLHGLQRDOVHJQRVXSHULRUHGHO
WHVVXWR
$EEDVVDUHLOSLHGLQR
6HJQRGLSDUWHQ]D
6HJQRVXSHULRUH
)LORGHOODJR
)LORGHOODVSROLQD
127$
/DVFDODVXOFXUVRUHqLQGLFDWDLQFHQWLPHWUL
,PSRVWDUHLOTXDGUDQWHVHOHWWRUHGLPRWLYLVX´´
&XFLUHLQDYDQWLILQFKpVLUDJJLXQJHLOFRQWUDVVHJQR
DQWHULRUHGHOO·DVROD)HUPDUHODFXFLWXUDDGXQ
SXQWRDVLQLVWUD
,PSRVWDUHLOTXDGUDQWHVHOHWWRUHGLPRWLYLVX´´
&XFLUHSXQWL)HUPDUHODFXFLWXUDDGXQSXQWRD
GHVWUD
,PSRVWDUHLOTXDGUDQWHVHOHWWRUHGLPRWLYLVX´´
&XFLUHILQFKpVLUDJJLXQJHLOFRQWUDVVHJQR
SRVWHULRUHGHOO·DVROD)HUPDUHODFXFLWXUDDGXQ
SXQWRDGHVWUD
,PSRVWDUHLOTXDGUDQWHVHOHWWRUHGLPRWLYLVX´´
&XFLUHDOFXQHEDVWHHVROOHYDUHO·DJRGDOWHVVXWR
,PSRVWDUHLOFRPDQGRGHOODOXQJKH]]DGHOSXQWRVX
´´HLOVHOHWWRUHGLPRWLYLVXFXFLWXUDGLULWWD
&XFLUHDOFXQLSXQWLGLFKLXVXUD
7RJOLHUHLOWHVVXWRGDOODPDFFKLQDHWDJOLDUHLOILORGL
FXFLWXUD
,QVHULUHXQRVSLOORQHOODEDVWD
4XLQGLWDJOLDUHO·DSHUWXUDFRQXQGLYDULFDWRUH
)DUHDWWHQ]LRQHDQRQWDJOLDUHLSXQWL
5HJROD]LRQHGHOODGHQVLWjGHOSXQWRSHUDVROH
,PSRVWDUHLOFXUVRUHGHOODOXQJKH]]DGHOSXQWRWUD´´
SHUUHJRODUHODGHQVLWjGHOSXQWRDGRFFKLHOOR
».
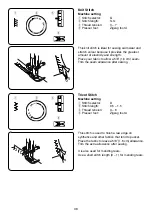
Cousez 5 points, puis arrêtez la couture par un
point de droite.
v
Relevez l’aiguille dans sa position la plus haute.
Réglez le bouton de sélection de point sur «
$VROD
,PSRVWD]LRQHGHOODPDFFKLQD
3XQWR
/XQJKH]]DGHOSXQWR
²
7HQVLRQHGHOILOR
²
3LHGLQRSUHPLVWRIID
3LHGLQRSHUDVROH
&RQWUDVVHJQDUHDWWHQWDPHQWHODOXQJKH]]D
GHOO·DVRODVXOWHVVXWR
3RUUHLOWHVVXWRVRWWRLOSLHGLQRFRQLOFRQWUDVVHJQR
GHOO·DVRODULYROWRYHUVRO·XWHQWH
0XRYHUHLOFRUVRLRYHUVRO·XWHQWHLQPRGRFKHLO
VHJQRVXSHULRUH VXOFXUVRUHFRUULVSRQGDDO
VHJQRGLSDUWHQ]D
$OOLQHDUHLVHJQLVXOSLHGLQRDOVHJQRVXSHULRUHGHO
WHVVXWR
$EEDVVDUHLOSLHGLQR
6HJQRGLSDUWHQ]D
6HJQRVXSHULRUH
)LORGHOODJR
)LORGHOODVSROLQD
127$
/DVFDODVXOFXUVRUHqLQGLFDWDLQFHQWLPHWUL
,PSRVWDUHLOTXDGUDQWHVHOHWWRUHGLPRWLYLVX´´
&XFLUHLQDYDQWLILQFKpVLUDJJLXQJHLOFRQWUDVVHJQR
DQWHULRUHGHOO·DVROD)HUPDUHODFXFLWXUDDGXQ
SXQWRDVLQLVWUD
,PSRVWDUHLOTXDGUDQWHVHOHWWRUHGLPRWLYLVX´´
&XFLUHSXQWL)HUPDUHODFXFLWXUDDGXQSXQWRD
GHVWUD
,PSRVWDUHLOTXDGUDQWHVHOHWWRUHGLPRWLYLVX´´
&XFLUHILQFKpVLUDJJLXQJHLOFRQWUDVVHJQR
SRVWHULRUHGHOO·DVROD)HUPDUHODFXFLWXUDDGXQ
SXQWRDGHVWUD
,PSRVWDUHLOTXDGUDQWHVHOHWWRUHGLPRWLYLVX´´
&XFLUHDOFXQHEDVWHHVROOHYDUHO·DJRGDOWHVVXWR
,PSRVWDUHLOFRPDQGRGHOODOXQJKH]]DGHOSXQWRVX
´´HLOVHOHWWRUHGLPRWLYLVXFXFLWXUDGLULWWD
&XFLUHDOFXQLSXQWLGLFKLXVXUD
7RJOLHUHLOWHVVXWRGDOODPDFFKLQDHWDJOLDUHLOILORGL
FXFLWXUD
,QVHULUHXQRVSLOORQHOODEDVWD
4XLQGLWDJOLDUHO·DSHUWXUDFRQXQGLYDULFDWRUH
)DUHDWWHQ]LRQHDQRQWDJOLDUHLSXQWL
5HJROD]LRQHGHOODGHQVLWjGHOSXQWRSHUDVROH
,PSRVWDUHLOFXUVRUHGHOODOXQJKH]]DGHOSXQWRWUD´´
SHUUHJRODUHODGHQVLWjGHOSXQWRDGRFFKLHOOR
».
Cousez jusqu’à ce que l’aiguille atteigne le
repère arrière de la boutonnière.
b
Relevez l’aiguille jusqu’à sa position la plus haute.
Réglez le bouton de sélection de point sur «
$VROD
,PSRVWD]LRQHGHOODPDFFKLQD
3XQWR
/XQJKH]]DGHOSXQWR
²
7HQVLRQHGHOILOR
²
3LHGLQRSUHPLVWRIID
3LHGLQRSHUDVROH
&RQWUDVVHJQDUHDWWHQWDPHQWHODOXQJKH]]D
GHOO·DVRODVXOWHVVXWR
3RUUHLOWHVVXWRVRWWRLOSLHGLQRFRQLOFRQWUDVVHJQR
GHOO·DVRODULYROWRYHUVRO·XWHQWH
0XRYHUHLOFRUVRLRYHUVRO·XWHQWHLQPRGRFKHLO
VHJQRVXSHULRUH VXOFXUVRUHFRUULVSRQGDDO
VHJQRGLSDUWHQ]D
$OOLQHDUHLVHJQLVXOSLHGLQRDOVHJQRVXSHULRUHGHO
WHVVXWR
$EEDVVDUHLOSLHGLQR
6HJQRGLSDUWHQ]D
6HJQRVXSHULRUH
)LORGHOODJR
)LORGHOODVSROLQD
127$
/DVFDODVXOFXUVRUHqLQGLFDWDLQFHQWLPHWUL
,PSRVWDUHLOTXDGUDQWHVHOHWWRUHGLPRWLYLVX´´
&XFLUHLQDYDQWLILQFKpVLUDJJLXQJHLOFRQWUDVVHJQR
DQWHULRUHGHOO·DVROD)HUPDUHODFXFLWXUDDGXQ
SXQWRDVLQLVWUD
,PSRVWDUHLOTXDGUDQWHVHOHWWRUHGLPRWLYLVX´´
&XFLUHSXQWL)HUPDUHODFXFLWXUDDGXQSXQWRD
GHVWUD
,PSRVWDUHLOTXDGUDQWHVHOHWWRUHGLPRWLYLVX´´
&XFLUHILQFKpVLUDJJLXQJHLOFRQWUDVVHJQR
SRVWHULRUHGHOO·DVROD)HUPDUHODFXFLWXUDDGXQ
SXQWRDGHVWUD
,PSRVWDUHLOTXDGUDQWHVHOHWWRUHGLPRWLYLVX´´
&XFLUHDOFXQHEDVWHHVROOHYDUHO·DJRGDOWHVVXWR
,PSRVWDUHLOFRPDQGRGHOODOXQJKH]]DGHOSXQWRVX
´´HLOVHOHWWRUHGLPRWLYLVXFXFLWXUDGLULWWD
&XFLUHDOFXQLSXQWLGLFKLXVXUD
7RJOLHUHLOWHVVXWRGDOODPDFFKLQDHWDJOLDUHLOILORGL
FXFLWXUD
,QVHULUHXQRVSLOORQHOODEDVWD
4XLQGLWDJOLDUHO·DSHUWXUDFRQXQGLYDULFDWRUH
)DUHDWWHQ]LRQHDQRQWDJOLDUHLSXQWL
5HJROD]LRQHGHOODGHQVLWjGHOSXQWRSHUDVROH
,PSRVWDUHLOFXUVRUHGHOODOXQJKH]]DGHOSXQWRWUD´´
SHUUHJRODUHODGHQVLWjGHOSXQWRDGRFFKLHOOR
».
Cousez 5 points, puis arrêtez la couture par un
point de droite. Réglez le bouton de réglage de
la longueur de point sur « 0 » et le bouton de
sélection de point pour la couture au point droit
(réglage B).
Cousez quelques points d’arrêt.
n
Relevez l’aiguille et le pied-de-biche. Retirez le
tissu de la machine et coupez les fils de couture.
Insérez une épingle dans la couture du bord.
Coupez la fente à l’aide du découd-vite.Faites
attention à ne pas couper les fils de couture.
t
Épingle
y
Découd-vite
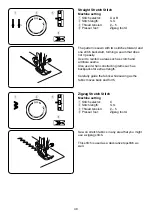
Boutonnière en 4 phases
Réglages de la machine
q
Motif de point:
w
Longueur du point: 0,5 – 1
e
Tension du fil:
1 – 5
r
Pied-de-biche:
Pied boutonnière
Pour ajuster la densité des points de la
boutonnière:
Réglez le bouton de réglage de la longueur de
point entre «
$VROD
,PSRVWD]LRQHGHOODPDFFKLQD
3XQWR
/XQJKH]]DGHOSXQWR
²
7HQVLRQHGHOILOR
²
3LHGLQRSUHPLVWRIID
3LHGLQRSHUDVROH
&RQWUDVVHJQDUHDWWHQWDPHQWHODOXQJKH]]D
GHOO·DVRODVXOWHVVXWR
3RUUHLOWHVVXWRVRWWRLOSLHGLQRFRQLOFRQWUDVVHJQR
GHOO·DVRODULYROWRYHUVRO·XWHQWH
0XRYHUHLOFRUVRLRYHUVRO·XWHQWHLQPRGRFKHLO
VHJQRVXSHULRUH VXOFXUVRUHFRUULVSRQGDDO
VHJQRGLSDUWHQ]D
$OOLQHDUHLVHJQLVXOSLHGLQRDOVHJQRVXSHULRUHGHO
WHVVXWR
$EEDVVDUHLOSLHGLQR
6HJQRGLSDUWHQ]D
6HJQRVXSHULRUH
)LORGHOODJR
)LORGHOODVSROLQD
127$
/DVFDODVXOFXUVRUHqLQGLFDWDLQFHQWLPHWUL
,PSRVWDUHLOTXDGUDQWHVHOHWWRUHGLPRWLYLVX´´
&XFLUHLQDYDQWLILQFKpVLUDJJLXQJHLOFRQWUDVVHJQR
DQWHULRUHGHOO·DVROD)HUPDUHODFXFLWXUDDGXQ
SXQWRDVLQLVWUD
,PSRVWDUHLOTXDGUDQWHVHOHWWRUHGLPRWLYLVX´´
&XFLUHSXQWL)HUPDUHODFXFLWXUDDGXQSXQWRD
GHVWUD
,PSRVWDUHLOTXDGUDQWHVHOHWWRUHGLPRWLYLVX´´
&XFLUHILQFKpVLUDJJLXQJHLOFRQWUDVVHJQR
SRVWHULRUHGHOO·DVROD)HUPDUHODFXFLWXUDDGXQ
SXQWRDGHVWUD
,PSRVWDUHLOTXDGUDQWHVHOHWWRUHGLPRWLYLVX´´
&XFLUHDOFXQHEDVWHHVROOHYDUHO·DJRGDOWHVVXWR
,PSRVWDUHLOFRPDQGRGHOODOXQJKH]]DGHOSXQWRVX
´´HLOVHOHWWRUHGLPRWLYLVXFXFLWXUDGLULWWD
&XFLUHDOFXQLSXQWLGLFKLXVXUD
7RJOLHUHLOWHVVXWRGDOODPDFFKLQDHWDJOLDUHLOILORGL
FXFLWXUD
,QVHULUHXQRVSLOORQHOODEDVWD
4XLQGLWDJOLDUHO·DSHUWXUDFRQXQGLYDULFDWRUH
)DUHDWWHQ]LRQHDQRQWDJOLDUHLSXQWL
5HJROD]LRQHGHOODGHQVLWjGHOSXQWRSHUDVROH
,PSRVWDUHLOFXUVRUHGHOODOXQJKH]]DGHOSXQWRWUD´´
SHUUHJRODUHODGHQVLWjGHOSXQWRDGRFFKLHOOR
» pour déterminer la densité du
point de la boutonnière.
u
Boutonnières plus dense
i
Boutonnières moins dense
REMARQUE:
L’échelle de la glissière est en centimètres.
z
Stellen Sie den Stichmuster-Auswahlknopf auf “
$VROD
,PSRVWD]LRQHGHOODPDFFKLQD
3XQWR
/XQJKH]]DGHOSXQWR
²
7HQVLRQHGHOILOR
²
3LHGLQRSUHPLVWRIID
3LHGLQRSHUDVROH
&RQWUDVVHJQDUHDWWHQWDPHQWHODOXQJKH]]D
GHOO·DVRODVXOWHVVXWR
3RUUHLOWHVVXWRVRWWRLOSLHGLQRFRQLOFRQWUDVVHJQR
GHOO·DVRODULYROWRYHUVRO·XWHQWH
0XRYHUHLOFRUVRLRYHUVRO·XWHQWHLQPRGRFKHLO
VHJQRVXSHULRUH VXOFXUVRUHFRUULVSRQGDDO
VHJQRGLSDUWHQ]D
$OOLQHDUHLVHJQLVXOSLHGLQRDOVHJQRVXSHULRUHGHO
WHVVXWR
$EEDVVDUHLOSLHGLQR
6HJQRGLSDUWHQ]D
6HJQRVXSHULRUH
)LORGHOODJR
)LORGHOODVSROLQD
127$
/DVFDODVXOFXUVRUHqLQGLFDWDLQFHQWLPHWUL
,PSRVWDUHLOTXDGUDQWHVHOHWWRUHGLPRWLYLVX´´
&XFLUHLQDYDQWLILQFKpVLUDJJLXQJHLOFRQWUDVVHJQR
DQWHULRUHGHOO·DVROD)HUPDUHODFXFLWXUDDGXQ
SXQWRDVLQLVWUD
,PSRVWDUHLOTXDGUDQWHVHOHWWRUHGLPRWLYLVX´´
&XFLUHSXQWL)HUPDUHODFXFLWXUDDGXQSXQWRD
GHVWUD
,PSRVWDUHLOTXDGUDQWHVHOHWWRUHGLPRWLYLVX´´
&XFLUHILQFKpVLUDJJLXQJHLOFRQWUDVVHJQR
SRVWHULRUHGHOO·DVROD)HUPDUHODFXFLWXUDDGXQ
SXQWRDGHVWUD
,PSRVWDUHLOTXDGUDQWHVHOHWWRUHGLPRWLYLVX´´
&XFLUHDOFXQHEDVWHHVROOHYDUHO·DJRGDOWHVVXWR
,PSRVWDUHLOFRPDQGRGHOODOXQJKH]]DGHOSXQWRVX
´´HLOVHOHWWRUHGLPRWLYLVXFXFLWXUDGLULWWD
&XFLUHDOFXQLSXQWLGLFKLXVXUD
7RJOLHUHLOWHVVXWRGDOODPDFFKLQDHWDJOLDUHLOILORGL
FXFLWXUD
,QVHULUHXQRVSLOORQHOODEDVWD
4XLQGLWDJOLDUHO·DSHUWXUDFRQXQGLYDULFDWRUH
)DUHDWWHQ]LRQHDQRQWDJOLDUHLSXQWL
5HJROD]LRQHGHOODGHQVLWjGHOSXQWRSHUDVROH
,PSRVWDUHLOFXUVRUHGHOODOXQJKH]]DGHOSXQWRWUD´´
SHUUHJRODUHODGHQVLWjGHOSXQWRDGRFFKLHOOR
”.
Markieren Sie die Knopflochlänge vorsichtig auf
dem Stoff. Legen Sie den Stoff unter den Fuß,
wobei die Knopflochmarkierung auf Sie zu läuft.
Ziehen Sie Unter- und Oberfaden nach links.
Bewegen Sie den Schieber im Knopflochfuß auf
sich zu, so dass die obere Markierung
w
auf
dem Schieber über der Startmarkierung
q
liegt.
q
Startmarkierung
w
Obere Markierung
e
Oberfaden
r
Unterfaden
x
Nähen Sie vorwärts, bis Sie die vordere
Markierung Ihres Knopflochs erreichen. Halten
Sie an einem linken Stich an.
c
Bringen Sie die Nadel in ihre höchste Stellung.
Stellen Sie den Stichmuster-Auswahlknopf auf
“
$VROD
,PSRVWD]LRQHGHOODPDFFKLQD
3XQWR
/XQJKH]]DGHOSXQWR
²
7HQVLRQHGHOILOR
²
3LHGLQRSUHPLVWRIID
3LHGLQRSHUDVROH
&RQWUDVVHJQDUHDWWHQWDPHQWHODOXQJKH]]D
GHOO·DVRODVXOWHVVXWR
3RUUHLOWHVVXWRVRWWRLOSLHGLQRFRQLOFRQWUDVVHJQR
GHOO·DVRODULYROWRYHUVRO·XWHQWH
0XRYHUHLOFRUVRLRYHUVRO·XWHQWHLQPRGRFKHLO
VHJQRVXSHULRUH VXOFXUVRUHFRUULVSRQGDDO
VHJQRGLSDUWHQ]D
$OOLQHDUHLVHJQLVXOSLHGLQRDOVHJQRVXSHULRUHGHO
WHVVXWR
$EEDVVDUHLOSLHGLQR
6HJQRGLSDUWHQ]D
6HJQRVXSHULRUH
)LORGHOODJR
)LORGHOODVSROLQD
127$
/DVFDODVXOFXUVRUHqLQGLFDWDLQFHQWLPHWUL
,PSRVWDUHLOTXDGUDQWHVHOHWWRUHGLPRWLYLVX´´
&XFLUHLQDYDQWLILQFKpVLUDJJLXQJHLOFRQWUDVVHJQR
DQWHULRUHGHOO·DVROD)HUPDUHODFXFLWXUDDGXQ
SXQWRDVLQLVWUD
,PSRVWDUHLOTXDGUDQWHVHOHWWRUHGLPRWLYLVX´´
&XFLUHSXQWL)HUPDUHODFXFLWXUDDGXQSXQWRD
GHVWUD
,PSRVWDUHLOTXDGUDQWHVHOHWWRUHGLPRWLYLVX´´
&XFLUHILQFKpVLUDJJLXQJHLOFRQWUDVVHJQR
SRVWHULRUHGHOO·DVROD)HUPDUHODFXFLWXUDDGXQ
SXQWRDGHVWUD
,PSRVWDUHLOTXDGUDQWHVHOHWWRUHGLPRWLYLVX´´
&XFLUHDOFXQHEDVWHHVROOHYDUHO·DJRGDOWHVVXWR
,PSRVWDUHLOFRPDQGRGHOODOXQJKH]]DGHOSXQWRVX
´´HLOVHOHWWRUHGLPRWLYLVXFXFLWXUDGLULWWD
&XFLUHDOFXQLSXQWLGLFKLXVXUD
7RJOLHUHLOWHVVXWRGDOODPDFFKLQDHWDJOLDUHLOILORGL
FXFLWXUD
,QVHULUHXQRVSLOORQHOODEDVWD
4XLQGLWDJOLDUHO·DSHUWXUDFRQXQGLYDULFDWRUH
)DUHDWWHQ]LRQHDQRQWDJOLDUHLSXQWL
5HJROD]LRQHGHOODGHQVLWjGHOSXQWRSHUDVROH
,PSRVWDUHLOFXUVRUHGHOODOXQJKH]]DGHOSXQWRWUD´´
SHUUHJRODUHODGHQVLWjGHOSXQWRDGRFFKLHOOR
”.
Nähen Sie 5 Stiche. Halten Sie dann an einem
rechten Stich an.
v
Bringen Sie die Nadel in ihre höchste Stellung.
Stellen Sie den Stichmuster-Auswahlknopf
auf “
$VROD
,PSRVWD]LRQHGHOODPDFFKLQD
3XQWR
/XQJKH]]DGHOSXQWR
²
7HQVLRQHGHOILOR
²
3LHGLQRSUHPLVWRIID
3LHGLQRSHUDVROH
&RQWUDVVHJQDUHDWWHQWDPHQWHODOXQJKH]]D
GHOO·DVRODVXOWHVVXWR
3RUUHLOWHVVXWRVRWWRLOSLHGLQRFRQLOFRQWUDVVHJQR
GHOO·DVRODULYROWRYHUVRO·XWHQWH
0XRYHUHLOFRUVRLRYHUVRO·XWHQWHLQPRGRFKHLO
VHJQRVXSHULRUH VXOFXUVRUHFRUULVSRQGDDO
VHJQRGLSDUWHQ]D
$OOLQHDUHLVHJQLVXOSLHGLQRDOVHJQRVXSHULRUHGHO
WHVVXWR
$EEDVVDUHLOSLHGLQR
6HJQRGLSDUWHQ]D
6HJQRVXSHULRUH
)LORGHOODJR
)LORGHOODVSROLQD
127$
/DVFDODVXOFXUVRUHqLQGLFDWDLQFHQWLPHWUL
,PSRVWDUHLOTXDGUDQWHVHOHWWRUHGLPRWLYLVX´´
&XFLUHLQDYDQWLILQFKpVLUDJJLXQJHLOFRQWUDVVHJQR
DQWHULRUHGHOO·DVROD)HUPDUHODFXFLWXUDDGXQ
SXQWRDVLQLVWUD
,PSRVWDUHLOTXDGUDQWHVHOHWWRUHGLPRWLYLVX´´
&XFLUHSXQWL)HUPDUHODFXFLWXUDDGXQSXQWRD
GHVWUD
,PSRVWDUHLOTXDGUDQWHVHOHWWRUHGLPRWLYLVX´´
&XFLUHILQFKpVLUDJJLXQJHLOFRQWUDVVHJQR
SRVWHULRUHGHOO·DVROD)HUPDUHODFXFLWXUDDGXQ
SXQWRDGHVWUD
,PSRVWDUHLOTXDGUDQWHVHOHWWRUHGLPRWLYLVX´´
&XFLUHDOFXQHEDVWHHVROOHYDUHO·DJRGDOWHVVXWR
,PSRVWDUHLOFRPDQGRGHOODOXQJKH]]DGHOSXQWRVX
´´HLOVHOHWWRUHGLPRWLYLVXFXFLWXUDGLULWWD
&XFLUHDOFXQLSXQWLGLFKLXVXUD
7RJOLHUHLOWHVVXWRGDOODPDFFKLQDHWDJOLDUHLOILORGL
FXFLWXUD
,QVHULUHXQRVSLOORQHOODEDVWD
4XLQGLWDJOLDUHO·DSHUWXUDFRQXQGLYDULFDWRUH
)DUHDWWHQ]LRQHDQRQWDJOLDUHLSXQWL
5HJROD]LRQHGHOODGHQVLWjGHOSXQWRSHUDVROH
,PSRVWDUHLOFXUVRUHGHOODOXQJKH]]DGHOSXQWRWUD´´
SHUUHJRODUHODGHQVLWjGHOSXQWRDGRFFKLHOOR
”. Nähen Sie, bis die Nadel die hintere
Markierung des Knopflochs erreicht.
b
Bringen Sie die Nadel in ihre höchste Stellung.
Stellen Sie den Stichmuster-Auswahlknopf auf
“
$VROD
,PSRVWD]LRQHGHOODPDFFKLQD
3XQWR
/XQJKH]]DGHOSXQWR
²
7HQVLRQHGHOILOR
²
3LHGLQRSUHPLVWRIID
3LHGLQRSHUDVROH
&RQWUDVVHJQDUHDWWHQWDPHQWHODOXQJKH]]D
GHOO·DVRODVXOWHVVXWR
3RUUHLOWHVVXWRVRWWRLOSLHGLQRFRQLOFRQWUDVVHJQR
GHOO·DVRODULYROWRYHUVRO·XWHQWH
0XRYHUHLOFRUVRLRYHUVRO·XWHQWHLQPRGRFKHLO
VHJQRVXSHULRUH VXOFXUVRUHFRUULVSRQGDDO
VHJQRGLSDUWHQ]D
$OOLQHDUHLVHJQLVXOSLHGLQRDOVHJQRVXSHULRUHGHO
WHVVXWR
$EEDVVDUHLOSLHGLQR
6HJQRGLSDUWHQ]D
6HJQRVXSHULRUH
)LORGHOODJR
)LORGHOODVSROLQD
127$
/DVFDODVXOFXUVRUHqLQGLFDWDLQFHQWLPHWUL
,PSRVWDUHLOTXDGUDQWHVHOHWWRUHGLPRWLYLVX´´
&XFLUHLQDYDQWLILQFKpVLUDJJLXQJHLOFRQWUDVVHJQR
DQWHULRUHGHOO·DVROD)HUPDUHODFXFLWXUDDGXQ
SXQWRDVLQLVWUD
,PSRVWDUHLOTXDGUDQWHVHOHWWRUHGLPRWLYLVX´´
&XFLUHSXQWL)HUPDUHODFXFLWXUDDGXQSXQWRD
GHVWUD
,PSRVWDUHLOTXDGUDQWHVHOHWWRUHGLPRWLYLVX´´
&XFLUHILQFKpVLUDJJLXQJHLOFRQWUDVVHJQR
SRVWHULRUHGHOO·DVROD)HUPDUHODFXFLWXUDDGXQ
SXQWRDGHVWUD
,PSRVWDUHLOTXDGUDQWHVHOHWWRUHGLPRWLYLVX´´
&XFLUHDOFXQHEDVWHHVROOHYDUHO·DJRGDOWHVVXWR
,PSRVWDUHLOFRPDQGRGHOODOXQJKH]]DGHOSXQWRVX
´´HLOVHOHWWRUHGLPRWLYLVXFXFLWXUDGLULWWD
&XFLUHDOFXQLSXQWLGLFKLXVXUD
7RJOLHUHLOWHVVXWRGDOODPDFFKLQDHWDJOLDUHLOILORGL
FXFLWXUD
,QVHULUHXQRVSLOORQHOODEDVWD
4XLQGLWDJOLDUHO·DSHUWXUDFRQXQGLYDULFDWRUH
)DUHDWWHQ]LRQHDQRQWDJOLDUHLSXQWL
5HJROD]LRQHGHOODGHQVLWjGHOSXQWRSHUDVROH
,PSRVWDUHLOFXUVRUHGHOODOXQJKH]]DGHOSXQWRWUD´´
SHUUHJRODUHODGHQVLWjGHOSXQWRDGRFFKLHOOR
”. Nähen Sie 5 Stiche und stoppen Sie,
wenn die Nadel oben steht. Stellen Sie den
Stichlängen-Knopf auf “0” und den Stichmuster-
Auswahlknopf auf Geradstich.
Nähen Sie einige Vernähstiche.
n
Heben Sie die Nadel und den Nähfuß. Nehmen
Sie den Stoff aus der Maschine und schneiden
Sie die Nähfäden ab. Stecken Sie eine
Stecknadel in den Knopflochriegel.
Schneiden Sie die Öffnung mit einem
Nahttrenner auf.
Vorsicht - schneiden Sie dabei nicht in die Naht.
t
Stecknadel
y
Nahttrenner
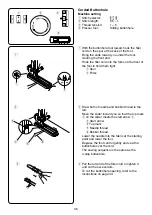
Knopflochnähen in 4 Schritten
Maschineneinstellungen
q
Stichmuster:
w
Stitch length:
0,5 – 1
e
Fadenspannung:
1 – 5
r
Nähfuß:
Knopflochfuß
Einstellen der Knopflochstichdichte:
Die Knopflochstichdichte kann durch Einstellen
des Stichlängenknopfes “
$VROD
,PSRVWD]LRQHGHOODPDFFKLQD
3XQWR
/XQJKH]]DGHOSXQWR
²
7HQVLRQHGHOILOR
²
3LHGLQRSUHPLVWRIID
3LHGLQRSHUDVROH
&RQWUDVVHJQDUHDWWHQWDPHQWHODOXQJKH]]D
GHOO·DVRODVXOWHVVXWR
3RUUHLOWHVVXWRVRWWRLOSLHGLQRFRQLOFRQWUDVVHJQR
GHOO·DVRODULYROWRYHUVRO·XWHQWH
0XRYHUHLOFRUVRLRYHUVRO·XWHQWHLQPRGRFKHLO
VHJQRVXSHULRUH VXOFXUVRUHFRUULVSRQGDDO
VHJQRGLSDUWHQ]D
$OOLQHDUHLVHJQLVXOSLHGLQRDOVHJQRVXSHULRUHGHO
WHVVXWR
$EEDVVDUHLOSLHGLQR
6HJQRGLSDUWHQ]D
6HJQRVXSHULRUH
)LORGHOODJR
)LORGHOODVSROLQD
127$
/DVFDODVXOFXUVRUHqLQGLFDWDLQFHQWLPHWUL
,PSRVWDUHLOTXDGUDQWHVHOHWWRUHGLPRWLYLVX´´
&XFLUHLQDYDQWLILQFKpVLUDJJLXQJHLOFRQWUDVVHJQR
DQWHULRUHGHOO·DVROD)HUPDUHODFXFLWXUDDGXQ
SXQWRDVLQLVWUD
,PSRVWDUHLOTXDGUDQWHVHOHWWRUHGLPRWLYLVX´´
&XFLUHSXQWL)HUPDUHODFXFLWXUDDGXQSXQWRD
GHVWUD
,PSRVWDUHLOTXDGUDQWHVHOHWWRUHGLPRWLYLVX´´
&XFLUHILQFKpVLUDJJLXQJHLOFRQWUDVVHJQR
SRVWHULRUHGHOO·DVROD)HUPDUHODFXFLWXUDDGXQ
SXQWRDGHVWUD
,PSRVWDUHLOTXDGUDQWHVHOHWWRUHGLPRWLYLVX´´
&XFLUHDOFXQHEDVWHHVROOHYDUHO·DJRGDOWHVVXWR
,PSRVWDUHLOFRPDQGRGHOODOXQJKH]]DGHOSXQWRVX
´´HLOVHOHWWRUHGLPRWLYLVXFXFLWXUDGLULWWD
&XFLUHDOFXQLSXQWLGLFKLXVXUD
7RJOLHUHLOWHVVXWRGDOODPDFFKLQDHWDJOLDUHLOILORGL
FXFLWXUD
,QVHULUHXQRVSLOORQHOODEDVWD
4XLQGLWDJOLDUHO·DSHUWXUDFRQXQGLYDULFDWRUH
)DUHDWWHQ]LRQHDQRQWDJOLDUHLSXQWL
5HJROD]LRQHGHOODGHQVLWjGHOSXQWRSHUDVROH
,PSRVWDUHLOFXUVRUHGHOODOXQJKH]]DGHOSXQWRWUD´´
SHUUHJRODUHODGHQVLWjGHOSXQWRDGRFFKLHOOR
” justiert werden.
u
Dichteres Knopfloch
i
Gröberes Knopfloch
ANMERKUNG:
Die Skala auf dem Schieber ist in Zentimeter
eingeteilt.
Summary of Contents for eXplore 160
Page 1: ...Instruction Book Manuel d instructions Bedienungsanleitung eXplore 160...
Page 2: ......
Page 75: ......
Page 76: ...508 809 187 EFG...


