background image


33


Mask Function 

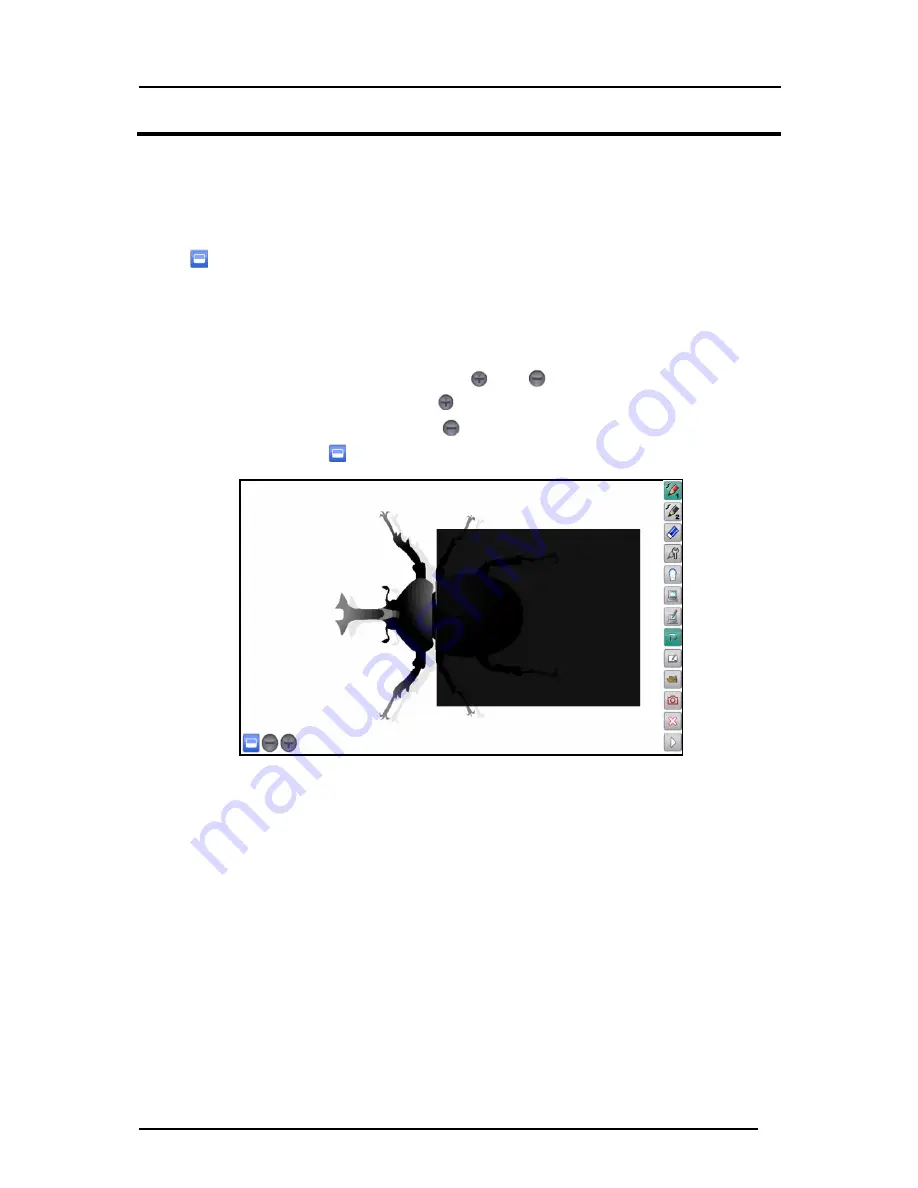
The mask hides part of or whole Document Camera image that is displayed. 
By temporarily hiding part of the image that you do not want to show while asking questions or 
giving explanation, your lessons will become more effective. 
 
Select 

  on the sub menu. 

The entire screen is masked. Adjust the size of the mask by dragging it. 
When the mouse cursor reaches the edge of the screen, it will not go further.   
In that case, release the mouse cursor and restart the dragging from the upper position. 
The mask size can be changed from 100 x 100 pixels to the size of the screen. 
The darkness of the mask can be adjusted with    and    . 
The darkness of the mask increases when    is pressed. 
The darkness of the mask decreases when    is pressed. 
To cancel the mask, touch 

  on the sub menu again. 


Summary of Contents for CRV-24

Page 1: ...Instruction Manual Student Response System CRV 24 32 40 Please read this manual before using this product Please retain this manual ...

Page 2: ...sories specified by the manufacturer 12 Use only with the cart stand tripod bracket or table specified by the manufacturer or sold with the apparatus When a cart is used use caution when moving the cart apparatus combination to avoid injury from tip over 13 Unplug this apparatus during lighting storms or when unused for long periods of time 14 Refer all servicing to qualified service personnel Ser...

Page 3: ...ment off and on the user is encouraged to try to correct the interference by one or more of the following measures Reorient or relocate the receiving antenna Increase the separation between the equipment and receiver Connect the equipment into an outlet on a circuit different from that to which the receiver is connected Consult the dealer or an experienced radio TV technician for help Cet appareil...

Page 4: ...Used in this Manual Name Caution Meaning Indicates that the user must without fail pay careful attention to any sentences or illustrations marked with a Caution symbol Name Prohibited Meaning Indicates that the user must pay careful attention to any sentences or illustrations marked with a Prohibited do not do symbol Name Compulsory Meaning Indicates that the user must pay careful attention to any...

Page 5: ...xtra careful if there are children in the area when using the product If for any reason the product is dropped or damaged turn off the power switch on the clicker and remove the batteries Then remove the wireless adapter from your computer and contact your local dealer Continuing to use the product in this condition could result in a fire or electric shock Do not remove the cover from the product ...

Page 6: ...sult a doctor immediately Attention Do not place the product in a damp or dusty location This could result in a fire or electric shock Do not place the product in a location where it could be exposed to smoke steam or water droplets such as on a kitchen counter or near a humidifier This could result in a fire or electric shock If this product is not going to be used for a long time take the batter...

Page 7: ...y obstacles the wireless connection with the wireless adapter may be degraded About wireless equipment used on the 2 4 GHz band This frequency bandwidth is the same as for industrial scientific and medical equipment such as microwave ovens mobile unit identification systems radio stations that require a license used in factory production lines and specified low power radio stations radio stations ...

Page 8: ...2 F 104 F Humidity 30 90 No condensation When storing the product do not leave it under direct sunlight or by heaters It may be discolored deformed or damaged Maintenance Perform cleaning of the clicker in a dry place Make sure to remove the batteries before cleaning Use a soft dry cloth for cleaning To remove heavy dirt moisten a soft cloth with diluted neutral detergent and wipe the dirt after w...

Page 9: ...ter 21 Launching Image Mate Accent for SRS 21 Database Selection 22 About Image Mate Accent 23 Basic Screen 23 Basic Screen Configuration 23 Various Operation Modes 24 Diagram of the modes 24 PC Annotation Mode 25 PC Operation Mode 25 Document Camera Mode 25 Whiteboard Mode 25 Teaching Material Import Mode 26 Drawing Operation 28 Drawing 28 Deleting 29 Recording a Lesson 30 Operating the Document ...

Page 10: ...tput the personal report 68 Saving in other formats 69 Various Settings 70 Wireless setting for the clicker 70 Image Mate Accent for SRS Configurations 71 Starting the software 71 Description of menu tabs 71 Settings 72 SRS Settings 73 Software update 75 About 76 SRS Data Settings 77 Starting the software 77 Check the connection 79 Battery level 80 Clicker Information 81 Register students informat...

Page 11: ...11 Clicker 89 Wireless adapter 90 Troubleshooting 91 Specifications 92 Product specifications 92 System Requirements 93 Disclaimer 94 About Trademarks 94 Repairable Period 94 ...

Page 12: ...out the operations of the Pen Tablet refer to the User s Guide of ELMO Wireless Slate Tablet Functions of Image Mate Accent can also be used when a mouse is used instead of the Pen Tablet For details about the operation using a mouse refer to About Image Mate Accent When you use SRS with Elmo Pen Tablet CRA 1 the wireless settings between the wireless adapter of SRS and the tablet need to be set u...

Page 13: ...oice questions Majority Testing by Yes or No question can be easily performed Utilize the collected data The collected data is automatically stored on the users computer and can be converted to standard formats These standard files can be shared with other computers Manage the clicker You can add delete a clicker or display the battery level Use with the Document Camera or the Pen Tablet You can p...

Page 14: ...ou purchased Seal clicker no Clicker number sticker sheet Wireless adapter CRA 1R Screw driver for M3 For the back cover of the clicker Carrying Case Application software CD ROM Before use Quick Start Guide Clicker CRV CK 1 CRV 24 24pcs CRV 32 32pcs CRV 40 40pcs Dry cell AAA battery Included into the clicker CRV 24 48pcs CRV 32 64pcs CRV 40 80pcs ...

Page 15: ...from 1 24 or 32 40 is attached Caution The supplied clicker number sticker can be attached Wireless setting button Use this button when configuring the wireless connection setting with the wireless adapter Open the battery box cover when performing the configuration See Wireless setting for the clicker Back Battery box cover fixing screw Use the supplied screw driver to tighten the fixing screw Fr...

Page 16: ...n be secured with Velcro tape Accessory storage Stores accessories such as the wireless adapter and a screw driver Caution Be careful not to lose the accessories when you open the zipper Inside Clicker compartments Stores clickers vertically as shown in the picture Max 40pcs of clickers can be stored Upper part of the clicker is slightly out of the compartment for easier handling Caution Store 1 c...

Page 17: ... the insulation sheet while pressing the batteries In case it is difficult to remove the cover with the tape use the supplied screw driver to loosen the battery box cover fixing screw Dispose of the tape and the insulation sheet after removal Make sure to attach the cover after removing the insulation sheet and tighten the fixing screw Be careful when replacing the battery because it may pop out T...

Page 18: ...x after inserting the batteries Do not mix old and new batteries or ones of different types When disposing of used batteries follow the instructions from your local government Time for replacement of the batteries When the battery level is low operational performance may be degraded Replace the batteries when the power LED begins to flash during power ON or after sending a response Be careful when...

Page 19: ...Insert the supplied CD ROM to the CD ROM Drive of your computer Select Install Image Mate Accent for SRS in the menu Depending on your computer the menu may not appear automatically In that case open the drive where the supplied CD ROM is inserted from My Computer and double click startup exe in the Win folder Follow the displayed instructions to install When the software is successfully installed...

Page 20: ...M Then run ELMO_IMAforSRS dmg The launcher is displayed Run ImageMateAccentforSRS Follow the displayed instructions to install Run ELMOUSBDriver_1 0 0 pkg Follow the displayed instructions to install Depending on your computer you may be asked to restart the computer In that case press YES to restart the computer ...

Page 21: ... desktop of your computer The SRS icon cannot be selected when the wireless adapter that supports SRS is not connected The SRS control panel can also be displayed from the SRS icon in the IMA menu icon N o t e SRS launcher SRS icon To display the SRS control panel Select this icon to start SRS right away PC Annotation mode icon To display menu icons when IMA is started in the PC Drawing mode Selec...

Page 22: ...ed for the first time after starting the Image Mate Accent for SRS In that case please select the database to use Selected database turns to red Press OK to confirm the database The software enters the PC Annotation mode or the SRS mode The database set as default database through Select Database is displayed in red first See Database Settings N o t e ...

Page 23: ...ge Mate Accent for SRS SRS control panel From this window you can operate SRS See List of SRS operations Drawing area This area is for displaying the Document Camera image and drawing The entire monitor is the drawing area Drawing menu area You can select the pen to use for drawing or delete all drawings See List of Menu icons Menu area These buttons are for configuration or operation of the Docum...

Page 24: ...ed teaching material in Teaching Material Import mode Computer operations or displaying the SRS control panel can be possible from any of these modes Document Camera mode Background image Image of created teaching material Screen capture Teaching Material Import mode Document Camera image Basic operations Drawing Deleting Recording Background image selection Document Camera image display PC Annota...

Page 25: ... to change the background for the PC Annotation mode or pose questions with SRS Click to enter the PC Operation mode Document Camera Mode In Document Camera mode you can draw on the Document Camera image or save the drawing as a picture Click to enter the Document Camera mode Whiteboard Mode In the Whiteboard mode you can set a whiteboard image as the background and draw over it or save the drawin...

Page 26: ...t date and the end date are displayed Drop down list To select the file format of the picture Home To display all the pictures in Teaching Materials screen Favorite To display the pictures set as Favorite in Teaching Materials screen Background To display the pictures to be used as background Deletion To delete the selected pictures The deleted pictures are moved to the Recycle Bin of the OS Cance...

Page 27: ...ctures with a shortcut number The registered background picture can be overwritten by another picture by drag and drop The software enters the Whiteboard mode after the cancel button is pressed and the newly registered background shortcut icon flashes for a certain period of time Menu Icon List To remove the shortcut drag and drop the picture from the background shortcut area to the list of backgr...

Page 28: ...on the top right of the screen Select to draw a red line and select to draw a black line The initial setting is pencil red for Pen1 and pencil black for Pen2 The pen types and the line types can be changed in the pen settings See Setting the Pen Draw lines by moving a mouse while pressing the left button of the mouse N o t e ...

Page 29: ...elete part of a drawing align the cursor with the area that you want to delete and move the mouse while pressing the right button of the mouse You cannot partially delete a line that was drawn continuously Delete all Select to delete all the lines on a screen ...

Page 30: ...30 Caution Recording a Lesson Saving a picture Display the image that you want to save as a picture Select to save the picture For information on how to check the saved picture see Selecting Pictures ...

Page 31: ... interval can be set from 1 second to 24 hours Select the recording start button in the Recording Setting window to start the recording Select the recording stop button to stop the recording To stop the recording select the recording button in the menu and click the recording stop button The recording indicator disappears Recording Setting window Recording format setting Recording stop button Reco...

Page 32: ...om In Out To control the zoom level of the Document Camera Auto Focus To focus the Document Camera automatically Brightness Up Down To adjust the brightness of the Document Camera Pause To pause the Document Camera image Image flip To flip vertically the Document Camera image The image flip icon can be shown by moving to the next page of the menu with N o t e Document Camera operation buttons ...

Page 33: ...masked Adjust the size of the mask by dragging it When the mouse cursor reaches the edge of the screen it will not go further In that case release the mouse cursor and restart the dragging from the upper position The mask size can be changed from 100 x 100 pixels to the size of the screen The darkness of the mask can be adjusted with and The darkness of the mask increases when is pressed The darkn...

Page 34: ... the highlighted area to move it You can change the size of the highlighted area by dragging the non highlighted area The highlight size can be changed from 100 x 100 pixels to the size 300 pixels smaller than the screen size The darkness of the non highlighted area can be adjusted with and The darkness of the non highlighted area increases when is pressed The darkness of the non highlighted area ...

Page 35: ...art and moving the image with the pen your lessons will become more effective Select on the sub menu An electronically magnified image is displayed on the screen Drag the image to move it To cancel the scroll select on the sub menu again The scroll function cannot be operated in the PC Annotation mode N o t e ...

Page 36: ...nt Then set the Image Mate Accent for SRS to the PC Annotation mode or the SRS mode The PowerPoint Support icon appears in the bottom left of the screen You can move to the previous page by pressing or to the next page by pressing The PowerPoint Support function does not support PowerPoint Viewer N o t e PowerPoint Support icon ...

Page 37: ...with the set line thickness The colors are displayed semi transparently Color button To configure the color for the selected pen Line type To select a line type for annotations Free hand Draw a free hand line Straight Draw a straight line Square Draw a square shape Circle Draw a circle Pen thickness To configure the thickness for the selected pen Select the pen type color and pen thickness for pen...

Page 38: ...PC Operation mode To enter the PC Operation mode PC Annotation mode To enter the PC Annotation mode Document Camera mode To enter the Document Camera mode Whiteboard mode To enter the Whiteboard mode Teaching Material Import mode To enter the Teaching Material Import mode Capture To save the currently displayed contents as a picture Elements such as the Document Camera image that is displayed on t...

Page 39: ...us To adjust the focus of the Document Camera automatically Brightness Up Down To adjust the brightness of the Document Camera Pause To pause the Document Camera image Background Shortcuts To display the registered background shortcuts 4 background pictures which were registered in the Teaching Material Import mode can be saved as shortcuts The favorite pictures are registered by default Change as...

Page 40: ...ed area by dragging the non highlighted area Scroll To digitally enlarge the Document Camera image Use it to enlarge the area that is too small This is different from the zoom function of the Document Camera PowerPoint Support Previous page Next page To operate the PowerPoint without entering the PC Operation mode You can move between pages of PowerPoint from the PC Annotation mode ...

Page 41: ...screen of SRS Operations such as posing questions giving answers and displaying the results are performed from the SRS control panel SRS control panel Buttons SRS icon SRS Setting Menu Buttons IMA menu icon IMA sub menu icon ...

Page 42: ...earning Countdown Timer To display the Countdown Timer See Countdown Timer screen Answer Options To display the answer options currently available in red The drawing shows an example of 6 choice question The current setting for the question type 2 6 choice True Yes False No can be changed using these buttons Menu To display the setting menu To hide the setting menu when the setting menu is on disp...

Page 43: ...ed the set time can be changed in increments of 1 min When Second is selected the set time can be changed in increments of 10 sec The set time can also be changed when the Countdown Timer is in operation Minute Second selection To switch the minute and the second when performing the Countdown Timer setting The selected icon turns to green The drawing shows an example when Second is selected The se...

Page 44: ...esponses To display the number of clickers responded By selecting this button the unanswered clickers can be displayed Close Testing To close Testing The results are saved as a file Start Testing To cancel the current Testing and return to the Before Testing status Number of responses Close Testing button Start Testing button ...

Page 45: ... selected the set time can be changed in increments of 10 sec The set time can also be changed when the Countdown Timer is in operation Minute Second selection To switch the minute and the second when performing the Countdown Timer setting The selected icon turns to green The drawing shows an example when Second is selected The set time can be changed using the Increase Decrease button Close To cl...

Page 46: ...ctivated when the group setting is set See Group learning Speed Ranking To display the response time by clicker Speed ranking See Speed Ranking Return to the question screen when the speed ranking is displayed Response To select a correct answer The color of the selected button turns to green The drawing shows an example when 2 B is selected Start Testing To return to the Starting screen Start Tes...

Page 47: ...rds to students who have performed well See Giving an award Report To run the reporting software SRS Reporting in order to display the results or configure the clicker settings See Utilizing the collected data Settings To run the configuration software SRS Configurations in order to configure the operation of the software See Image Mate Accent for SRS Configurations Award button Review button Repo...

Page 48: ...conds or more to turn off the clicker Power LED The LED lights up when the clicker is turned on When the battery level is low LED flashes for 5 seconds after the clicker is turned on and during the wireless connection 1 A 6 F Response button To select answers Selected button flashes for max 7 seconds when sending a response and lights up for 5 seconds if the response is successfully accepted It fl...

Page 49: ...from your computer screen Refer to About Image Mate Accent for details about modes and operations other than SRS functions Display the SRS control panel Press the SRS icon to display the SRS control panel If no clickers are registered to the wireless adapter the SRS icon will not display N o t e N o t e SRS control panel SRS icon ...

Page 50: ...D flashes for 5 seconds In that case replace with new batteries The clicker automatically enters standby status when there is no wireless communication Pressing any button will resume the operation After a certain period of time has elapsed in standby status the power automatically goes off The time to power off can be changed with Image Mate Accent for SRS Configurations Default setting is 300 se...

Page 51: ... Testing is Open status Open Testing to receive responses from clickers When Start Testing button is selected Testing starts with current question type Default setting 3 choice question The question type can be changed using the Response buttons 2 6 T F before pressing the Start Testing button E g When 3 is selected the question type becomes 3 choice question and the color of 1 3 buttons turns to ...

Page 52: ...esponse button again after the LED is off When the battery level is low the power LED flashes for 5 seconds In that case replace the batteries with new ones The SRS control panel can be iconized with the Iconize button Click the icon to return to the SRS control panel By using the Countdown Timer you can show the remaining time To use the Countdown Timer display the Countdown Timer before starting...

Page 53: ...ith the Absent mark is selected Response buttons You can answer the question in place of the student by selecting the number When you answer the question in place of the student the relevant clicker number is removed from the list You cannot modify the answer once you did it N o t e N o t e Unanswered Clickers screen When the student answered or you answered in place of the student the relevant cl...

Page 54: ...n switches between the question screen and the results screen When the group setting is set the results by group can be displayed See Group learning N o t e N o t e Close Testing Selects the correct answer The selected answer turns to green Select the correct answer again to release it The number of students answered correctly is displayed Displays the Speed Ranking Student information display but...

Page 55: ... at the bottom left corner over the question screen The results window can be moved freely by dragging it When the Full screen button is selected the results are displayed in full screen Press the Close button to close the results display Question screen Results display window Full screen button Close button ...

Page 56: ... be displayed at a time Top 5 10 15 20 The drawing shows an example when Top 5 is selected A scroll bar appears when all information cannot be displayed at a time Switches the display range between All and Only correct answers The drawing shows an example when All is selected The correct answers are displayed in green and the wrong answers are in red only when All is selected The clicker number st...

Page 57: ...utton will resume the operation After a certain period of time has elapsed in standby status the power automatically goes off The time to power off can be changed with Image Mate Accent for SRS Configurations Default setting is 300 seconds Clear the SRS control panel Clear the SRS control panel by selecting the SRS icon Both the SRS control panel and the launcher are closed at the same time when t...

Page 58: ...l Select the Group symbol setting button and select either Default alphabet or Animals animals from the pull down menu Drag and drop the symbol to the Group box The color of the symbol changes The drawing shows an example when Animals is selected Select the Group number setting button Then select the number of groups from the pull down menu It is not possible to configure group settings during Tes...

Page 59: ...is displayed inside group box Now you joined in the group Press one of these buttons to join in a group The participant s clicker number Student number and the nickname if registered are displayed The participant can be moved to other groups by drag and drop You can reselect the clicker that once participated in a group Finalize the settings Clear the settings Cancel the settings ...

Page 60: ...ocedure Refer to in From posing a question to close the question Display the group results Select the Group icon displayed in the overall results display screen The screen switches to the Group results display screen Personal results can also be displayed by selecting the Results display button N o t e Detail of the results inside group is displayed Results display button Student information displ...

Page 61: ...in the session by using the Move button to display the question screen Finish the review Select the Review button from the settings menu to finish the review The SRS control panel returns to Starting screen The review can also be finished by selecting the review icon in the SRS control panel N o t e Move button This turns to grey when it is at the start or the end of the session Question start dat...

Page 62: ... Select the Award button to display the Award screen Enter names of recipient and sender by using the drawing function Pen icon Date is displayed automatically Finalize button Enter the name of the students to be awarded Image selection button The image can be changed Enter the name of the teacher Print button You can print out the screen image ...

Page 63: ...g Result Display Software Starting the software Select a report from the menu in the SRS control panel to launch SRS Reporting Then select the Reporting tab Select the type of report Session Report Personal Report from the tabs The software can also be launched from Start Program Files ELMO Image Mate Accent for SRS ELMO SRS Reporting N o t e Session Report tab Personal Report tab ...

Page 64: ... in the list first are the latest saved session and other sessions saved in the same month as the latest saved session Specify the period using the calendar buttons to set the display range manually Items to be displayed in the list of sessions Date and Time Question Image 1st Question Questions Number of questions Scroll Page button 15items are displayed in each page Question thumbnail Remove the...

Page 65: ...questions Date and Time Question Image Number of Students Accuracy Number of choices Number of responses per choice The results of multiple sessions or questions cannot be viewed together Multiple sessions or questions can be deleted together N o t e Question Image Cells of correct answers are colored and checked Question start date Testing start date Number of Students Accuracy Number of choices ...

Page 66: ... The software asks whether to save the annotations once the close button is pressed If you select save a dialogue Save as appears to save the image Display a report for the question Select a question in the question list that you wish to view The selected question turns to blue Press the Select button to display a report for the question N o t e Eraser button Undo button Pen buttons ...

Page 67: ...Select PRINT button while a report is displayed The printer needs to be installed on your computer N o t e Results graph Print button Close button Question screen Saved screen with added annotations are displayed Date Time Pie chart button Bar graph button ...

Page 68: ... the period using the calendar buttons to set the display range manually Items to be displayed in the list of sessions Date and Time Question Image 1st Question Number of questions Items to be displayed in the list of questions Student number Answers per questions Percentage of students answered correctly Answers Correct answer is displayed in green Session start date Question Image You can edit t...

Page 69: ...splayed Select Export after specifying a date save format and a destination folder from the dialogue displayed A folder in which image files for the question screen are saved is created in the same folder as the export file when the results are exported in XML format N o t e Export button Select a save format Tick here to save all the records Specify a destination folder ...

Page 70: ...ker flashes a few times Now wireless connection between the clicker and the wireless adapter is established The wireless setting between the clicker and the wireless adapter was established prior to shipping When adding a clicker the wireless setting for the added clicker needs to be performed before use If a clicker is used as described below wireless connection with the wireless adapter may beco...

Page 71: ... can also be launched from Start Program Files ELMO Image Mate Accent for SRS ELMO SRS Configurations Description of menu tabs Items to be configured or checked in each sheet are as follows Settings Contents location SRS Settings Database Location Timer settings Default quiz type Automatically display graph results Clicker Power Software update Image Mate Accent for SRS Proxy setting About Softwar...

Page 72: ... the specified destination folder Image files can be added as stamps or backgrounds in jpg bmp or png formats Note that it may not be able to display some files in these formats The existing data inside the folder is not automatically transferred to a new destination folder when the destination folder is changed The previous data cannot be displayed after making this change N o t e Open the destin...

Page 73: ...ts cannot be displayed after making this change The contents are stored in Image Mate Accent folder created inside the specified destination folder For details on iRespond sold separately please contact a dealer N o t e The destination to store the SRS records can be configured by pressing the Browse button Tick here to automatically output the SRS data after the session The SRS data can be import...

Page 74: ... setting 3 choice question Select a question type 2 6 choice True Yes False No from the pull down menu Automatically display graph results Put a tick mark here when you want to show the results first in the Results Display screen Clicker Power The time for auto power off of the clicker can be set in increments of 10 sec between 10 sec and 2 550 sec using up down buttons Default setting is 300 seco...

Page 75: ...re Image Mate Accent for SRS Press the Check the latest version button to check the availability of the update N o t e Tick here to activate the automatic software update The software automatically checks the availability of the update when the computer is started and when Image Mate Accent for SRS is started Check the availability of the update The browser starts and the Software License Agreemen...

Page 76: ...fault settings When you need to configure this setting put a tick mark in Use Proxy Server Consult your internet administrator or provider for details as to the configuration About You can see the detailed information of the software N o t e Tick here ...

Page 77: ...RS Reporting Then select the SRS tab ELMO SRS Reporting can also be launched from Start Program Files ELMO Image Mate Accent for SRS ELMO SRS Reporting To perform the other operation than Battery level check close the Image Mate Accent for SRS first Make sure that the wireless adapter is connected to your computer N o t e Clicker management Registration of the students Database management ...

Page 78: ...y level Clicker Information To associate the clicker with a student or add delete the clicker Menu button Name Function Register students information To register the students information Menu button Name Function Create Database To register the database See Database Settings Select Database To select the database Edit profile of database To edit the database profile ...

Page 79: ...at is pressed the battery level and the clicker version are displayed Connect the wireless adapter to your computer before performing the wireless connection check N o t e Button that is pressed Battery level Good The battery level is enough Low The battery level is low Caution Replace the batteries when LOW is displayed Clicker version DeviceID Added or updated in the 1st line after the button on...

Page 80: ...ll the registered clickers can be displayed Perform the Check the connection to see the current battery level N o t e Battery level Good The battery level is enough Low The battery level is low Caution Replace the batteries when Low is displayed Last connected time ...

Page 81: ...ce ID is newly assigned to the added clicker and it is added to the bottom of the list Refer to Adding or Changing the clicker for details about adding or changing the clicker Max 50 clickers can be registered N o t e N o t e Student s nicknames and pictures are displayed if registered The clicker numbers student numbers are displayed The row of the specific clicker ID s can be selected by pressin...

Page 82: ...the students in relation to the use of SRS Same number of the students as the clickers you use can be registered Max 50 clickers can be registered N o t e Register or change a picture Register a nickname Move display in the order of the student number Student number Student ID number Nickname Register the Student ID number Clear the registered information Clicker number Student number Take a pictu...

Page 83: ...e Document Camera to your computer and switch it on Select the clicker number under which the picture is registered Then press the Let s take photos button to display the photo shooting window Press the shutter button to register the captured picture Zoom buttons Shutter button Image flip button Shooting area Auto Focus button ...

Page 84: ... displayed Confirm if the selected database is the right one Then enter the name and the description of the database to create After completing all the procedures select the Create button A database cannot be created without entering the database name A database cannot be created if a database with the same name exists N o t e The details of the selected database are displayed Select a database to...

Page 85: ...ected the details of the selected database are displayed Press the OK button after confirming that the selected database is the right one The name of the current database is displayed Select a database The student s information of the selected database is displayed The description of the selected database is displayed ...

Page 86: ... database button you can edit the name and the description of the registered database Select the database you wish to edit then edit the name and the description Press the OK button after finishing the edit Select the database Edit the description Edit the name ...

Page 87: ...r Information button in the SRS tab to show the list of clickers Select the added clicker Turn on the added clicker and press one of the Response buttons on the clicker Verify that the Device ID of the added clicker is displayed in blue If the Device ID of the added clicker is not displayed retry from the step wireless setting When adding the clicker press the OK button to finish Register the stud...

Page 88: ...write the data Select OK after confirming the message in a dialogue box Finalize the registration Finalize the registration by pressing OK Only Device ID is overwritten Other items remain unchanged Once the clicker is replaced overwritten such clicker will not be able to communicate with the wireless adapter Perform the Wireless setting for the clicker to use the clicker again Make sure to select ...

Page 89: ...r in standby status On The communication with the wireless adapter is established LED is on for max 5 seconds after the connection establishment Flashing The clicker is trying to establish the connection with the wireless adapter or failed to establish the connection with the wireless adapter The clicker attempts to establish the connection for max 7 seconds after pressing Response button When suc...

Page 90: ...omputer is on or the adapter is communicating with other device The interval of flash changes depending on the condition of the communication High speed flashing The Wireless setting button is pressed For details about other LED status than starting SRS when using with Elmo Pen Tablet CRA 1 refer to the User s Guide of ELMO Wireless Slate Tablet ...

Page 91: ...ation between the clicker and the wireless adapter Refer to Wireless setting for the clicker and then perform the wireless settings If this does not improve the situation stop using the wireless device or electronic equipment or move to a location with no interference When using the clickers keep at least 20cm distance between the clickers Cannot use SRS SRS icon is not displayed Is a proper wirel...

Page 92: ...b including dry cell AAA battery x 2 Wireless adapter Model Name CRA 1R Operating Temperature 0 C 40 C 32 F 104 F Wireless Band Used 2 4GHz Number of clickers to be registered Max 50pcs PC Interface USB typeA plug USB2 0 HI SPEED Power Supply USB bus power Consumption Current Max 5 0V 50mA External Dimensions L64 2 17 32 W22 7 8 H10 13 32 mm Weight 11g 0 02425lb Carrying Bag Storage Temperature 20...

Page 93: ...ws XP 64 bit version Mac Mac OS X 10 7 x 6 x Intel CPU CPU Intel Core 2 Duo 2 GHz equivalent or higher Memory 2 GB or higher Video board Board compatible with Microsoft DirectX 9 0c Hard disk 1 GB or higher empty space Screen resolution 1024 768 pixels or higher 32 bit or higher USB USB 2 0 HI SPEED Compatible Document Cameras L 1ex L 1zero L 1zero r TT 02RX TT 02s L 1n P10S P30S P10 P100 P100N HV...

Page 94: ... form of the OS name is used in the text The full title for Windows VISTA is the Microsoft Windows VISTA operating system The shortened form of the OS name is used in the text The full title for Windows 7 is the Microsoft Windows 7 operating system The shortened form of the OS name is used in the text Microsoft and Windows are registered trademarks of the Microsoft Corporation in the U S and other...

Page 95: ...Tel 516 501 1400 Fax 516 501 0429 E mail elmo elmousa com Web http www elmousa com West Coast Branch Cypress Pointe Business Park 5676 Corporate Avenue Cypress CA 90630 U S A Tel 714 828 8457 Fax 714 828 8429 ELMO Europe SAS Immeuble Elysées la Défense 7C Place du Dôme 92056 Paris la Défense France Tel 33 0 1 73 02 67 06 Fax 33 0 1 73 02 67 10 6X1CRVAC2 R3 Xdx ...

Reviews: