background image


14 


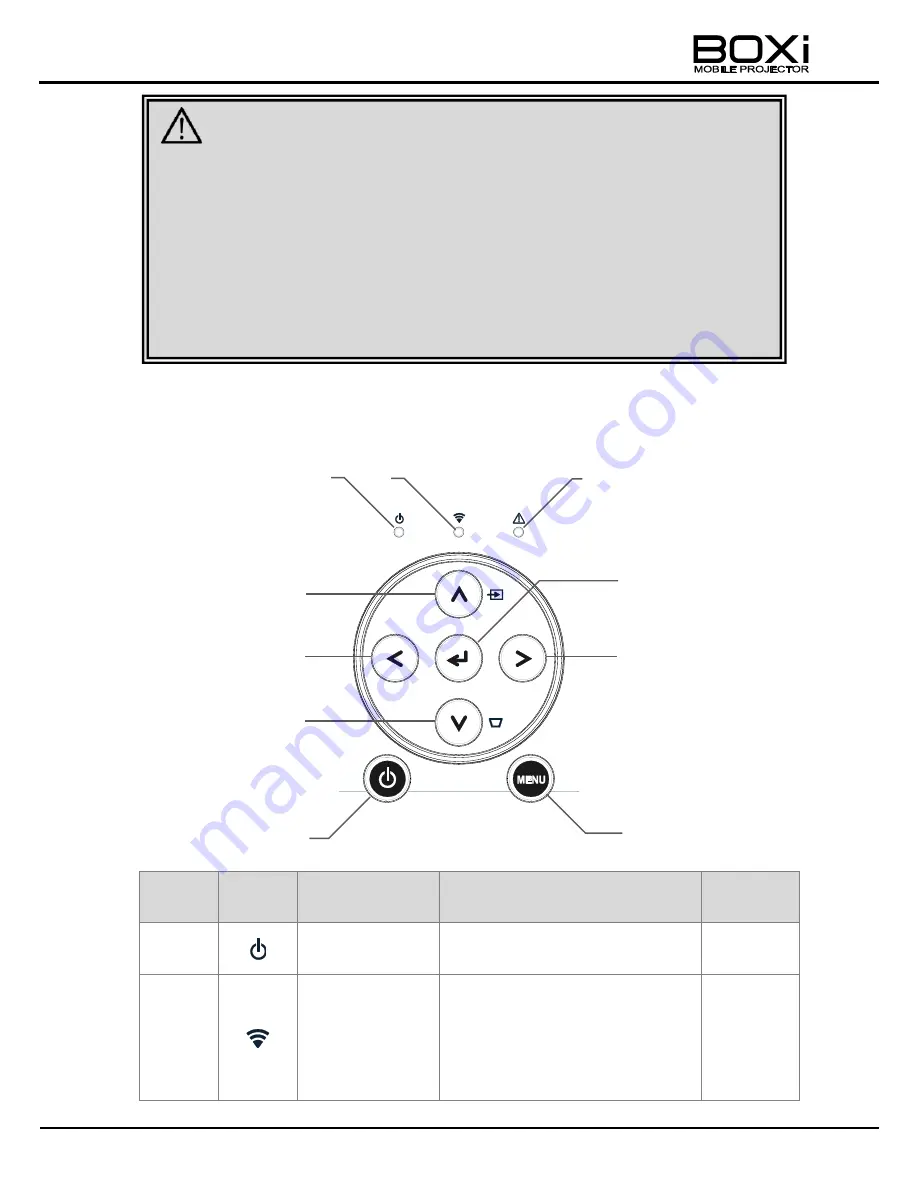
Control panel


Number 

Mark 

Name 

Function 

Related 

Page 


Power indicator 

The green LED turns on when 

the projector is turned on. 

P16 


Wireless LAN 

indicator 

The blue LED turns on when 

WiFi is used or ready to be used. 

The blue LED flashes while the 

projector is trying to establish a 

WiFi connection. 

P16 


⑨ 


④ 

⑥ 

⑦ 

⑤ 


CAUTION 


Do not look into the lens during the projection. The strong light emitted from 

the lens may cause damage to your eyes. Pay attention especially when you 

use the projector in an environment where there are children.       


Do not touch around the exhaust vent during or immediately after the 

projection. The area around the exhaust vent may become very hot and 

could result in burn. 


Hot air may be emitted from the exhaust vent. Do not place any objects, 

which are easily affected by heat, in front of the exhaust vent.


Summary of Contents for Boxi MP-350

Page 1: ...carefully before using the projector Refer to the separate Instruction Manual Network Operation Guide for the operations of a Wireless LAN WiFi Keep this guide in a safe place for future reference 2012 Copyright ELMO Co Ltd All rights reserved MP 350 English Instruction Manual Master Operation Guide ...

Page 2: ...et basement or near a swimming pool and the like Placement Do not place this product on an unstable cart stand tripod bracket or table The product may fall causing serious injury to a child or adult and serious damage to the product Use only with a cart stand tripod bracket or table recommended by the manufacturer or sold with the product Any mounting of the product should follow the manufacturer ...

Page 3: ...r supply cords should be routed so that they are not likely to be walked on or pinched by items placed upon or against them paying particular attention to cords at plugs convenience receptacles and the point where they exit from the product Lightning For added protection for this product during a lightning storm or when it is left unattended and unused for long periods of time unplug it from the w...

Page 4: ...tore the product to its normal operation If the product has been dropped or damaged in any way When the product exhibits a distinct change in performance this indicates a need for service Replacement Parts When replacement parts are required be sure the service technician has used replacement parts specified by the manufacturer or have the same characteristics as the original part Unauthorized sub...

Page 5: ... to the presence of important operating and maintenance servicing instructions in the literature accompanying the product SA 1966 SA 1965 This symbol crossed out wheeled bin WEEE Annex IV indicates separate collection of waste electrical and electronic equipment in the EU countries Please do not throw the equipment into the domestic refuse Please use the return and collection systems available in ...

Page 6: ... steam Dirt may attach to the optical parts such as lens causing unclear image Do not use this product in locations exposed to extreme temperature or locations where the temperature changes too quickly Use this product under the following environmental conditions Temperature 5 35 Humidity less than 85 No condensation When the product is suddenly brought into a warm place from a cold place or when ...

Page 7: ...f the parts Using this product in high temperature or in locations where there are a lot of dusts or smoke or using this product continuously for a long period of time for business purpose may deteriorate the product performance or quality even less than a year of usage due to the lifetime of its parts To purchase replacement parts or repair contact the dealer from whom you purchased this product ...

Page 8: ...ce to radio or television reception which can be determined by turning the equipment off and on the user is encouraged to try to correct the interference by one of the following measures Reorient or relocate the receiving antenna Increase the separation between the equipment and receiver Connect the equipment into an outlet on a circuit different from that to which the receiver is connected Consul...

Page 9: ...NECTING TO THE DEVICES 27 Connecting the power AC adapter and power cord 27 Connecting to RGB IN terminal 28 Connecting to HDMI terminal 29 Connecting a USB flash drive 30 Connecting using wireless LAN 31 2 BASIC OPERATION 32 TURNING THE POWER ON OFF 32 Powering on 32 Powering off 33 DETECTING THE INPUT SOURCE 34 Checking the current input source 34 Waiting for the input source to be automatically...

Page 10: ...SELECTING THE DISPLAY MODE 64 ADJUSTING THE BRIGHTNESS 65 ADJUSTING THE CONTRAST 66 ADJUSTING THE VOLUME 67 Volume setting 67 Turning off the sound MUTE 67 SETTING THE LANGUAGE 68 DETAIL SETTINGS 69 Displaying the detail settings 69 Display the Main menu 69 Checking various information 72 Setting the ECO mode 72 Displaying the Display setting menu 73 Adjusting the horizontal position of the image ...

Page 11: ...R 83 6 TROUBLESHOOTING 84 INDICATOR ICONS 84 LIST OF USB MENU ERROR MESSAGES 88 WARNING INDICATOR DISPLAY 89 COMMON PROBLEMS AND CHECK ITEMS 90 7 SPECIFICATIONS 93 SPECIFICATIONS 93 Remote control 95 Supplied accessories 95 LIST OF COMPATIBLE SIGNALS 96 8 Appendix 98 Converting an Office file to a PDF file 98 TRADEMARKS 99 9 WARRANTY AND AFTER SALES SERVICE 100 ...

Page 12: ...d with this product If any item is missing contact the dealer from whom you purchased this product Projector AC adapter Power cord Remote control Battery included Protective cover IMPORTANT SAFEGUARD WARRANTY CARD CD ROM with Hook and loop fastener 2pcs QUICK START GUIDE included ...

Page 13: ...ted image P38 Speaker Built in speaker Control panel To control the projector P14 Remote sensor To receive IR signal from the remote control P21 Rear panel Terminal panel to connect other devices P17 Intake vent Air ventilator inlet to cool down the inside of the projector Exhaust vent Air ventilator outlet to exhaust the air inside of the projector ...

Page 14: ...ION Do not look into the lens during the projection The strong light emitted from the lens may cause damage to your eyes Pay attention especially when you use the projector in an environment where there are children Do not touch around the exhaust vent during or immediately after the projection The area around the exhaust vent may become very hot and could result in burn Hot air may be emitted fro...

Page 15: ...en P37 DOWN button To move the selected item downward The Keystone adjustment screen appears when the Input source standby screen is displayed or the image is displayed on the screen P40 LEFT button To move the selected item to the left RIGHT button To move the selected item to the right Enter button To execute the selected item Power button To turn on off the projector P32 33 MENU Menu button To ...

Page 16: ...ower indicator Green Related Page On The projector is turned on P32 Off The projector is turned off P33 Wireless LAN indicator Blue On A WiFi connection is established P32 Off A WiFi connection is off P32 Flashing The projector is now trying to establish a WiFi connection P32 Warning indicator Red On An abnormal temperature inside the projector is detected P84 Off The projector is in normal condit...

Page 17: ...splay or play the files stored in the USB flash drive P30 DC IN 12V To connect the supplied AC adapter P27 Anti theft security slot To connect a security cable Use the HIGH SPEED HDMI cable with HDMI logo HDMI cable that is not compliant with HDMI standard may not be used Do not apply excessive force to the HDMI terminal while an HDMI output device is connected It could damage the HDMI terminal le...

Page 18: ...ating the menu P57 UP button To move the selected item upward DOWN button To move the selected item downward LEFT button To move the selected item to the left RIGHT button To move the selected item to the right ENTER button To execute the selected item Blank screen button To display cancel the blank screen that temporarily hides the projected image P43 Input selection button To display hide the In...

Page 19: ... the sound P43 Preparing the remote control 1 A battery is pre installed in the remote control at the time of shipment with insulation sheet Remove the insulation sheet before using the remote control for the first time 1 Pull out the battery case 2 Take out the old button battery and put the new button battery on the battery case with the side facing up 3 Insert the battery case to the remote con...

Page 20: ...ry If the leaked electrolyte contacts your skin immediately wash it away with running water When the time to replace the battery comes immediately remove the battery Remove the battery from the remote control when you do not use the remote control for a long period of time Do not heat the battery or throw into fire Do not reverse the positive and negative terminals When disposing the battery follo...

Page 21: ...e IR receiver The remote control transmits IR signals and the projector will not respond if there are objects between the remote control and the IR receiver The strong light such as direct sun light or The remote control may not work correctly if strong light such as direct sun light or light from an extremely close range such as from an inverter fluorescent lamp shines on the IR receiver of the p...

Page 22: ... 8 78 45 96 9 60 6 88 50 107 7 67 3 98 55 118 5 74 0 108 60 129 2 80 8 118 65 140 0 87 5 128 68 146 5 91 5 133 スクリーンサイズ 型 幅 高 さ Screen size inch Height Width The values in the fable are design values and may vary Use them as an indication only The aspect ratio of the projected image in full screen is 16 10 When the aspect ratio of the input signal is different from 16 10 such as 16 9 or 4 3 top an...

Page 23: ...protective cover Attach the supplied Velcro tape to the bottom of the projector marked in red dotted lines Velcro tape Supplied Place the projector on the cover as shown in the below picture Fix the projector with Velcro tape Cover the projector to protect it from damage The Velcro tape may not be able to maintain its holding power if there are foreign objects on the attachment surface such as dus...

Page 24: ...protective cover The projector may slip out of the cover and drop to the ground causing malfunction of the projector Do not use the projector with the protective cover on it Doing so can cause the protective cover to get extremely hot and possibly resulting in burn or injury The projector will remain hot for a while after it is turned off Put the protective cover on the projector after it is coole...

Page 25: ...projector is being used Strong light is emitted from the projector s lens If you look directly into this light it can hurt and damage your eyes Be especially careful not to let young children look into the lens Do not touch the ventilation outlet as it can become heated while the projector is turned on and immediately after the projector is turned off CAUTION ...

Page 26: ... column do not extend the column when mounting the projector Bottom of the projector Tripod receptacle When mounted on a tripod Refer to the instruction manual of the tripod for instructions on the use of the tripod Place the tripod in stable condition Otherwise it may tip over causing injury When connecting the cables such as the power cord RGB cable or HDMI cable make sure that nobody can trip o...

Page 27: ... AC adapter and power cord are for use with the projector only Do not use with other devices Do not place the projector on carpet cushions or bedding and do not cover the projector with a cloth or tablecloth Doing so will increase the temperature of the projector and may cause fire or malfunction The supplied AC adapter may become hot during normal operation This is normal Do not continue to touch...

Page 28: ...the RGB IN terminal In such cases change the setting from the display setting menu or change the resolution of the device connected to the projector If no image is displayed on the screen when connecting a notebook computer set the computer so that it can output RGB signals externally The setting procedure varies depending on the type of the computer Refer to the instruction manual of your compute...

Page 29: ...Firmly insert the cable into the connector BACK Use the HIGH SPEED HDMI cable with HDMI logo HDMI cable that is not compliant with HDMI standard may not be used This projector complies with HDMI standard However we do not guarantee the operation with all the output devices Do not apply excessive force to the HDMI terminal while an HDMI output device is connected It could damage the HDMI terminal l...

Page 30: ...displayed by connecting the digital camera to the projector in mass storage mode with a USB cable Refer to page 42 for the information on the USB viewer operation Always make a back up of the data that you have saved to the USB flash drive The data in the USB flash drive may be accidentally deleted by malfunction or repair of the projector Some USB flash drives may not be used with the projector D...

Page 31: ...n software BOXi Air a client software installed in iOS devices Supported devices iPhone iPad iOS Version 4 0 or higher Refer to the separate Instruction Manual Network Operation Guide for the network operation with iOS devices Read the precautions described in Notes on the use of Wireless LAN in page 7 before using the WiFi function CAUTION Smart phone Tablet device N o t e ...

Page 32: ...roperly 2 Press the button on the control panel or on the remote control Power indicator will turn green Wireless LAN indicator will turn on at the same time The Input source standby screen will be displayed It will take some time before you can operate the projector after the power is on Control panel Remote control N o t e ...

Page 33: ...Power indicator will turn off The Wireless LAN indicator will also turn off The cooling fan will operate for a while Disconnect the power cord after the fan stops The Power off confirmation message will disappear after 5 seconds of no operation Press Power button again to turn off the projector Remote control Control panel The projector will be hot for a while after it is turned off Do not put the...

Page 34: ...for the input source to be automatically detected for details on the AUTO auto detection function Waiting for the input source to be automatically detected The AUTO function is activated as default setting The input source will be automatically detected when the devices are connected to the RGB IN and HDMI terminals Manually select the source with the remote control or from the control panel of th...

Page 35: ...Input source standby screen or is projecting an image 3 Select the input source with the buttons Select the desired input source with the buttons and press the button to execute the selection When one of either AUTO HDMI or RGB is selected the Input source select menu will be closed and the image of the selected source will be displayed When USB or WiFi is selected the menu of the selected mode wi...

Page 36: ... for details on the input source When USB or WiFi is selected the automatic detection function cannot be used In that case manually change the input source by pressing the MENU button on the control panel or on the remote control according to the instruction in SELECTING THE INPUT SOURCE Page55 For details on the operations when USB or WiFi is selected refer to the followings USB 3 USB VIEWER Page...

Page 37: ...Input source standby screen or is projecting an image 3 Select the input source with the buttons Select the desired input source with the buttons and press the button to execute the selection When one of either AUTO HDMI or RGB is selected the Input source select menu will be closed and the image of the selected source will be displayed When USB or WiFi is selected the menu of the selected mode wi...

Page 38: ...ECTING THE INPUT SOURCE Page55 for details on the input source When USB or WiFi is selected the automatic detection function cannot be used In that case manually change the input source by pressing the MENU button on the control panel or on the remote control according to the instruction in SELECTING THE INPUT SOURCE Page55 For details on the operations when USB or WiFi is selected refer to the fo...

Page 39: ... Pay attention especially when you use the projector in an environment where there are children Do not touch the lens If the lens becomes dirty from fingerprints or anything else the projected images may become blurry In such cases wipe the lens with commercial lens cleaning paper Make sure to turn off the projector disconnect the power cord and then allow the cabinet to cool before cleaning the l...

Page 40: ...ess the button or button near the mark to correct the keystone distortion Press the button Press when the projection angle is increased Press the button Press when the projection angle is decreased Correcting the keystone distortion manually with control panel 1 Press the button on the control panel The following Keystone correction window will be displayed Keystone correction window Keystone corr...

Page 41: ...lightly degraded because the correction is made electronically The keystone distortion can be corrected to 40 of the angle of tilt The keystone correction can also be performed from the menu Refer to CORRECTING THE KEYSTONE DISTORTION Page40 for details When USB or WiFi is selected the keystone correction can not be performed with the button on the control panel In that case perform the keystone c...

Page 42: ...wn the volume 1 Press the button near the mark on the remote control The following Volume control window will be displayed and the volume will be turned down Volume control window The Volume control window will be automatically closed after 3 seconds of no operation The volume control can also be performed from the menu Refer to CONTROLLING THE VOLUME Page42 for details Volume control window N o t...

Page 43: ...sed while in mute the mute will be released and the volume will be decreased by 1 level HIDING THE IMAGE You can temporarily hide the projected image with the Blank screen function 1 Press the button on the remote control The blank screen will be displayed to hide the projected image Press the button again to return to the input signal screen You can also exit the blank screen by pressing any butt...

Page 44: ...han 3Mbps MPG Video codec MPEG1 Audio codec MPEG Audio Layer3 MP3 Recommended bit rate less than 3Mbps Refer to PLAYING MOVIES MOVIES Page48 for details Still picture files JPEG BMP Refer to DISPLAYING STILL PICTURES STILL PICTURES Page51 for details Office files Microsoft Word 97 2003 2007 2010 Microsoft Excel 97 2003 2007 2010 Microsoft PowerPoint 97 2003 2007 2010 Adobe PDF 1 0 1 4 Refer to DIS...

Page 45: ...menu with the buttons on the control panel or on the remote control Then press the button to execute the selection 4 Select the icon Select the USB icon in the Input source select menu with the buttons on the control panel or on the remote control Then press the button to execute the selection The following USB menu will be displayed Input source select menu Control panel Remote control Main menu ...

Page 46: ...ay movie files stored in the USB flash drive Refer to PLAYING MOVIES MOVIES Page48 for details Still pictures To display still picture files stored in the USB flash drive Refer to DISPLAYING STILL PICTURES STILL PICTURES Page47 for details Office files To display Office files Word Excel PowerPoint PDF stored in the USB flash drive Refer to DISPLAYING OFFICE FILES OFFICE FILES Page48 for details ...

Page 47: ...e picture is selected the message No File will be displayed Use the Still picture display function after saving a JPG or BMP file into the folder to be accessed If the file name is too long it may not be displayed correctly If the file is too large its file size may not be displayed correctly Pressing the buttons on the control panel or the remote control too fast may freeze the screen If the scre...

Page 48: ...tory path will be displayed Movie file icons will be displayed File name File size The date the file was created will be displayed Scroll bar 1 Select a movie file to play Either movie files or folders are displayed in the list of movies Move the marker to the file or folder that you want to play with the buttons on the control panel or on the remote control Marker List of movies Disk file ...

Page 49: ...trol Control panel Action Mark Operation Play Press the button during playback Stop Press the MENU button during playback The screen returns to the list of movie files Pause Press the button during playback Multiple speed playback Fast forward 2 4 8 16 32 Press the button during forward playback Each time you press the button the playback speed will change as follows 2x 4x 8x 16x 32x 1x 2x Rewind ...

Page 50: ...ted formats may not be played correctly We recommend you to do a test before playing the movie Movie files that are over 2GB in size may not be played When using the USB viewer function in BOXi Office files may appear differently from the display in PC applications In this case converting the Office files to PDF files will allow them to be displayed properly Please look at page98 about Converting ...

Page 51: ... still picture files or folders will be displayed 1 Select a still picture file to display Either still picture files or folders are displayed in the list of still pictures Move the cursor to the file or folder that you want to display with the buttons on the control panel or on the remote control If the button is pressed after moving the cursor to the folder the files in the folder will be displa...

Page 52: ... Remote control Control panel Action Operation Go to the next file Press the button when the picture is displayed in normal size Go to the previous file Press the button when the picture is displayed in normal size Return to the list of still pictures Press the MENU button when the picture is displayed in normal size Zoom in Press the button The picture will be zoomed in each time the button is pr...

Page 53: ... was created will be displayed Scroll bar The following still picture files are supported File format JPEG BMP Resolution JPEG Max 16Mpixel BMP Max 9Mpixel Some files of supported formats may not be displayed correctly We recommend you to do a test before displaying the still picture Thumbnails may not be displayed if the remaining free space on the USB flash drive is running low Delete unnecessar...

Page 54: ...rker to the file or folder that you want to display with the buttons on the control panel or on the remote control If the button is pressed after moving the marker to the folder the files in the folder will be displayed If you want to return to the previous screen press the MENU button Marker Disk file List of Office files ...

Page 55: ...yed in normal size Move the display position to the right Press the button when the file is displayed in normal size Return to the list of Office files Press the MENU button when the file is displayed in normal size Zoom in Press the button The file will be zoomed in each time the button is pressed There are 5 zoom levels available The zoom level returns to normal after level 5 Move to the right P...

Page 56: ...rted formats may not be displayed correctly We recommend you to do a test before displaying the files If you cannot see the entire page after scrolling the zoomed file press the button several times to return the zoom level to normal The animation feature of PowerPoint is not supported The file may be displayed differently with the USB viewer N o t e ...

Page 57: ...d if the MENU button is pressed again The menu will also be closed automatically after 30 seconds of no operation Operating the menus The selected item in the main menu will be marked in blue If you open the selected item a sub menu will be displayed and you can configure the details The items that cannot be selected will be marked in dark grey Main menu Sub menu The selected item will be marked i...

Page 58: ... be used to adjust the setting values For example Volume adjustment bar The value set with of the adjustment bar using the buttons cannot be returned to the previous value before setting by pressing the MENU button The menu will be automatically closed after 30 seconds of no operation Press the MENU button again to display the menu There are 3 shortcut buttons Input source select Keystone Volume o...

Page 59: ...n menu Icon Name Options Adjustable range Description Input source selection P61 AUTO Default To change the input source HDMI RGB USB WiFi Keystone adjustment P63 40 40 Default setting 0 To correct the vertical keystone distortion The correction can be made in increments of one degree Display mode selection P64 Cinema Game To set an appropriate image mode according to the scene Photo Default Prese...

Page 60: ...e menus and messages French German Spanish Italian Swedish Dutch Portuguese Russian Japanese Simplified Chinese Detail settings P69 The following items can be configured ECO mode Default setting OFF Display setting Horizontal position Vertical position Frequency Tracking Aspect ratio Default setting AUTO Fixed Auto power off Default setting 180 Projection mode Default setting Front Installation mo...

Page 61: ...ayed 3 Select the input source with the buttons on the remote control or on the control panel Press the button to execute the selection and return to the main menu Projected image will change to the image of the selected input source Icon Name Description AUTO The projector will search HDMI signal or RGB signal The projector will search HDMI signal first and then RGB signal The image of the detect...

Page 62: ...B and WiFi signal will not be detected automatically when AUTO is selected Select USB or WiFi from the Input source select menu The selected input source will be displayed when HDMI RGB USB or WiFi is selected If the selected input source cannot be detected the icon of the selected input source will be displayed at the top right of the Input source standby screen Refer to Checking the current inpu...

Page 63: ...be displayed 3 Correct the keystone distortion with the buttons on the remote control or on the control panel Press the button to execute the correction and return to the main menu Remote control or control panel Press the button Press when the projection angle is increased Press the button Press when the projection angle is decreased The keystone correction can cause an image to be slightly degra...

Page 64: ...play mode select menu will be displayed 3 Select the display mode with the buttons on the remote control or on the control panel Press the button to execute the selection and return to the main menu The following display mode can be selected Icon Mode Description Cinema Game A mode suitable for watching movies or playing games Photo A mode suitable for displaying still pictures such as photos Pres...

Page 65: ...ress the button to execute the selection The Brightness adjustment window will be displayed 3 Adjust the brightness with the buttons on the remote control or on the control panel Press the button to execute the adjustment and return to the main menu The brightness adjustment cannot be done from the Input source standby screen The brightness adjustment can be done to the respective input source HDM...

Page 66: ...l Press the button to execute the selection The Contrast adjustment window will be displayed 3 Adjust the brightness with the buttons on the remote control or on the control panel Press the button to execute the adjustment and return to the main menu The contrast adjustment cannot be done from the Input source standby screen The contrast adjustment can be done to the respective input source HDMI R...

Page 67: ...control or on the control panel Press the button to execute the selection The Volume setting window will be displayed 3 Adjust the volume with the buttons on the remote control or on the control panel Press the button to execute the adjustment and return to the main menu Turning off the sound MUTE You can temporarily mute the sound with the MUTE button on the remote control Refer to Turning off th...

Page 68: ... buttons on the remote control or on the control panel Press the button to execute the selection The Language menu will be displayed 3 Select the language with the buttons on the remote control or on the control panel Press the button to execute the selection and return to the main menu The following language can be selected Language English French German Spanish Italian Swedish Dutch Portuguese R...

Page 69: ...main menu Page57 Press the MENU button on the remote control or on the control panel The main menu will be displayed 2 Select the icon with the buttons on the remote control or on the control panel Press the button to execute the selection The Detail settings menu will be displayed 3 Select the item to be configured with the buttons on the remote control or on the control panel Press the button to...

Page 70: ...ut signal It will reduce the vertical flicker noise Tracking P75 To change the sampling phase of the projector against the input signal It will reduce the horizontal flicker noise Aspect ratio P76 Auto To set the horizontal to vertical ratio of the input signal 4 3 16 9 Auto power off setting P77 Off To automatically turn off the projector after a certain period of no operation 1 180 Projection mo...

Page 71: ...71 Icon Name Options Description Factory settings P81 Yes To return all the settings to factory default No ...

Page 72: ...ll be displayed Setting the ECO mode 1 Display the Detail settings menu 2 Select the icon with the buttons on the remote control or on the control panel Press the button to execute the selection The ECO mode setting menu will be displayed 3 Select ON or OFF with the buttons on the remote control or on the control panel Setting Description ON To activate the ECO mode OFF To cancel the ECO mode Pres...

Page 73: ...yed Adjusting the horizontal position of the image 1 Display the Display setting menu 2 Select the icon with the buttons on the remote control or on the control panel Press the button to execute the selection 3 Adjust the position with the buttons on the remote control or on the control panel Press the button to execute the adjustment and return to the Display setting menu Display setting menu Det...

Page 74: ...rol panel Press the button to execute the adjustment and return to the Display setting menu Adjusting the frequency 1 Display the Display setting menu 2 Select the icon with the buttons on the remote control or on the control panel Press the button to execute the selection 3 Adjust the frequency with the buttons on the remote control or on the control panel Press the button to execute the adjustme...

Page 75: ...he buttons on the remote control or on the control panel Press the button to execute the selection 3 Adjust the tracking with the buttons on the remote control or on the control panel Press the button to execute the adjustment and return to the Display setting menu Display setting menu ...

Page 76: ...remote control or on the control panel The following aspect ratio can be selected Icon Description To display the input signal in its original aspect ratio To display the input signal in 4 3 aspect ratio To display the input signal in 16 9 aspect ratio Press the button to execute the selection and return to the Display setting menu Display setting menu The aspect ratio setting will not be saved It...

Page 77: ...following auto power off time can be selected Auto power off time Off Disable the auto power off function 1 minute 3 minutes 5 minutes 10 minutes 20 minutes 30 minutes 60 minutes 120 minutes 180 minutes Press the button to execute the selection and return to the Detail settings menu When the auto power off function is enabled the projector will be turned off automatically after no operation is per...

Page 78: ...78 The message as shown in the right picture will be displayed 30 seconds before the projector is turned off automatically The projector will be turned off after 30 seconds ...

Page 79: ...on mode setting menu will be displayed 3 Select Front or Rear with the buttons on the remote control or on the control panel Press the button to execute the selection and return to the Detail settings menu Icon Mode Description Front To be used when the projector is placed in front of a screen Rear To be used when the projector is placed behind a screen Detail settings menu Projection mode setting...

Page 80: ...n the desktop mount position Ceiling To be used when the projector is installed to the ceiling Press the button to execute the selection and return to the Detail settings menu Detail settings menu Do not place the projector on an unstable cart stand or table Doing so may cause the projector fall down or tip over Installation work such as ceiling suspension should only be carried out by a qualified...

Page 81: ...ctory settings menu will be displayed 3 Select Yes or No with the buttons on the remote control or on the control panel Icon Description To return to the factory settings Do not return to the factory settings Press the button to execute the selection and return to the Detail settings menu Refer to MAIN MENU Page57 for the default values for each setting item Detail settings menu Factory settings m...

Page 82: ...ning paper Cleaning the cabinet and the remote control Cleaning the cabinet 1 Before starting the cleaning turn off the projector disconnect the power cord and then allow the cabinet to cool 2 Gently wipe the cabinet with a soft cloth like gauze If the cabinet is particularly dirty soak the soft cloth in water with a small amount of neutral detergent in it Do not look into the lens during the proj...

Page 83: ... dealer for the maintenance fee Do not use solvents such as alcohol benzene or thinner as they may mar the finish of the case causing electric shock Do not apply volatile materials such as insecticide on the cabinet Do not leave a rubber sticky tape or vinyl product in prolonged contact with it Otherwise the surface finish will be deteriorated or the coating may be stripped off The surface of the ...

Page 84: ...act your dealer Example of the warning indication Icon Description Solution Temperature warning The internal temperature has been increased This icon will be displayed for 10 seconds every 5 minutes Turn off the projector immediately and allow the projector to cool down for at least 30 minutes Make sure the followings and turn on the projector The ventilator is not blocked by objects or in any way...

Page 85: ...ess of the LED is decreased It is the time to replace the LED lamp If you continue to use the projector without replacing the lamp the brightness will decrease continuously This icon will be displayed once after the projector is turned on Contact your dealer for repair ...

Page 86: ...d by objects or in any way obstructed The ventilator is not covered with dust The peripheral temperature is not exceeding 35 FAN error There is a problem with the internal fan The projector will be turned off in 5 seconds Turn off the projector immediately and allow the projector to cool down for at least 30 minutes Make sure the followings and turn on the projector No foreign objects are inserted...

Page 87: ...a lot of dust or smoke or using it continuously for long hours for business purposes may deteriorate the performance or the quality of the projector after less than 1 year of use depending on the life of the components In such cases contact your dealer for chargeable repair CAUTION ...

Page 88: ... the format and version of the file Also change the file to be played or displayed P44 Not enough free space Delete unnecessary files Delete unnecessary files in the USB flash drive and retry File is damaged The damaged files cannot be played or displayed Change the file to be played or displayed No file was found Check if the USB flash drive is inserted correctly Be aware that some USB flash driv...

Page 89: ...tor is not covered with dust The peripheral temperature is not exceeding 35 Off The projector is in normal condition Flashing Flashing every 0 25 seconds There is something wrong with the internal fan Turn off the projector immediately and allow the projector to cool down for at least 30 minutes Make sure the followings and turn on the projector No foreign objects are inserted between the rotating...

Page 90: ... 89 Power turns off automatically Is the warning icon displayed before the projector is turned off P84 Is the indicator flashing P89 Is the auto power off function enabled Default setting 180 minutes P77 No image Is the correct input source selected P35 37 61 Is the projector in the blank screen mode P43 Is the cable connected to the input terminal correctly P28 29 Is the video signal output from ...

Page 91: ... the image This is a common problem peculiar to the display device This is not a malfunction Vertical stripes in the image This is due to the interference with the screen This is not a malfunction P38 If you are using analog RGB input try to adjust the display setting from the menu P73 74 75 Color is uneven This is due to the diffraction of light which is peculiar to the projector This is not a ma...

Page 92: ...ear Please look at a USB menu error message list P88 When using the USB viewer Office files appear differently from PC applications This is due to the limitation of the viewer installed in BOXi When the display is different converting the Office file to PDF file will allow it to be displayed properly P98 Refer to the separate Instruction Manual Network Operation Guide for the operations of a Wirel...

Page 93: ...ng Brightness 300 lm ANSI Contrast ratio full white full black 1 000 1 JIS X 6911 10 000 1 According to our company s measurement standard Color reproduction Full color 16 770 000 colors Audio output 1W monaural speaker In out terminals RGB IN Mini D sub 15p female 1 RGB 0 7Vp p 75Ω positive polarity H V Sync 4 0Vp p TTL positive negative polarity HDMI HDMI Type A 1 HDCP compliant USB USB Type A 1...

Page 94: ...umption 65 4W DC12V 5 45A at ECO mode OFF 35W at ECO mode ON External dimensions 132 mm W x 143 mm D x 43 mm H including the rubber foot Weight 500g The contrast ratio between the maximum white luminance and the minimum black luminance for the projection system ...

Page 95: ...ns 45 mm x 70 5 mm x 5 mm Weight 25g including battery Supplied accessories Remote control with a battery inserted 1pce Power cord 1pce AC adapter 1pce Protective cover with hook and loop fastener 2pcs 1pce Important safeguard 1pce Warranty card 1pce CD ROM quick start guide included 1pce ...

Page 96: ...0 37 9 72 8 VGA 75Hz 640 480 37 5 75 0 VGA 85Hz 640 480 43 3 85 0 SVGA 56Hz 800 600 35 2 56 3 SVGA 60Hz 800 600 37 9 60 3 SVGA 72Hz 800 600 48 1 72 2 SVGA 75Hz 800 600 46 9 75 0 SVGA 85Hz 800 600 53 7 85 1 832 624 75Hz 832 624 49 7 74 5 XGA 60Hz 1024 768 48 4 60 0 XGA 70Hz 1024 768 56 5 70 1 XGA 75Hz 1024 768 60 0 75 0 XGA 85Hz 1024 768 68 7 85 0 1152 864 75Hz 1152 864 67 5 75 0 1152 870 75Hz 1152...

Page 97: ... 1080 56 3 50 0 1080p 1920 1080 67 5 60 0 An image with higher resolution will be compressed and displayed When the image is compressed the thickness of the characters or lines may not be uniform or the color may be blurred Depending on the computer used some adjustments may be needed Refer to DETAIL SETTINGS Page69 for details If the video signal is input to RGB IN terminal the image may not be d...

Page 98: ...version of other Office files is similar For Microsoft PowerPoint 2010 1 Start up Microsoft PowerPoint and open the Office file to be converted 2 Select Print from the file menu 3 Select Adobe PDF from the printer menu 4 Click the Print button to commence printing 5 Assign a filename and store the file under PDF File Storage Location CAUTION Not all Office files can be converted Display of the con...

Page 99: ...trademark of Cisco Systems Inc in the U S and other countries HDMI logo and High Definition Multimedia interface are trademarks or registered trademarks of HDMI Licensing LLC Microsoft Windows Word Excel and PowerPoint are trademarks or registered trademarks of Microsoft Corporation in the U S and other countries Adobe PDF is a trademark or registered trademark of Adobe Systems Incorporated in the...

Page 100: ...age caused by misuse improper application wrong operation other than specified in the instruction manual 2 Failure or damage resulting from repair modification or cleaning by disassembling by someone other than authorized service center 3 Failure or damage caused by mud sand water dropping or impact 4 Failure or damage caused by fire salt gas earthquake wind flood environmental pollution lightning...

Page 101: ... to our customer service at customer s expenses 3 Contact our customer service described below when you need repair service OTHER CUSTOMER SERVICE Customer service You can inquire the following inquiries about the projector to our customer service 1 About repair service 2 About instruction of use sale or other issues ...

Page 102: ...Dôme Tel 516 501 1400 Fax 516 501 0429 92056 Paris La Défense France E mail elmo elmousa com Tel 33 0 1 73 02 67 06 Web http www elmousa com Fax 33 0 1 73 02 67 10 West Coast Branch German Branch 5676 Corporate Avenue Hansaallee 201 Haus 1 Cypress CA 90630 U S A 40549 Düsseldorf Germany Tel 714 828 8457 Fax 714 823 8429 Tel 49 0 211 544756 40 Fax 49 0 211 544756 60 OVERSEAS SUBSIDISRY COMPANIES ...

Reviews: